
Monstera Aerial Roots Not Attaching Pole: A Wick-Pole Fix
Monstera aerial roots not attaching pole? A dry, smooth surface gives roots little to grip. A moist sphagnum wick-pole retrofit gives them a surface they can attach to over a few weeks to months.
Elena Vargas · Published 2026-05-28 · 25 min read

Key Takeaways
- A dry, smooth surface such as bare plastic or a glazed rim gives an aerial root little moisture or texture to grip, so it may keep growing rather than attach.
- Long-fiber New Zealand sphagnum is a useful pole material because it holds water and stays fibrous, but bark, coir, and moss-covered boards can also work.
- A wick-pole retrofit using sphagnum, a structural core, a wick, and a reservoir is a reasonable project, but attachment can take weeks to months depending on humidity, season, and plant growth.
- Attachment is slow and mostly invisible at first, so avoid repeatedly lifting or tugging a recovering root to check on it.
- Judge a root by color, firmness, and tip mucilage together because a mature brown, corky root can still be alive.
When a Monstera deliciosa pushes out a fat aerial root that reaches the smooth plastic rim of its nursery pot or a glossy plastic-wrapped moss pole, the root often keeps growing outward or downward instead of gripping and attaching.
Sometimes the tip eventually browns, no anchoring side roots form there, and the plant stays loosely supported even as more aerial roots appear.
Watering matters, but the surface an aerial root meets matters too. A dry, smooth, rigid surface offers little of the moisture and microscopic texture that roots use to commit to a support.
That is a reasonable interpretation of how climbing aroids behave, not a mechanism measured on Monstera itself.
Give the Root a Moist, Rough Surface
The practical fix has two parts. Give the root a surface that stays moist and slightly rough, and redirect the next healthy root onto it.
The diagnosis, retrofit, and recovery timeline below explain how to do that without disturbing the plant.
I number each active aerial root on a plant photo and mark the date it first touches the pole. Attachment can lag behind contact, so moving the root every few days resets the experiment.
The marked root is held gently against the surface without constriction while I record whether its tip remains active. A drying or damaged tip will not attach just because the pole is wetter.
Pole moisture is checked separately near the newest node and near the pot. Water can leave the top dry while the bottom stays saturated, which encourages roots in the wrong zone and can keep the pot too wet.
Why do Monstera aerial roots stop growing at the pot edge?
An aerial root that fails to attach at the pot rim is likely responding to two things at once (surface texture (smooth) and moisture (low)). Both make a poor grip site.
Root tips do sense touch, gravity, and water gradients, and grow toward or away from what they contact.
Exactly how a Monstera aerial root reads a plastic rim has not been measured, so treat the description here as a working explanation rather than an established sequence.
Before blaming the surface, also rule out ordinary causes of a stalled root, including physical damage, low ambient humidity, dormancy or a cool season, low light, and simple root immaturity.
What are Monstera aerial roots actually doing?
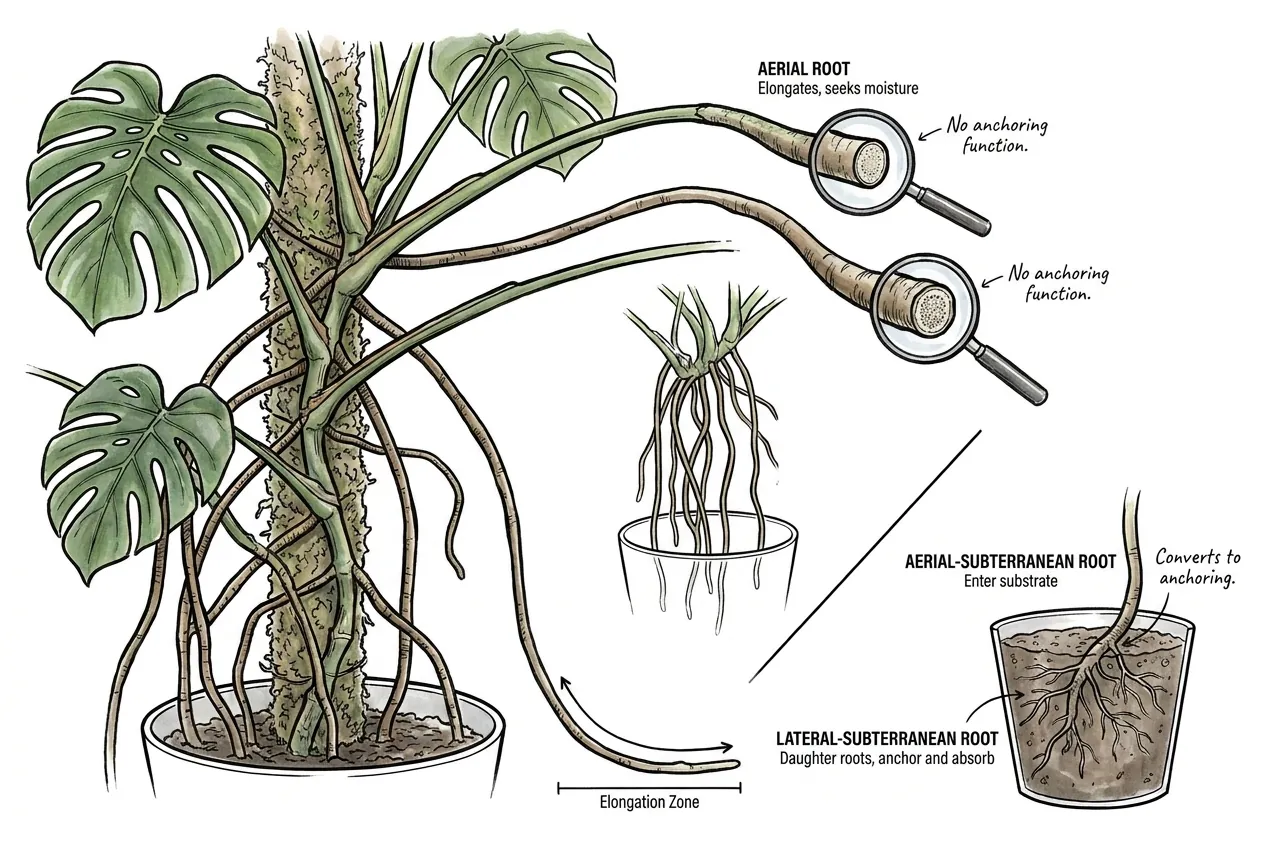
A Monstera aerial root can behave differently depending on what it reaches. The same root that hangs in the air can enter substrate or a moist support and, once established there, produce side roots that help anchor the plant.
A small greenhouse study confirmed that unattached Monstera aerial roots can keep extending during active growth.
Extension does not predict attachment, so do not use root length or a calendar to decide whether a support is working.
What Makes Attachment Possible
An aerial root tends to form anchoring side roots after its tip settles against a moist, fibrous surface.
A tall plant whose aerial roots never find such a surface stays more loosely supported and is easier to knock over.
References
Cellular Growth in Aerial Roots Differs From That in Typical Substrate Roots
Diverse climbing strategies in aroid vines
What is contact thigmotropism, and why is smooth plastic a poor grip surface?
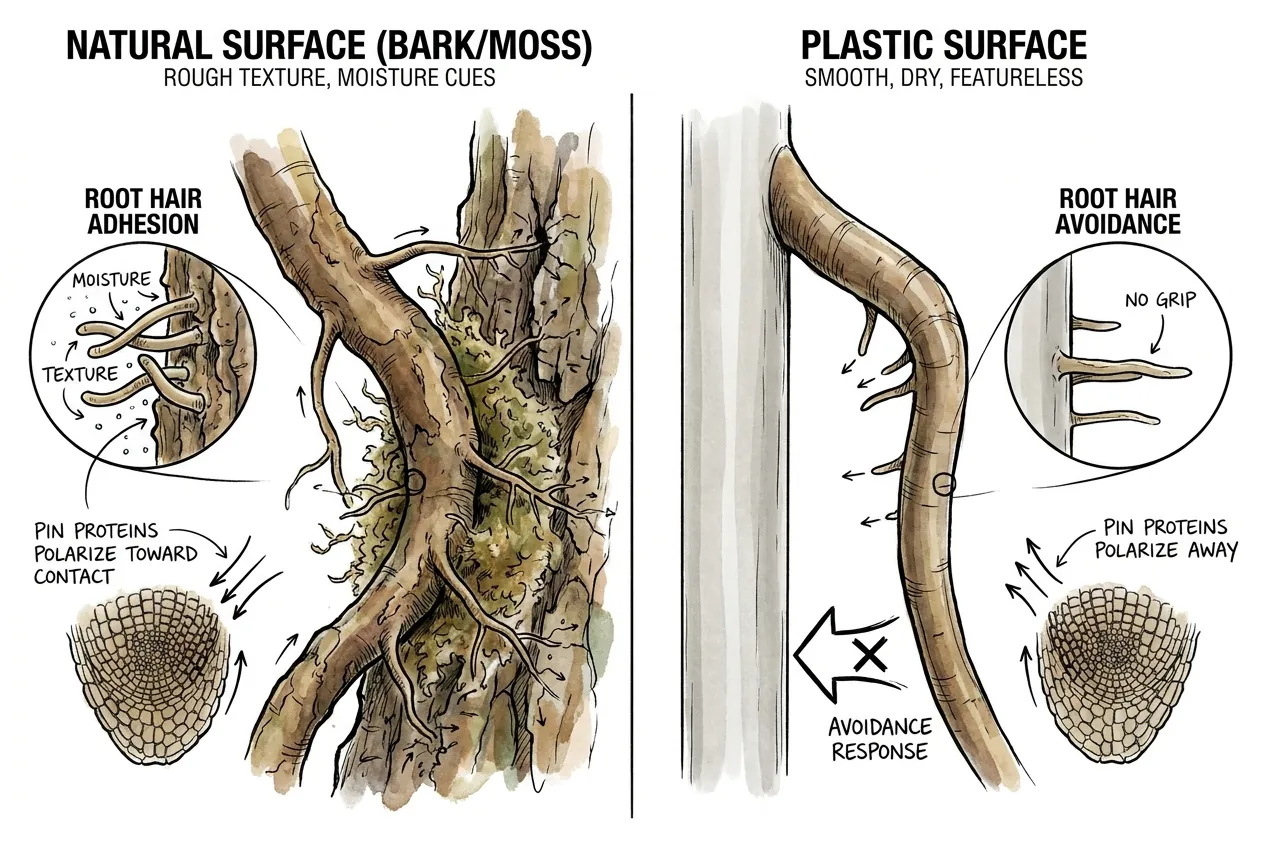
Contact thigmotropism is the directional growth response of a root to a surface it touches.
A 2022 theoretical modeling study of climbing-plant root-hair adhesion (building on English-ivy literature) argues that fine root hairs interlock more effectively with microscopically rough, cracked surfaces than with smooth featureless ones, where mucilage alone is a weaker anchor.
That is a model of adhesion mechanics, not an experiment on Monstera, and it does not measure sphagnum or plastic directly.
Applied loosely to houseplant care, the takeaway is intuitive. A moist, fibrous, slightly rough surface gives root hairs something to grip, while a dry, smooth surface gives them little. Bark and sphagnum offer that texture. A bare plastic rim or mesh does not.
References
Climbing-plant root-hair adhesion (theoretical model, 2022)
Why does the root cap read the pot rim as too dry?
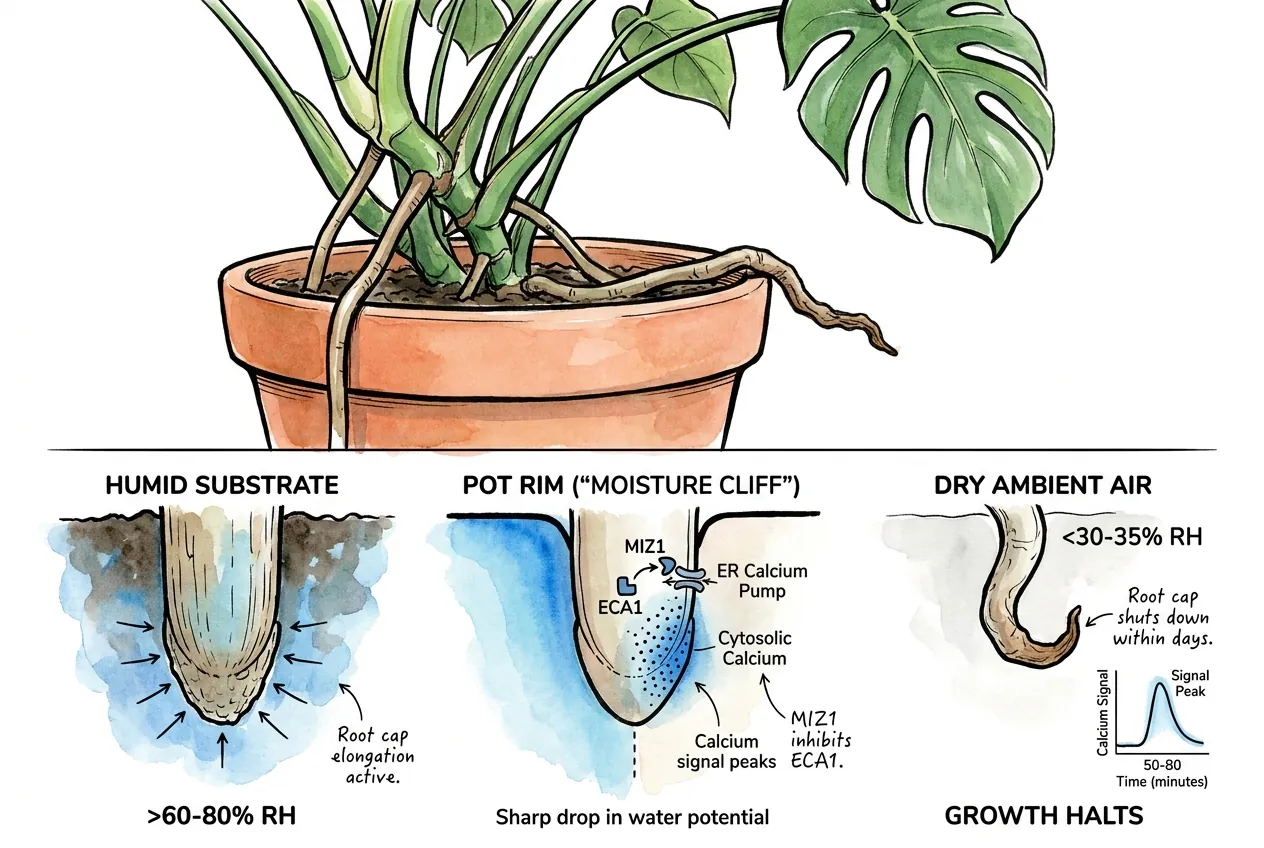
Aerial root tips grow best in humid air. As a root leaves the moist substrate and reaches out into dry room air, it loses that humidity, which is one reason a tip can slow or stall at the rim.
Roots are known to grow toward moisture (hydrotropism), a response studied mainly in lab plants such as Arabidopsis.
The molecular details of that response are still debated, and importantly, that laboratory work is about roots seeking water in soil, not about aerial roots avoiding plastic, so it should not be presented as the mechanism here.
Use Humidity as a Working Range
The drier the air at the rim, the less inviting it is for an exposed aerial root.
Homes can drop to 30–35% RH in winter with heating, which is on the dry side for a humidity-loving aroid, though the exact point at which a root stalls is not established.
References
Calcium signaling in root hydrotropism (Arabidopsis)
Humidity and aerial roots in indoor Araceae
What surface actually triggers Monstera aerial root attachment?
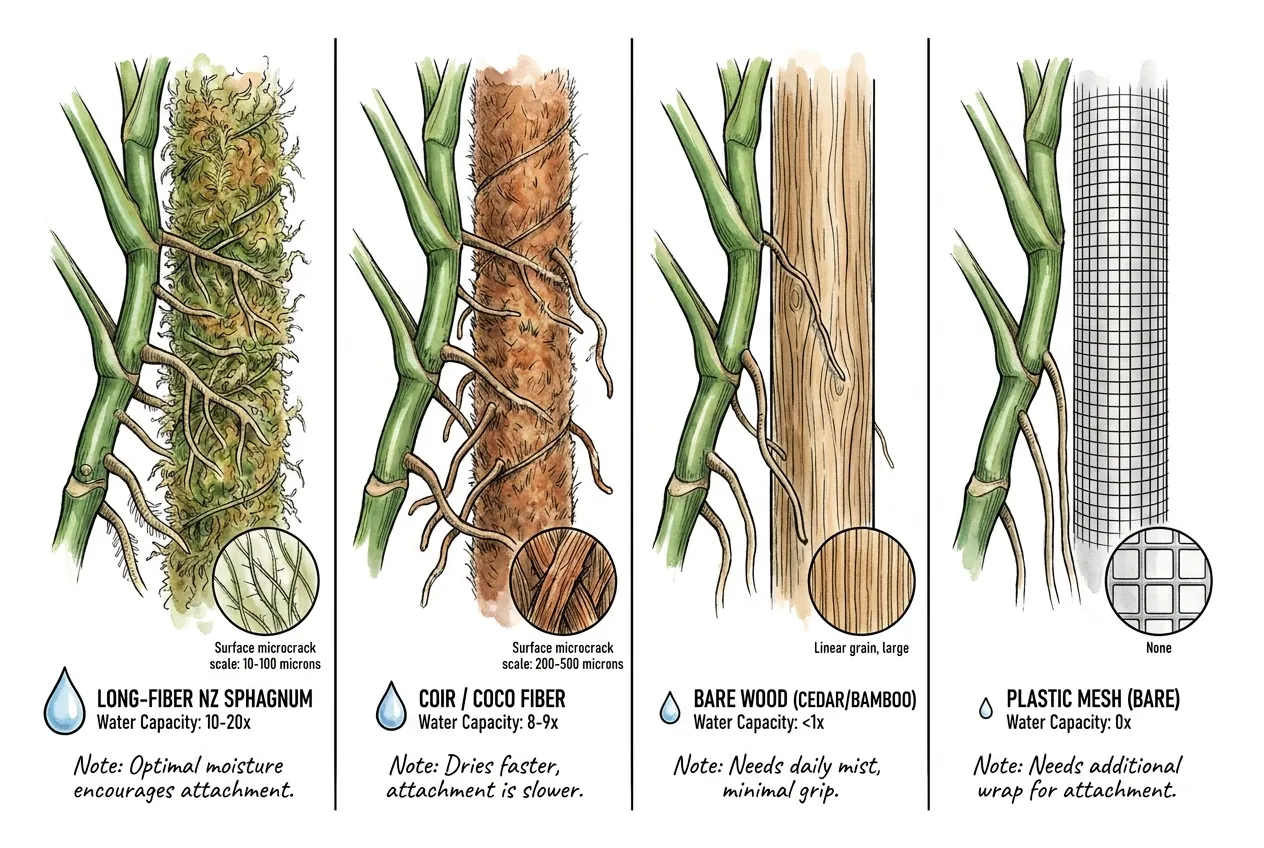
A good climbing surface is both moist and slightly rough. Long-fiber New Zealand sphagnum is one of the better common materials because it holds a lot of water and stays fibrous, but it is not the only workable choice (rough bark, coir, and moss-covered boards or poles all work in the right setup).
Pole Material Comparison
| Material | When it fits | Main limitation |
|---|---|---|
| Long-fiber sphagnum | Best when you want a moist, fibrous surface that is easy to guide roots onto. | Needs regular checking and eventually rebuilding. |
| Coir | A lower-cost textured wrap when you can water it more often. | Usually dries faster and can lose structure sooner. |
| Rough wood or board | Useful for a simpler, drier support in a humid setup. | Does not hold moisture for the root on its own. |
| Bare plastic mesh | Useful only as a scaffold for a moss or coir wrap. | Too smooth and dry to be the climbing surface by itself. |
Why sphagnum holds up well as a pole material
Long-fiber sphagnum (the intact moss, not processed peat) is prized on moss poles because it holds a large amount of water for its weight and keeps a loose, fibrous structure.
Coir also holds plenty of water and is cheaper, but tends to feel coarser and can dry out or break down faster.
Research on living Sphagnum shows that how much water the moss stores depends on the species and on how densely the strands are packed. Denser, well-structured moss holds more per gram.
Those studies looked at live moss in the field, not a specific retail product, so treat any exact times-its-weight figure for a bagged product as an approximation.
In practice, a well-packed sphagnum pole usually stays moist longer between top-ups than a coir one, and its finer, more varied surface gives root hairs more to grip.
How long it actually stays moist depends on your room, how tightly it is packed, airflow, and how well the wick works, so plan to check it by feel rather than on a fixed schedule.
Why bare plastic mesh poles need a wrap
A bare plastic mesh moss pole, before it is filled or wrapped, is essentially a dry stake.
It offers little moisture, so roots have less reason to attach to it and often just grow past.
The mesh works best as a scaffold that holds a moist sphagnum layer in place. The moss, not the plastic, is the surface the roots attach to.
What sphagnum should I buy?
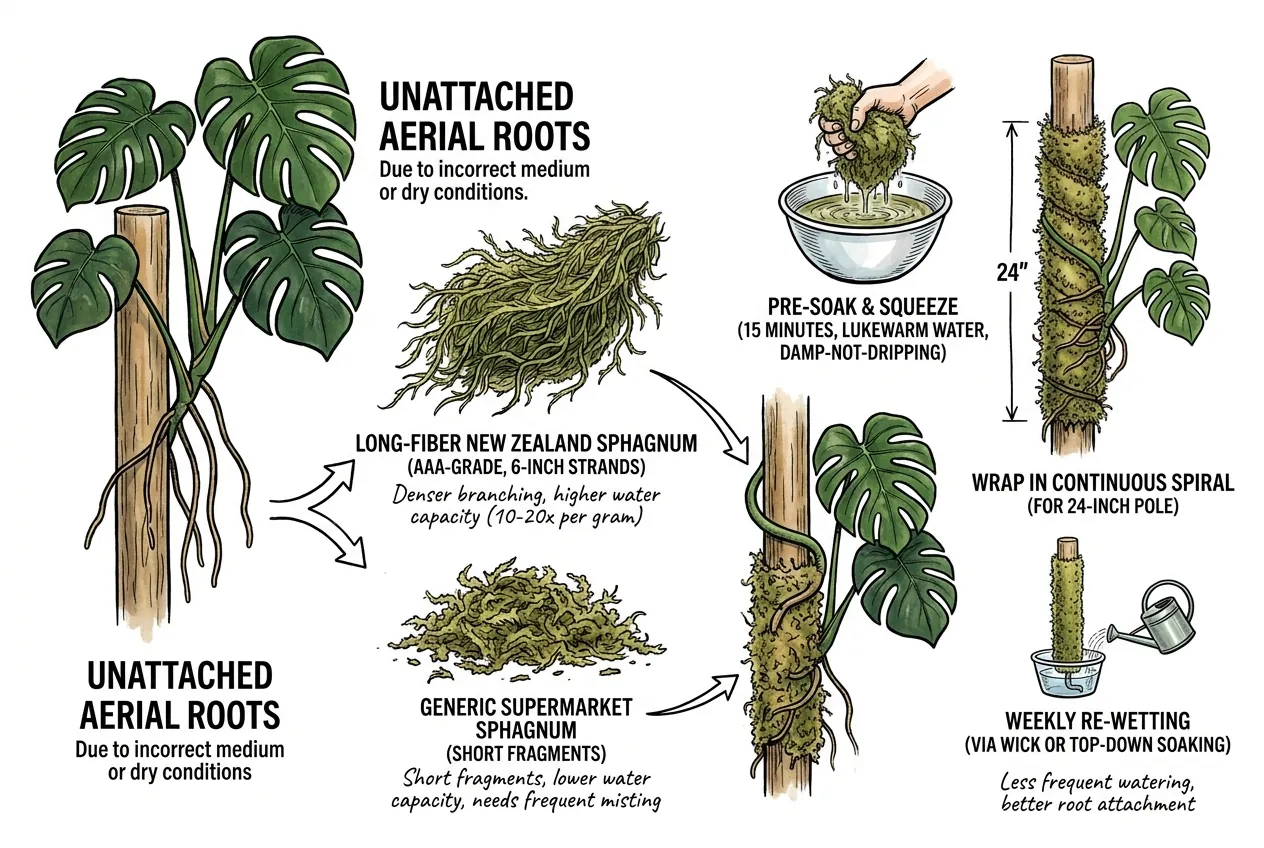
Look for long-fiber New Zealand sphagnum with long, clean strands rather than short, dusty fragments.
Longer strands are simply easier to wrap around a pole in continuous handfuls. Grade labels vary by seller, so judge by strand length and condition rather than a letter grade alone.
Besgrow Premium New Zealand Sphagnum Moss
Besgrow sphagnum moss is a long-fiber option that suits wrapping a pole when you want continuous strands rather than small fragments.
It makes sense for several poles or future rebuilds, but is more material than a single small support may need. Check the current listing for grade and quantity before buying.
Sphagnum Handling Note
Wear gloves and long sleeves and wash up afterward when working with damp sphagnum. Soil and moss can rarely harbor the fungus that causes sporotrichosis, which enters through skin cuts (per CDC guidance).
- Pre-soak the moss for about 15 minutes in lukewarm water.
- Squeeze it to damp, not dripping.
- Wrap it around the pole in a continuous spiral, firm but not compacted so hard that it can no longer breathe or wick.
- Check moisture by feel and re-wet before it dries out, using the wick reservoir or a top-down soak. How often depends on your room, not a fixed weekly rule.
Cost note
Premium long-fiber sphagnum typically costs more than a generic supermarket bag, but a good pole can go a long time between rebuilds, so the extra cost is spread out. Prices and availability vary by seller and season.
If you only need a small handful and already have some moss on hand, use what you have and buy premium long-fiber next time you refresh the pole.
References
Variation in Water-Holding Capacity in Sphagnum Species Depends on Both Plant and Colony Structure
Climbing-plant root-hair adhesion (theoretical model, 2022)
How do I retrofit a failing pole into a wick pole?
A wick-pole retrofit turns a smooth or failing pole into a moist climbing surface. Build and test it before you rely on it, because the wick, reservoir, and mesh must all work together without leaks.
Build the Core, Wrap, and Wick
A workable design uses a structural core, a sphagnum wrap held in place by a mesh sleeve, and a wick that draws water up from a small reservoir to keep the moss damp.
Prototype the details below and check for leaks and even wetting before you rely on the pole.
What materials do I need?
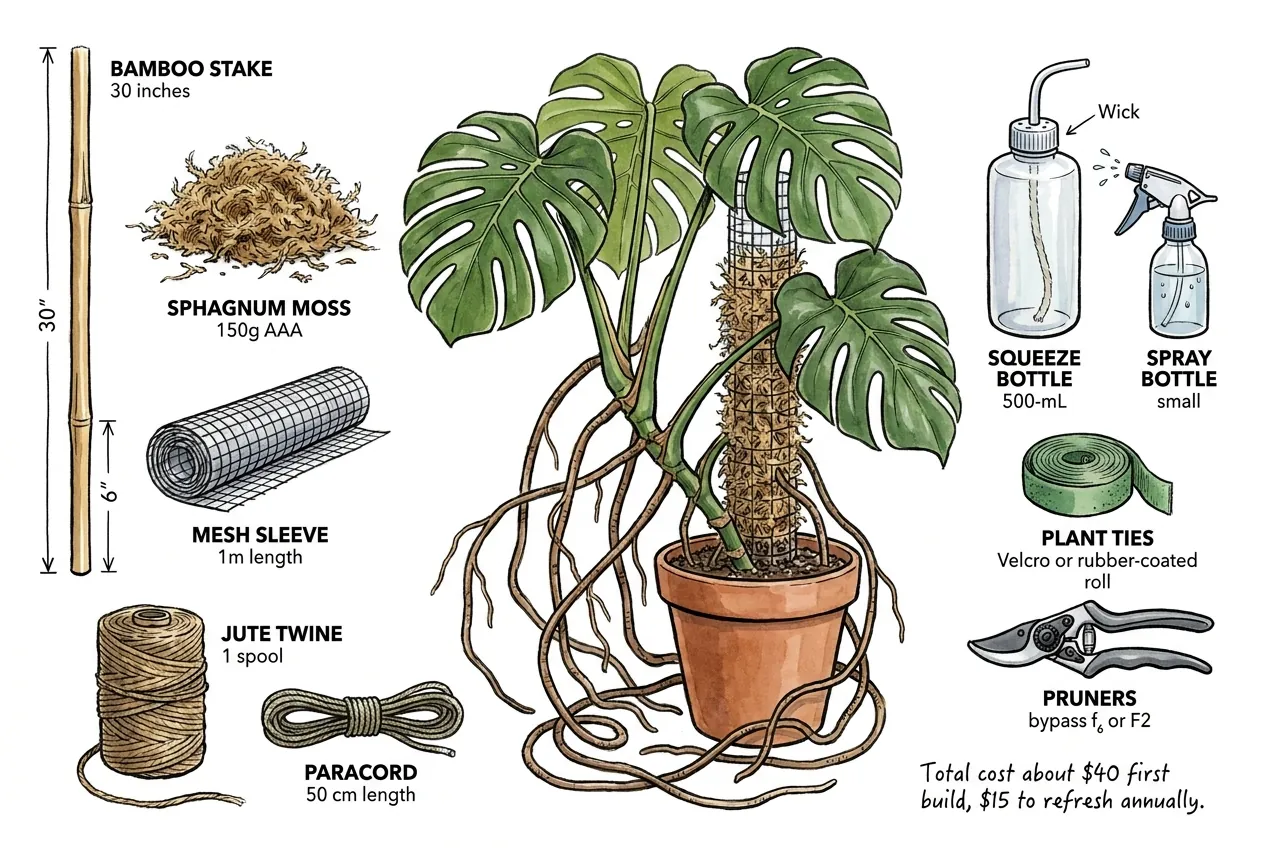
Example build kit for one 24-inch pole
- 1 × bamboo stake or 1-inch PVC, about 30 inches (long enough to bury a stable base, see the burial note below)
- Enough long-fiber New Zealand sphagnum to wrap the pole (a couple of good handfuls. A small pole holds far less than a 500 g bag)
- ~1 m polypropylene tubular mesh sleeve (roughly 2–5 mm openings)
- Twine to secure the wrap. A synthetic (polyester) twine lasts longer in a constantly wet build than jute, which rots
- 1 × ~50 cm length of 4 mm cord, gutted or a wicking synthetic (test that it actually draws water up the full height)
- 1 × small reservoir bottle with the cap drilled for the wick (watch for leaks and overflow)
- 1 × small spray bottle
- 1 × roll of soft plant ties (Velcro or rubber-coated wire)
- A clean, sharp cutting tool for any aerial-root trimming (a bypass pruner such as a Felco, or clean sharp snips for small soft roots)
Cost varies widely with what you already own. There is no single fixed price.
Assembly in 30-45 minutes
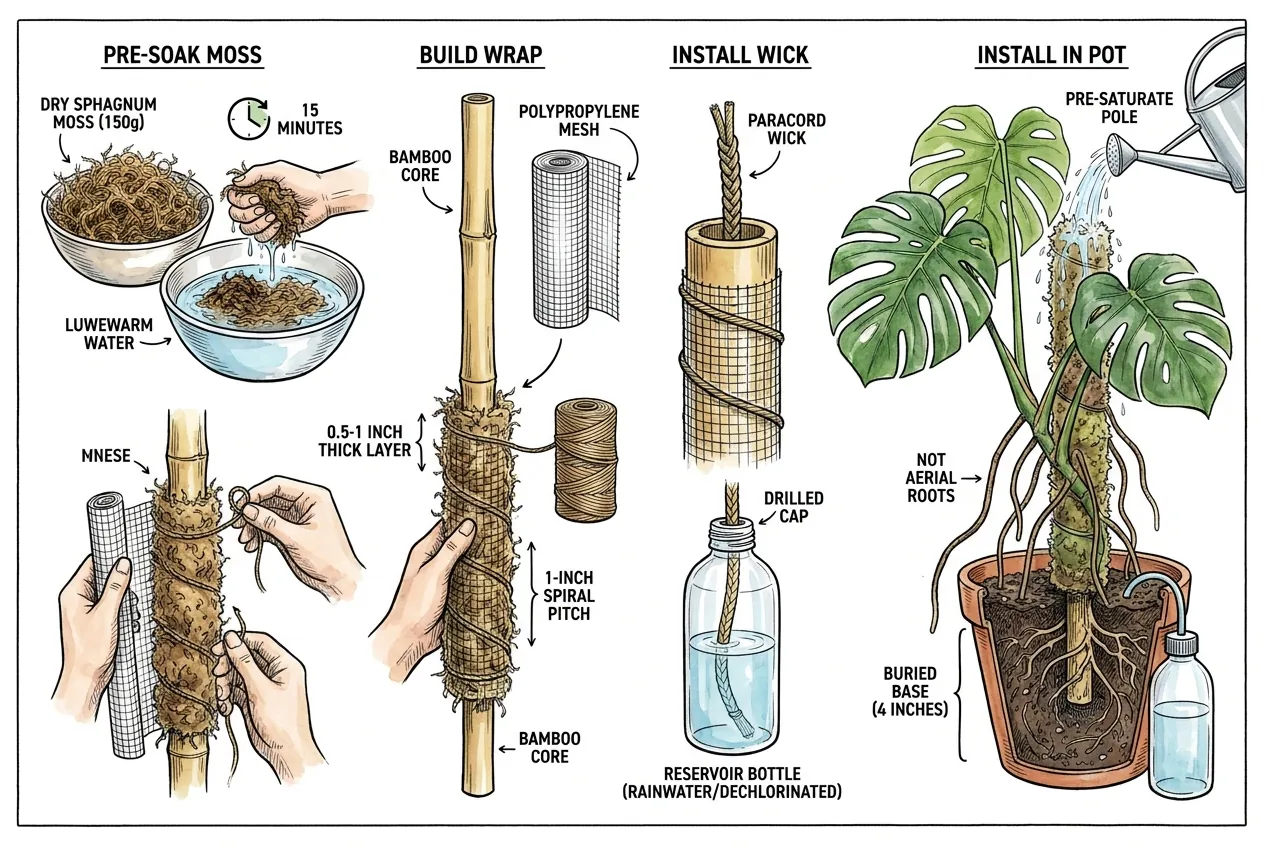
Step 1. Pre-soak the moss
Soak the sphagnum in lukewarm water for about 15 minutes, then squeeze it to damp, not dripping. Wear gloves for this.
Step 2. Build the wrap
Slide the mesh sleeve onto the core, leaving enough bare base for a stable burial (see step 4).
Pack a fairly even layer of sphagnum around the core. On a 1-inch core aiming for roughly a 2-inch finished diameter, that is about a half-inch of moss all around. Keep it firm but not crushed so it can still breathe and wick.
Slide the mesh back over and secure it with twine in a downward spiral, trimming any sharp mesh edges.
Step 3. Install the wick
Run the wick cord alongside or through the core, with the upper end tucked into the moss column and the lower end reaching the reservoir. Drill the reservoir cap for the wick.
Fill the reservoir with rainwater or dechlorinated tap water. (Plain tap water is usually fine too. Rain or dechlorinated water just leaves less mineral buildup.)
Confirm the wick actually draws water up the full height before you trust it.
Step 4. Install in pot
Bury enough of the base to keep the pole stable, typically several inches, deeper for a taller or top-heavy pole, easing it in alongside the root ball rather than spearing through it.
If the plant is already potted, adding a deep pole may be easier to do at repotting time.
Set the reservoir at the pot edge or just buried alongside, and check for leaks. Moisten the pole to start, but avoid soaking the potting mix. The goal is an evenly moist pole, not a waterlogged pot.
How do I redirect a stalled aerial root onto the new pole?
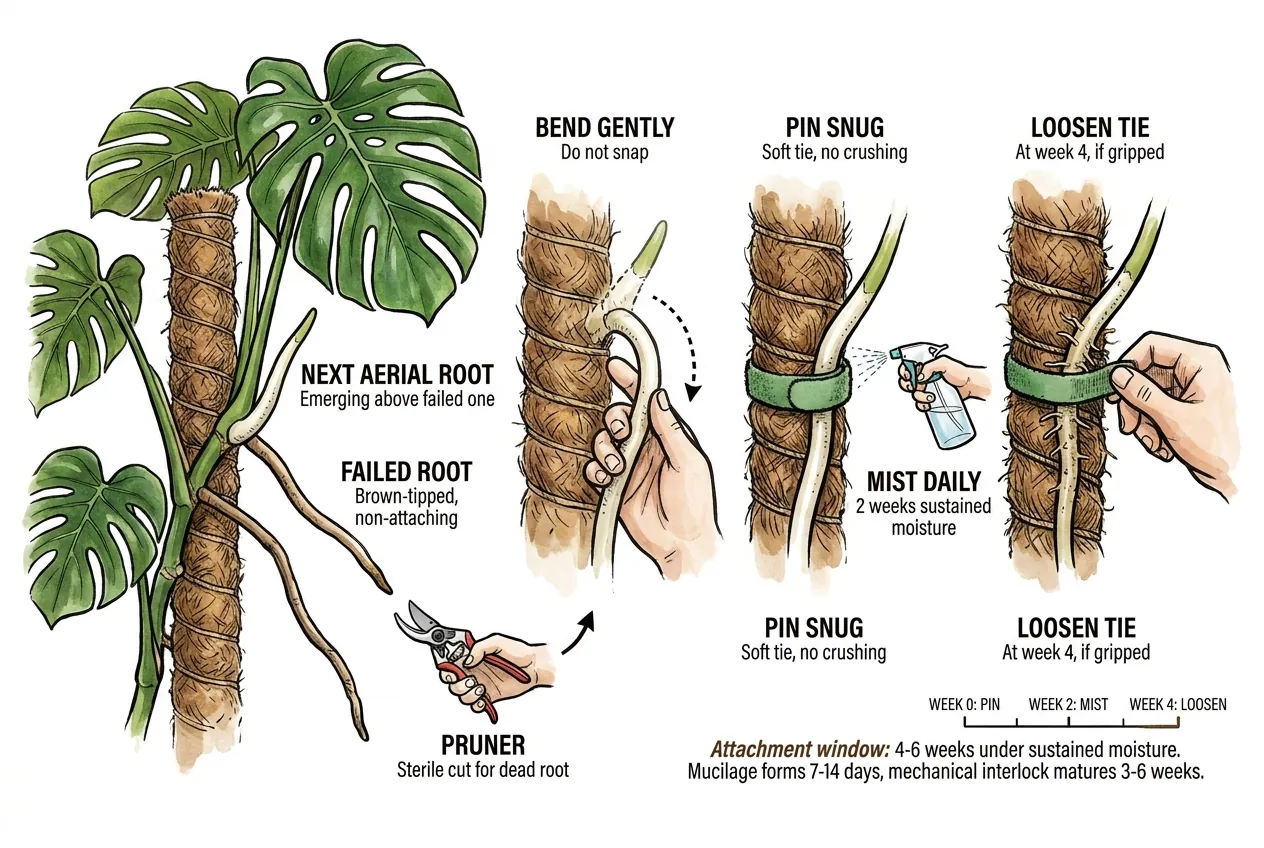
Redirect protocol
- Pick a healthy, pliable aerial root, often a newer one, rather than trying to revive a browned, dead tip.
- Guide it gently toward the moist pole. Stop if you feel it start to crack or resist.
- Hold it against the moss with a soft loop of Velcro or rubber-coated tie (snug enough to keep contact, loose enough not to constrict growth).
- Keep the contact area moist by checking the moss and misting as needed. Avoid keeping the leaves and stem constantly wet.
- Check the tie every week or two and loosen it once the root is holding on its own.
Under consistently moist, warm conditions, aerial roots often begin to grip within a few weeks, but it can take longer, up to months, in low humidity, cooler seasons, or on an immature plant.
Mucilage and root hairs contribute to that grip. The exact days-by-days schedule is not established, so watch the plant rather than the calendar.
You usually will not need to cut anything for a redirect. If a root has a clearly dead, damaged tip in the way, remove just that root with a clean, sharp tool, taking care not to nick the stem or a node.
A bypass pruner gives a clean cut on thicker roots. For small, soft aerial roots, clean sharp snips or scissors also work.
Felco F6 Pruning Shears
Felco F6 Pruning Shears suit someone who also wants a durable bypass pruner for regular plant work.
For a soft Monstera aerial root, clean sharp snips are usually enough, so choose the Felco only if its broader pruning use justifies the cost.
Whatever you use, wipe off debris and disinfect the blade with 70% isopropyl (a good soak, then let it air-dry), keeping the alcohol away from open flame.
Make one clean cut, leaving a small safe stub so you do not injure the stem. Wear gloves and eye protection. Monstera sap contains calcium oxalate that can irritate skin and eyes.
Tool Note
A Felco costs several times more than a generic pruner, but is repairable and long-lasting. The larger Felco F2 suits bigger hands or thicker outdoor stems. Either is optional for this job.
References
Hormonal interactions during root tropic growth. Hydrotropism
DIY Self-Watering Moss Pole (Cori Sears)
What does the recovery timeline look like?
Recovery is gradual and varies a lot with light, temperature, season, the root’s age, and the plant.
The rough phases below are a general expectation, not a guaranteed schedule. Treat the week numbers as loose ranges.
- Early on, the root rehydrates and settles against the moist surface.
- For several weeks, there may be little visible change even as the root begins to grip.
- Later, the first firm attachment becomes noticeable.
- Longer term, side roots grow into the moss and add real anchoring.
A common mistake is pulling on a recovering root because nothing visible has happened yet. Early attachment is slow and easy to disturb, so give it time.
Recovery phases and what to do
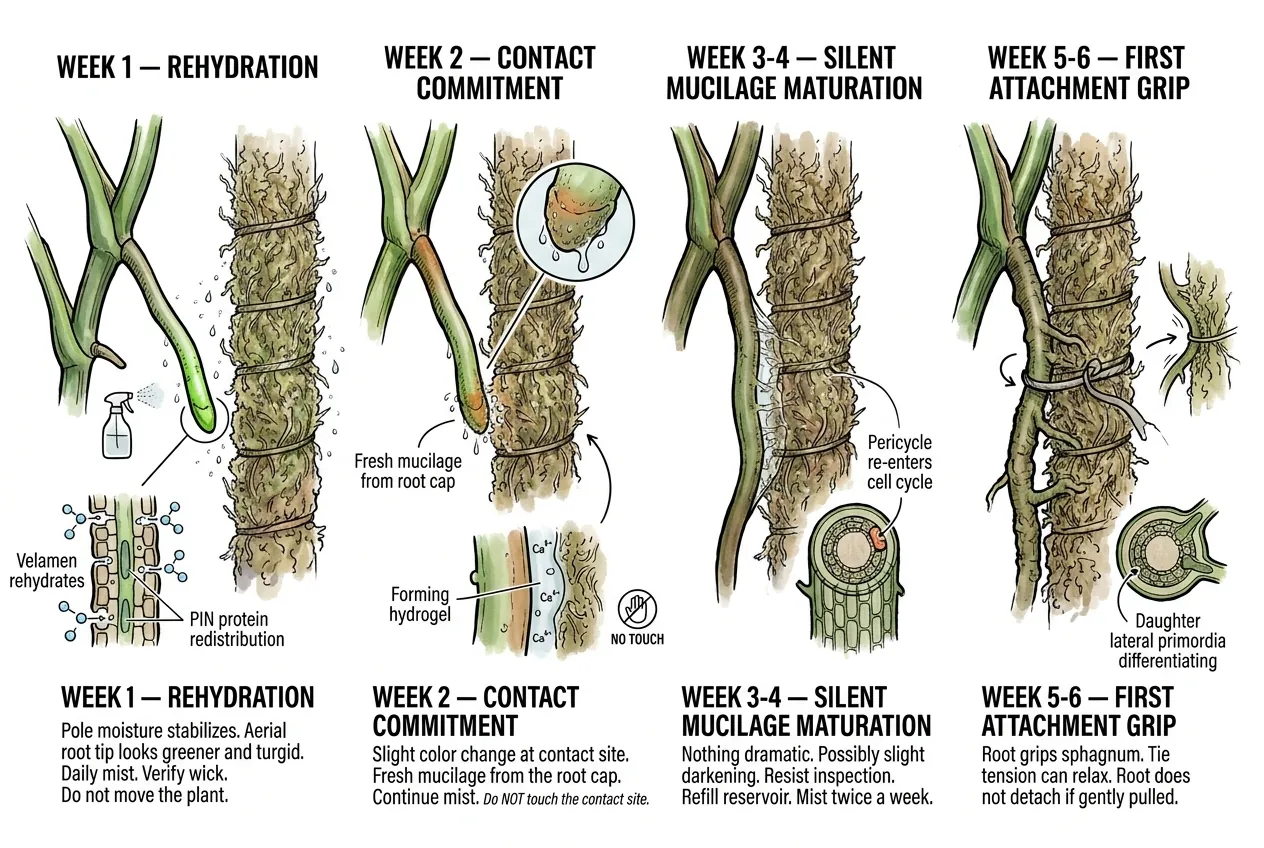
Early (Rehydration)
What You May See
The pole holds moisture. The aerial root tip may look a bit greener and firmer.
What to Do
Keep the moss moist and the wick working. Do not keep moving the plant.
Next (Making contact)
What You May See
A slight color change where the root meets the moss. Sometimes fresh, tacky mucilage at the tip.
What to Do
Maintain moisture and leave the contact area alone, aside from a light check for tie constriction or rot.
Middle (Quiet stretch)
What You May See
Often nothing dramatic for a few weeks. Slight darkening can mean maturation, but also drying or damage, so look at the whole root.
What to Do
Resist the urge to lift and inspect. Keep the reservoir topped up and the moss evenly moist by feel.
Later (First firm grip)
What You May See
The root starts to hold the sphagnum and does not pull away with a very gentle touch. (A hard tug can still damage it, so go easy.)
What to Do
Loosen the tie once the root supports itself. Do not remove it too early.
Longest (Side roots and anchoring)
What You May See
Fine root hairs and side roots working into the moss. The root becomes better anchored over time.
What to Do
Remove ties once they are no longer needed, and train the next healthy root if you have one. Resume normal care.
Why does the middle stretch feel like nothing is happening?
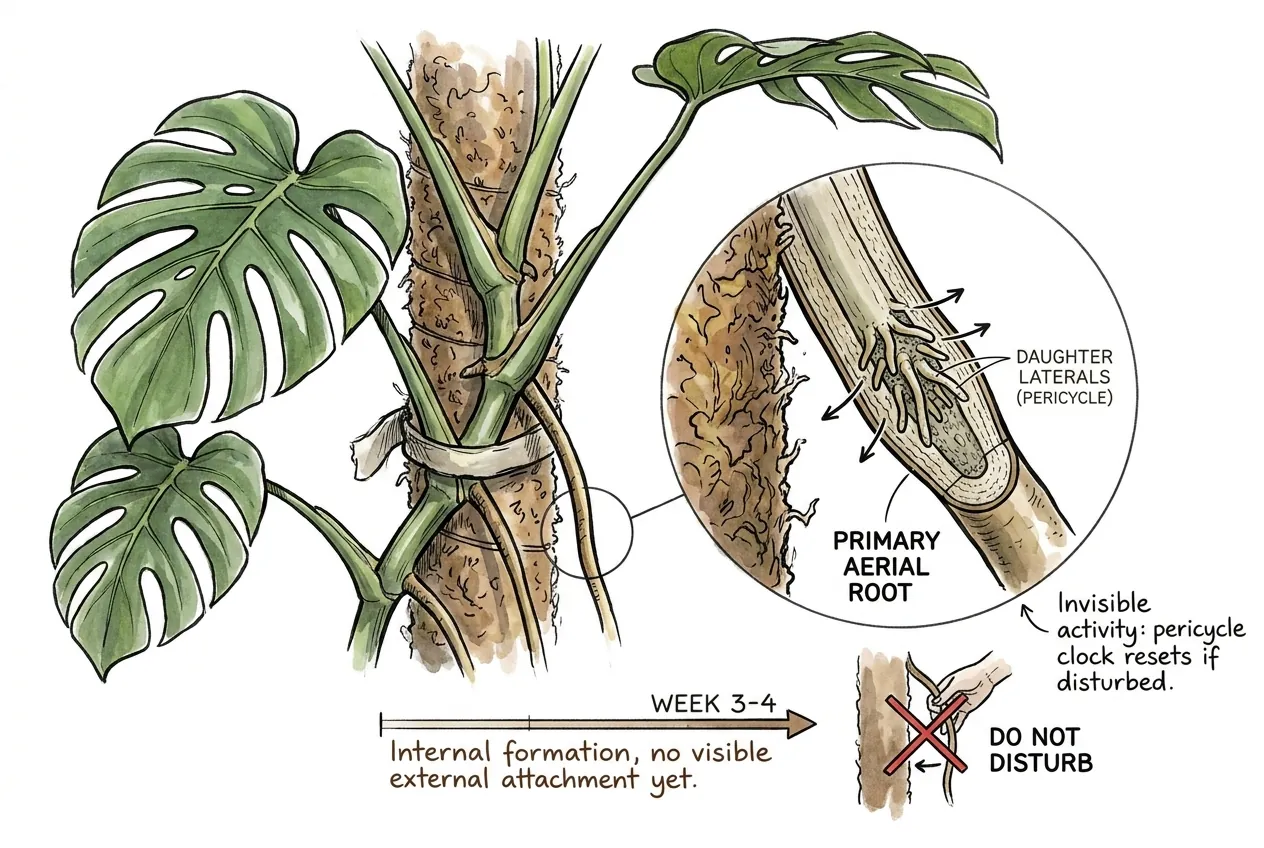
Because much of the early progress is out of sight. Like other roots, side roots start from internal tissue and only become visible once they push out through the surface, which can lag noticeably behind the first attachment.
Repeatedly lifting the root to check on it can break that fragile early contact and set progress back, so it is worth leaving it undisturbed.
How long attachment takes depends on conditions. A few weeks is common when the plant is growing actively in warm, humid, well-lit conditions, but it can stretch to months in low humidity, cooler seasons, or on a young plant.
References
DIY Self-Watering Moss Pole (Cori Sears)
Cellular Growth in Aerial Roots Differs From That in Typical Substrate Roots
When should I redirect, prune, or leave a stalled aerial root alone?
Aerial roots roughly fall into a few conditions, and each suggests a different response. Judge by color, firmness, and tip mucilage together, not color alone, because the categories below are a rough guide, not a validated diagnostic.
One easy mistake is treating a firm, green, simply-paused root as dead and cutting it. A pause can just mean the season, the light, or a root that has not found a surface yet.
What do the states look like?
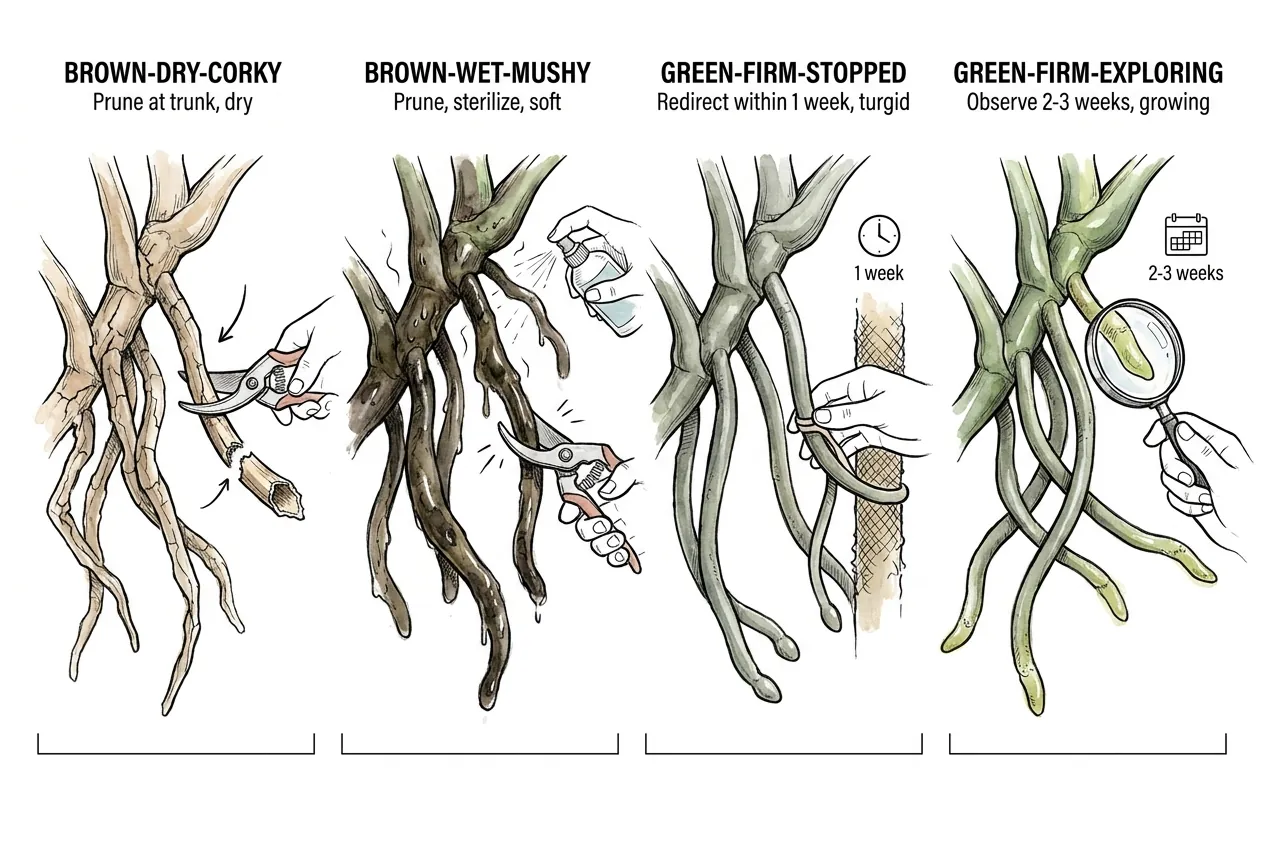
| State | Color | Texture | Action |
|---|---|---|---|
| Brown, dry, crumbly tip | Brown, faded | Dry, crushable, papery, hollow | Likely dead. Can be removed if in the way (a mature corky root may still be alive. Check first) |
| Brown/black, wet, mushy | Brown to black | Soft, possibly smelly | Suspect rot (trim to healthy tissue and check the root zone) |
| Green, firm, paused | Grey-green | Turgid, no fresh mucilage, not extending for a while | Alive (redirect onto a moist surface when convenient) |
| Green, firm, exploring | Grey-green | Turgid, fresh mucilage, growing in its own direction | Leave it alone and observe |
How do I tell a dehydrated-but-alive root from a dead one?
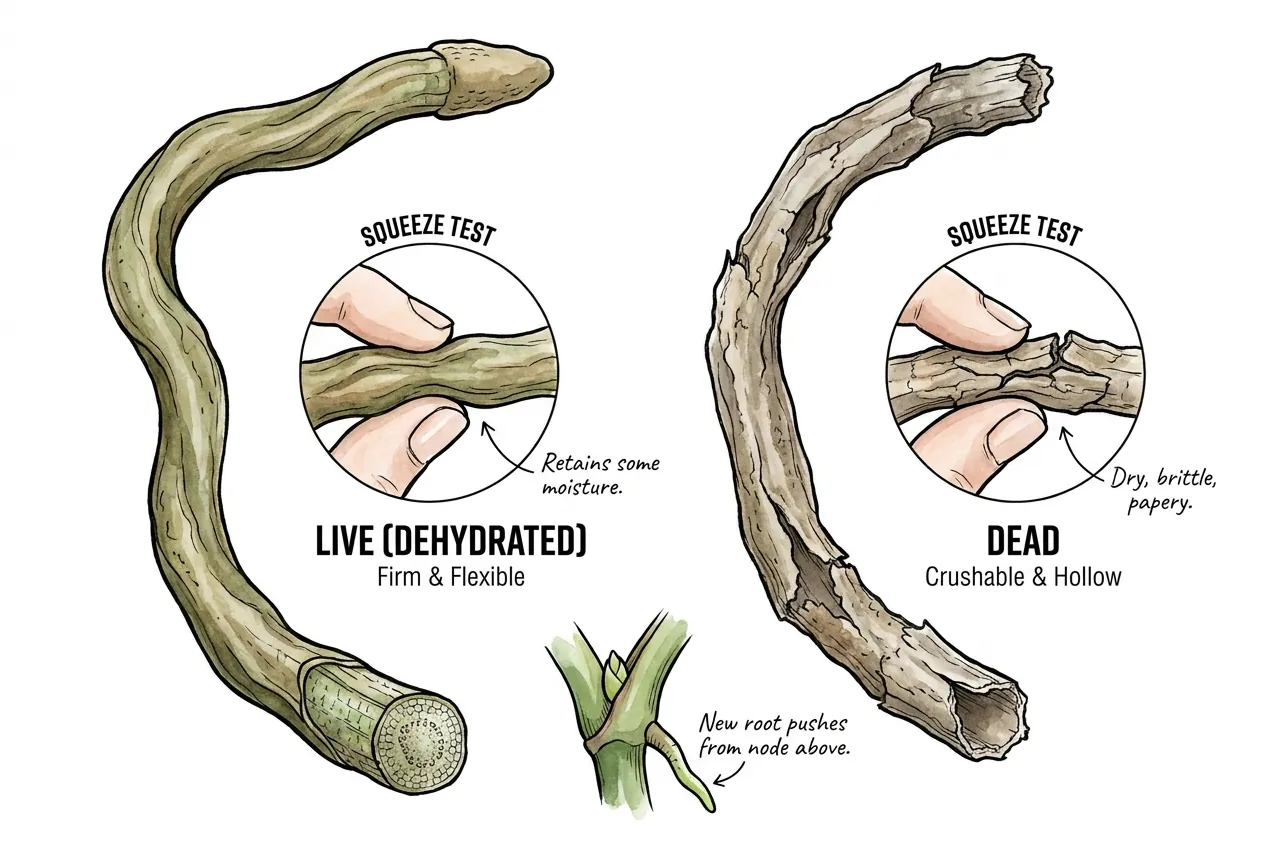
The firmness check
Feel the tip very gently. Firm and flexible suggests it is alive. Dry, hollow, papery, or easily crushed suggests it is dead.
Do not squeeze hard. A firm pinch can damage living tissue, so a light touch is enough.
A dead tip is usually brown and faded with no fresh mucilage. A living root tends to stay firmer, keep its color better, and may show fresh mucilage, though not every healthy aerial root looks the same.
If a tip has clearly died, that root will not regrow from the tip. The plant often puts out a new root elsewhere over the following weeks, but there is no guaranteed timing, so watch rather than expect it on a schedule.
How do I make a clean cut without infecting the plant?
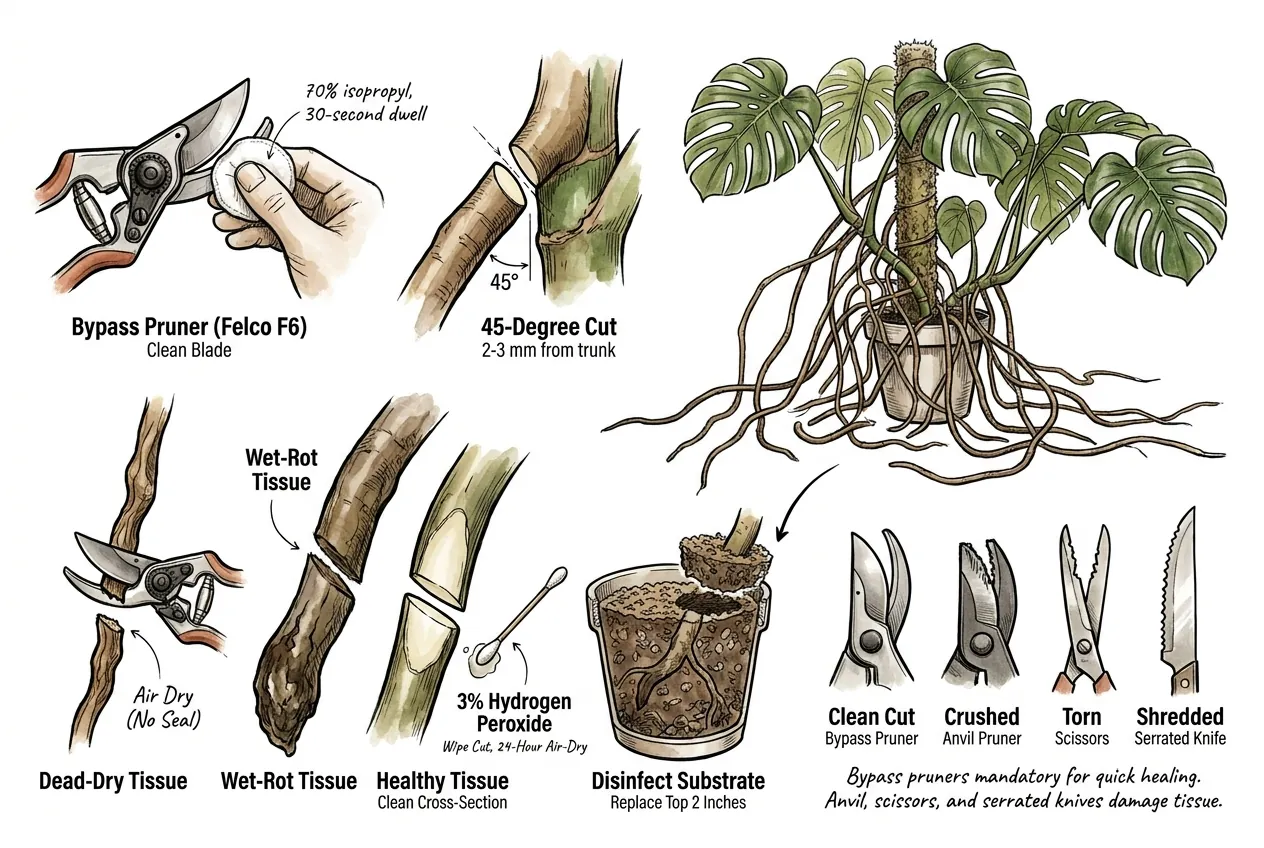
Clean-cutting steps
- Wipe debris off the blade and disinfect it with 70% isopropyl (soak it well, then let it air-dry). Keep alcohol away from open flame.
- Make one clean cut through the root only, leaving a small stub so you do not nick the stem or a node. The exact angle and distance matter less than a clean cut that spares the stem.
- For dry, dead tissue, no sealant is needed. It generally heals in normal air.
- If a root is mushy or rotten, cut back to firm, healthy tissue and, more importantly, look at the cause. Check the root zone for how wet, how far, and how bad the problem is. Avoid routinely applying hydrogen peroxide to fresh, living tissue, as it can damage it.
- If rot is in the pot, replacing the top inch or two of mix does not disinfect the root zone. Assess how far the rot extends and, if needed, unpot to inspect, remove affected roots, and refresh the mix. A full repot may be warranted.
A clean, sharp cut is what matters most. A bypass pruner gives that on thicker roots. Small, soft aerial roots can also be cut with clean, sharp snips or scissors. Avoid dull or crushing tools, which mash the tissue.
Cutting Safety
Wear gloves and eye protection (Monstera sap contains calcium oxalate that can irritate skin and eyes) and wear gloves and long sleeves when handling damp sphagnum (rare sporotrichosis risk).
Isopropyl alcohol is flammable. Keep it away from flame and use it with ventilation.
References
Should I cut off the brown aerial roots from Monstera Deliciosa? (Bumble Plants)
What does the long-term setup look like so this does not happen again?
A few habits reduce the chance of the same problem returning. Give roots a moist surface to climb, keep the support stable, keep ambient humidity reasonable, and keep one clean, sharp cutting tool on hand. None of these are strict rules. Adapt them to your plant and home.
Pot and rim choices
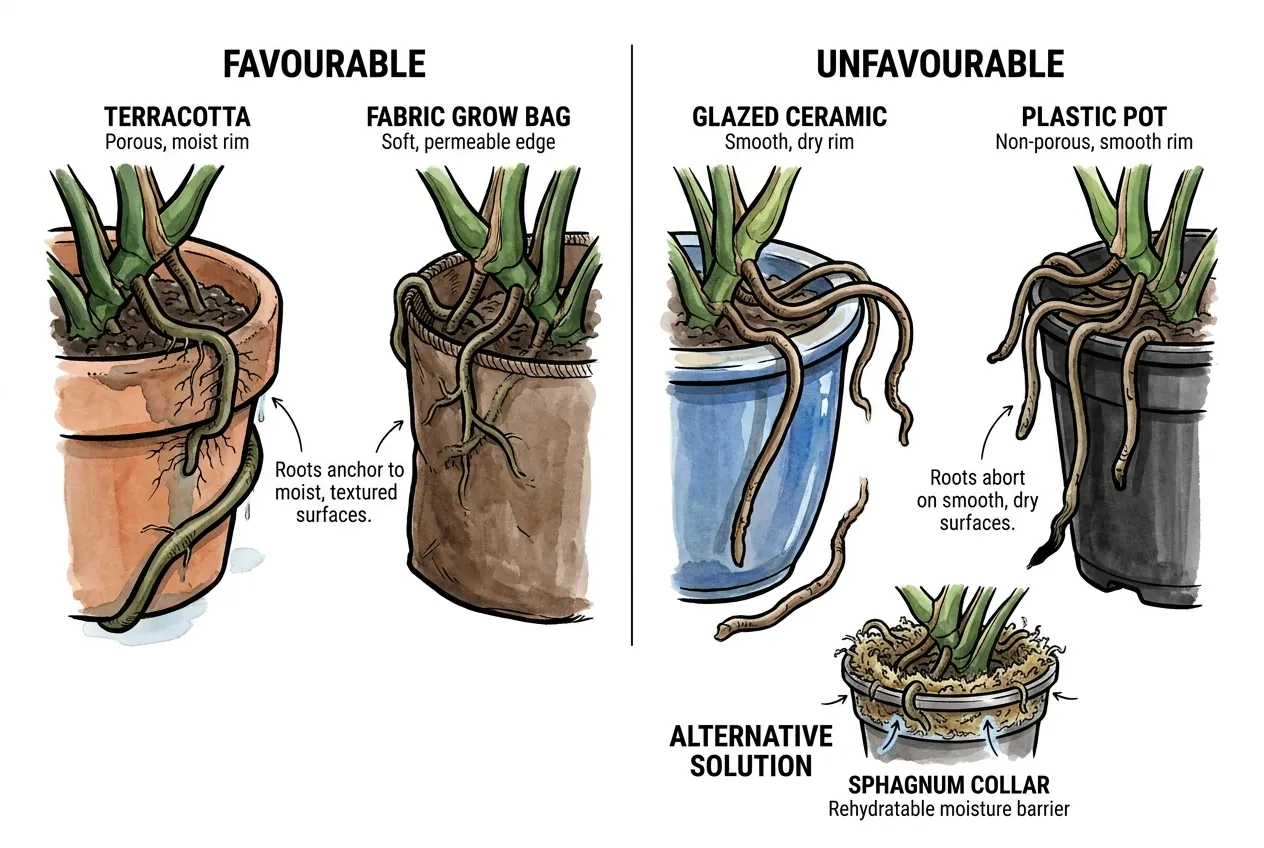
Porous terracotta can absorb and slowly release some moisture at its lip, and fabric grow bags have a soft, permeable edge. Both can feel more root-friendly than a slick surface.
How damp a terracotta rim actually stays depends on the clay, firing, any coating, and the environment, so it is not always moist.
Glazed ceramic and bare plastic are smoother and drier at the rim, which gives a root less to grip, but this does not mean a root always fails there.
Aerial roots often just keep growing down toward the soil or on to another support.
Rather than fixing this only through pot choice, it usually helps more to give the plant a moss pole, board, or trellis, and to guide lower roots into the soil.
A small sphagnum collar at the rim can create a moist contact surface, but keeping the moss permanently wet against the stem base risks crown rot, mold, and fungus gnats and can hide problems, so use it thoughtfully, not by default.
Pole anchoring
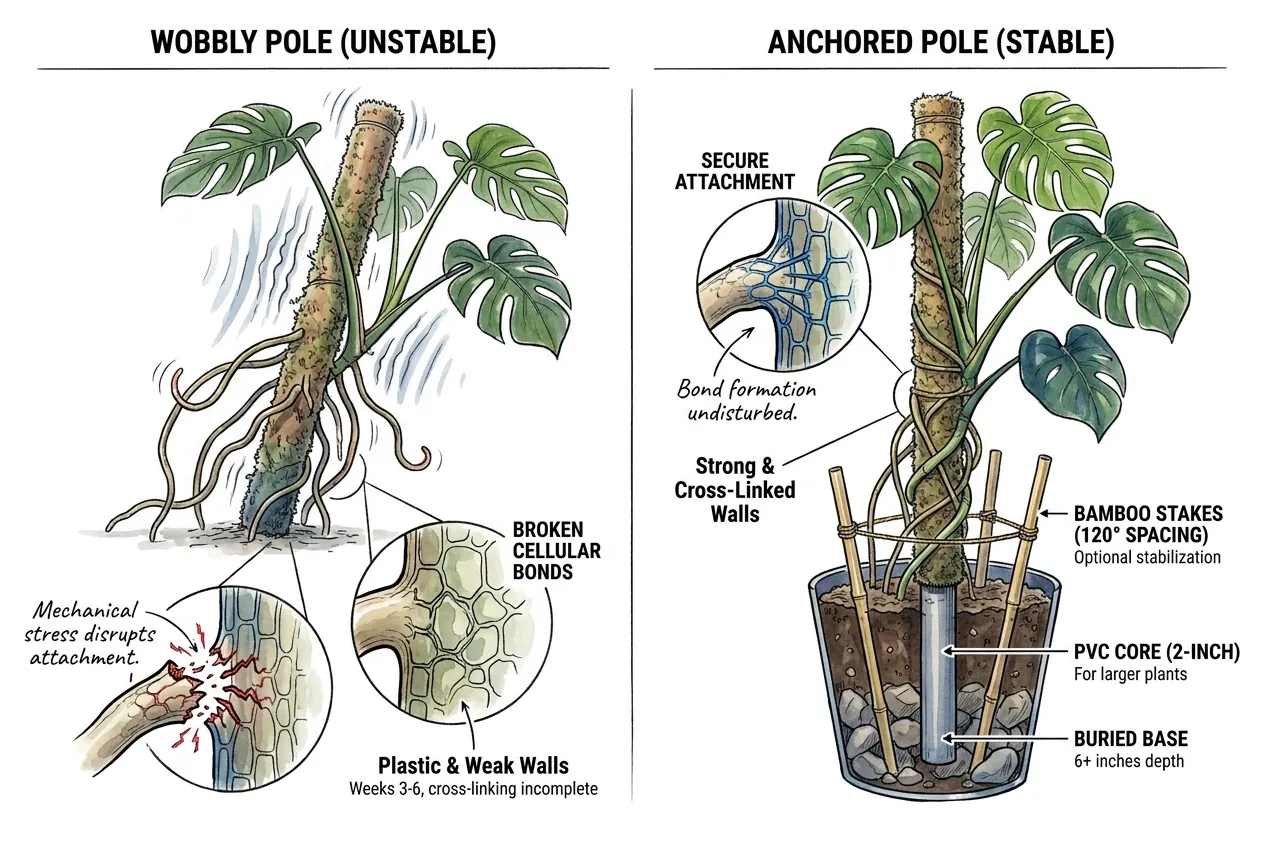
A wobbly pole tugs on freshly attached roots and on the stem, which can loosen contact before it firms up.
Keeping the support steady is a sensible mechanical precaution, though there is no established critical week for this.
Bury enough of the base for a firm hold, adding stakes or a thicker core if a taller or heavier plant needs it.
Match the depth and support to the pot size, root ball, and how top-heavy the plant is, rather than to a fixed formula.
Humidity floor
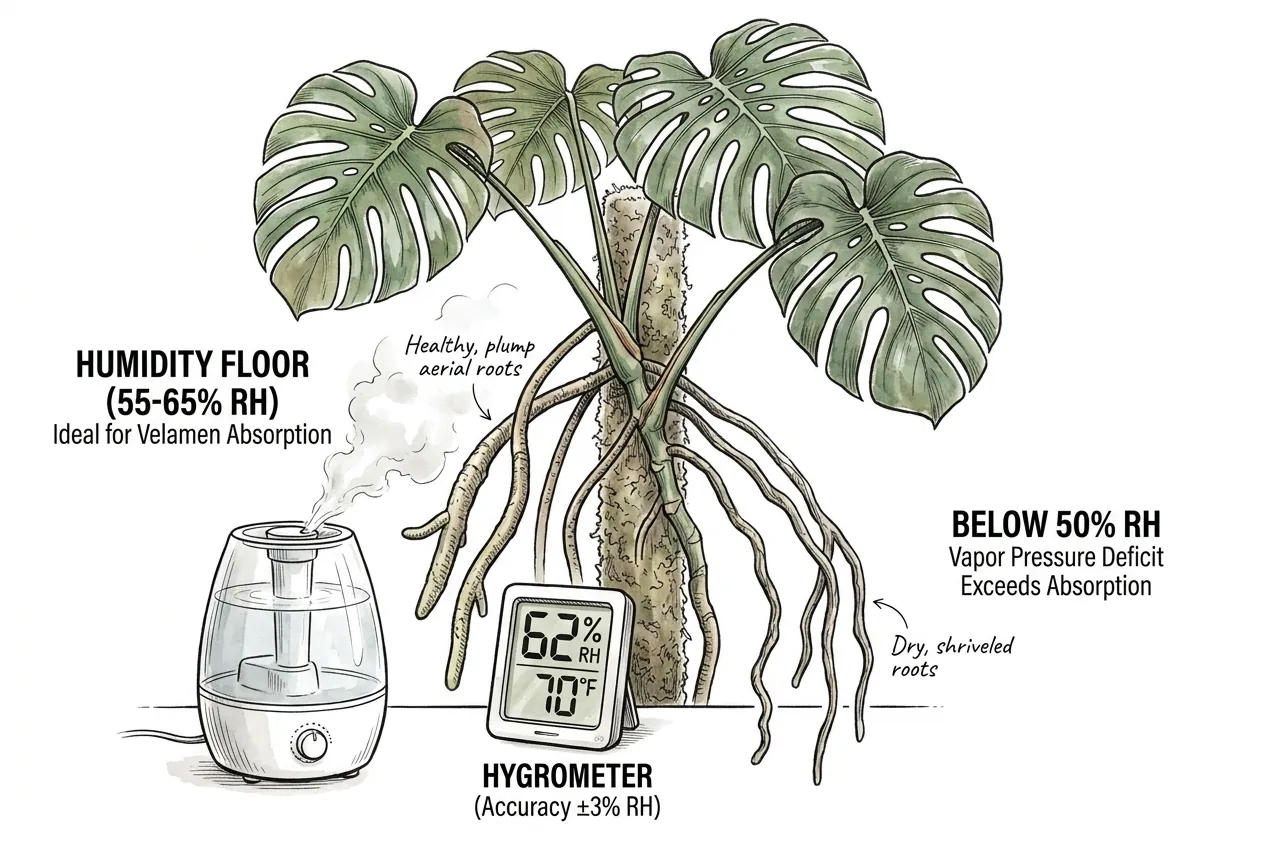
Monstera generally does well in moderate humidity. A range of roughly 55–65% RH is a comfortable, achievable target in many homes and suits both people and most houseplants, but it is a practical guideline, not a proven pass/fail line for aerial-root health.
Very dry air speeds drying and can stress a humidity-loving plant. Very humid, still air raises the risk of condensation and fungal problems.
There is no single RH number that is automatically safe or unsafe (airflow, temperature, leaf wetness, and how long conditions persist all matter).
If you use a humidifier, keep it clean, avoid pointing its plume straight at the plant, and watch for condensation.
Govee H5075 Hygrometer Thermometer
Govee H5075 is useful when you need to log humidity and temperature near the plant and compare trends over time.
It is a Bluetooth spot logger, not a calibrated reference instrument, so cross-check surprising readings and do not treat one number as a verdict on the plant.
Place it near the plant, around canopy height rather than on the floor, and away from a humidifier plume, a vent, or a cold window.
Comparing a couple of spots gives a better picture than one reading.
Hygrometer note
A logging hygrometer costs a bit more than a basic dial gauge, and better accuracy is genuinely helpful, but any gauge is an aid, not a guarantee. Models vary and can drift, so treat readings as approximate.
Tools that matter
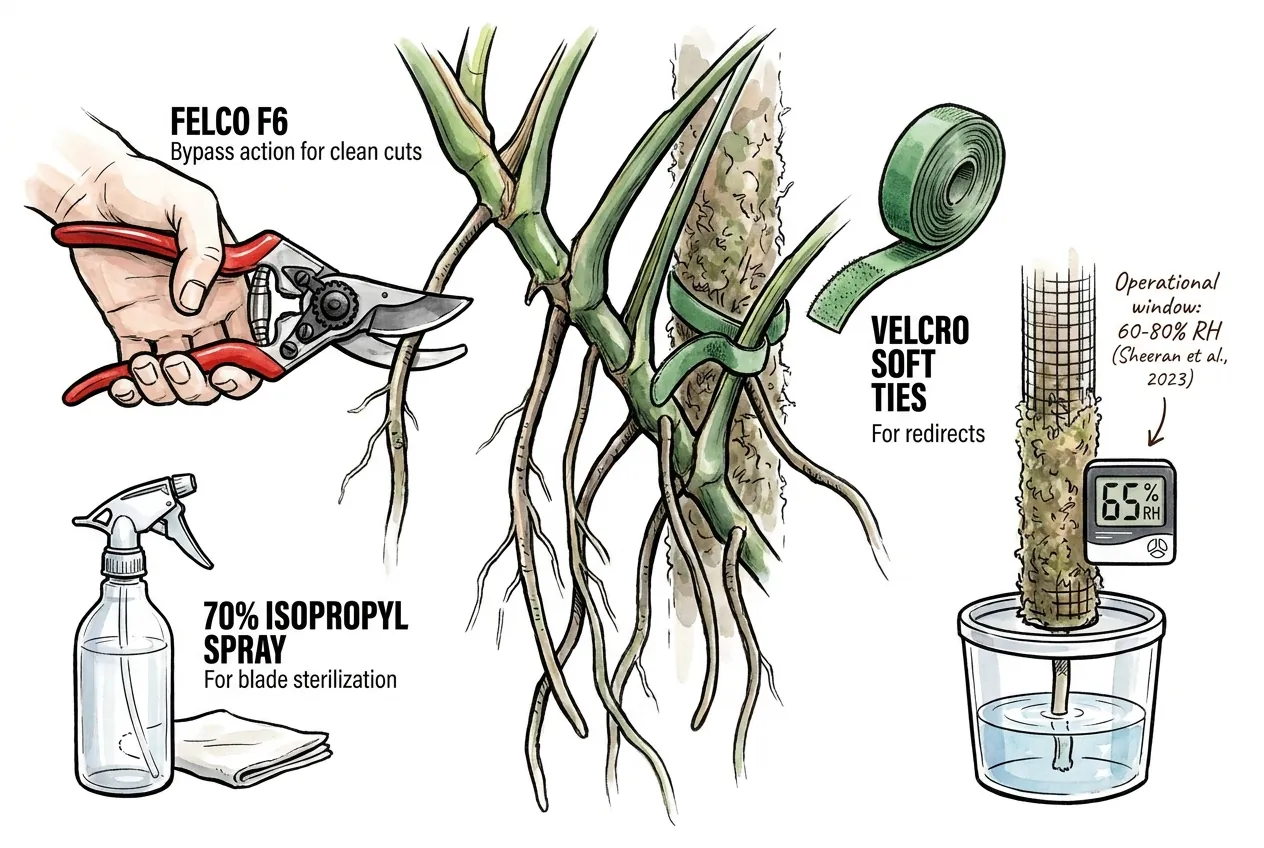
A clean, sharp bypass pruner such as the Felco F6 (or F2 for larger hands) handles any aerial root you would cut.
For the small, soft roots most Monsteras produce, clean sharp snips are often enough and cheaper.
Round out the kit with 70% isopropyl for disinfecting the blade (flammable, store and use it carefully), soft ties for redirects, and the wick-pole reservoir.
Keep gloves and eye protection nearby for handling sap and damp sphagnum.
References
Aerial roots elevate indoor plant health
Diverse climbing strategies in aroid vines
Affiliate Disclosure
This article contains Amazon affiliate links. As an Amazon Associate I earn from qualifying purchases. If you use these links, the site may earn a commission at no extra cost to you. Product availability, price, and specifications can change. Check the current listing before buying.