
Alocasia Frydek Soil Mix: Recipes That Stop Rot
A practical guide to building an Alocasia Frydek soil mix: why airless, waterlogged soil raises the risk of rot, how to aim for an open, well-aerated structure, three starting recipes to tune to your humidity and pot, and how to feed without salt-burning the corm.
Samuel Reed · Published 2025-12-22 · 26 min read
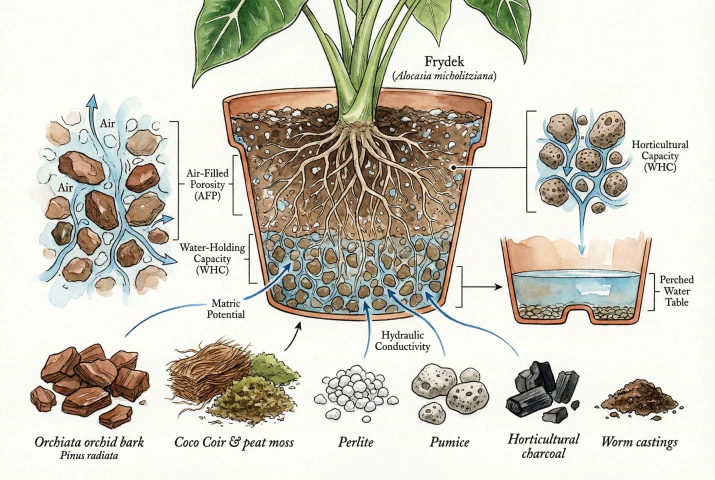
Key Takeaways
- Frydek roots need oxygen at the root zone, and waterlogged, airless soil strongly raises the risk of rot. A mix that crumbles when you unclench your fist is a rough texture check that it's open and chunky, not a guarantee.
- Build the soil for air as well as moisture with chunky bark plus pumice or coarse perlite. Published air-filled porosity ranges for general nursery media run roughly 10–30%, but there is no measured Frydek-specific target, so test your actual mix.
- There is no single recipe because the right balance depends on your environment. Lean toward more aeration in humid, cool, or easy-to-overwater conditions, and more retention in dry, heated, or terracotta conditions.
- Coco coir and peat each have tradeoffs. Coir is often easier to re-wet once it has dried, while peat can turn water-repellent when bone dry and channel water down the sides of the pot.
- Concentrated fertilizer and hard water can leave salts behind as the soil dries. Follow the product's dilution rate, make sure the pot drains freely, and flush based on measured buildup rather than a fixed calendar.
Start With Air and Drainage
A Pothos will forgive almost any soil. An Alocasia Frydek (Green Velvet Alocasia) is fussier, and a lot of that fussiness comes down to the mix it's planted in.
Frydeks are prone to root rot, and the generic keep it moist advice on nursery tags often works against them by keeping the soil wetter than it should be.
Getting the mix right is not about one fixed recipe. Balance air and water at the roots, then account for your humidity, temperature, watering habits, and pot.
I fill a clean one-liter nursery pot with loose mix, level it without pressing, and record the dry weight. After slow saturation, the pot drains for 30 minutes before I record the water used, drained weight, and drying time. The fixed pot and drain time prevent container dimensions or trapped runoff from making two mixes look different.
On the next watering, I add the same volume at the same rate and watch whether the center rewets or water escapes along the pot wall. That second pass reveals channeling that the first drainage time can miss.
1. The Physiology of the Frydek
To build a good mix, it helps to understand the plant you're potting. Frydek is a cultivar of Alocasia micholitziana, an aroid.
It's a terrestrial plant native to Luzon in the Philippines, growing in montane primary and secondary forest and along roadsides at roughly 1,200–1,500 m.
The general takeaway for potting is simply that it prefers an open, well-aerated root zone over dense, compacted mud, not that it needs a substrate mimicking any one specific natural material.
1.1 Oxygen and the Root Zone (Why Wet Feet Are Risky)
Aroid roots need oxygen at the root zone, and this is a piece that generic care advice often skips.
People often say root rot is caused by overwatering. That's a useful shorthand, but it collapses two related things that are worth keeping separate.
One is hypoxia (low oxygen). When roots sit in waterlogged, compacted soil, the pore spaces fill with water and oxygen can no longer diffuse into the root zone.
Roots respire less efficiently, get stressed, and become more vulnerable to injury. That much is well established for plants in general.
The other is rot itself, which is usually a disease. Actual root and corm rot commonly involves pathogens. Oomycetes (like Pythium and Phytophthora), fungi, or bacteria, and depends on things like an available source of infection, temperature, tissue damage, and hygiene.
Water and low oxygen create conditions that favour these organisms. They are a major risk factor, not the whole diagnosis.
So it is more accurate to say soggy, airless soil raises the risk of rot than to say water is never the problem.
Some wetland plants have special ways to move oxygen through flooded roots, but that does not provide a care target for Frydek. The practical point is still to avoid a mix that stays compacted and saturated.
The practical takeaway
A good mix has to hold air as well as water. A soil that stays a dense, airless brick works against the plant.
A quick squeeze that crumbles apart is a rough texture check (not a measurement) that your mix is on the chunky, open end (more on its limits later).
Plant responses to soil waterlogging and oxygen deficiency
1.2 Big Leaves vs. The Corm
The Frydek pulls in two directions at once, which is part of what makes soil choice tricky.
- Thirsty leaves. The large, velvety leaves have a lot of surface area and can transpire (lose water) quickly under bright, warm, or dry conditions, creating real water demand.
- Storage corm The plant grows from a modified underground stem that stores water and energy. Constantly wet soil makes the corm prone to rot.
Many dense potting soils meet the water demand but keep the corm too wet. The goal is a mix that holds moisture within its particles while still letting air move between them (in other words, staying moist without staying soggy).
1.3 Feeding and Salts
Alocasia are often called heavy feeders when actively growing large leaves, but their roots are still sensitive to salt buildup.
Fertilizers add dissolved salts to the soil solution. If that solution becomes more concentrated than the inside of the root cells, water can be pulled out of the roots rather than in (the basis of fertilizer burn).
Organic matter with a higher cation exchange capacity (CEC) helps here. It holds some nutrients and buffers swings in the soil solution, which softens (though doesn't eliminate) the risk.
It doesn't store salts perfectly or safely release exactly what the plant needs, so correct dilution and drainage still matter most.
How the Mix Holds Air and Water
Before buying ingredients, decide how quickly the pot needs to drain and how easily a dry root ball needs to re-wet.
2.1 Porosity. The Air-Filled Porosity (AFP) Metric
In horticultural physics, we talk about Air-Filled Porosity (AFP) and Water-Holding Capacity (WHC).
Water-Holding Capacity
The volume of water the substrate retains after gravity has drained the excess.
Air-Filled Porosity
The volume of air remaining in the substrate after drainage.
Published guidance for general greenhouse and nursery container media puts a reasonable air-filled range somewhere around 10–30%, and different institutions cite different figures (for example roughly 10–20% or up to about 25%) depending on the crop, the container, and how they measured it.
There is no published, measured AFP target specifically for Alocasia Frydek, so treat aim for an open, well-aerated mix as the goal and any single percentage as a general starting point rather than a verified number for this plant.
It is also worth noting that AFP is not fixed by an ingredient list. The same volume recipe can end up with very different air space depending on particle size, how wet and compacted it is, how far the organic parts have broken down, and, importantly, the height of the pot.
A tall, freely draining pot holds more air than a short, wide one filled with the identical mix.
When air space gets very low, gas exchange is limited and CO2 can build up around the roots, which works against healthy respiration.
Avoid Both Dry Pockets and Soggy Fines
Very fine material can hold too much water and crowd out air. A mix made only of large chunks can drain so fast that it develops dry pockets. Combine large bark or pumice for structure with enough coir, peat, or fine organic material to keep moisture distributed through the root ball.
Let Pot Shape Inform the Mix
Every pot holds a wetter zone near the bottom after excess water drains. That zone takes up more of a short, wide pot than of a taller one.
What Pot Shape Changes
A shallow, wide pot generally wants a coarser mix (more aeration) to offset its larger saturation zone, while a taller pot can carry a bit more moisture retention. Pot shape is one factor, not the only one (drainage and the particle-size mix matter too).
3. The Ingredients
Here's a look at the common ingredients, considering their physical structure, chemical stability, and biological contribution.
3.1 The Backbone. Orchid Bark (Pinus radiata)
Skip landscaping mulch and random wood chips. A graded orchid bark, commonly Pinus radiata (New Zealand pine), is the better choice for a stable, chunky structure.
Why Bark Holds Structure
Pinus radiata bark is hard and relatively high in lignin, a polymer that resists microbial breakdown. In practice, coarser, denser barks tend to hold their structure longer than soft, finely shredded ones, which keeps air pockets open. Exact lifespan varies a lot with particle size, moisture, temperature, and microbial activity, so specific lasts X years figures are rough at best (expect to refresh the mix periodically rather than treating any bark as permanent).
What Bark Does for Aeration
It creates large macro-pores where roots can breathe. These open pockets are a horticultural aeration choice. Describing them as mimicking an epiphyte's natural home is loose, since Frydek is a terrestrial plant (see the habitat note below).
Aged Bark Tradeoffs
Orchiata is a well-regarded aged (not composted) bark. Aging is meant to mellow water-soluble tannins while keeping the hard structure. It's a solid coarse-bark choice, though claims that it's uniquely superior come mostly from the maker rather than independent, long-term Frydek comparisons.
Coarse bark option
Orchiata New Zealand Orchid Bark suits a medium or large Frydek that needs lasting chunky structure. A very coarse grade is not the best first choice for a small cutting or a pot that already dries too quickly.
3.2 The Sponge (Coco Coir vs. Peat Moss)
This is the part of the mix that holds water. Coir and peat are the two usual choices, and each has genuine tradeoffs (the right one depends partly on your water and the specific product you buy).
Peat Moss
Peat tends to be acidic (often quoted around pH 3.5–4.5, though it varies by product and is usually pH-adjusted with lime in commercial mixes), which can pull a mix toward the mildly acidic range aroids like. It has a high cation exchange capacity, so it holds nutrients well. Its main drawback is that it can turn water-repellent once it dries out fully. It shrinks and hardens, and water then channels down the sides of the pot rather than soaking the root ball. Peat is also environmentally contentious to harvest.
Coco Coir
Coco coir is usually closer to neutral (roughly pH 5.5–6.8, again product-dependent). Once it has been hydrated, it's generally easier to re-wet than dried-out peat, which is a real convenience for a plant that wilts quickly. Note the easy to re-wet point comes with a caveat. A fresh, compressed coir brick still needs a proper initial soak before it takes up water evenly. The other catch is quality. Unbuffered coir can carry high sodium/potassium salts, so buy buffered, washed coir.
Retention, air space, and re-wetting all vary with grade, fibre-to-pith ratio, processing, and compaction, so compare the actual product rather than assuming coir always beats peat.
For a Frydek, coir's easier re-wetting is a reasonable reason to lean that way. If your tap water is hard and alkaline, a coir/peat blend can help, but bear in mind that pH is only part of the picture. Water alkalinity matters too, and a little peat won't indefinitely cancel it out, so test if this is a persistent problem.
PRO-MIX HP With Mycorrhizae
If you would rather not hydrate and blend raw coir or peat, PRO-MIX HP with Mycorrhizae provides an airy ready-made base. It works best when you still add chunky bark or pumice for a large Frydek. Treat it as a complete peat-and-perlite base, not as a direct scoop-for-scoop replacement for coir in the recipes below.
The linked professional bale is sensible only if you pot frequently or can share it. It is oversized for one or two houseplants.
3.3 The Lungs (Perlite vs. Pumice)
Perlite
Perlite is expanded volcanic glass (light, sterile, and good at holding air). Because it's so light, it can float and migrate upward with watering, and finer grades can break down over time. How much this happens depends on the grade and handling. Coarser perlite holds larger air pockets and drifts less than fine dust.
Pumice
Pumice is a porous volcanic rock. It's heavier, so it tends to stay put and adds ballast that can help steady a top-heavy plant, and its internal pores hold some water and air. It's more abrasion-resistant than perlite but not truly indestructible. Fines can still form with handling.
Which to Use
Pumice is a good choice if you can source it, especially for a large Frydek that might tip.
Coarse perlite is a cheaper, lighter alternative when weight matters, such as in a hanging basket, or when the budget is tight. Rinse either material before use to remove dust.
Handling Safety
Dry perlite and pumice produce fine dust that you shouldn't breathe. Work in a ventilated spot, dampen the material or rinse it before handling, and consider a dust mask and eye protection. Check the product's safety data sheet if in doubt.
Coarse Horticultural Perlite
Fine garden-center perlite is small enough that it can behave more like sand in a chunky mix, so a coarser grade tends to hold open more air space.
Rinse off the dust before you use it (see the mixing section below).
Mother Earth Coco and Perlite Mix
Mother Earth Coco + Perlite Mix is a ready-made moisture-retentive base, not a bag of standalone coarse perlite. Do not use it for the aeration portion of the recipes below, because it also adds coir. Use it as the base of a simpler mix, or choose single-ingredient coarse perlite to follow the recipes as written.
3.4 Horticultural Charcoal
A quick clarification first. Horticultural charcoal is not automatically the same thing as activated carbon.
Activated carbon is charcoal that has gone through an extra activation step to develop a large, adsorptive pore structure to a specification.
A bag labelled horticultural charcoal may or may not be activated, and the properties of charcoal and biochar (pH, surface area, how much they adsorb) vary a great deal with the feedstock and how they were made.
Possible Adsorption
Porous chars can adsorb some compounds. But they don't reliably strip out excess fertilizer salts on demand, and some chars can also tie up nutrients (phosphate, ammonium) or trace elements you actually want. So don't count on charcoal as a salt filter (manage salts with correct fertilizer dilution, water quality, free drainage, and, ideally, an EC/runoff check).
Microbial Habitat
The porous surface can host beneficial microbes, which is a reasonable reason to include a small amount.
pH Effects
Effects on pH are not one-directional. Many chars are alkaline, so sweetening the soil isn't always a benefit. In already-alkaline water or media it can make micronutrient lockout worse. If pH matters to you, measure it.
3.5 The Biology (Worm Castings)
Worm castings (vermicompost) are the one soil-like ingredient worth adding, as a small nutrient-and-biology amendment.
Nutrients and Microbes
Castings have a high cation exchange capacity, so they hold nutrients and release them slowly, and they introduce microbial life that helps break organic matter down into forms the plant can use. A little goes a long way.
Pest-Control Claims
You'll see claims that castings suppress fungus gnats and root aphids by breaking down their exoskeletons (via chitinase). Some studies have found vermicompost can influence plant health and, in places, pest or disease pressure, but that's not a guarantee that any given bag will control an active infestation, and it doesn't replace proper pest management (letting the top dry out, sticky traps, and labelled biological or insecticidal controls). Don't add extra castings expecting them to fix a gnat problem.
Wiggle Worm Castings
Wiggle Worm castings are a straightforward pure-castings amendment that adds biology and slow-release nutrients your inert perlite and bark don't provide.
Note that pure castings or an organic certification doesn't by itself prove a product is free of weed seeds or pathogens (worm composting, unlike hot composting, doesn't reliably kill those) so if you're cautious, use a reputable bagged product rather than unknown backyard compost.
4. Building a Recipe for Your Conditions
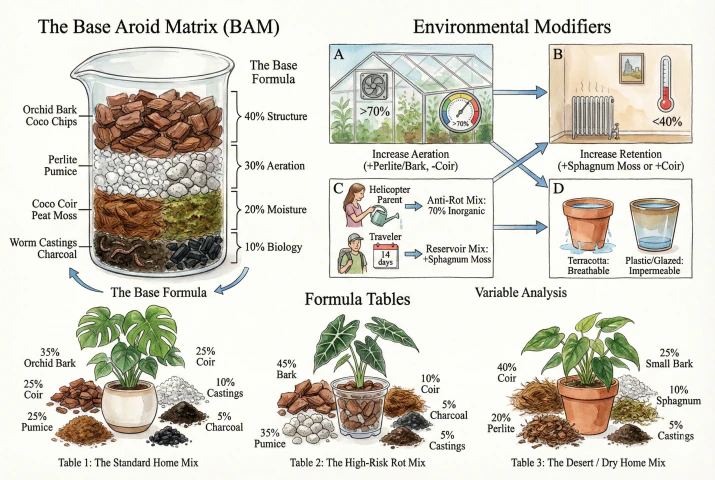
There is no single correct recipe. What works depends heavily on your environment, your pot, and your watering habits.
A retentive recipe suited to a humid greenhouse can stay too wet elsewhere, and the same mix in a very dry, heated room may simply dry out faster.
Whether that leads to problems depends on light, temperature, pot, and watering, so it's worth adjusting the mix to your conditions rather than assuming one recipe transfers.
The approach here is a base formula that you nudge with a few environmental adjustments.
4.1 The Base Aroid Matrix (BAM)
A general aroid-mix demonstration (Sydney Plant Guy). It shows the kind of chunky mix discussed here for aroids broadly. It isn't a test of the specific Frydek percentages or air-space targets below.
This is a starting point for a middling environment (say, around 50% humidity and about 70°F). Adjust from here.
40% Structure
Orchid Bark with medium chunks plus coco chips.
30% Aeration
Coarse perlite or pumice.
20% Moisture
Coco coir or peat moss such as PRO-MIX HP.
10% Biology
Worm castings plus charcoal.
4.2 Adjusting for Your Conditions
Look at how fast a pot dries in your space, which is driven mostly by temperature, humidity, airflow, and light.
The adjustments below are in percentage points of the whole mix, and they're rough starting points (verify by watching how your particular pot actually dries down, not by the numbers alone).
Variable A. Humidity & Airflow
The Situation
High humidity (say above 70%) generally slows transpiration, so the plant pulls less water and the soil stays wet longer.
The Adjustment
Lean toward more aeration so gravity does more of the drying. As a starting point, add around 10–15 percentage points of coarse perlite/pumice and take the same amount out of the coir, then watch how it dries.
Variable B. Temperature & Heating
The Situation
Low humidity (below ~40%) with indoor heating speeds up drying from both the soil surface and the leaves (the zone where you tend to see crispy edges).
The Adjustment
Lean toward more retention for a bit more buffer. Add some chopped sphagnum moss, or increase coir by roughly 10–15 percentage points.
Variable C. Watering Habits
- If you tend to water frequently (or worry you overwater). Lean toward the anti-rot end. Cut back the water-holding sponge and go heavily inorganic (something like 70% pumice/lava rock, 30% organic) so the mix holds less water and dries faster. This is more forgiving of frequent watering, but it doesn't make overwatering impossible. Pumice, lava, and perlite still hold some water, and any mix can stay saturated if the pot has no drainage hole, sits in a full cachepot or reservoir, is much larger than the root ball, or lives somewhere cool and dim. Free drainage and a sensible pot size matter as much as the recipe. (Judge watering by how dry the mix actually is, by weight or a moisture check, not by a fixed number of days, since a small terracotta pot and a large plastic one behave very differently.)
- If you tend to water infrequently or travel a lot. Lean toward the reservoir end. Adding chopped sphagnum moss (around 15%) increases water storage. Sphagnum can hold many times its dry weight in water, though how much extra plant-available water that gives a 15% blend depends on the moss grade and how it's packed.
Variable D. Pot Material
Terracotta
Porous terracotta loses some water through the walls, so soil tends to dry faster. The effect varies with wall thickness, any coating, and whether it sits in a saucer. Lean toward the drier end of your options.
Plastic and Glazed Ceramic
Their walls do not breathe, so they hold moisture longer than terracotta. Lean toward the wetter end.
Glass and Other No-Drainage Vessels
The bigger issue here is usually drainage, not wall porosity. A glass jar or cachepot with no drainage hole can leave water standing at the bottom, and clear containers add their own problems such as algae and roots exposed to light. If you use one, either add drainage or water very sparingly and pour off any excess. The pot material chart matters far less than whether water can actually leave.
In practice, whether the pot has a drainage hole matters more than what it's made of.
4.3 Ready-to-Use Recipes
Here are three starting recipes. These tables are the ones to follow (the earlier graphic is a rough illustration only).
Measurements are by volume (e.g. Scoops), not weight, and they're starting points (the real air-and-water balance of any mix depends on your exact ingredients and pot, so watch how it drains and dries and adjust).
Recipe 1. Balanced (avg temp 68-75°F, 40-50% humidity, plastic or ceramic pot)
| Component | Share |
|---|---|
| Orchid bark + coco chips (structure) | 40% |
| Coarse perlite or pumice (aeration) | 30% |
| Coco coir (moisture) | 20% |
| Worm castings + charcoal (biology, buffer) | 10% |
Recipe 2. High-Risk Rot (high humidity above 60%, low light, plastic pot, or a chronic over-waterer)
| Component | Share |
|---|---|
| Pumice or lava rock (inorganic ballast) | 50% |
| Orchid bark | 20% |
| Coarse perlite | 15% |
| Coco coir | 10% |
| Worm castings + charcoal | 5% |
Recipe 3. Dry Home (humidity below 40%, high airflow/HVAC, terracotta, or a chronic under-waterer)
| Component | Share |
|---|---|
| Orchid bark + coco chips | 35% |
| Coco coir | 30% |
| Chopped sphagnum moss (reservoir) | 15% |
| Coarse perlite or pumice | 10% |
| Worm castings + charcoal | 10% |
5. Feeding (Nutrients, Hyponex, and Micronutrients)
Fertilizers aren't just additives you dump in. They change the chemistry of your soil solution, so it helps to understand how your mix handles them.
5.1 The Hyponex Factor (Managing Salt Buildup)
Hyponex Fertilizer
The Japanese liquid concentrate (原液) with an N-P-K of 6-10-5 is a quick-acting complete fertilizer at roughly pH 6–7 and is popular among aroid growers.
Its P number (10) is higher than its N and K.
- On the phosphorus. Phosphorus is genuinely essential for energy transfer (ATP) and root development, so it's a useful nutrient. But it's a myth that piling on extra P builds the corm when the plant already has enough. Beyond meeting the plant's need, more phosphorus doesn't force bigger corm growth, and there's no Alocasia-specific trial showing a high-P feed is superior here. Choose a fertilizer based on the plant's actual needs, not on chasing the biggest P number.
- The real risk is salt buildup. Any concentrated fertilizer adds dissolved salts to the soil solution. It's not true that all synthetic fertilizers have a high salt index. Salt index varies a lot by formulation (for example, urea and ammonium nitrate sit much higher than monoammonium phosphate). What matters in practice is not over-concentrating the feed and not letting salts accumulate.
The mechanism If the salt concentration in the soil solution rises above the concentration inside the root cells, water moves out of the roots rather than into them. This osmotic effect can damage root tips. It is not reverse osmosis.
- The danger. In a retentive, coir/peat-heavy mix, salts can concentrate as the soil dries out. Brown, crispy leaf tips can be a sign of this, though tip burn has other causes too (low humidity, inconsistent watering), so confirm with the pattern of symptoms rather than assuming.
The Adjustment
If you feed regularly with a concentrated fertilizer, make the pot easy to flush.
- Keep it free-draining. A slightly more porous mix (a bit more coarse perlite or pumice) lets you run water through the pot to rinse out accumulated salts. A drainage hole is the non-negotiable part.
- Don't rely on charcoal as a salt sponge. As noted above, charcoal doesn't dependably remove fertilizer salts, so there's no evidence-based reason to double it to a fixed percentage. The more reliable levers are diluting the fertilizer correctly, watering with reasonable-quality water, and flushing when buildup actually shows up.
Hyponex 6-10-5 is a real, complete liquid feed from Japan that some growers seek out. It can be hard to source outside Japan, so treat it as optional.
If you use it, follow the manufacturer's guidance rather than a made-up schedule. The official houseplant instructions are to dilute it heavily (on the order of 500×) and feed about once a week, starting a couple of weeks after potting.
Whatever fertilizer you use, watch for salt buildup and flush the pot when it appears, adjusting frequency to what you actually see rather than a fixed calendar.
5.2 Micronutrients and pH (A Note)
A common follow-up question is about micronutrient supplements. The general chemistry here is real. Micronutrients like iron become less available as pH climbs, and a plant grown in alkaline conditions (roughly above pH 7) can show interveinal chlorosis, yellowing between green veins, when iron drops out of solution.
Chelated forms of these nutrients (for example EDTA- or DTPA-chelated iron) stay available across a wider pH range, though the two chelates aren't interchangeable and each holds up over a different pH band.
Agromix can refer to different soils, base media, or supplements depending on the maker, so no single dose or add-peat fix applies to every product. If you suspect a micronutrient issue, check your water alkalinity and root-zone pH and EC first, then choose a labelled product and follow its rate. Interveinal chlorosis is not specific to iron. Magnesium or manganese shortages, root damage, and pH or EC problems can look similar.
An Alocasia repotting and mix demonstration (All the Plant Babies). It's a helpful walkthrough of the general process, not evidence for any specific micronutrient or pH claim above.
6. Mixing It Properly
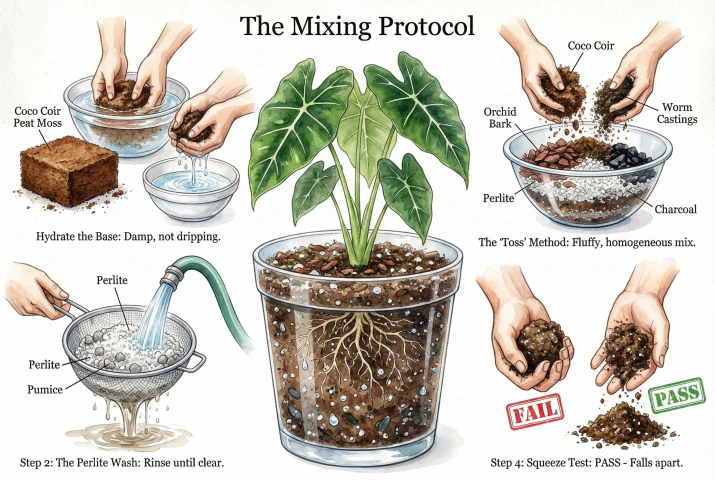
How you combine the ingredients matters. Mixing them evenly, rather than layering them, gives a more uniform root zone.
If you just tip separate dry ingredients into a pot in layers, you can end up with fines concentrated in one band and coarse bark in another, which makes for uneven wetting and drainage.
Tossing everything together avoids that.
Step 1. Hydrate the Base
Pre-wet your coir or peat before mixing. Both can be hard to wet when they're bone dry and compressed, peat in particular tends to repel water when fully dried, so if you pot into dry material and then water, the water can channel around the root ball instead of soaking in.
- Action. Soak your coir/peat in warm water until fully expanded. Squeeze it out until it's damp like a wrung-out sponge, not dripping.
Step 2. The Perlite Wash
Perlite (and pumice) usually come coated in fine dust. That dust doesn't just make a mess. Those fines can settle into and clog pore space, reducing aeration.
Rinsing also keeps the dust out of the air when you handle it.
- Action. Put your perlite/pumice in a sieve and rinse with water until it runs clear. You want the chunks, not the fine powder.
Step 3. The Toss Method
- Action. Mix the Bark, Perlite, and Charcoal first. Then add the moist Coir/Peat and Worm Castings. Use your hands to toss it like a salad. You want a fluffy, homogeneous mix where the organic matter coats the chunks, bridging the gaps without filling them.
Step 4. The Squeeze Test (a rough texture check)
This is a quick screening check, not a measurement. It tells you something about texture and moisture, but it does not measure air-filled porosity, water-holding capacity, or how much oxygen actually reaches the roots.
- Action. Grab a handful of your final mix. Squeeze it firmly. Open your hand.
If it stays in a tight, muddy ball. It's probably leaning too fine/retentive (consider adding more bark or coarse perlite/pumice).
- If it mostly breaks apart into a loose, crumbly pile. It's on the chunky, open end, which is what you want.
Because the result depends on how wet the mix is and how hard you squeeze, use it as a sanity check only.
If you want a real sense of a recipe's air and water balance, measure it. Pack a known volume, saturate and let it drain, and compare the drained water against the container volume to get a rough air-space and water-holding figure for that mix in that pot.
Reading the Soil
If your Frydek starts struggling, work through the likely causes symptom by symptom. In every case, actually check the roots and the drainage before you commit to a fix. The same symptom can have different causes.
Symptom. Lower Leaves Are Yellowing While the Soil Stays Wet
- Check. Is the pot draining? Is it much bigger than the root ball? Is it cool and dim (so the plant uses little water)? Slide the plant out and look at the roots. Firm and pale is fine. Brown, soft, or foul-smelling is a bad sign.
- Possible causes. An airless/too-retentive mix, an oversized pot, poor drainage, or root rot already underway.
- Action If the roots look healthy, improving drainage and letting the mix dry further may be enough. Mushy roots with an off smell point to rot. Remove dead tissue with a clean, sterilized tool, inspect the corm, and repot into a fresh, open mix such as the High-Risk Rot recipe. Do not repot from the wet-soil symptom alone without inspecting the roots.
Symptom. Water Runs Through While the Root Ball Stays Dry
- Check. Is the mix very chunky, or has the coir/peat dried out and gone water-repellent?
- Possible cause. Channeling. Water races past large chunks or around a dried-out core without wetting it.
- Action. Rehydrate by bottom-watering (stand the pot in water until the surface feels moist, then drain fully). Longer term, a slightly finer mix (more like the Dry Home recipe) helps bridge the gaps.
Symptom. Crispy Leaf Tips and a Whitish Mineral Crust
- Check. Have you been feeding a concentrated fertilizer, or is your water hard? Low humidity and erratic watering can cause tip burn too, so weigh those in.
- Possible cause. Salt buildup in the mix.
- Action. Flush the pot (run tepid water through the soil until a good volume has passed and drained away) and revisit your fertilizer dilution. How often you need to do this depends on your feeding, water, and mix, so go by what you see rather than a fixed schedule.
A Simple Summary
Don't agonise over exact ratios. Focus on the structure and what each ingredient does.
- Bark gives the mix its chunky framework.
- Perlite/pumice keeps air pockets open.
- Coir/peat holds the water.
- Charcoal adds some porous surface for microbes (and possibly minor adsorption).
- Worm castings add a little slow-release nutrition and biology.
In a humid, slow-drying setting, lean toward more aeration (bark, perlite/pumice). In a dry, fast-drying one, lean toward more retention (coir, a little sphagnum).
And whatever the recipe, make sure the pot drains freely and isn't far too large for the plant.
A Frydek does better in an open, airy mix than in dense, compacted potting soil. Give it air and chunky structure, watch watering and drainage, and adjust from how the pot actually dries.
Keep pH and Additives Secondary
Organic components help a mix retain some nutrients, but they do not lock the root zone to a fixed pH or protect a plant from overfeeding. If pH or micronutrient availability is a persistent concern, measure the root zone and your water rather than adding amendments by habit.
Silica is optional, not a proven Frydek treatment for stronger stems or pest resistance. If you use potassium silicate, follow its label, remember that it is alkaline, and do not mix it directly with an acidic fertilizer unless the product instructions allow it.
That's the whole approach. Understand what each ingredient does, aim for an open and well-draining mix, tune the balance to your environment and pot, and adjust based on what your plant actually does.
Test rather than assume, and you'll keep your Green Velvet Alocasia in good shape.
Affiliate Disclosure
This article contains Amazon affiliate links. As an Amazon Associate I earn from qualifying purchases. If you use these links, the site may earn a commission at no extra cost to you. Product availability, price, and specifications can change. Check the current listing before buying.