
Staghorn Fern Mounting Guide: Shape, Care, and Materials
Mount a staghorn fern securely and upright. Choose a rot-resistant board and sphagnum, tie the root ball, then water and feed the finished mount.
Elena Vargas · Published 2025-12-22 · 20 min read
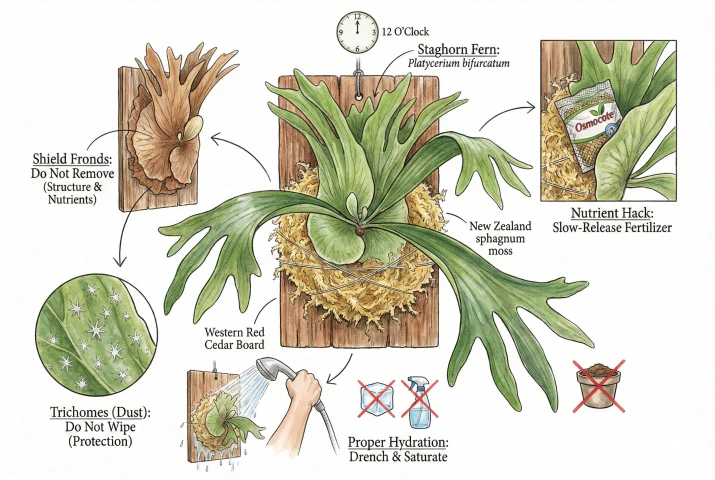
Key Takeaways
- Mounting suits the fern’s epiphytic habit because a board with sphagnum moss lets the rhizome breathe. A young plant can also grow in a well-drained container. What matters is an airy, fast-draining medium, not the shape of the support.
- Mount the plant upright, with its active growth point at the top and unobstructed. Keeping the natural upper side up helps new fronds fan out rather than reorienting later.
- Leave the brown shield fronds and the white fuzz alone. The papery shields form the plant’s structural mound and nutrient trap, while the white trichomes help with moisture and sun and do not regrow on a mature frond once rubbed off.
- Water by deep soaking rather than light misting. Drench the moss and shield fronds until saturated to keep the fronds turgid. A quick mist mainly raises humidity and will not hydrate the root ball.
- Feed sparingly with a balanced fertilizer and follow the product label. A diluted liquid feed or a modest amount of slow-release pellets in the medium can work. Skip whole banana peels, which invite pests and mold.
Why Mounting Works
Most people buy a staghorn fern after seeing a mounted one (a gravity-defying, antler-like plant fanning off a wall).
It looks architectural and a little prehistoric, and it’s the reason mounting is so popular.
Then the plant you bring home from the garden center is usually a young fern in a plastic pot.
The fronds may droop, and the base can look like a pile of brown, papery leaves. Some of that is normal (those brown shields are supposed to be there). Some of it is a sign the plant wants more light or a better-draining medium.
Or perhaps you tried to mount it and the new fronds came in twisted, because the plant was set at an odd angle and had to reorient toward the light.
Mounting Versus Potting
Staghorn ferns are epiphytes. They grow perched on trees rather than in the ground, anchoring to bark and drawing moisture from rain and humid air. That is why mounting works so well.
It is not the only option, though. A small plant can grow perfectly well in a well-drained container.
What the fern needs is airy, fast-draining conditions and enough light, whichever support you choose.
What Makes a Mount Successful
A successful mount keeps the roots airy, the active growth point upright and unobstructed, and the finished wet weight securely supported.
How Anatomy Shapes the Mount
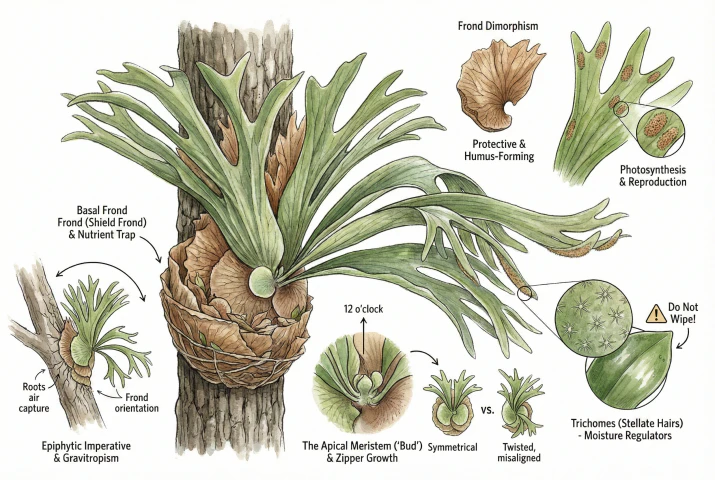
Before you grab a board, some line, or a watering can, it helps to understand the plant’s anatomy.
A staghorn fern behaves differently from a typical potted houseplant, and a few of its features drive both its health and its shape.
Anatomy and evolutionary history strongly influence the plant’s form, though light, water, age, and growing conditions matter too.
The Epiphytic Habit and Orientation
Platycerium species are epiphytes, meaning they grow upon other plants (from the Greek phyton, plant) but are not parasitic.
The genus is native to tropical and subtropical regions of Africa, Asia, and Australia, with one species in South America (Peru–Bolivia). Individual species anchor to tree branches or rock faces.
This creates two practical needs, good drainage and an upright orientation.
Airy Root Zone
First, their roots do best in airy, fast-draining conditions rather than heavy, waterlogged medium.
They absorb moisture from rain runoff and humid air while getting plenty of air around the roots.
A dense, constantly wet medium can starve the roots of oxygen. Note this is about drainage and aeration, not the pot itself. A coarse, well-drained container mix can also work for a young plant.
Poor growth in soil usually traces to a fine, compacted, or perpetually soggy mix, not to being potted.
Upright Orientation
Second, the plant responds to gravity (gravitropism) and light (phototropism). Positioned upright, the shield fronds catch debris falling from above, while the fertile fronds arch outward.
Mount it sideways or upside down and new fronds will tend to reorient toward the light, which can leave the display looking twisted rather than fanning cleanly.
Shield and Antler Fronds Have Different Jobs
To care for the plant, it helps to distinguish its two frond types. The staghorn fern is dimorphic. It produces two different kinds of leaves with distinct primary roles, though both can photosynthesize while green.
The Basal Frond (Shield Frond)
This is the flat, round, kidney-shaped leaf at the base of the plant. To the uninitiated, this often looks like the dead part of the plant because it turns brown and papery as it matures.
Protection and Nutrient Trap
The shield frond protects the rhizome and roots from desiccation and physical damage. It also catches leaves, insect carcasses, and bird droppings, which decay into humus directly against the roots.
Species Differences
In Platycerium bifurcatum shield fronds form a low mound, while in Platycerium superbum successive shields build a tall, upright catch-basin. Leave brown shield fronds in place because they still protect the rhizome and trap litter and water. A soft or slimy shield is a separate rot problem, not routine cleanup.
The Foliar Frond (Fertile/Antler Frond)
These are the long, green, bifurcated (forked) leaves that extend outward.
Photosynthesis and Reproduction
The foliar fronds do much of the photosynthesis and handle reproduction. Brown, fuzzy patches on the underside of mature tips are sporangia, clusters of spores used for reproduction, not pests.
Light and Frond Shape
In low light, fronds tend to grow long, strappy, and droopy as they reach for the sun. In brighter, indirect light, they tend to stay more compact and upright, giving the classic antler look. Species, age, and watering affect the outcome too, so treat this as a tendency rather than a fixed rule.
On the selective advantage of coloniality in staghorn ferns (Platycerium bifurcatum)
The Growth Point
The staghorn fern grows from a central point on the rhizome, the apical meristem or bud.
New fronds unfurl from this point, and the plant has a natural upper side, the direction its recent fronds and shield lobes point.
Mounting the plant so that growth point sits at the top, with its natural upper side up, gives new fronds a head start toward a clean, upright fan.
If you mount it sideways, new fronds often reorient toward the light, which can leave the display looking twisted.
This is a practical orientation cue rather than a precise botanical law. Exactly how much a misaligned plant twists depends on the plant, the light, and the species.
So, when you mount, keep the active growth point up and unobstructed. There is no need to hit an exact clock position (just identify the upper side and keep new growth free to expand).
Do Not Rub Off the Trichomes
If you look closely at the green fronds, you will see they are covered in a fine, white fuzz or dust. These are trichomes, or star-shaped hairs.
They help reduce water loss by holding a layer of humid air against the leaf surface, and they are generally thought to help shade the leaf from strong sun.
As a practical rule, avoid wiping the leaves to clean them. Rubbing removes the trichomes from a mature frond, and they do not grow back on a leaf that has already expanded.
A leaf stripped of its trichomes loses that protective layer, so it’s better to leave the fuzz intact. If the plant is dusty, rinse it gently rather than wiping.
How to Mount a Staghorn Fern
If you want the mounted look, you move the plant from a pot onto a vertical board or slab. This lets the fronds drape and arch naturally.
Work gently (you are handling live roots and fronds) and take your time.
Plan for the Wet Weight
A mature, watered mount can be heavy, and it will hang over whatever is beneath it. Root-zone materials are selected for moisture and decay resistance. They are not substitutes for engineered wall hardware.
Use a board and fasteners rated for the wet load, hang from a wall stud or an approved anchor, avoid positions over people, pets, or electronics, and inspect the assembly periodically.
Choose Mounting Materials
Long-fiber sphagnum moss
Long-fiber sphagnum moss (LFSM) is the usual mounting medium. It is different from the decorative sheet moss or preserved Spanish moss sold for crafts, some of which is preserved or dyed and not meant to hold water. Check the label if you are unsure.
A premium long-strand grade suits one small or medium mount, because long strands make the root ball easier to wrap. Skip it for decorative top-dressing, a mount that only needs a larger board, or a watering routine that keeps any moss constantly saturated.
The Besgrow manufacturer card below documents one Premier New Zealand Sphagnum cristatum grade with at least half its strands 150 mm or longer, low soluble salts, pH around 4.8, and water-holding up to about 20 times dry weight. Those figures describe that product grade, not all long-fiber moss. Species, strand-length definition, compression, and expanded yield still differ by supplier and lot, so read the exact package. High water retention is not protective. Even premium moss can rot the crown if the mount stays saturated and poorly aerated.
Ties to hold the plant to the board
You need something to hold the plant against the moss until it roots in. Options include wide plastic or nylon strips, nylon stocking/pantyhose, or non-copper wire.
UF/IFAS actually suggests pantyhose over monofilament or wire, because a broad, soft material is less likely to cut into the fronds and it eventually breaks down so it doesn’t girdle the plant.
Monofilament fishing line is sometimes used as a temporary tie, but a thin line can cut into tissue, and it doesn’t decay, so you have to remember to loosen or remove it as the plant grows.
If you use any tie, pick a broad, soft material where you can, run it over the tough brown shields rather than the green fronds, and don’t rely on the plant-to-board tie to carry the load to the wall. That is the job of the board and its wall hardware.
Board or slab
Use a rot-resistant board or slab rated for wet, outdoor-style service and sized to carry the plant’s mature wet weight.
Western redcedar heartwood is naturally decay-resistant (rated resistant to very resistant by the USDA Forest Products Laboratory), which makes it a common choice, though no wood is rot-proof forever.
Cork bark and tree-fern slabs are more naturalistic surfaces. Avoid pine for a permanently damp mount, since it decays faster.
If you use treated lumber, identify the preservative from its current label or end tag rather than assuming. Modern residential treatments (such as ACQ or copper azole) are arsenic-free, and older CCA (which did contain arsenic) was largely phased out of consumer lumber after 2003. When in doubt, a naturally durable untreated wood avoids the question.
Cork bark is the most tree-trunk-like surface but has little water-holding capacity, so pair it with a moss pad behind the root ball. A flat plank is easier for a beginner to secure.
Choose a board thick enough to hold your fasteners without splitting.
Besgrow Spagmoss specification
Mounting Steps
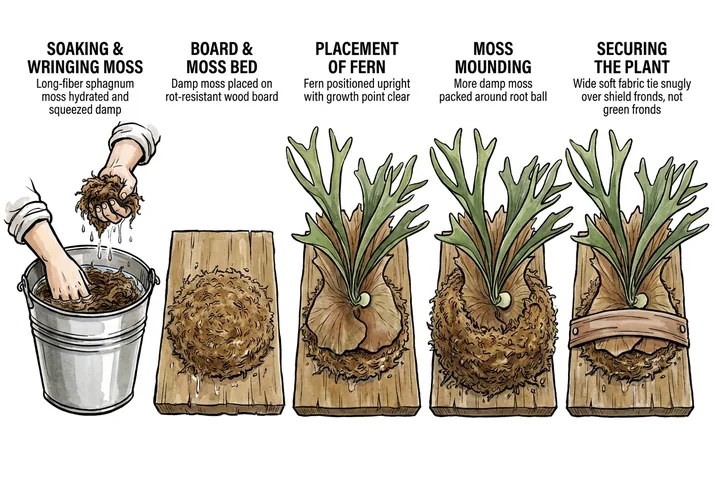
- Hydrate the moss. Soak your long-fiber sphagnum moss in a bucket of water until it is fully wetted (usually 15–20 minutes), then wring it out so it is damp like a wrung-out sponge, not dripping. Very wet, poorly aerated moss is more prone to fungal problems.
- Prepare the board. Lay your board flat and picture where the fern will sit (often slightly below center, to leave room for upward growth). Set a ring of anchor points around where the root ball will go, using fasteners sized for the board so they hold without splitting it or poking through the back. These anchors are only for tying the plant down. The board’s own wall hardware carries the weight.
- Unpot the fern. Remove it from its nursery pot. You will likely find a dense root ball.
- Reduce the medium only as needed. Gently loosen the old mix and remove the portion that is compacted, broken down, or waterlogged so you can surround the roots with airy moss. Keep the healthy roots and the core rhizome intact. There is no need to strip the plant bare, and over-pruning stresses it and can invite rot.
- Separate pups only if you want to (optional). If the pot holds several plants and you prefer a single-specimen look, you can divide them, but this is a propagation choice, not a required step. Use a sterile blade and make sure each division keeps its own roots and fronds.
- Orient the plant upright. Identify the plant’s natural upper side and mount it with the growth point at the top. Recent antler fronds tend to emerge with the V facing up or out, and the top of a shield frond often has lobed fingers while the bottom is rounder. You do not need a precise angle. Keep the active growth point up and unobstructed. On a multi-pup colony this axis may be less obvious, so use the overall upper side.
- Build the moss bed. Place a bed of damp moss on the board where the plant will sit.
- Set the plant and pack moss. Place the fern on the moss with the orientation from step 6, then pack more moss around the root ball. Tuck moss behind loose shield fronds, or over the root ball if the shields are small, to build a mound. Keep the central growth point uncovered so it gets light and air.
- Tie it down. Anchor your tie at one point, then work it across the plant from anchor to anchor. Run ties over the tough brown shield fronds, which help hold the plant, and avoid pinning down the green antler fronds. Snug it firmly enough that the root ball stays in solid contact with the moss, but not so tight that the tie bites into the tissue. You want secure, not cutting. Finish by tying off the tie, and plan to check and loosen it as the plant grows so it never girdles the rhizome.
Comparison of Mounting Substrates
| Substrate | Water holding | When to replace | Notes |
|---|---|---|---|
| Long-fiber sphagnum (e.g. NZ) | Very high (manufacturer reports up to ~20x its weight) | Replace when it compacts, breaks down, smells off, or roots look unhealthy | Mildly acidic. The usual mounting medium. Rehydrate and loosen before use. |
| Peat moss | High | Watch for compaction over time | Can be used as a root medium (extension guidance lists sphagnum or peat), but it compacts and holds water, so keep the mount well-drained and aerated. |
| Coco husk / chips | Moderate. Drains fast | Replace when it breaks down or compacts | Inexpensive in bulk, less acidic than sphagnum. May need more frequent watering. |
| Cork bark slab | Low (surface only) | Long-lasting. Replace if it degrades | Most naturalistic surface. Pair with a moss pad behind the root ball. |
| Tree-fern panel | Moderate to high | Long-lasting | Good rooting surface but often pricey, because some tree-fern is harvested from wild or protected species, check the species, origin, and that it is legally and sustainably sourced (some are CITES-listed). |
| Decorative sheet / preserved moss | Low | Not applicable | Meant for decoration. Use only as a top dressing, not as the water-holding medium. |
Replacement timing varies with how tightly the medium is packed, how often you water and feed, and your climate, so judge by feel, smell, and root health rather than a fixed calendar. The sphagnum replacement guide gives a closer look at those warning signs.
Care After Mounting
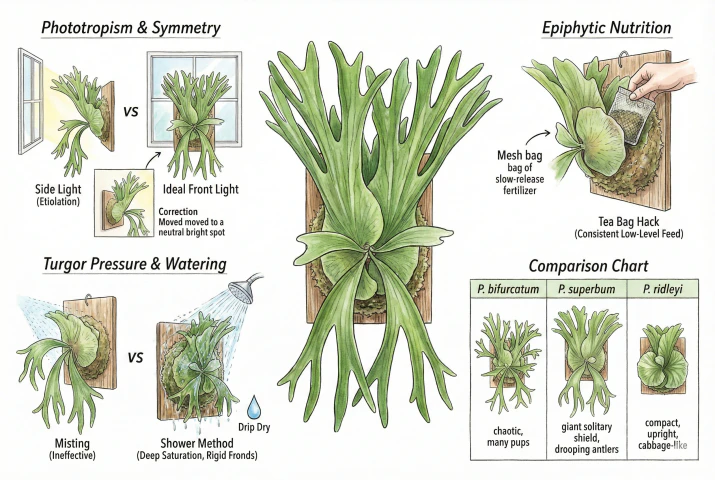
Once the plant is mounted, the main ongoing tasks are light, water, and feeding.
Manage Light Direction
Staghorn ferns are phototropic. Their fronds grow toward the light.
- If you hang your fern on a wall beside a window, the light hits it from one side and the fronds tend to bend and grow toward the window, leaving a lopsided plant. If light is also too dim, fronds may stretch and thin out. That is etiolation, a separate low-light response.
- Rotating a wall mount every few days is not very practical, so it is easier to manage the light source and placement.
Placement matters. A wall facing a large window and receiving bright, indirect light head-on encourages more even growth.
Distance matters too. A spot that is directly across from the window but far into the room may be too dim, so check that the fern actually gets bright light for a good part of the day.
- If side lighting is your only option, a supplemental grow light placed in front of or above the fern can help even out growth over time. Species form and the plant’s response to gravity still play a role, so think of this as improving symmetry rather than guaranteeing a perfectly upright plant.
Water the Whole Root Ball
Watering a mounted fern is different from watering a pot. A pot holds a reservoir of water, while a well-drained board sheds free water and the moss holds the rest.
Sphagnum still retains a lot of water, so the mount stays damp after excess drains.
- A quick mist mainly raises humidity for a short while and does not saturate the root ball. To keep fronds turgid, the moss and roots need to be thoroughly wetted. Misting can supplement humidity, but it is not a substitute for real watering.
- To water, take the board down, set it in the shower or a bathtub, or take it outside, and run lukewarm water over the shield fronds and moss until the root ball is thoroughly wetted and heavy. Go by weight and feel rather than a fixed timer. Some species hold water in the crown pocket of the shield, so in cool or still air avoid leaving standing water there for long.
- Let the mount drip until free runoff stops before rehanging it to protect your walls and floors. Then let the medium dry out somewhat before the next deep watering rather than keeping it soggy.
Evolution of the Stomatal Regulation of Plant Water Content
After a thorough soak, I let the mount drain vertically for 30 minutes before weighing it. Thirty minutes clears the fast runoff without turning the check into an all-day drying trial, so later weights start from the same point.
I record that drained wet weight, then insert the same three-millimeter bamboo skewer two centimeters into a marked moss edge away from the rhizome for 60 seconds each morning. I call the mount ready for water when the skewer shows no dark wet line, and I weigh it then. The fixed point and contact time give that individual mount a repeatable dry-end weight instead of a borrowed calendar.
The reference is reset after remounting, adding moss, dividing pups, or a large flush of new shield growth. Seasonal room-humidity changes trigger another check. I never transfer one fern’s target weight to another because board size, moss mass, shield structure, and root volume can outweigh the plant’s own water use.
Feed Lightly During Active Growth
In the wild, staghorns get nutrients from decaying leaves and animal droppings that collect against the shield fronds.
Indoors, they get less of that, so occasional feeding during active growth helps.
- A balanced fertilizer with a roughly 1/1/1 ratio works well. Two common approaches are a diluted liquid feed applied when you water or a modest amount of slow-release pellets worked into the medium. UF/IFAS guidance suggests following the product label and feeding young plants more often than mature ones.
- Follow the rate on your product’s label rather than a fixed spoonful, and distribute pellets through the medium rather than concentrating them in one spot against the plant, where trapped moisture and a high salt concentration could cause a burn. Slow-release pellets release faster in warm, wet conditions, so the amount reaching the roots varies with temperature and watering rather than staying perfectly constant.
Choose a Species That Fits the Space
| Species | Growth habit | Relative difficulty | Notes |
|---|---|---|---|
| P. bifurcatum | Clustering / colonial | More forgiving | Produces many pups and forms a full clump over time. Commonly grown and a common starting species. |
| P. superbum | Solitary / large | Less forgiving | Does not produce pups. Builds a series of tall shield fronds into a large upright nest, with long drooping antlers. Sensitive to overwatering. |
| P. ridleyi | Compact / upright | More demanding | Smaller, with upright, tightly clustered fronds. Generally considered a species for more experienced growers. |
Difficulty is a general impression from grower experience, not a measured rating, and depends on your climate and setup.
Staghorn species differ in size and growth habit, so choosing one that suits your space is a big part of the result.
Staghorn Mounting FAQ
Three popular shortcuts can undermine an otherwise sound mount.
Should I feed a staghorn fern a banana peel?
Why Raw Banana Peel Causes Problems
It’s better to skip the raw peel.
Bananas do contain potassium, but tucking a raw peel into your fern isn’t a good way to deliver it.
As the peel decays it tends to attract ants, fruit flies, and fungus gnats, and it can grow mold sitting against the plant.
Raw peel also isn’t a balanced source of nutrients. Its potassium becomes available only gradually as it breaks down, and it’s low in the other nutrients the plant needs.
Use Balanced Fertilizer Instead
Use a balanced fertilizer (a diluted liquid feed or slow-release pellets), following the label.
If you want to use banana peels, compost them properly first and use the finished compost, rather than laying raw peel on the plant. If you are dealing with lesions or suspected disease rather than harmless surface mold, use the staghorn fern fungicide guide to diagnose before treating.
Should I water a staghorn fern with ice cubes?
Why Ice Cubes Are Insufficient
It doesn’t suit a mounted staghorn.
Staghorn ferns are tropical or subtropical, though some are hardier than often assumed. P. bifurcatum and P. veitchii can tolerate brief dips to around 30°F, or about -1°C.
The bigger practical problem is volume and coverage. A few ice cubes provide only a small amount of water, not nearly enough to saturate a moss ball, so relying on them tends to leave the mount chronically dry.
There is no good evidence that ice is beneficial here, but the common claim that a 0°C cube instantly ruptures the cells it touches is also overstated. In a controlled study on potted Phalaenopsis, another tropical epiphyte, ice-cube watering did not cause visible cold injury, though those results do not directly transfer to Platycerium.
Water the Whole Root Ball
Water thoroughly with lukewarm water until the whole root ball is saturated, then let free water drain before rehanging.
Should I wipe the white dust off staghorn fern leaves?
Why Wiping Removes Protection
You’d be rubbing off the plant’s protective coating.
That dust is a layer of trichomes, star-shaped hairs that help the plant hold moisture and are thought to shade the leaf from strong sun.
Wiping them off removes that layer, and they do not regrow on a leaf that has already expanded.
A leaf stripped of its trichomes is more exposed, so it’s best left alone.
Rinse Instead of Wiping
If the plant is dusty, rinse it gently rather than wiping, and skip leaf-shine products.
Keep the Mount Stable as It Grows
Growing a healthy, good-looking staghorn fern comes down to working with the plant’s biology.
It’s an epiphyte that grows perched on trees, draws moisture from rain and humid air, and shields its fronds with a coat of fine hairs.
Mounting Checklist
- Give it airy, well-drained roots. Mounting suits its habit, and a well-drained pot can work for a young plant too.
- Mount it upright, with the active growth point at the top and unobstructed, to help new fronds fan out cleanly.
- Water it deeply so the root ball is fully saturated, then let it dry out somewhat before the next watering.
- Leave the trichomes and brown shield fronds alone (they’re part of how the plant protects and feeds itself).
Do that, and a small potted fern can grow into a large, wall-mounted specimen over time. Before you hang one, make sure the board and its wall hardware are rated for the mature wet weight and mounted somewhere a fall wouldn’t hurt anyone.