
Cycas Air Layering: What the 2025 MDPI Study Actually Showed
In a 2025 Marler & Cruz study, every Cycas edentata air layer rooted by exposing peripheral vascular tissue. What the study actually showed, its limits, and safety and legal cautions.
Jordan Cole · Published 2026-06-01 · 27 min read
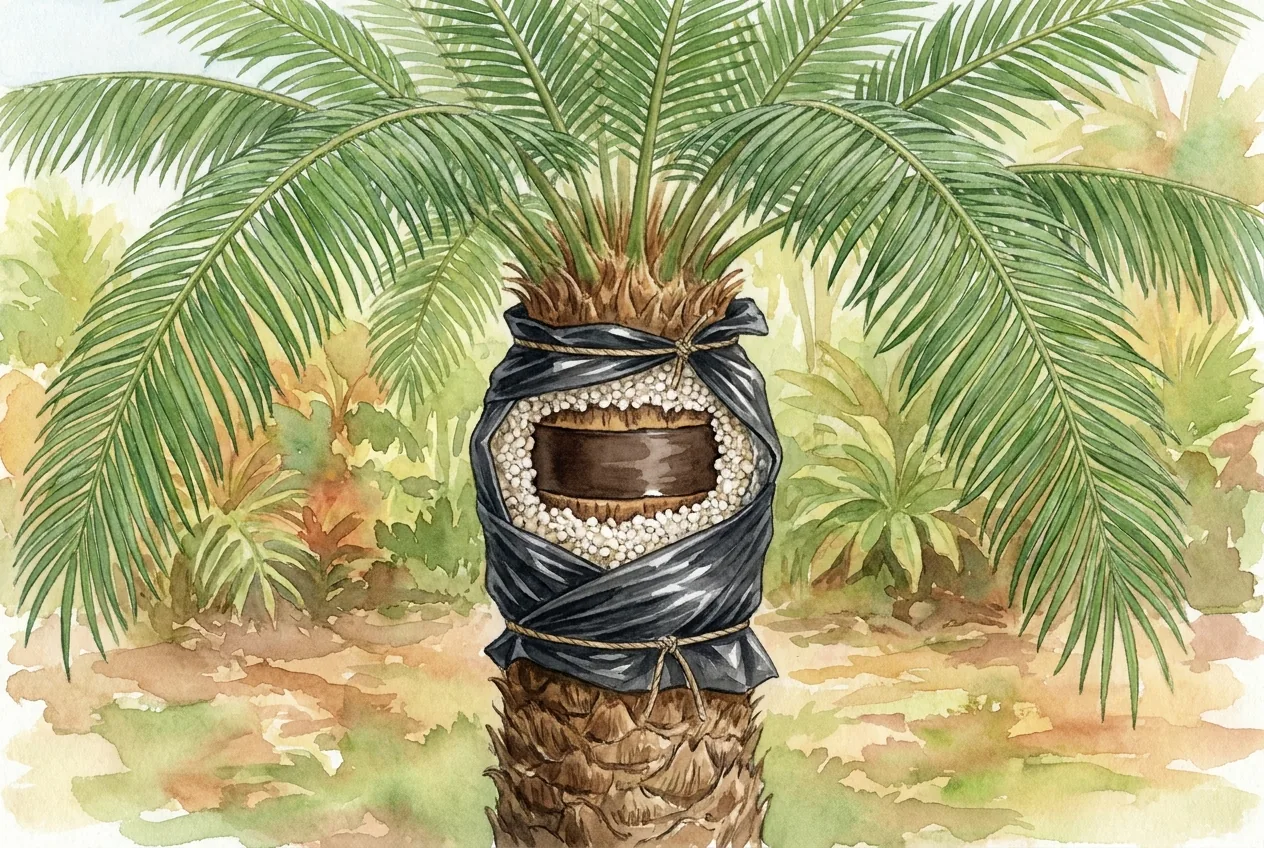
Cloning a trunked Cycas has long been limited to waiting for slow basal pups or decapitating the trunk.
A 2025 study by Marler & Cruz (MDPI Horticulturae 11(7). 814) reported a third option. Every replicate air layer rooted.
That result is real, but it comes from a specific, tightly controlled experiment, so apply it as a study-specific result rather than a validated home recipe.
Read This First
The result comes from one species, Cycas edentata, and a small group of mature plants grown in a tropical ex-situ garden. The tested method used a full sanitation-and-barrier sequence. It sprayed the wound with 10% bleach, applied 3 mg/g IBA, sealed the exposed tissue with commercial pruning sealant, then wrapped a perlite, pumice, and rice-husk medium in black plastic around it.
Do not treat the reported timing or rooting rate as a guarantee for a rare plant, a different species, or a different climate. Get species-specific expert help before cutting a valuable specimen.
Safety, toxicity, and legality (before you cut)
- Cycas tissue contains cycasin, which can cause severe illness or death in animals and is hazardous to people. Keep cut material, sap, and contaminated moss away from children and pets, and dispose of trimmings safely.
- Air layering combines saws, blades, alcohol, and sometimes fungicides, so plan tool and chemical safety before cutting. Wear eye, hand, and dust-level respiratory protection, secure the plant, never mix chemicals, and follow every product label.
- Protected or listed cycads require provenance and permit checks before propagation or trade. Rules differ by species, source, and jurisdiction, and possession is treated separately from trade or collection. Do not collect from the wild.
I rehearse the hand and tool path around the cycad with the blade covered and the plant untouched. Pets, children, loose clothing, and trip hazards are out of the work area before I expose a cutting edge near toxic tissue.
If I cannot reach the proposed layer site while keeping stable footing and control of the tool, I do not improvise the cut. I choose a safer site or seek experienced help.
Before wrapping the prepared area, I photograph it with a scale and date. Later checks can then compare callus and discoloration without repeatedly unwrapping the site just to remember its starting size.
Why are trunked cycads so hard to clone?
A cycad stem is built differently from an ordinary woody tree stem. Its vascular tissue sits in several rings inside a storage-rich core rather than in one continuous cambial ring.
Methods written for ordinary woody trees do not transfer cleanly to a Cycas trunk.
What makes the cycad stem anatomically different?
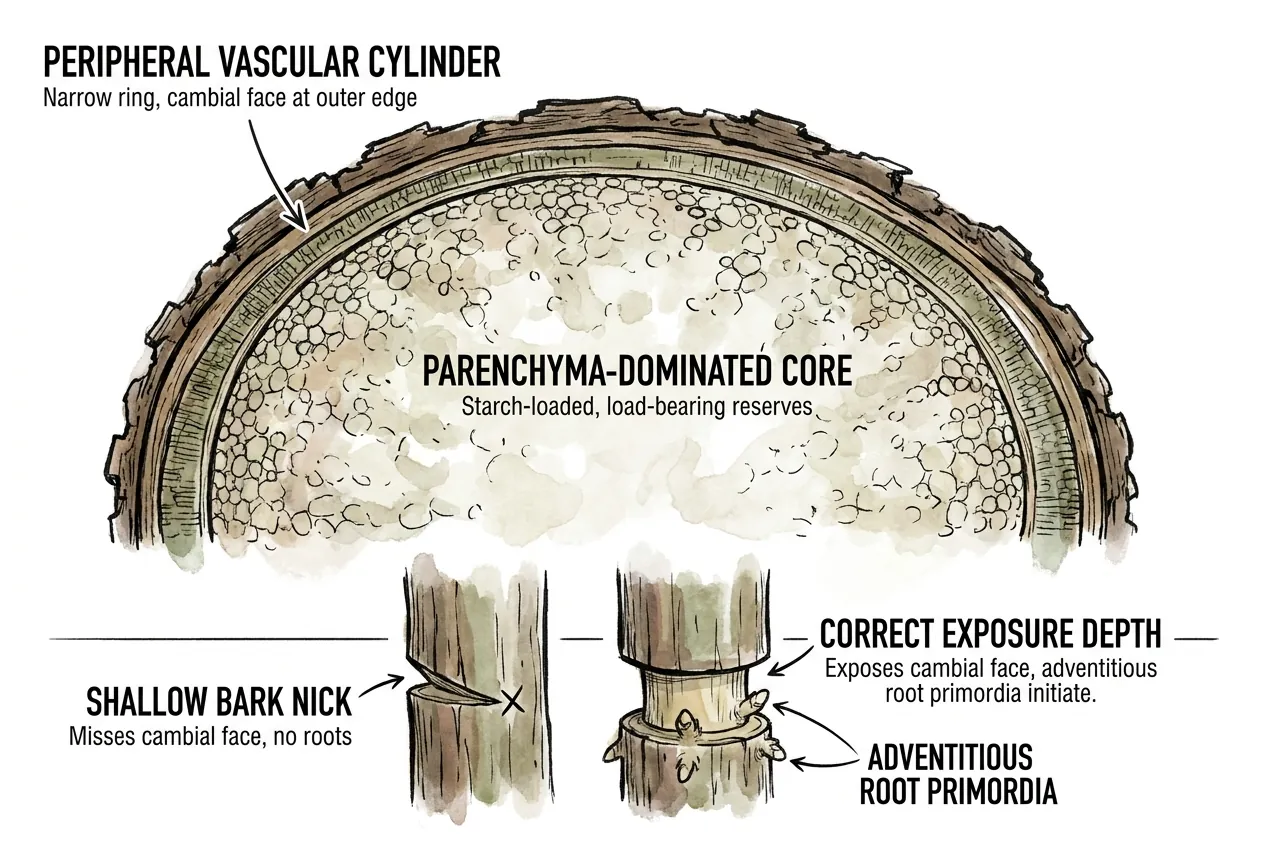
In the experiment, the wound passed through bark and cortex to reach the outer vascular tissue. Roots formed from the upper surface of that exposed tissue while the inner vascular rings and pith remained intact. A shallow bark-only nick does not reach the tested rooting zone.
Choose a healthy, unstressed donor where possible. Cycad stems store carbohydrates, but this study did not prove that stored starch determines rooting success.
Where do adventitious roots actually initiate on a cycad stem?
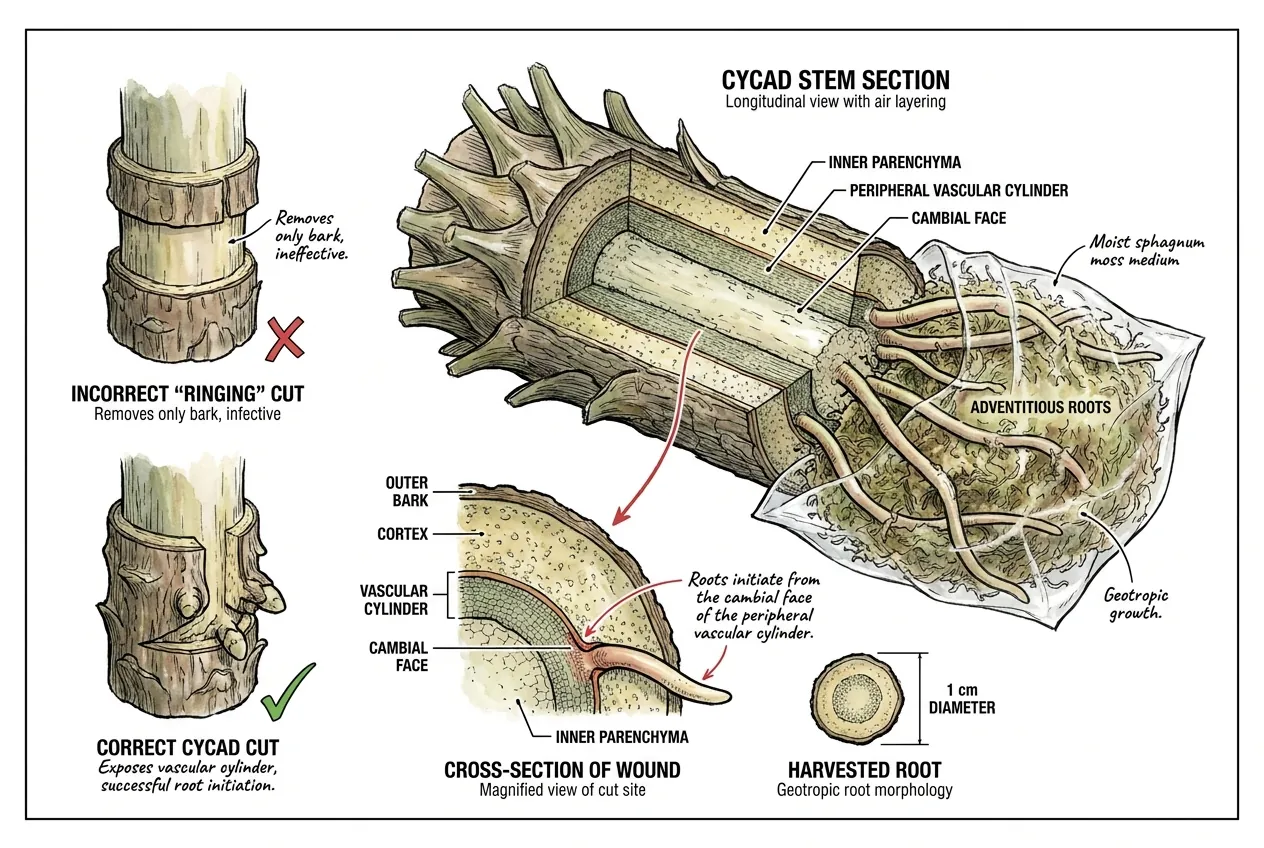
Roots formed from peripheral vascular tissue at the upper wound surface, not from the inner stem. The cut must reach that tissue, while the inner vascular rings and pith should remain intact.
How does the 2025 Marler & Cruz wound-exposure protocol actually work?
The first experiment tested four wound-exposure treatments around the trunk circumference, 90, 180, 270, and 360 degrees, with six replicates each. Every replicate eventually rooted.
Root output scaled with exposure. The 90-degree treatment produced roughly 3–6 roots per layer and the 360-degree treatment roughly 14–19, and total root length differed by about 3.7× between them.
Average length and diameter of the individual roots did not differ between treatments.
What the Paper Actually Did to Every Wound
The study did not root bare wounds. In all treatments the wound was sprayed with 10% bleach and allowed to dry, treated with 3 mg/g IBA, then completely covered with a commercial pruning sealant and dried for at least two hours before a perlite/crushed-pumice/rice-husk medium was applied and wrapped in black plastic.
The authors described that full prophylactic covering, keeping the nonsterile medium off the starch-rich wound tissue, as central to success.
So the difference between treatments was the exposure angle, but the sanitation, IBA, and sealant steps were applied to all of them. The geometry was not a substitute for those steps.
What does the wound geometry look like?
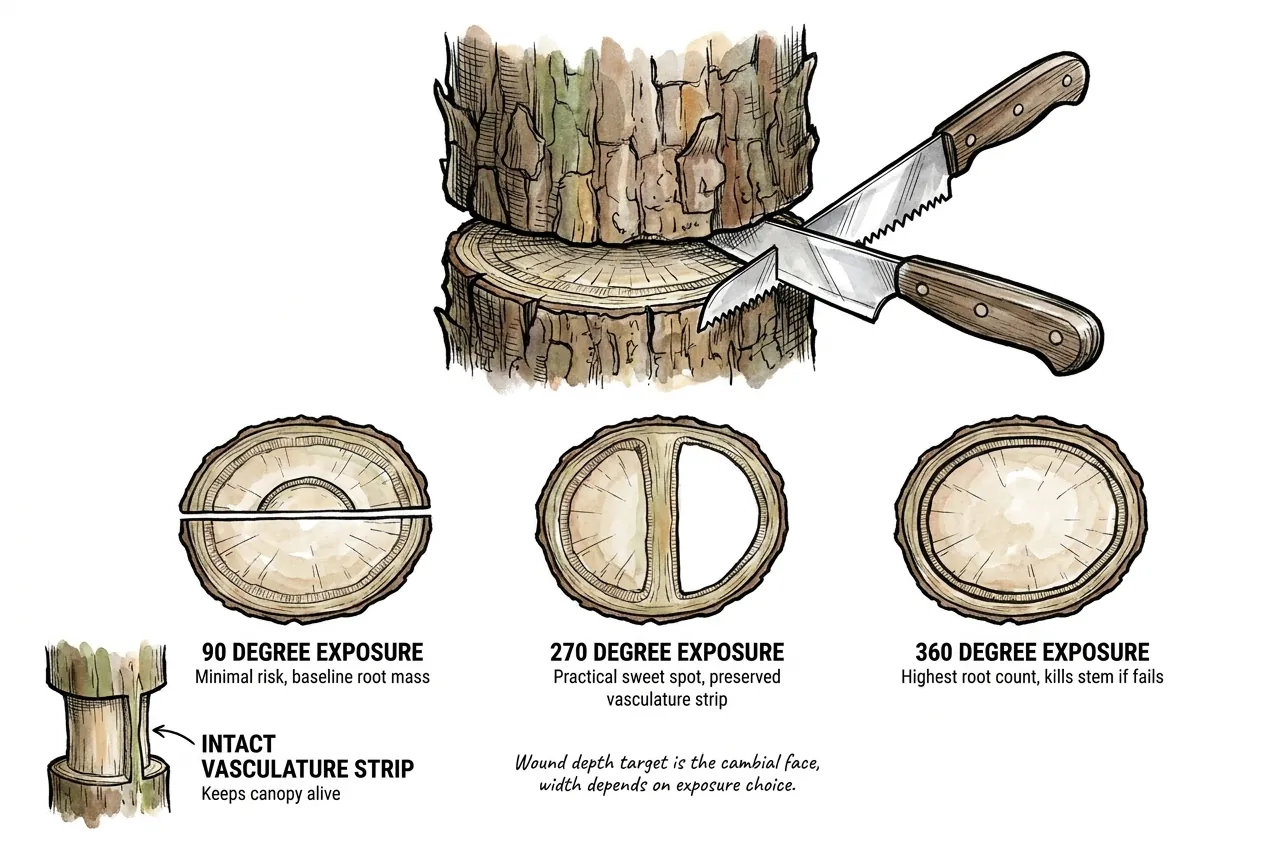
The wound is a horizontal band cut through bark and cortex to reach the peripheral vascular tissue.
In the study the wounds were made with a hand saw and a butcher knife, roughly 3.5 cm deep and about 4 cm wide, with care taken to leave no sawdust on the final surface.
The inner vascular cylinders and pith were left in place.
A common hobbyist choice is to stop short of a full 360-degree girdle, for example a 270-degree exposure that leaves a vertical strip of intact bark, on the theory that it protects the canopy if the layer fails.
That is a reasonable precaution, but be aware it is an extrapolation. The study did not compare donor survival, canopy dieback, or long-term recovery across the treatments, so there is no direct data ranking 270 degrees as safer than 360. All four treatments rooted, and in every treatment the internal cylinders and pith were preserved.
Wound exposure vs. Root yield
The study measured root number and total root length. It did not measure root mass or quantify risk to the parent stem, so those columns are omitted rather than estimated.
All values are from six replicates per treatment on 14-year-old C. edentata.
| Exposure | Replicates that rooted | Roots per layer (approx.) | Total root length |
|---|---|---|---|
| 90 deg | All (6/6) | ~3–6 | Lowest (baseline) |
| 180 deg | All (6/6) | Intermediate | Intermediate |
| 270 deg | All (6/6) | Intermediate | Intermediate |
| 360 deg | All (6/6) | ~14–19 | ~3.7× the 90-degree value |
Why does exposure percentage matter so much?
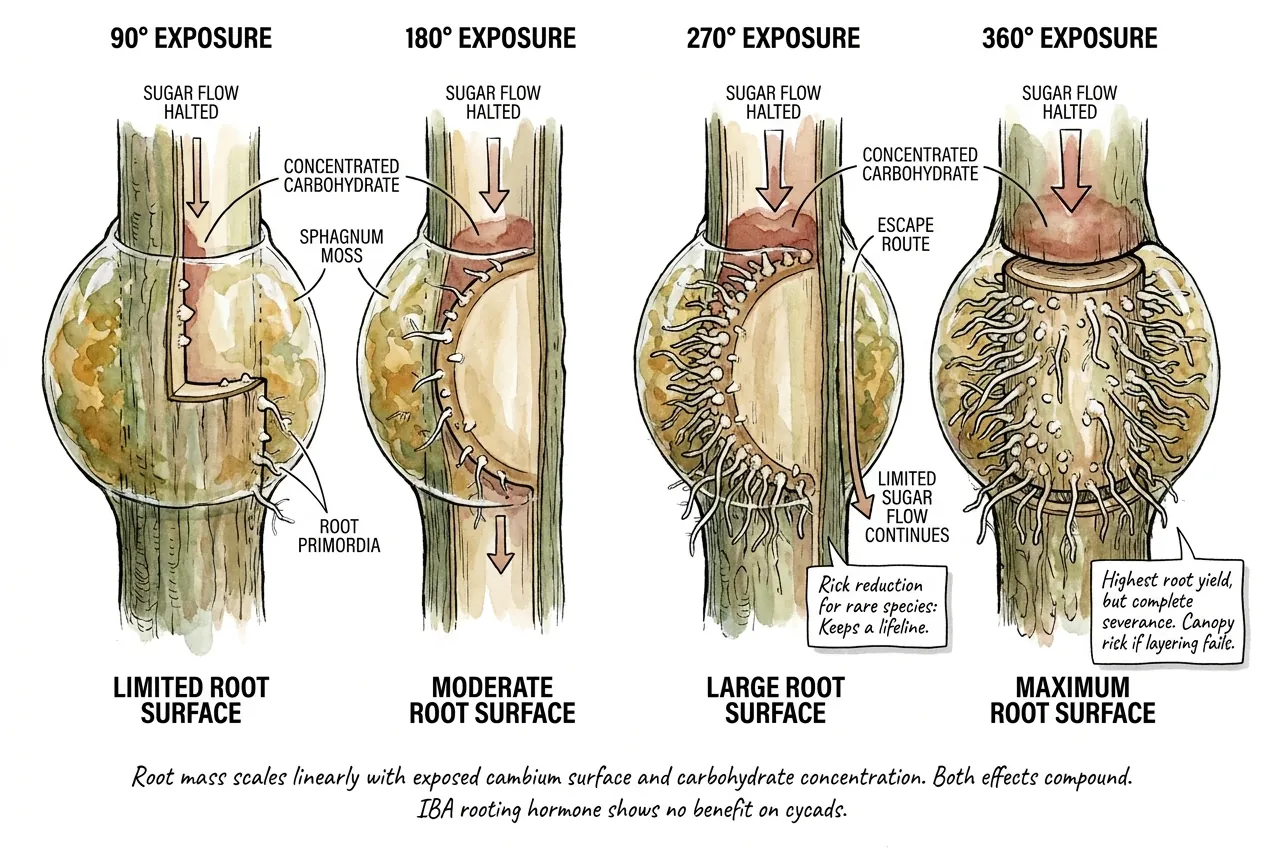
More exposure probably gives more root-starting tissue. The experiment found more roots and more total root length at wider exposure angles, but it did not test the internal mechanism.
Caution for a Rare or Single Specimen
Deep circumferential cuts on a valuable plant carry real risk to the canopy above the wound, and that risk is not well characterized here. The study did not track donor survival or canopy dieback by treatment, and it did not fully sever the internal vascular cylinders (those were preserved).
If this is your only specimen of a rare Cycas, the conservative course is to have deep cutting done by an experienced grower, a conservation institution, or an arborist, and to accept that a single valuable plant sits outside the study’s scope.
What did the study find about IBA rooting hormone?
In this one experiment, air layers treated with 3 mg/g indole-3-butyric acid (IBA) did not root measurably better than untreated controls.
So for these conditions, this species, this concentration, this formulation, IBA did not add a clear benefit.
This is a narrow result from one concentration and one species. It does not show that auxin never helps another cycad. In the tested method, IBA was not the clear deciding factor, so do not rely on hormone alone while changing the wound, barrier, or donor condition.
What materials did the study rely on?
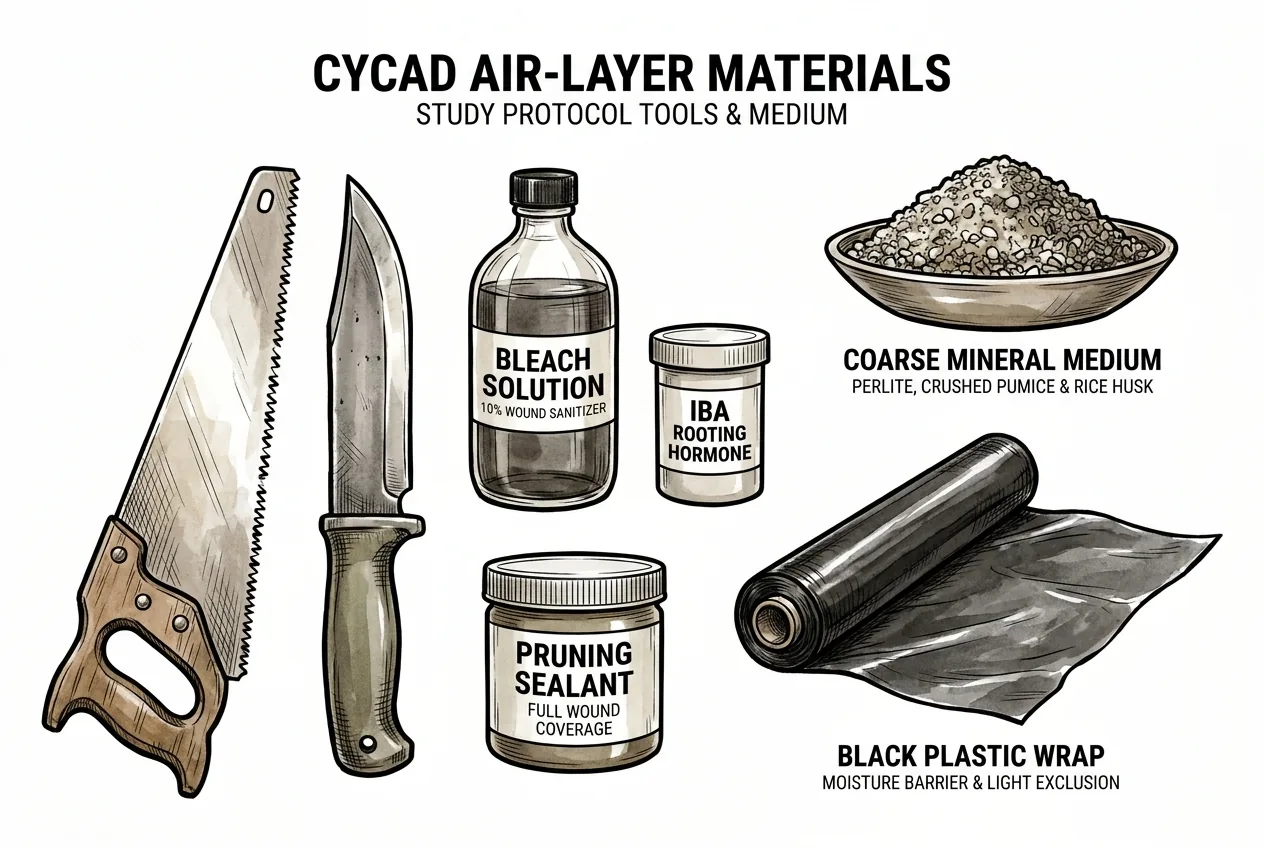
Materials Used in the Published Method
The method used a hand saw and knife, 10% bleach for wound sanitation, 3 mg/g IBA, a commercial pruning sealant to fully cover the wound, and a mineral medium of perlite, crushed pumice, and rice husk wrapped in black plastic.
Any home shopping list that leaves out the bleach, sealant, and mineral medium is a departure from the study, not a faithful copy of it.
What tools and materials will you need?
Minimum Kit for a Faithful Comparison
A workable kit includes a clean, sharp cutting tool such as a grafting knife or scalpel, 70 percent isopropyl alcohol to disinfect the blade between cuts, a wound sanitizer and full-coverage wound sealant as used in the study, a moisture-holding medium, plastic film, and ties for the top and bottom of the layer.
If you plan to match the paper, budget for bleach, IBA, pruning sealant, and a perlite/pumice/rice-husk medium as well, and read the safety notes above before handling any of them.
Substituting materials, such as packing bare moss against the wound instead of sealing it, changes the method. Do not present a stripped-down kit as the protocol.
A note on medium (the study did not use sphagnum)
Separate Study Materials From Hobby Substitutions
The Marler & Cruz layers were packed in a perlite, crushed-pumice, and rice-husk medium, not sphagnum.
Long-fibre sphagnum is a common hobbyist choice for air layers because loose, long fibres resist compaction and hold moisture while keeping some air space, and that general reasoning is sound.
Specific figures sometimes quoted for water holding, anaerobic timing, fibre length, or air-filled porosity are not cycad-specific measurements from this or any Cycas wound study, so treat them as rough generalities rather than validated thresholds.
Published work on Sphagnum water-holding capacity shows that retention varies by species and by physical structure. It does not establish that sphagnum is a safe or optimal medium against a fresh cycad wound.
Long-fibre New Zealand sphagnum is stocked by several suppliers in various grades.
Prices and pack sizes vary by seller and over time, so check the listing rather than assuming a fixed price.
Long-fibre New Zealand sphagnum
Long-fibre sphagnum is often sold as a compressed brick, but grade, dry weight, and expanded yield vary by supplier and lot. Size the purchase from the package’s stated expanded volume and the amount of moss each layer needs rather than borrowing another brick’s conversion. Soak until fully hydrated, then squeeze until water stops dripping but the moss stays cool and damp.
Note that sphagnum is more expensive per litre than compressed peat and is chosen for its structure rather than cost. Keep in mind this was not the study’s medium.
Choosing by spec, not brand
If you use sphagnum, prefer a long-fibre New Zealand grade over milled sphagnum or peat blends, which have shorter fibre and a different water-air balance.
Exact fibre-length and porosity targets are not well established for this use, so judge by feel and drainage rather than a single number.
What kind of knife should you use?
Use a clean, sharp knife you can control (a grafting knife or a scalpel-type blade for finer work, or, as in the study itself, a hand saw and butcher knife for the deeper band cut).
The point is a clean cut and a clean surface with no torn tissue or sawdust left behind. A dull, dirty blade tears tissue and invites rot.
The bare cambium scrape language sometimes attached to this step is not the study’s method. It left the inner cylinders and pith intact.
Disinfect the blade with 70 percent IPA between cuts. Note that the study also treated the wound itself with 10% bleach. Wiping the blade is not a substitute for that wound sanitation step.
A grafting knife option
A dedicated grafting knife gives you the control this cut needs. Look for a firm, easily sharpened blade with edge geometry suited to clean slicing rather than sawing.
For a large trunk band, a saw plus a sturdy knife, as used in the study, may work better. Whichever you choose, keep it sharp, clean, and disinfected.
Tool Safety Caution
A dedicated grafting or pruning blade is easier to sterilize and control than an improvised kitchen knife.
Follow the tool-safety notes above. Keep control of the blade, secure the plant, and wear cut-resistant gloves and eye protection when cutting a large trunk.
What is the step-by-step execution recipe?
One way to execute an air layer is outlined here. Treat the timing loosely. In the study, roots were visible in most layers by about 8 weeks and many roots reached about 10 cm by 14 weeks. These are study observations under tropical conditions, not a guaranteed schedule for your plant or climate.
Choosing a season with settled growth and avoiding an active leaf flush is sensible, but note the study wounds were made in mid-November under tropical monsoon conditions, so the best timing depends on your species and climate rather than a fixed spring rule.
Step 1. Pick the cut location
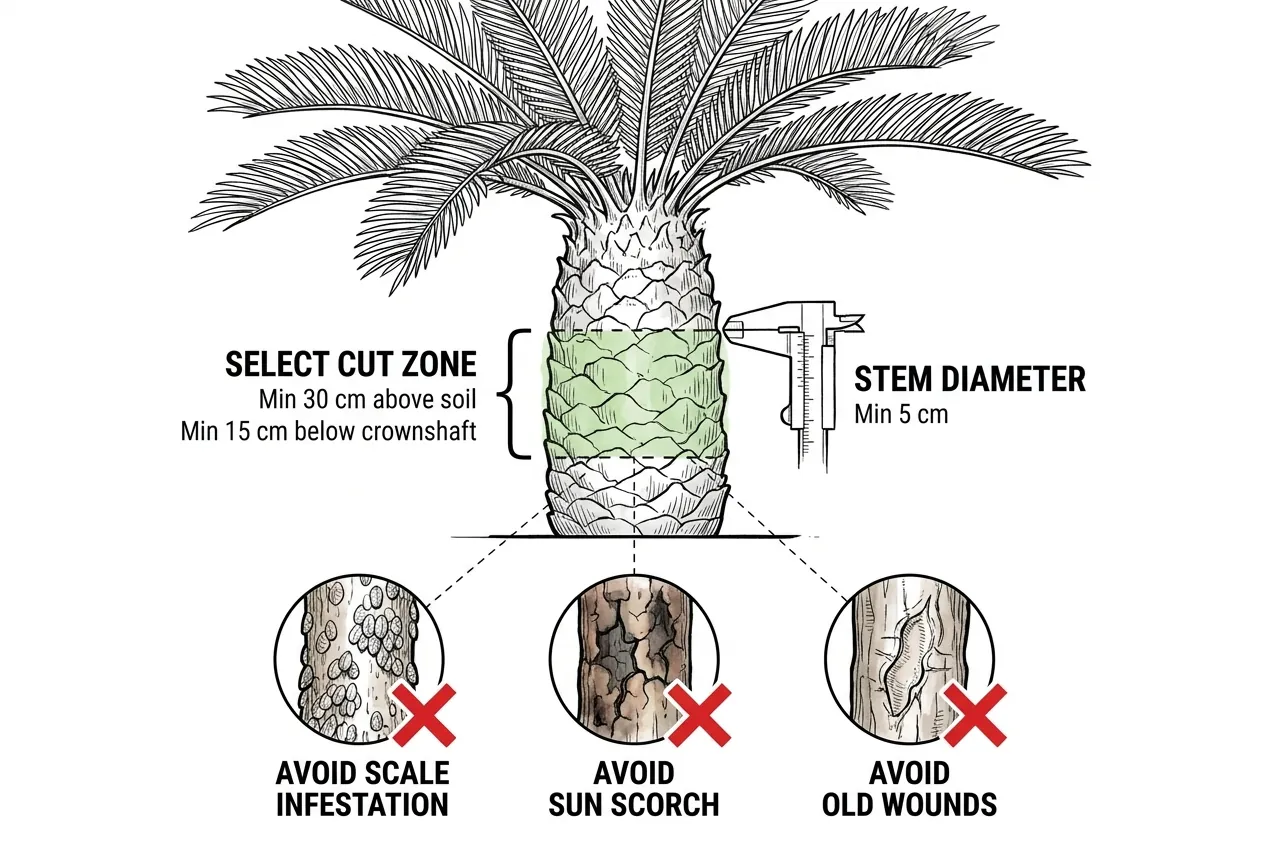
Pick a firm section of trunk with room to work, well clear of the soil line and below the leafy crown.
The study used mature stems roughly 15–22 cm in basal diameter. A much thinner stem is outside its tested range, so be cautious extrapolating to a small-diameter trunk.
Prefer healthy, unblemished bark and avoid scale-infested, sun-scorched, or previously wounded zones, since a stressed section is a poorer bet.
The specific distances (30 cm, 15 cm, 10 cm) and a 5 cm minimum diameter are rough guidance, not thresholds the study validated.
Step 2. Prep the sphagnum the night before
If you are using sphagnum, hydrate enough to wrap the wound with a generous margin and let it soak until fully saturated.
Then squeeze each handful until water stops dripping but the moss feels cool and damp, not sopping.
Exact soak times and dry-weight amounts vary with the product and layer size. Measure against your own wound rather than a fixed gram figure.
Wet-but-not-dripping is the practical target. (Remember the study’s medium was a mineral perlite/pumice/rice-husk mix, not sphagnum.)
Step 3. Mark and score the wound
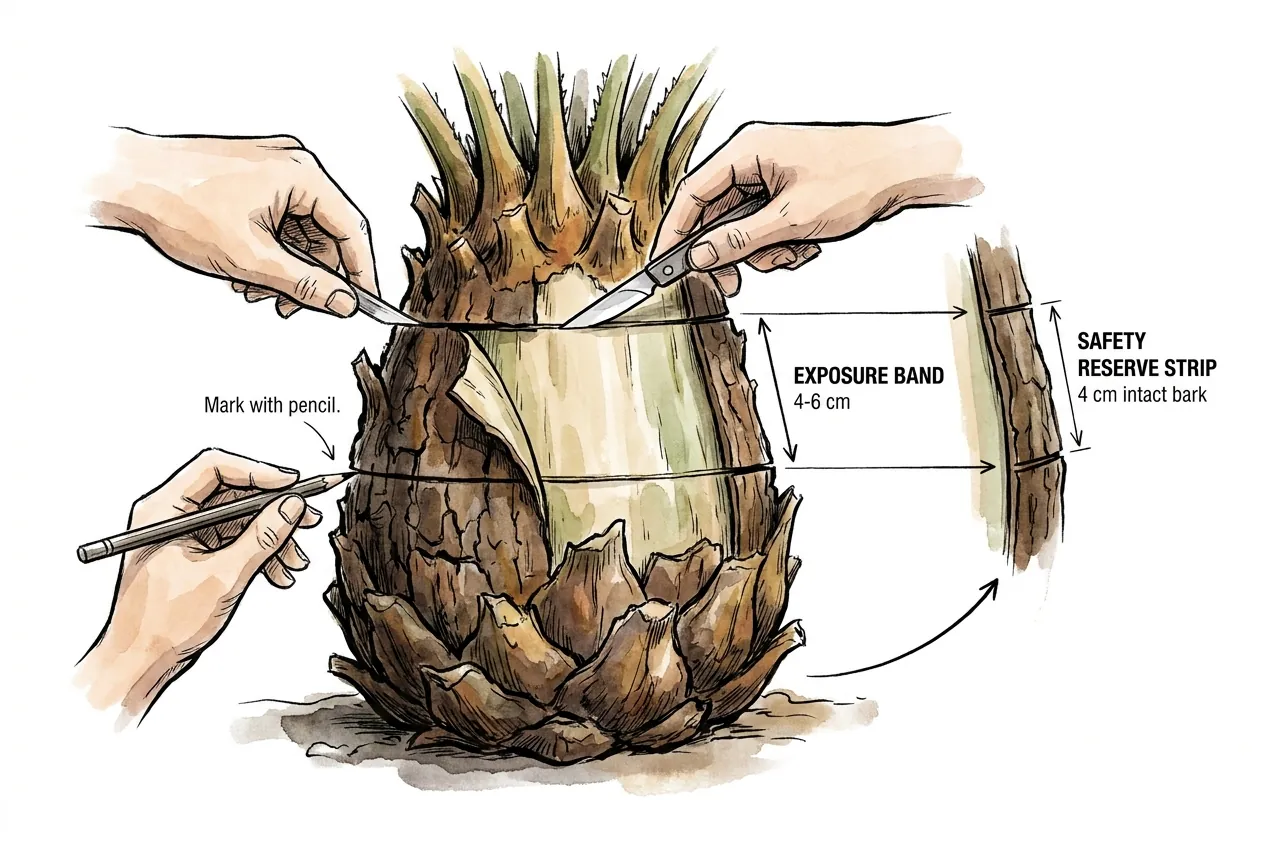
Mark a horizontal line at the cut elevation, then a second parallel line above it to define the band. The study’s band was about 4 cm wide. Keep the band consistent with that rather than widening it.
Exposure angle, meaning how far around the circumference you remove tissue, is separate from band width.
If you choose to leave an intact vertical strip as a precaution, remember that the width of that strip corresponds to a different arc on trunks of different diameters. A fixed strip in centimetres is not the same as a fixed percentage of the circumference, so do not equate a 4 cm strip with any particular angle.
Step 4. Cut to expose the peripheral vascular tissue
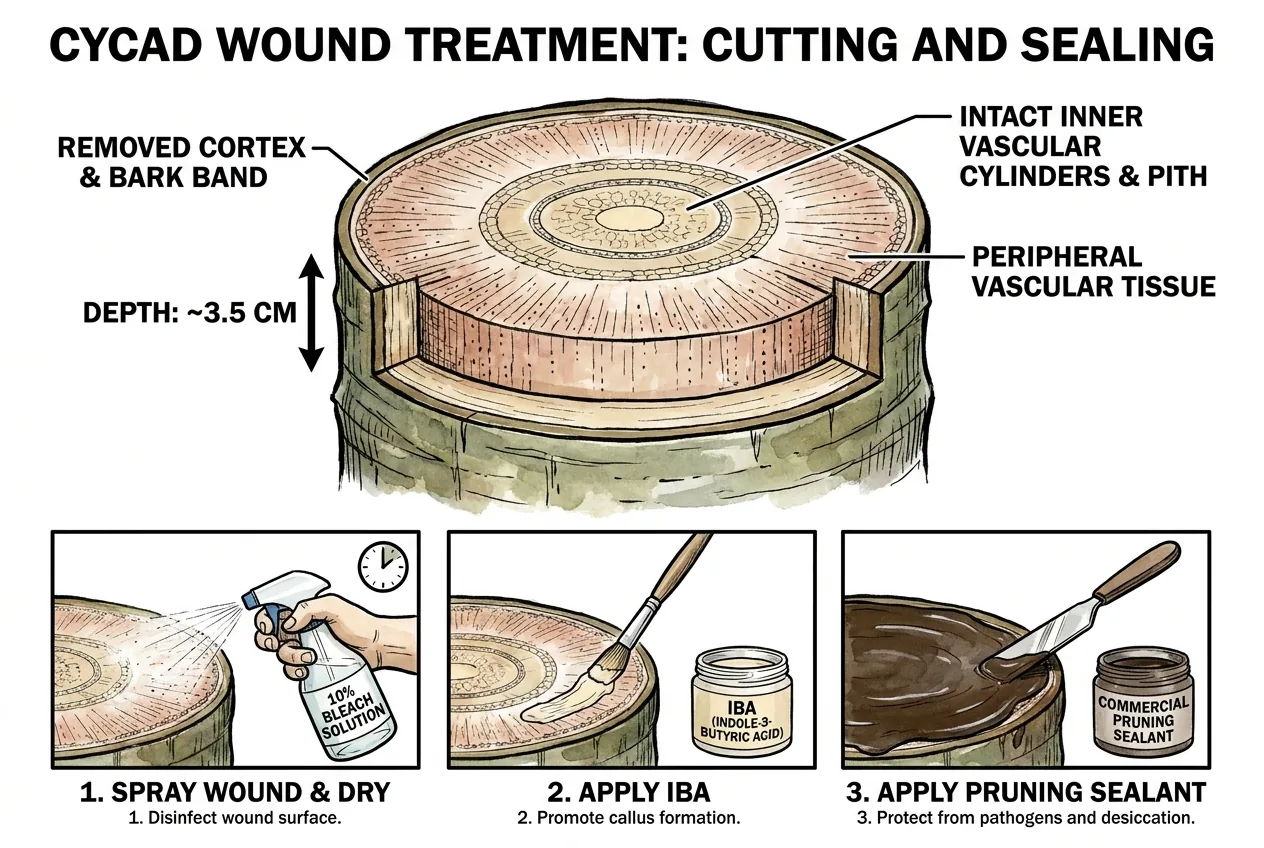
Cut through the bark and cortex along the band to reach the peripheral vascular tissue. The study used a depth of roughly 3.5 cm. Remove the band and leave no loose sawdust on the surface.
Do not gouge into the inner vascular cylinders or pith, which were left intact in the study.
Do Not Skip the Sanitation and Barrier Steps
After exposing the wound, the paper sprayed it with 10% bleach and let it dry, applied 3 mg/g IBA, then completely covered the wound with a commercial pruning sealant and let it dry for at least two hours before adding the mineral medium.
Packing bare, moist moss directly against a fresh, starch-rich wound is the opposite of what the study did, and the authors flagged that direct contact with a nonsterile medium as a decomposition risk.
If you deviate from the sealed-barrier approach, understand you are running an unvalidated variation on a valuable plant.
Step 5. Apply the medium around the wound
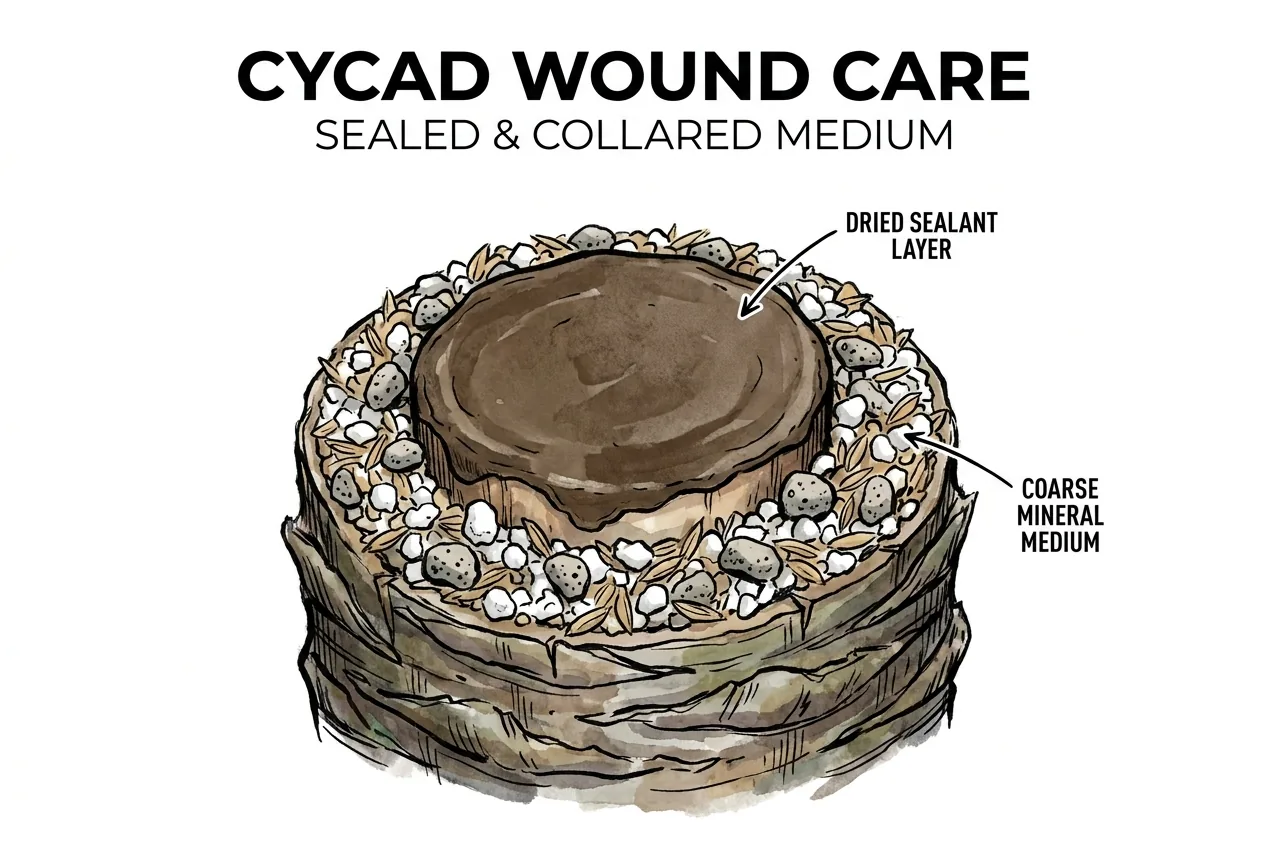
Seal the Wound First
In the study the exposed wound was completely covered with pruning sealant and dried before any medium was applied, so the perlite/pumice/rice-husk mix never touched the starch-rich wound tissue.
Placing damp moss directly on a bare wound (as some hobbyist illustrations show) recreates exactly the contamination risk the authors designed against. If you follow the published method, seal the wound first.
Whatever medium you use, pack it in a collar around the wrapped zone extending a few centimetres above and below, firmly enough to stay put but not so tightly that it becomes dense and airless. Over-compacted moss holds too little air.
Step 6. Wrap and tie
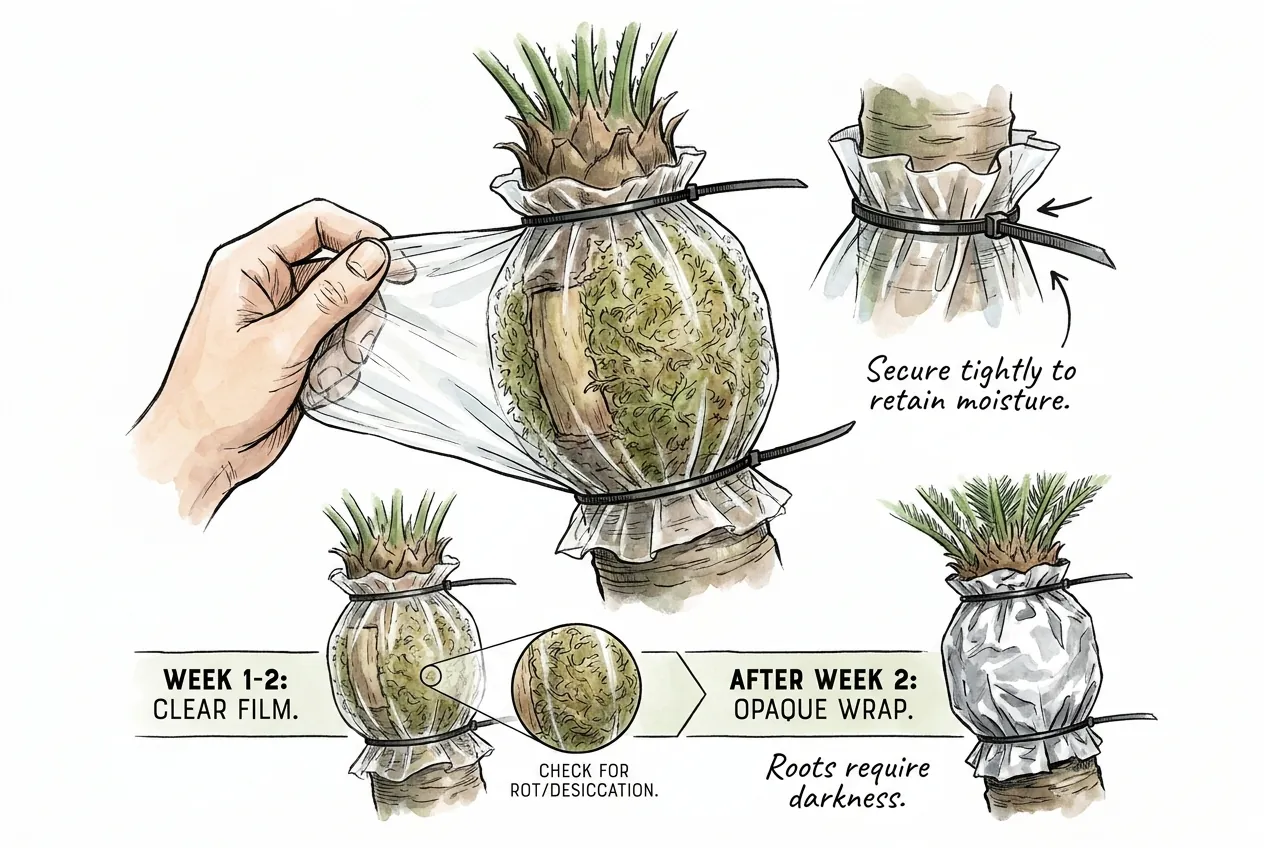
Wrap plastic film around the medium and seal the top and bottom with ties. The study used black plastic from the outset.
A clear-film-first approach is sometimes used so you can inspect early, but be aware that repeated opening can break the seal and let contamination in, and clear film in sun can overheat the interior.
If you want to inspect without unwrapping, an opaque wrap with a small clear window is a compromise.
Keeping light off the medium is generally reasonable, but the study did not run a light-versus-dark comparison, so the idea that roots form best in darkness is not an established, species-specific result here.
Step 7. Monitor weekly
Check the layer periodically. The medium should stay damp through the film. If it dries out, add a little water and reseal.
Note that the study did not open layers weekly. It removed the medium from some replicates only from about week 6, at roughly two-week intervals. Any exact water dose depends on layer size and climate, so add just enough to restore a damp rather than wet condition. Every re-opening is a chance to break the seal, so keep it minimal.
If the medium smells fermented or turns slimy, that is a sign of serious rot. Before re-attempting elsewhere, weigh whether the trunk can take another wound this season and consider giving the plant time to recover rather than cutting again immediately.
Air Layering For Difficult-To-Root Plants – Texas A&M AgriLife (general technique, not cycad-specific)
What does the timeline look like, and how do you know it is harvest-ready?
In the study, roots were visible in most layers by about 8 weeks, and by about 14 weeks many roots had reached roughly 10 cm. The individual-root average was closer to 7.25 cm.
Those are population-level observations with variation, not a fixed first-root-at-week-8 or harvest-at-week-14 guarantee, and actual timing depends on temperature, day length, and the donor’s condition.
What the study did and did not observe over time
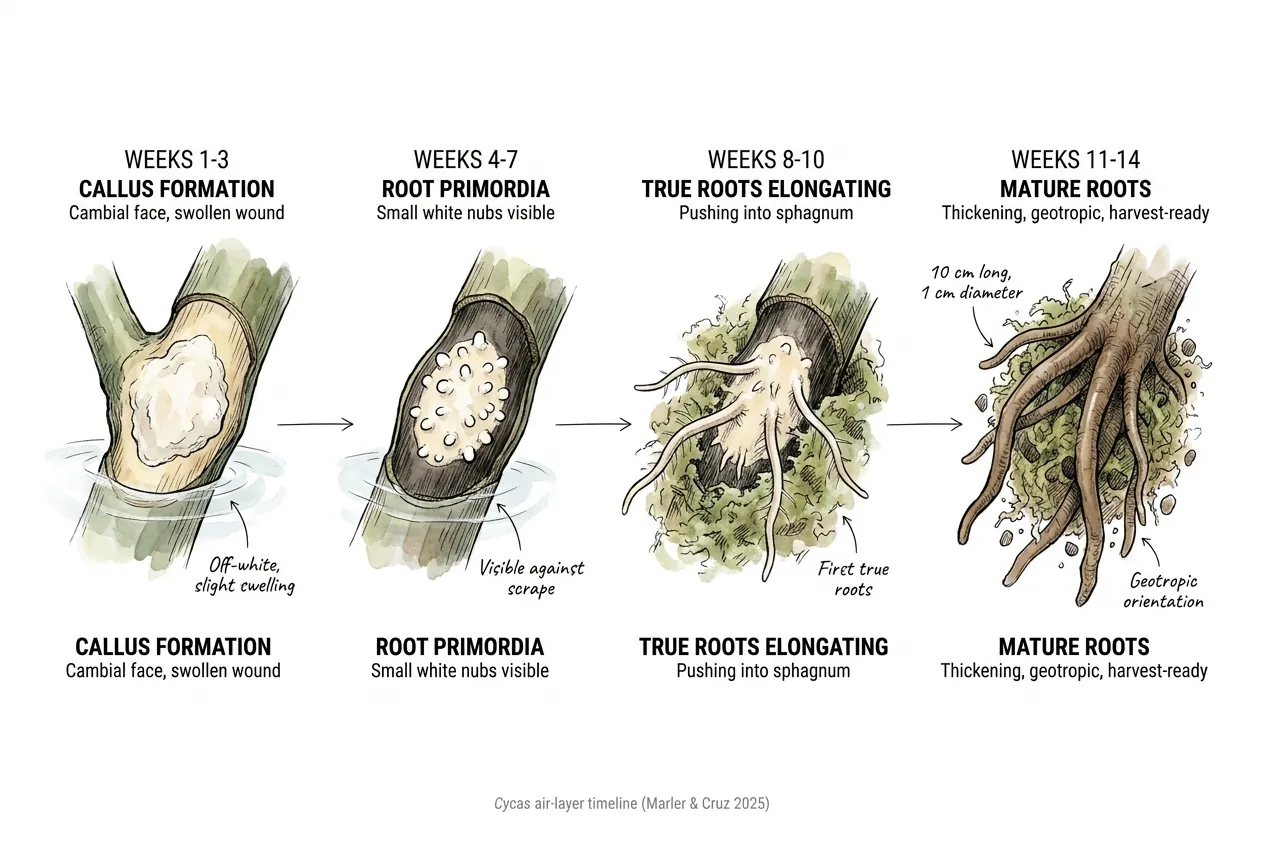
Be careful with detailed week-by-week callus-then-primordia timelines. The study did not inspect the tissue before roughly week 6, so specific claims about callus in weeks 1 to 3 and primordia in weeks 4 to 7 are not documented observations from Marler & Cruz.
What the study supports is directional. Roots were visible in most layers by around week 8, and many had reached about 10 cm by around week 14, with variation between layers.
Approximate timeline (study observations, with variation)
| Timepoint | What the study reported |
|---|---|
| Before ~week 6 | Tissue not inspected. No documented early callus/primordia stages |
| ~week 8 | Roots visible in most (not necessarily all) layers |
| ~week 14 | Many roots reached ~10 cm. Individual-root average closer to ~7.25 cm |
How do you harvest without killing the rooted layer?
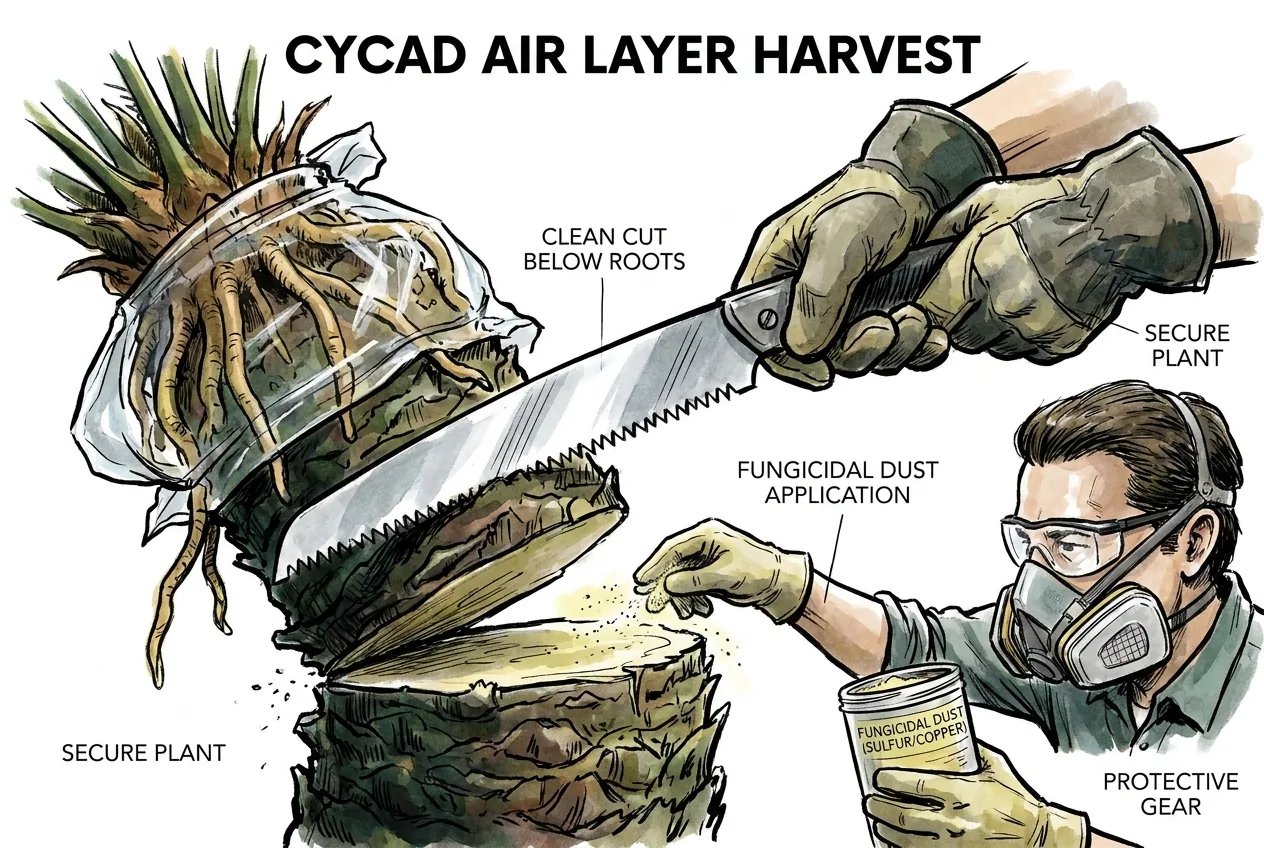
Once the layer has enough root, separate it by cutting the trunk cleanly below the lowest visible root, keeping a small margin so you do not nick the roots.
Cutting a large trunk is a two-hand, blade-control task (re-read the tool-safety notes and secure the plant first).
Treating the cut faces of a woody stem to keep water and pathogens out is standard practice, but if you use a fungicidal dust such as elemental sulfur or a copper product, follow its label for approved plants, rate, and protective equipment, including skin, eye, and respiratory protection for dusts, and dispose of residue safely.
These are not steps the study prescribed for air-layer harvest, and simply dusting both faces is not enough guidance to do it safely.
Pot the separated layer into a free-draining medium without over-potting, and go easy on fertilizer while it establishes.
The exact temperature range, shade percentage, fertilizer-free interval, and pot size often quoted for this step are general suggestions, not values the study tested. The first weeks after separation are the most fragile.
What potting mix should the rooted layer go into?
Aim for a coarse, free-draining mix (a mineral-heavy blend such as pumice with some bark drains freely and resists staying soggy, which suits a newly rooted cycad).
A common starting point is roughly 70 percent pumice to 30 percent coarse bark, but exact ratios, particle sizes, and porosity targets depend on your pot size, watering, and species, so treat those numbers as a starting point rather than a fixed rule.
Peat-heavy potting soils tend to hold more water. Many growers prefer a grittier mix while roots establish, though a strict no-peat-for-a-year rule is not something this study tested.
Avoid Over-Potting
A pot much larger than the root ball keeps too much wet medium around few roots, which is a common cause of rot after transplant.
Air Layering a Plant That Has Gotten Too Tall – South Dakota State Extension (general concept, not cycad-specific)
Air layer vs. Pup removal vs. Full-stem cutting (which method should you choose?)
Match the method to the plant. Basal pup removal suits a plant that produces vigorous offsets.
A full-stem decapitation cut suits an overgrown, leggy specimen you want to shorten anyway.
Air layering suits a trunked specimen when you want a clone from higher up the stem. Pup sizes, callus times, survival rates, and years-to-usable are rough field guidance without controlled comparative trials behind them.
What is the basal pup method, and what is its downside?
Basal pup removal is the traditional path. Wait for a basal offset to reach a workable size, remove it cleanly, dust the wounds, let it callus in dry shade, then root it.
Growers generally report good survival, but exact sizes and timings vary.
The downside is the wait, which can be several years before a plant produces a usable pup.
There is also a scope limit. Pups are clones of the donor, but only of a plant that actually pups, and only from the base.
Air layering is attractive because it can take a clone from higher on the trunk. Note, though, that it has been tested on one species at specific stem sizes, so claiming that it works anywhere on the trunk of any healthy specimen overstates what is known. Structure, wound history, and species response all matter.
When does full-stem cutting actually make sense?
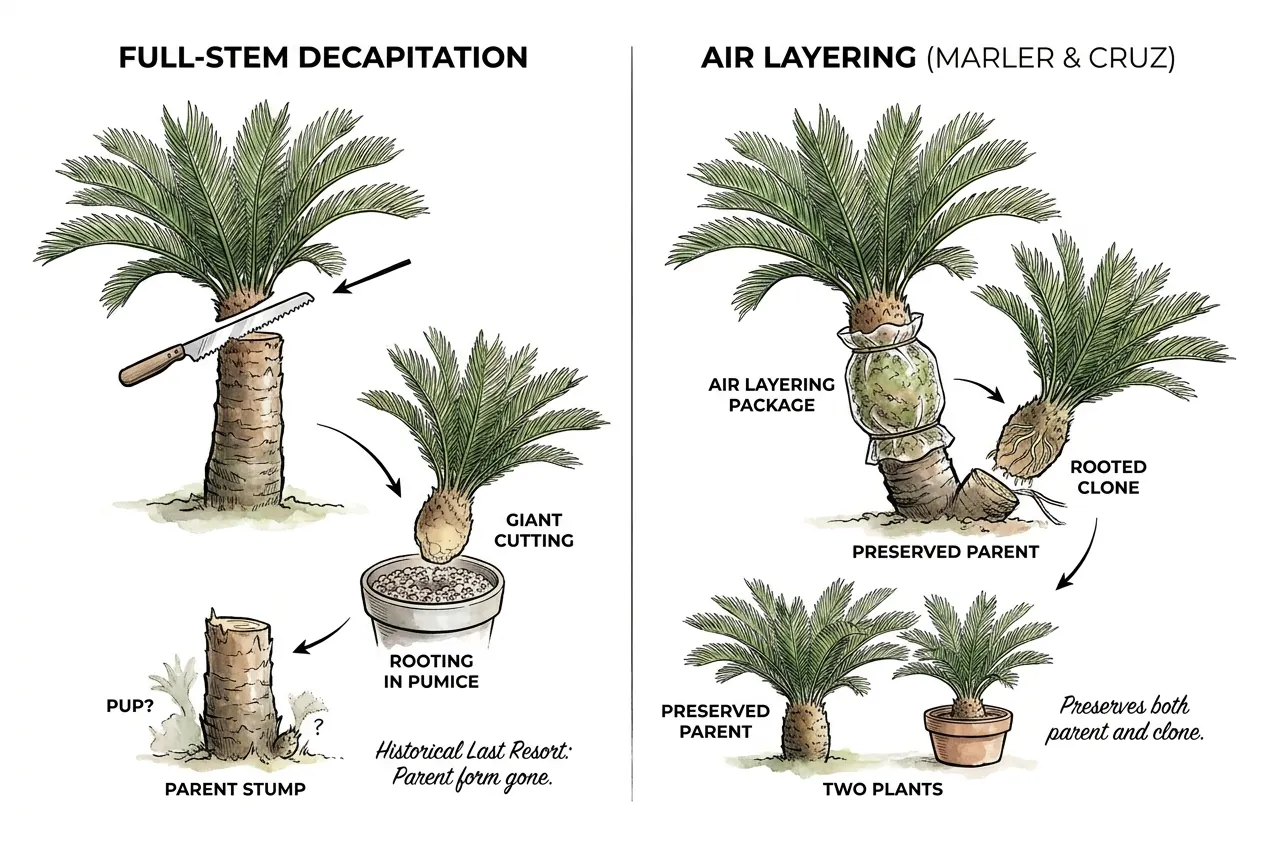
Full-stem cutting is the historical last-resort method. Decapitate the trunk, callus the cut crown, then root the top as a large cutting.
Survival has historically been lower, and the parent stump may or may not regrow. It makes most sense when the plant is already leggy and you want to shorten it.
Air layering is often described as non-destructive, but be precise about what that means. When you harvest the rooted air layer, you cut the trunk below the roots, which removes the crown above the wound. The parent is not left fully intact, and whether the stump regrows was not reported in this study.
What you reliably get is a rooted clone while the original stayed alive up to harvest. Claims of a fully preserved parent or a two-times preservation gain go beyond the evidence.
Method comparison (clone a trunked Cycas)
This comparison is qualitative. Times and survival are not from a controlled head-to-head trial, and the parent column reflects what the study did and did not report.
| Method | What happens to the parent | Rough time to a plant | Where on the plant | Difficulty |
|---|---|---|---|---|
| Wait for basal pup | Kept. Offset removed from base | Years (varies widely) | Base only | Easy |
| Full-stem decapitation cut | Crown removed. Stump may or may not regrow | Months (varies) | Top of stem | Hard |
| Air layer (Marler & Cruz) | Alive until harvest. Crown above the wound removed at harvest. Stump fate not reported | ~3–4 months in the study | Higher on the trunk (one species tested) | Moderate |
Why does this matter beyond hobbyists?
Cycads are among the most threatened groups of plants. Current IUCN Red List summary figures put roughly 71 percent of assessed cycad species in a threatened category, so more than 60 percent is a conservative way to state it. Cite the assessment version and date when using a specific number.
On Guam, Cycas micronesica declined steeply after the 2003 Aulacaspis yasumatsui (cycad aulacaspis scale) invasion.
Vegetative options for cloning a specific founder tree without felling it have been limited. Basal pups and stem cuttings already existed, but pups only come from plants that pup, and stem cutting is destructive.
A reliable air-layer method would add a less destructive option, which is why the 2025 result drew interest.
What did the Aulacaspis scale do to Cycas micronesica on Guam?
The cycad aulacaspis scale invaded Guam in 2003. According to the cited demography study, mortality reached about 92 percent within 6 years of chronic infestation, juveniles were lost within roughly 40 months, and the 2011 survivors were stressed, reproductively compromised, and not recruiting.
The species had been a dominant tree on the island, but a specific claim that it was the most abundant should point to a forest inventory.
An air-layer method could, in principle, help conservation programs clone surviving founder trees for an ex-situ collection with less damage than felling.
But note the important limit. The 2025 experiment was on Cycas edentata, not C. micronesica, and it was not applied to a conservation nursery.
Describing it as proven at scale or as an established founder-insurance tool turns a possibility into an outcome that has not yet been demonstrated.
How does the air-layer protocol fit into the conservation toolbox?
Conservation collections already use pup propagation and stem cuttings. A reliable air-layer method could add a further option by taking a clone from higher on a trunk rather than only from a basal pup.
The idea of multiple simultaneous layers on one stem, or routine use on ESA-listed species, goes beyond what this single-species study tested, so it should be read as a direction for further work, and, for protected species, only within the legal and permitting limits noted earlier, rather than an established institutional practice.
Demography of Cycas micronesica on Guam following introduction of the armoured scale Aulacaspis yasumatsui
What can go wrong, and how should you think about it?
No Failure Rate Was Measured
In the Marler & Cruz experiment every replicate rooted, so the study provides no failure cases and therefore no data on failure rates, causes, timing, or rescue steps.
The troubleshooting here is drawn from air-layering practice, not a validated Cycas diagnostic protocol, and any specific week numbers or salvage odds should be treated as rough judgment rather than evidence.
Hobbyist conditions also differ from the study’s controlled tropical setting, which is a reason to be more cautious, not to rely on unverified fixes.
Rot at the wound
Signs include a sour or fermented smell when you open the wrap, dark, softened or liquefied tissue at the wound, and slimy medium.
Excess moisture and poor aeration are common contributors. Without a lab culture, the exact organism is not something you can confirm by eye, so avoid stating a single definitive cause.
Once tissue has clearly liquefied, the outlook for that layer is poor. The most reliable safeguard is prevention. Do not over-wet the medium, use loose long-fibre material, and, following the study, keep a full sealant barrier between the medium and the bare wound rather than packing wet moss directly on it.
Leaving an open wound to air-dry and then re-packing runs counter to that sealed-barrier principle and is not a verified rescue for a rare plant. If a valuable specimen shows rot, consider expert help rather than improvising.
The medium dries out
Signs are pale, brittle, dried-out medium. Too little moisture plus too much direct sun heating the wrap is a common cause.
Research on Sphagnum desiccation tolerance shows that recovery depends on species and prior hardening. It is not a simple dries-once-and-never-recovers property, and that research does not study cycad wounds, so do not use it to claim the wound is beyond saving.
Prevention is shade and regular checks. If you catch drying early, add a little water and move the plant to more shade. Exact volumes depend on layer size and climate.
If nothing develops after a reasonable interval, you may decide to stop and try again another season, but avoid presenting a fixed abort-at-week-8 rule as established, since a slow but viable layer could be discarded prematurely.
Callus forms but roots do not
Sometimes a callus rim forms but no root nubs follow. It is plausible that a donor low on stored reserves, such as one recently stressed by scale, repotting, or a long move, is a poorer candidate, and choosing a healthy donor is reasonable on that basis.
But diagnosing insufficient stored starch without measuring tissue carbohydrate is a guess, and the specific week-12 or week-16 cutoffs and a high-potassium, low-nitrogen feeding plan for six months are not tested prescriptions. Any fertilizer use should follow the product label and, ideally, a soil or tissue test.
Decline of the canopy above the wound
Yellowing leaves or softening of the trunk above the wound are serious stress signs and worth watching for, but do not attribute them solely to exposure angle or describe a full girdle as completely severing the stem’s vasculature. In the study, even the 360-degree treatment rooted and the internal vascular cylinders and pith were preserved. Specific rules such as aborting if 30 percent of leaves yellow by week 6, treating the wound as a graft union, or assuming a 90-degree strip usually recovers are not supported by any experiment and should not be relied on. If a valuable plant shows canopy decline, get experienced help.
Symptom checklist (general troubleshooting, not study data)
Use this as an observation aid only. The study reported no failures, so the probable causes are general possibilities, not confirmed cycad-specific diagnoses, and there is no evidence-based abort schedule.
| What you observe | Possible contributor | General response |
|---|---|---|
| Sour smell, slimy medium, softened tissue | Excess moisture / poor aeration | Prevent by not over-wetting and keeping a sealed wound barrier. Poor outlook once tissue liquefies |
| Pale, brittle, dried-out medium | Too little moisture, too much sun | Add a little water, increase shade |
| Callus but no roots after a long wait | Possibly a low-reserve or stressed donor | Prefer a healthy donor. Do not diagnose without evidence |
| Yellowing leaves / softening above the wound | Stress above the wound (cause not certain) | Watch closely. Seek expert help on a valuable plant |
Bacterial wetwood and slime flux – Colorado State University Extension (tree pathology, not cycad-specific)
Key Takeaways
- The 2025 study rooted every replicate, but only on one species and a small group of plants under tropical conditions. It is promising evidence, not a universal cycad success rate.
- The published method used sanitation, 3 mg/g IBA, full pruning-sealant coverage, a mineral medium, and black plastic. Skipping the barrier steps or packing bare moss on the wound is a departure from the study.
- The single IBA concentration tested showed no clear added benefit. That does not prove auxin never helps another cycad, and the paper contains an internal sample-size discrepancy.
- Root output rose with exposure angle, but the study did not compare canopy survival by angle. Calling a 270-degree exposure safest is an extrapolation, not a measured result.
- Timing is approximate, with roots visible in most layers by about eight weeks and many roots near 10 cm by about fourteen weeks. Individual layers varied.
- Harvesting the layer removes the crown above the wound, so the parent is not left fully intact. For rare, ESA, or CITES plants, check permits and get expert help before cutting a valuable specimen.