
Tissue Culture Plants: Acclimating & Deflasking Guide
A practical guide to tissue culture plants: how the auxin-to-cytokinin ratio drives shoots and roots, the sterile setup you actually need, species protocols, and how to acclimate deflasked plantlets without losing them.
Jordan Cole · Published 2026-01-07 · 25 min read
Key Takeaways
- Tissue culture succeeds only when regeneration-competent plant cells receive conditions that match their species and explant. Some cells can be reprogrammed into a whole new plant, but not every cell responds equally.
- The cytokinin-to-auxin balance tends to steer tissue toward shoots or roots, but it is a heuristic rather than a universal recipe. Higher cytokinin often favors multiplication and higher auxin often favors roots, while the exact response varies by species and dose.
- Contamination control depends on technique as much as equipment. A still air box, a validated moist-heat sterilization cycle, and a preservative like PPM can reduce contamination, but none guarantees sterility on its own.
- Acclimatization is a major loss point because in-vitro plantlets often have a thin cuticle and poorly regulated stomata. Remove agar gently, lower humidity gradually, and treat any fixed timeline or humidity number as a starting point.
- Protocol figures are study-specific starting points, not universal recipes. For example, roughly 1–2.5 mg/L BAP may suit some aroids, but always run a small pilot first.
Understand What Tissue Culture Can and Cannot Predict
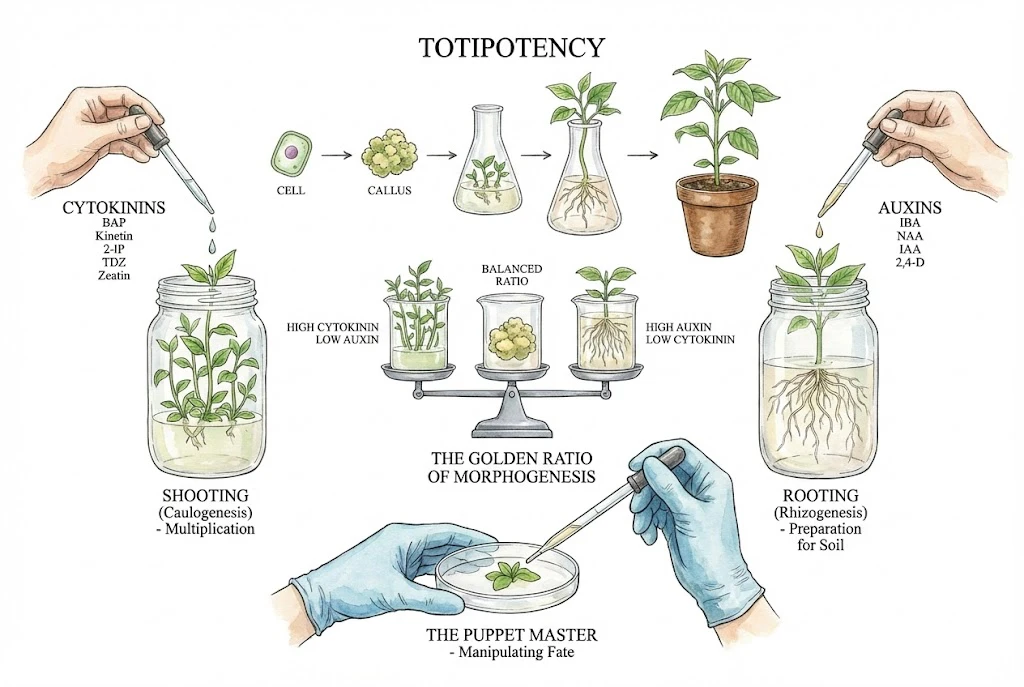
Many plant cells can form a whole plant under the right conditions. Not every cell or species responds the same way. The explant, its condition, light, medium, sanitation, and growth regulators all affect the result.
Use published protocols as a starting point, then run a small pilot before scaling up. A formula that works for one species or tissue may fail for another.
Before removing the first plantlet, I photograph the sealed flask, agar, roots, leaves, and any contamination. Once the contents are rinsed, the original condition cannot be reconstructed.
Each sibling gets a number, with broken roots and remaining agar recorded individually. A failure pattern tied to handling should not be blamed on the humidity ramp.
I begin with one three-millimeter lid shim for 15 minutes at the same time on each of the first two days. If the leaves stay upright, I either double the opening time or add a second shim, never both. One fixed step links any wilt to a known exposure instead of an undefined gradual opening.
Hormonal Regulation (Auxins and Cytokinins)
Plants use chemical signals, including hormones, to regulate cellular activity.
Two hormone groups you will work with most in tissue culture are auxins and cytokinins, though gibberellins, abscisic acid, and ethylene also play roles.
What the Hormone Ratio Can and Cannot Predict
Adjusting the balance of auxin and cytokinin is one of the main levers for influencing the plant’s growth pattern, but the absolute concentrations and the tissue’s own sensitivity matter too, so the ratio alone does not fully predict the outcome.
Skoog and Miller described this relationship in tobacco callus in 1957, and it remains a useful heuristic. As a general tendency, the balance of these two hormones strongly influences how the tissue develops.
It is a classic guideline rather than a fixed rule that holds identically across every species.
1. Cytokinins (Promoting Shoot Growth)
Cytokinins are hormones associated with cell division and, in many systems, the formation of shoots (stems and leaves).
Their effect depends on concentration, the accompanying auxin, and the genotype and explant.
They can help relax apical dominance, the tendency of the main stem to suppress side buds, encouraging dormant buds to activate. Not all shoot multiplication works through the same mechanism.
Commonly used cytokinins include BAP (6-benzylaminopurine), kinetin, 2-iP, TDZ (thidiazuron), and zeatin.
TDZ is a potent cytokinin-like regulator but carries a higher risk of carryover effects and abnormal growth, so it is used cautiously.
In many species, cytokinin-rich media favor shoot induction.
High cytokinin relative to auxin commonly promotes caulogenesis (shoot formation), though there are species-specific exceptions and concentration effects.
This is often used in Stage 2 (multiplication) to encourage a single plant to produce multiple shoots.
Potential Risks
Excess cytokinin is associated with abnormal growth, hyperhydricity (tissue becomes water-soaked and glassy, losing structural integrity), and somaclonal variation over repeated cycles.
Note that visible abnormalities are not the same as confirmed genetic mutations.
2. Auxins (Promoting Root Growth)
Auxins are involved in cell elongation and root formation, and, depending on type and concentration, can also drive callus formation and somatic embryogenesis.
IBA (indole-3-butyric acid), NAA (naphthaleneacetic acid), and IAA (indole-3-acetic acid) are auxins commonly used for rooting.
2,4-D is also an auxin, but it is typically used to induce callus or somatic embryogenesis rather than as a rooting hormone, so it does not belong in the same list for that purpose.
In the rooting stage, higher auxin relative to cytokinin is used to encourage root development.
High auxin relative to cytokinin commonly promotes rhizogenesis (root formation), though not every species or explant responds best to high auxin.
This is often used in Stage 3 (rooting) to prepare plantlets for transfer to soil. Some species use one-step or direct ex-vitro rooting instead.
Auxins, particularly IAA, can be relatively unstable under light and heat. Actual stability also depends on pH, the medium, sterilization, and storage.
Because of this, more stable auxins like IBA and NAA are often preferred, though efficacy is species-specific and NAA can be phytotoxic at higher doses.
Summary of Hormonal Interactions
| Hormone Balance | The Result (Morphogenesis) | Practical Application |
|---|---|---|
| High Cytokinin / Low Auxin | Shooting (Caulogenesis) | Multiplication Stage. Encourages the explant to produce maximum offspring. |
| High Auxin / Low Cytokinin | Rooting (Rhizogenesis) | Rooting Stage. Prepares the plantlets for soil establishment. |
| Roughly balanced | Often callus (varies by species) | Somatic embryogenesis / research. Can create a mass of undifferentiated cells. Less common for simple cloning. The exact outcome depends on species, dose, and explant. |
Nutrient Media. Murashige & Skoog (MS)
What the Medium Provides
The gel medium supplies water, mineral nutrients, a carbon source, and physical support for the explant.
Light, temperature, and gas exchange in the vessel headspace matter too, so the gel is not the whole picture.
One of the most common formulations is Murashige & Skoog (MS) medium, published in 1962. It was originally developed for tobacco, and full-strength MS is not the default for every species or stage.
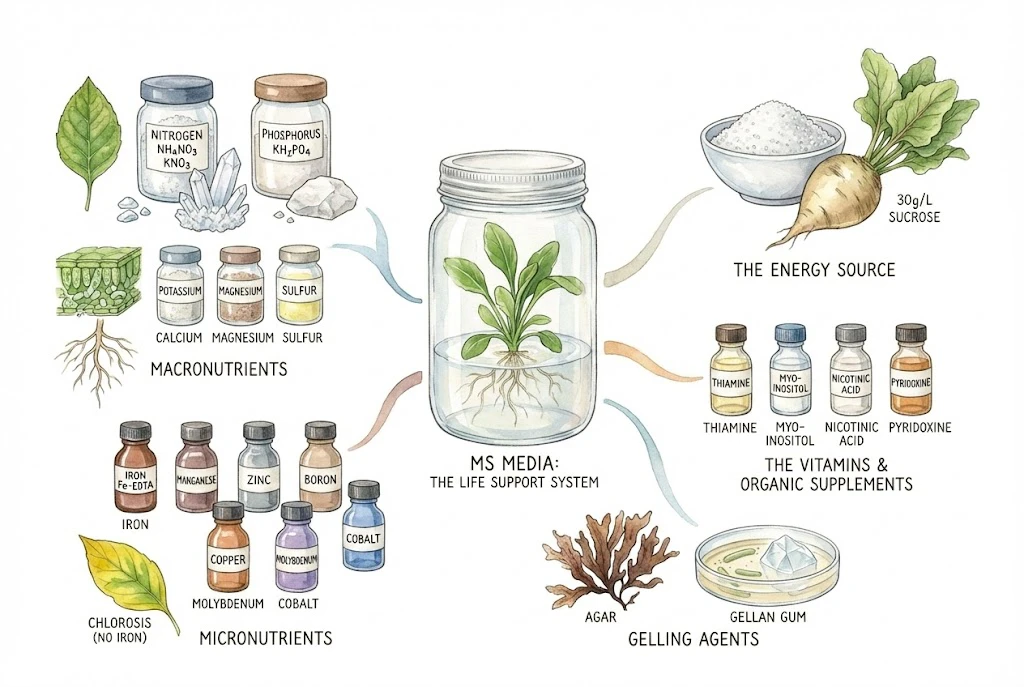
MS provides a range of macro- and micronutrients that a plant would normally take up from soil.
Because the plant is isolated from its natural environment, the medium supplies mineral nutrients, and other components such as a carbon source, vitamins, and plant growth regulators are added as needed.
The amounts below reflect a common formulation, not each species’ optimal requirement.
Carbon, Vitamins, and Gelling Agents
- Nitrogen (N). Supplied as Ammonium Nitrate (NH4NO3) and Potassium Nitrate (KNO3). Nitrogen is essential for amino acids, proteins, and DNA. MS media is known for its high nitrogen content, supporting rapid growth.
- Phosphorus (P). Supplied as Potassium Phosphate (KH2PO4). Essential for energy transfer (ATP) and photosynthesis.
- Potassium (K), Calcium (Ca), Magnesium (Mg), Sulfur (S). Critical for cell wall structure, enzyme activation, and chlorophyll production.
- Iron, manganese, zinc, boron, copper, molybdenum, and cobalt are required in trace amounts. Iron is usually supplied in chelated form (Fe-EDTA) to keep it available. Iron deficiency is one cause of chlorosis (yellowing), but yellowing can also come from pH, root damage, or other nutrient disorders, so do not treat it as a single diagnosis.
- In a closed vessel with low light and limited gas exchange, photosynthesis is limited, so a sugar is added as a supplementary carbon source. Such cultures are usually photomixotrophic (using both the added sugar and some of their own photosynthesis) rather than fully heterotrophic. Photoautotrophic culture is also possible.
- Sucrose (table sugar) is a common carbon source, often around 30 g/L, though amounts vary by species and stage (roughly 10–30 g/L).
- Thiamine (B1). Added to many media. Plants can synthesize thiamine. Some tissues or culture conditions benefit from an external supply, so it is not universally required.
- Myo-inositol. A common additive linked to cell wall synthesis and signaling. Some protocols include it and others omit it.
- Nicotinic acid (B3) & pyridoxine (B6). Included in some vitamin formulations, though not in every MS-based recipe.
- A gelling agent gives a firmer surface and affects water availability. Many protocols use solid media, but liquid and temporary-immersion systems are also used.
- Agar. Derived from seaweed. It is inexpensive. Its Ca/Mg impurities can vary between batches, which is a source of variability rather than a guaranteed benefit. A common range is 6–8 g/L.
- Gellan gum (Gelrite/Phytagel). Forms a clear gel, making roots easier to see. It sets with the help of divalent cations such as magnesium and is used at lower concentrations (commonly 2–3 g/L). Exact requirements depend on the formulation.
Setting Up Your Workspace
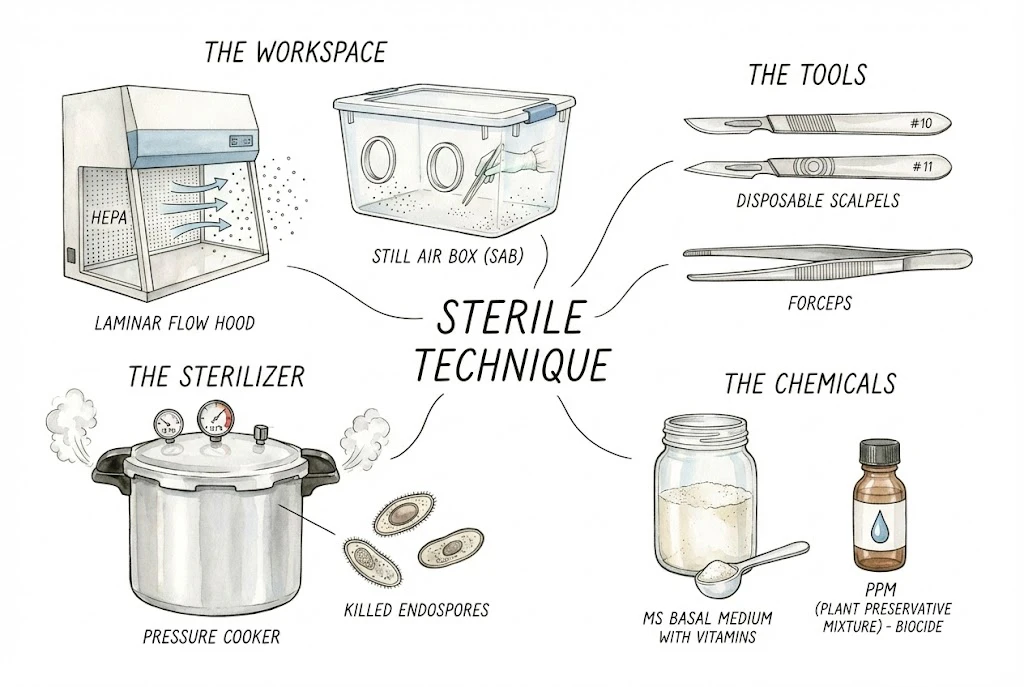
You do not need an industrial facility to start, but do not underestimate the training and risk involved in chemical, pressure, and aseptic work.
A central requirement is careful aseptic technique.
Airborne particles can carry bacteria and fungal spores, and nutrient-rich media readily supports their growth, so reducing contamination is critical.
Latent contamination already inside the tissue matters too, so it is not only about external particles.
The goal is a clean working environment in which airborne particulates are minimized. Aseptic technique reduces contamination rates but does not guarantee sterility.
1. Air Filtration (Still Air Box vs. Laminar Flow Hood)
The Laminar Flow Hood
A laminar-flow clean bench is a common professional tool. (It is distinct from a biological safety cabinet, which is designed to contain hazardous material rather than protect the work.)
It uses a fan to push air through a HEPA filter, producing a stream of particle-reduced air moving over the work.
This is not the same as sterile air, and it does not make your hands, tools, or surfaces sterile.
It is effective but costs more than most home setups. Prices vary widely by size, certification, and condition, so check current listings before budgeting.
The Still Air Box (SAB)
For home enthusiasts, a still air box is a low-cost alternative. It is not equivalent to a certified clean bench or to biological containment.
In an enclosure with minimal air currents, airborne particles tend to settle over time, so working slowly and deliberately inside it reduces how many particles are stirred up.
It reduces (but does not prevent) new contamination. Hands, tools, and the open armholes can still introduce contaminants, so surface disinfection and careful hand and tool workflow still matter.
A clear plastic storage tote (roughly 80–100 liters) with two armholes cut into the side is a common do-it-yourself example.
Check that the material tolerates your cleaning agents, smooth any sharp cut edges, and judge results by your own measured contamination rate rather than assuming it works.
2. Sterilization (Pressure Cooker)
A dry oven, boiling, or an unvalidated microwave cycle does not substitute for a validated moist-heat (saturated-steam) sterilization cycle.
A pressure cooker or autoclave is the usual way home growers reach those conditions, though other validated methods (such as filtration for heat-sensitive solutions) exist for specific uses.
Boiling water at sea level reaches about 100°C (212°F).
Some bacterial spores can survive boiling. How long depends on the organism, exposure time, and matrix, so not all contamination is the same endospore problem.
Saturated steam at 121°C (250°F), reached at about 15 PSI, is a common sterilization condition, but temperature and pressure alone do not guarantee sterility.
You also need direct contact of saturated steam with the load, adequate air removal/venting, an exposure time matched to the load and packaging, and confirmation with a chemical indicator every load plus periodic biological indicators.
A gauge-equipped food pressure canner may be used by some home growers, but vessel capacity does not establish sterilization performance.
It is not certified as a laboratory sterilizer, and reaching 121°C/15 PSI at one point does not by itself prove the whole load was sterilized.
Follow the exact canner’s load, venting, pressure, heat-source, cooling, and safety instructions, and validate the complete cycle with appropriate indicators before relying on it.
3. Instruments (Precision Tools)
Tissue culture involves precise manipulation of plant material, and the more important safety factors are keeping tools sterile, sizing them to the work, handling them carefully, and disposing of used blades in a sharps container.
A clean, sterile scalpel helps reduce cross-contamination. #10 (curved) or #11 (pointed) blades are common choices. Whether you need a fresh blade per batch depends on your explant and tool-sterilization routine.
Long stainless steel forceps (roughly 8–10 inches, sized to your vessels) help you handle plantlets inside jars while keeping your hands away from the material.
4. Chemicals (Pre-Mixed Solutions)
Weighing MS salts individually is involved and error-prone, though labs routinely do it with an analytical balance and stock solutions.
For home users, pre-mixed formulations are often more practical (just check what each product includes (vitamins, sucrose, gelling agent, or any PGRs)).
MS basal medium with vitamins powders exist from tissue-culture suppliers. Note the exact supplier, formulation, and lot, and set final pH and strength yourself, since these affect reproducibility.
A premix improves consistency of the salt ratios but does not remove weighing, volume, pH, or sterilization errors.
Plant Preservative Mixture (PPM) is a heat-stable, broad-spectrum preservative used to reduce bacterial and fungal contamination.
It is a laboratory chemical, not a household-safe product. Its manufacturer’s safety data sheet lists risks including allergic skin reactions and respiratory sensitization, and calls for gloves, eye/face protection, a lab coat, avoiding vapor, refrigerated (2–8 °C) storage, and proper disposal.
Plant response also varies, so test on a few explants first.
The manufacturer’s directions treat PPM as a supplement to good aseptic technique, not a substitute for it, and typical general dosing is 0.5–2 mL/L (higher-concentration protocols exist for endogenous contamination).
Recommended Equipment List
This list covers items to get started. It does not replace safety gear (gloves, eye/face protection), a pH meter, a balance, sterilization indicators, and a proper disposal/sharps container, which you will also want.
Pressure Canner
A food canner that can reach 15 PSI / 121°C with room for several jars. It is not a certified lab sterilizer, so validate your own cycle with indicators (see the sterilization section above).
MS Basal Medium with Vitamins
A pre-mixed nutrient powder, so you skip weighing individual salts. Confirm the exact formulation with your supplier.
Plant Preservative Mixture (PPM)
A preservative that can reduce contamination pressure. Follow the manufacturer’s directions and safety data sheet, and use the protective equipment noted above.
Disposable #11 scalpel blades are convenient for clean, precise cuts when your workflow calls for a fresh disposable blade.
If a product is labeled sterile, that is the seller’s claim unless an independent sterilization method, standard, and expiry are stated. Dispose of used blades in a sharps container.
The Process (Four Stages of Propagation)
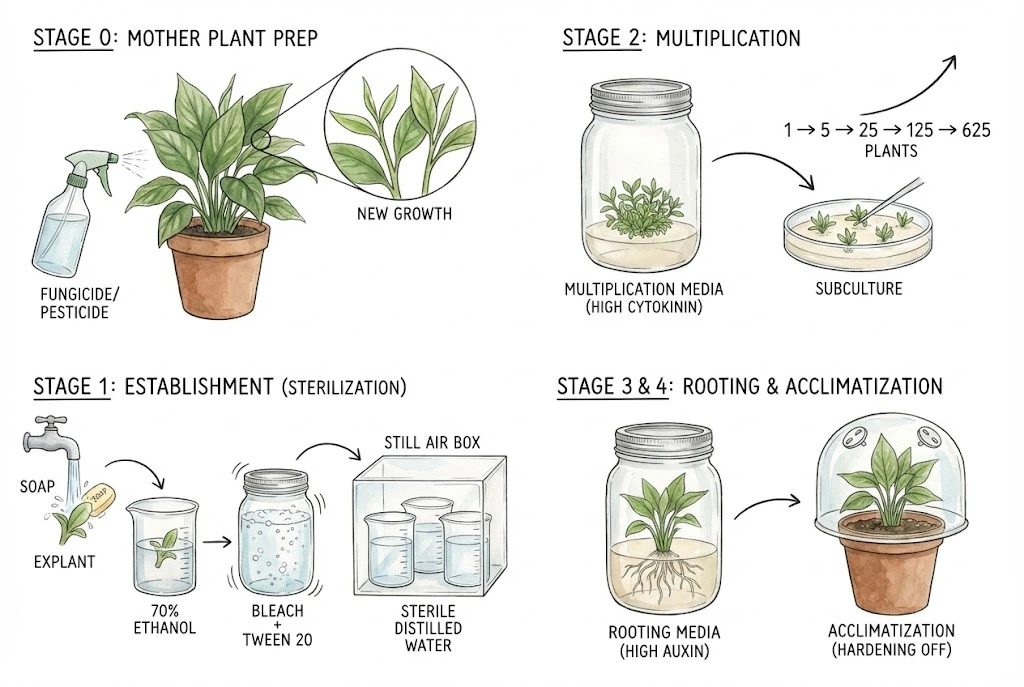
Tissue culture is a multi-step process, and moving carefully through each stage helps.
Working too quickly can raise contamination and handling errors, so keep records, run controls, and track your own contamination rate rather than blaming failures on impatience.
Stage 0. Mother Plant Preparation
The health of your starter material matters. A mother plant carrying pests or disease is more likely to give contaminated cultures, and a healthy appearance does not prove the plant is pathogen-free.
Do not apply pesticides or fungicides as a blanket pre-treatment. If a specific pest or disease is present, identify it first, then use only a product registered for that pest on that plant in that setting, exactly per its label rate, re-entry interval (REI), and required protective equipment.
In many places pesticide labels are legally binding, so follow integrated pest management (IPM), quarantine affected plants, and consult a local extension service or a qualified professional if you are unsure.
Starting from clean, healthy stock is safer than trying to chemically rescue a compromised plant.
Bottom watering can help keep foliage dry and reduce some surface contaminants, though the best watering approach depends on the species and the pest or pathogen situation.
Actively growing tissue, such as new shoots, can respond better than older, woody stems, but it is not guaranteed to be cleaner (endophyte load varies with the tissue, bud, and season).
Stage 1. Establishment (Sterilization)
This stage aims to reduce microorganisms on the plant surface while minimizing damage to the tissue.
Because that balance is species-specific, run a small pilot before committing your material.
Note that disinfectant concentrations and contact times below are examples, not a universal recipe. Work out the exact final concentrations, times, rinses, and protective equipment for your explant, and handle alcohol and bleach with adequate ventilation, gloves, and eye protection, keeping alcohol away from flames.
Rinse the cutting (explant) under running tap water, optionally with a little dish soap, to remove debris.
A common range is around 20–30 minutes, but shorten it for delicate tissue and to limit water use.
Briefly dip the explant in one alcohol solution, commonly around 70% ethanol or 70% isopropyl alcohol. These are different chemicals, so choose one and record its grade and contact time. The dip lasts roughly 30 to 60 seconds. Alcohol is flammable, so keep it away from flames and other ignition sources.
Purpose
Alcohol lowers surface tension and disrupts surface lipids and waxes, which can improve wetting and later bleach penetration. It does not simply dissolve the cuticle, and sensitive tissues can be injured.
Alcohol Exposure Caution
Prolonged alcohol exposure (often more than about a minute) can severely damage some explants. The exact tolerance varies by tissue.
Transfer the explant to a diluted sodium hypochlorite (bleach) solution with a little surfactant.
Because commercial bleaches differ in strength, work in terms of final available chlorine (NaOCl) rather than a fixed 10–20% bleach mixture, and note that Tween 20 and dish soap are not equivalent.
Contact Duration
Commonly 10–20 minutes, but this depends on explant type, bleach strength, agitation, and temperature.
Agitation Method
Gentle agitation helps even contact. Too vigorous agitation can injure the tissue.
Mechanism
Hypochlorite is an oxidant that damages microbial membranes, proteins, and nucleic acids, not only cell walls.
In the still air box, rinse the explant several times (three or more) with sterile water to remove residual bleach, which would otherwise damage the tissue.
Adequate rinse volume and duration matter as much as the number of rinses.
Stage 2. Multiplication
Once clean cultures are established, the plant is placed on multiplication medium. For many species this uses a cytokinin-rich medium, though the right level varies by species and should not be treated as a fixed standard.
The aim is to relax apical dominance and encourage axillary shoots. Cut nodal segments so each retains a bud, and mind the cutting position, orientation, and meristem to avoid damage.
The plantlets remain on this medium for roughly 4–8 weeks, forming a cluster of shoots. The interval depends on the species, medium depletion, vessel, and contamination.
The cluster is separated into individual pieces and transferred to fresh medium. Over many passages, watch for variation, senescence, and rising cost.
In principle, repeated multiplication can increase numbers quickly.
For example, 5 usable shoots per cycle over 4 cycles works out to 5⁴ = 625, but this assumes every shoot survives, roots, and acclimatizes, which is unrealistic.
Real yields are lower once you account for losses at each step.
Stage 3. Rooting
After generating enough shoots, the focus shifts to root development. Some species skip in-vitro rooting and are rooted directly ex vitro.
Shoots are transferred to rooting medium with higher auxin. The auxin type, exposure (a brief pulse versus continuous), carryover, and species-specific dose all affect the result.
Salts are often reduced (for example, half-strength MS) and cytokinin is removed, though this is not ideal for every plant.
Lower mineral strength can favor rooting in many species. The mechanism involves osmotic and nutrient signaling rather than roots literally seeking nutrients.
Stage 4. Acclimatization
This is the transition from the jar to the outside environment, and it is a major stress because the plantlet’s structure and function shift from a sheltered vessel to open air.
Cultures are often (though not always) kept at very high humidity with a readily available sugar and nutrient supply.
In-vitro leaves frequently have a thin, underdeveloped cuticle and poorly regulated stomata. They do not literally lack a cuticle or have lazy stomata, but they lose water quickly at first.
Lowering humidity gradually is generally important. Match the pace to the species, plantlet quality, substrate, and airflow, and measure rather than assume.
- Gently remove agar from the roots to reduce microbial growth and root-zone problems. Avoid harsh washing, which can damage fragile roots.
- Pot into an airy, well-draining substrate (for example, coir/perlite). This is not sterile on its own. Use a clean or pasteurized source and note the mix ratio.
- Keep under a high-humidity dome at first. Treat any exact figure (some protocols cite around 98–99%) with caution, since sensor accuracy, condensation, and fungal risk vary by setup and species.
- Lower the humidity gradually to encourage cuticle development and stomatal function. Two to four weeks suits some plants, but others need longer. Go by the plant’s response and measured humidity.
For the chamber, airy substrate, and hygrometer used in this weaning step, the tissue-culture acclimation chooser explains how to lower humidity gradually and measure the ramp.
Acclimation of in vitro-propagated big sagebrush (Artemisia tridentata)
Species-Specific Protocols
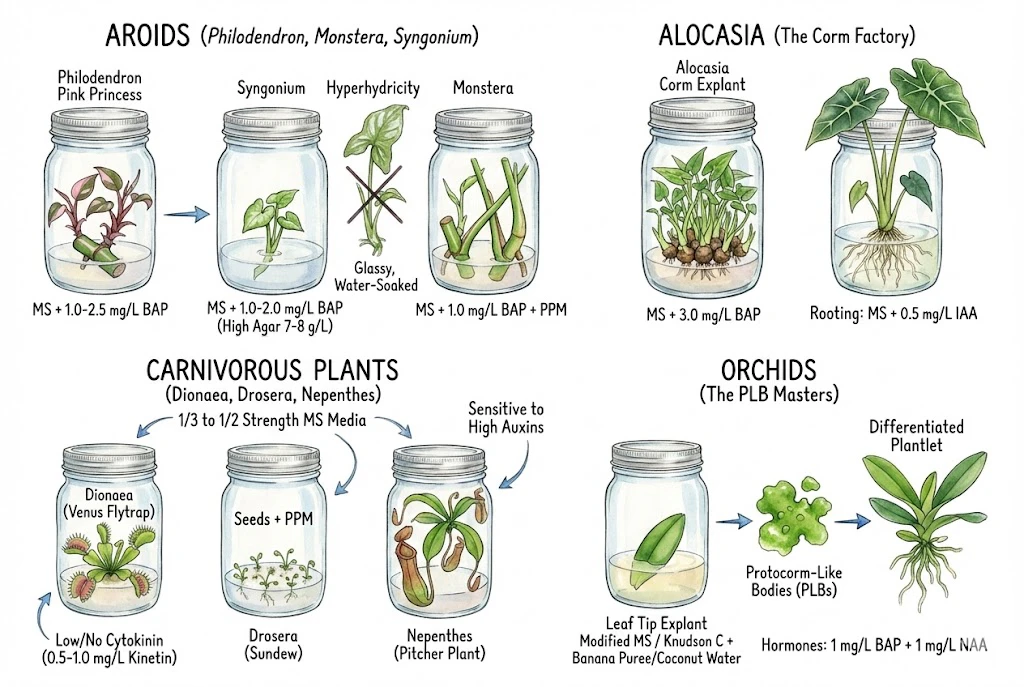
Different species and cultivars often need different nutrient and hormone conditions.
The figures below are starting points from individual studies, not settled recipes. Where possible, match each to its own primary source, species, cultivar, and explant, and run a small pilot before scaling up.
Aroids (Philodendron, Monstera, Syngonium)
These popular plants are often cultured, but the specifics differ by species, cultivar, and explant, so there is no single standard aroid protocol.
Philodendron (e.g., Pink Princess, White Knight)
Nodal segments or shoot tips are commonly used as explants. Donor age, sterilization, and any endogenous contamination differ between them.
BAP (benzylaminopurine) is a cytokinin often used for Philodendron multiplication, though the best level is cultivar-specific.
Some protocols report roughly 1.0–2.5 mg/L BAP as a useful range, but this is not an optimal value for the whole genus.
In some cultivars around 2.5 mg/L BAP gave high shoot numbers while higher concentrations reduced growth. This is not a fixed threshold that applies to every cultivar.
Adding a little auxin (for example, 0.5 mg/L NAA) improves root quality in some protocols, in combination with BAP and depending on the stage and cultivar.
Syngonium
Syngonium can show hyperhydricity in culture, though there is limited comparative evidence that the genus is unusually prone to it.
Adjustment
As one starting treatment, keep BAP moderate (around 1.0–2.0 mg/L) and firm the medium (agar around 7–8 g/L).
Gel firmness alone does not prevent hyperhydricity (gelling-agent brand, gas exchange, ammonium level, and humidity all contribute (see the review below)).
Monstera
Monstera is also an aroid, but that alone does not mean its protocol matches Philodendron. Species and cultivar studies still apply.
As an experimental starting point, some growers begin around 1.0 mg/L BAP. This is not a validated recipe for Monstera generally.
If only callus forms, you can trial a different cytokinin (kinetin or 2-iP), but also review the auxin, explant, light, and medium before changing hormones.
Thicker stem tissue can carry latent (endogenous) contamination, though stem thickness by itself is not a diagnosis of bacterial contamination.
If you use PPM here, follow the manufacturer’s directions and safety data sheet rather than adding it liberally. Use the stated dose, protective equipment, and a species phytotoxicity check first (see the equipment section above).
Hyperhydricity in plant tissue culture
Alocasia
Some Alocasia propagate from a corm, a modified stem storage organ (not a true bulb). A corm can be a convenient starting organ, but do not confuse it with the explants used in the study cited below.
Multiplication
MS medium + 3.0 mg/L BAP (as used in the study below).
A study on Alocasia longiloba reported high yields (around 18 shoots per explant) at 3.0 mg/L BAP.
Importantly, that work used seed-derived, in-vitro shoot-tip explants, not corm explants, so do not read it as a corm protocol or generalize it to other Alocasia.
In that study, a higher level (around 5.0 mg/L) performed worse. Treat that as a study-specific result, not a universal threshold or a confirmed cause of mutation.
Rooting
MS + 0.5 mg/L IAA (indole-3-acetic acid), per the same study.
Rooting was reported as reliable in that context. Ease of rooting varies with the species and conditions, so results elsewhere may differ.
Carnivorous Plants
Many carnivorous plants (for example, Dionaea, Drosera, Nepenthes) grow in low-nutrient conditions, and some are sensitive to full-strength MS, but these are diverse genera, so nutrient sensitivity varies.
Reduced-strength MS (commonly 1/3 to 1/2) is a starting range for some species. Water chemistry, nitrogen form, sugar, and the species itself all matter.
Low cytokinin or no plant growth regulator suits some species and stages. 0.5–1.0 mg/L kinetin is one option, not a blanket recommendation for all carnivorous plants.
High auxin can interfere with trap development in some species, but this is not a universal response across all carnivorous plants.
Seed can be a clean starting material, though not necessarily the easiest. Expect seed dormancy, variable germination, and genetic variability.
A dilute bleach dip (for example, around 10% commercial bleach for 5–10 minutes) appears in some seed protocols, because commercial bleach strengths differ, work in terms of final available chlorine rather than a fixed percentage.
Wild-collected seed can carry fungal contamination, so surface disinfection helps. Treat the exact strength and time as something to pilot rather than a fixed rule tied to habitat.
Orchids
Orchid culture often centers on protocorms or protocorm-like bodies (PLBs). Note the distinction between seed-derived protocorms and vegetatively produced PLBs.
Specialized media (such as Knudson C) or modified MS are used. Depending on the species and stage, other media (for example, Vacin & Went) are also common.
Some protocols adjust sugar level and add organic supplements such as banana puree or coconut water.
These natural additives vary in composition between batches, and coconut water contains more than one active component, so it is not simply a natural cytokinin.
A balance of auxin and cytokinin (for example, 1 mg/L BAP + 1 mg/L NAA) suits some PLB protocols, but it is not a universal orchid optimum.
Common Issues and Solutions
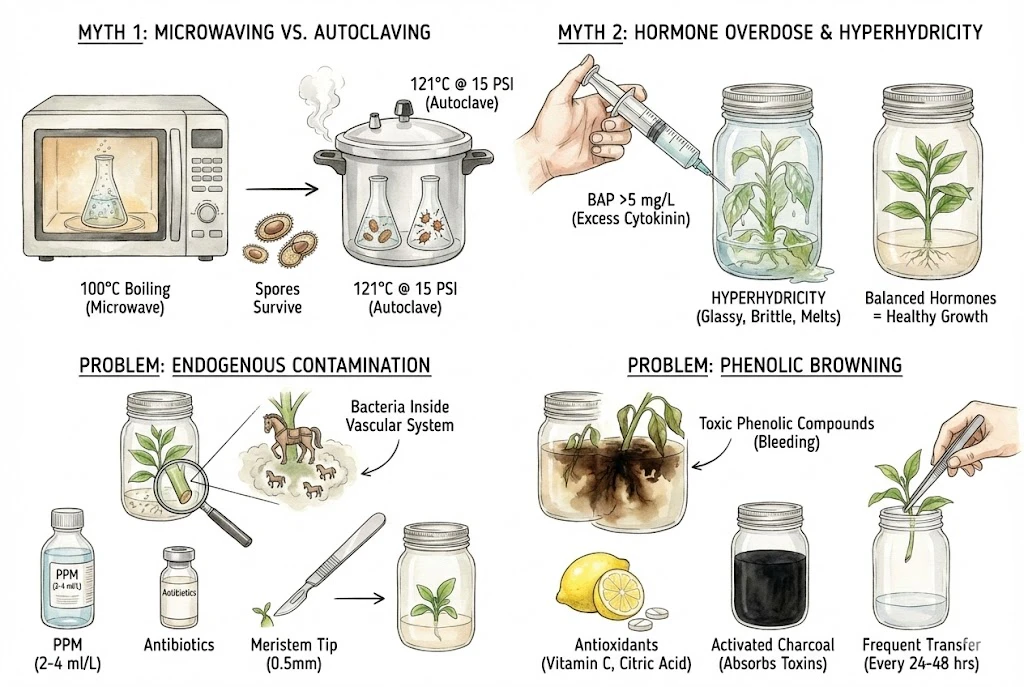
Advice on tissue culture often conflicts, so it helps to sort out a few common points.
The notes below clarify frequent misconceptions and problems, while trying not to replace one oversimplified rule with another.
Misconception 1 (Microwaving Media Is Sufficient)
Household microwaving is unreliable for laboratory-grade sterilization because of uneven heating and cold spots. This does not mean every microwave-assisted process is impossible.
A microwave heats water, typically into the boiling range, but without pressure you are relying on temperature alone, and time, power distribution, and container safety all matter.
Boiling can kill many vegetative cells while leaving some spores. How many survive depends on the organism and exposure time, so a simple kill/survive split is an oversimplification.
A validated 121°C saturated-steam cycle is a reliable method, usually reached with a pressure cooker or autoclave.
For specific uses, other validated approaches (filtration, dry heat, chemical sterilization) also exist.
A microwave can be handy for preliminary media heating, but do not lean on heavy antibiotic use to make up for understerilized media. That can hide contamination and encourage resistance and phytotoxicity. Use a validated moist-heat cycle instead.
Misconception 2 (More Hormones Lead to Faster Growth)
Excess plant growth regulators can cause problems, though hormone level alone does not explain every issue.
High cytokinin is associated with hyperhydricity (vitrification), but there is no universal threshold above 5 mg/L BAP. Some species react at much lower concentrations and others tolerate higher ones.
Affected tissue often looks glassy, translucent, and brittle. Confirm by anatomy and water content rather than appearance alone.
Such plantlets frequently struggle when moved to air, though some can recover with preconditioning, so it is not an automatic failure.
If glassiness appears, treat it as multi-factor. Consider lowering cytokinin, firming the gel, and improving gas exchange, and also review ammonium level, vessel humidity, light, and the explant and genotype (see the hyperhydricity review above).
Problem. Endogenous Contamination
Sometimes contamination appears from the cut end of the stem weeks after sterilization, even though the surface looked clean.
Bacteria living inside the tissue (endophytes and other latent microbes) may not be reached by surface disinfection.
Distinguish pathogens from harmless commensals and from culture contaminants, since the appropriate response differs, and appearance alone does not confirm the source.
- PPM. A higher in-medium concentration is sometimes used for endogenous contamination. Note that 2–4 mL/L is above the typical general dose (0.5–2 mL/L), if you go higher, follow the manufacturer’s endogenous-contamination directions and account for exposure time, transfers, protective equipment, and plant response.
- Antibiotics. Only consider antibiotics (for example, Timentin) after isolating and identifying the organism, testing susceptibility, and finding a minimal phytotoxic dose, and be aware of resistance and effects on the plant and its microbiome. For most home growers, discarding or quarantining a resistant, contaminated culture is the safer default rather than reaching for antibiotics.
- Meristem culture. Isolating the apical meristem can help eliminate some viruses, but it does not guarantee pathogen-free plants. Confirmation still needs virus indexing and bacterial testing, and sometimes thermo- or chemotherapy.
Problem. Phenolic Browning
Sometimes the medium turns brown or black around the cut site and the tissue dies. Browning often points to phenolic oxidation, but check for contamination or necrosis too, since not all darkening has the same cause.
Wounding can trigger the release of phenolic compounds that oxidize into browning products, which can harm the tissue.
The phenolic profile and enzyme activity differ by species and tissue.
Browning is a common problem in orchids. It also occurs in many other plants, so treat any claim that it is common in one group as a tendency rather than a rule.
- Antioxidants. Ascorbic acid (vitamin C) or citric acid are used as antioxidant treatments (often around 100–150 mg/L). The effective dose and pH depend on the species and exposure, so treat one figure as a starting point.
- Activated charcoal. 1–2 g/L can adsorb phenolics, but it also adsorbs hormones, vitamins, and metals, which can change growth (a trade-off to account for).
- Frequent transfer. Moving the explant to fresh medium (for example, every 24–48 hours) can reduce exudate buildup. More frequent handling also raises contamination, injury, and labor, so let a small pilot with an untreated control guide the interval.