
Tissue Culture Plants: Expert Acclimation & Care
Acclimate tissue culture plants after de-flasking: rinse gel, inspect roots, taper humidity, choose a substrate, manage aquatic melt, and diagnose failures.
Samuel Reed · Published 2025-12-16 · 14 min read

Key Takeaways
- Acclimation is a gradual change from a protected vessel to open air. Rinse away nutrient gel, inspect roots and leaves, and taper humidity while matching light, substrate, and planting depth to the species.
- Plantlets are not miniature versions of established plants. High humidity, sugar-rich medium, low light, and limited gas exchange can leave them with weak cuticles, sluggish stomata, and roots that need to adapt.
- Clean stock lowers risk but does not guarantee disease-free plants. Quarantine new material and treat contamination, soft rot, or persistent decline as reasons to isolate and investigate.
- Substrate and planting depth must fit the plant. Keep terrestrial crowns and rhizomes at the surface, keep epiphytic roots airy, and avoid treating one mix or depth as universal.
- Watch the plant rather than a fixed schedule. Humidity tapering, light, temperature, and watering should change in response to wilting, new growth, root condition, and the actual environment.
Tissue-culture plants leave a protected, high-humidity vessel for ordinary air, so survival depends on a gradual transition rather than a single rinse or fixed calendar. Inspect the plantlet, remove the nutrient gel, taper humidity, and match light, roots, substrate, and planting depth to the species while you watch its response.
1. The Acclimation Problem
What Changes at De-Flasking
The goal is to replace the culture vessel’s support step by step. Reduce contamination without damaging roots, provide enough humidity to prevent desiccation, and gradually restore the gas exchange, light, and root function that open-air growth requires.
I assign flask siblings to a chamber grid and photograph their starting root mass before randomizing positions. If losses later cluster at the vent or light edge, the grid exposes the environmental gradient.
Any rotation is a documented test. Moving the healthiest plantlets without recording it can make the new position look falsely successful.
A firm leaf formed outside the flask is a stronger milestone than temporary survival of the original leaves. The new leaf shows that the plantlet has begun functioning under the current light and humidity.
2. Why a Plantlet Needs a Slow Transition
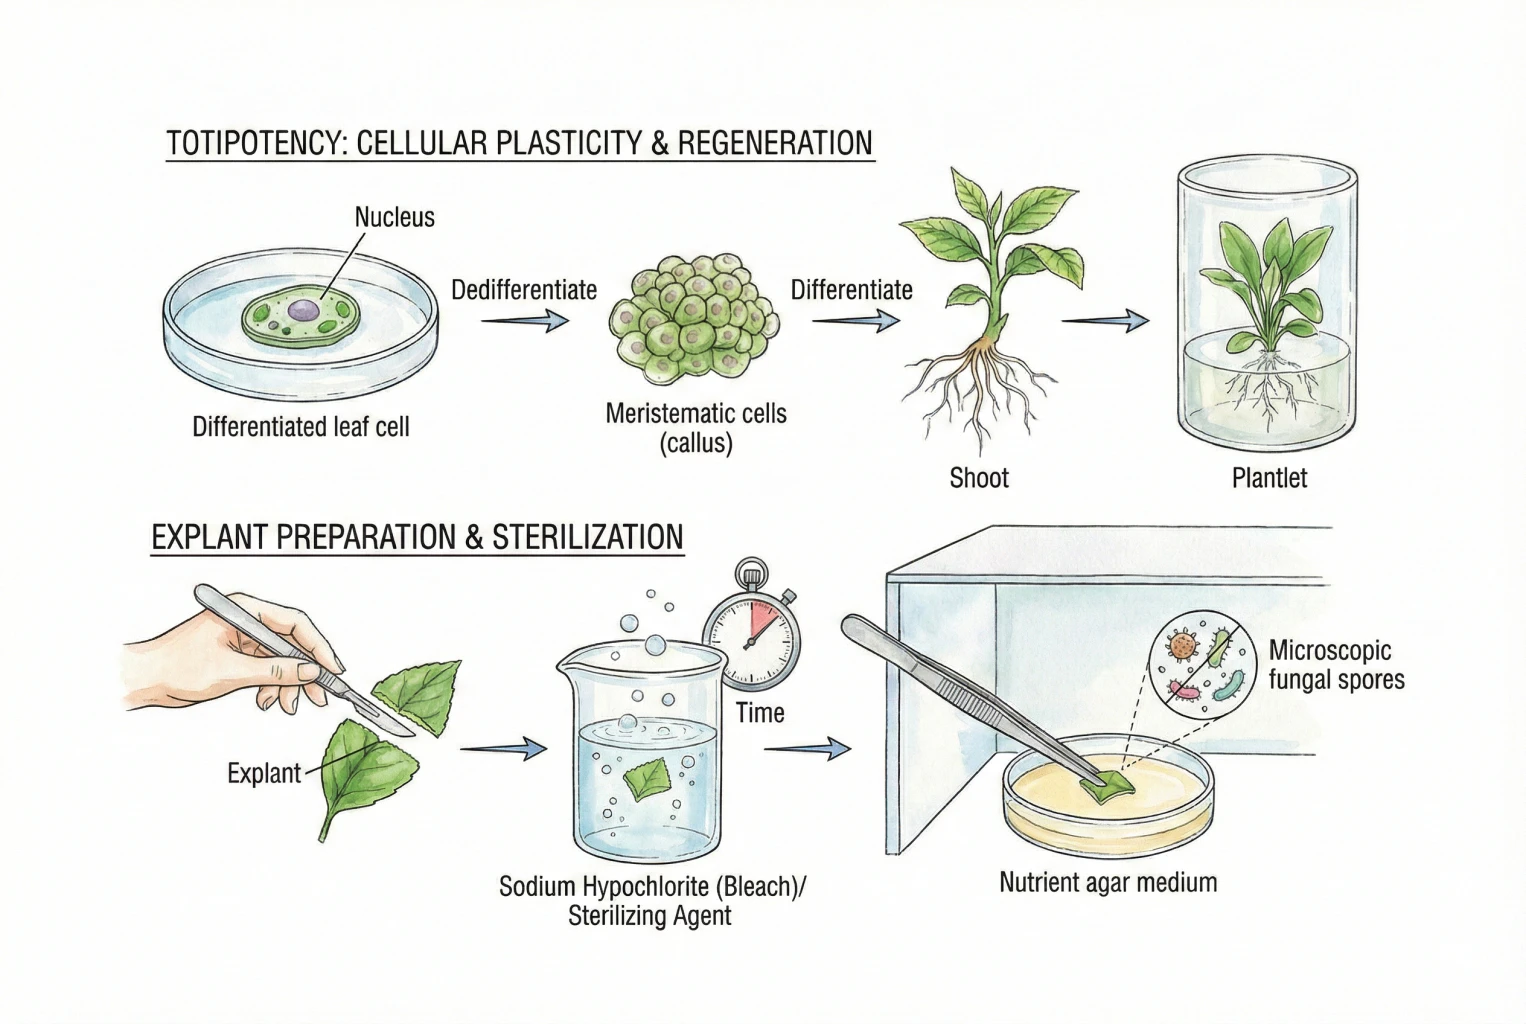
A plantlet has grown in high humidity, low light, and a sugar-rich gel. Its leaves and roots often need time to function well in ordinary air and substrate.
Rinse away the gel, keep humidity high at first, use gentle light, and reduce the cover only as the plant remains firm and continues growing.
Watch for Fragile or Glassy Growth
Some plantlets are unusually glassy, translucent, or brittle. These need an especially slow transition because they can lose water faster than new roots replace it. A normal-looking plantlet still benefits from gradual hardening off.
Hyperhydricity in Plant Tissue Culture
3. Preparation (Moving from a Sterile Vessel to Open Air)
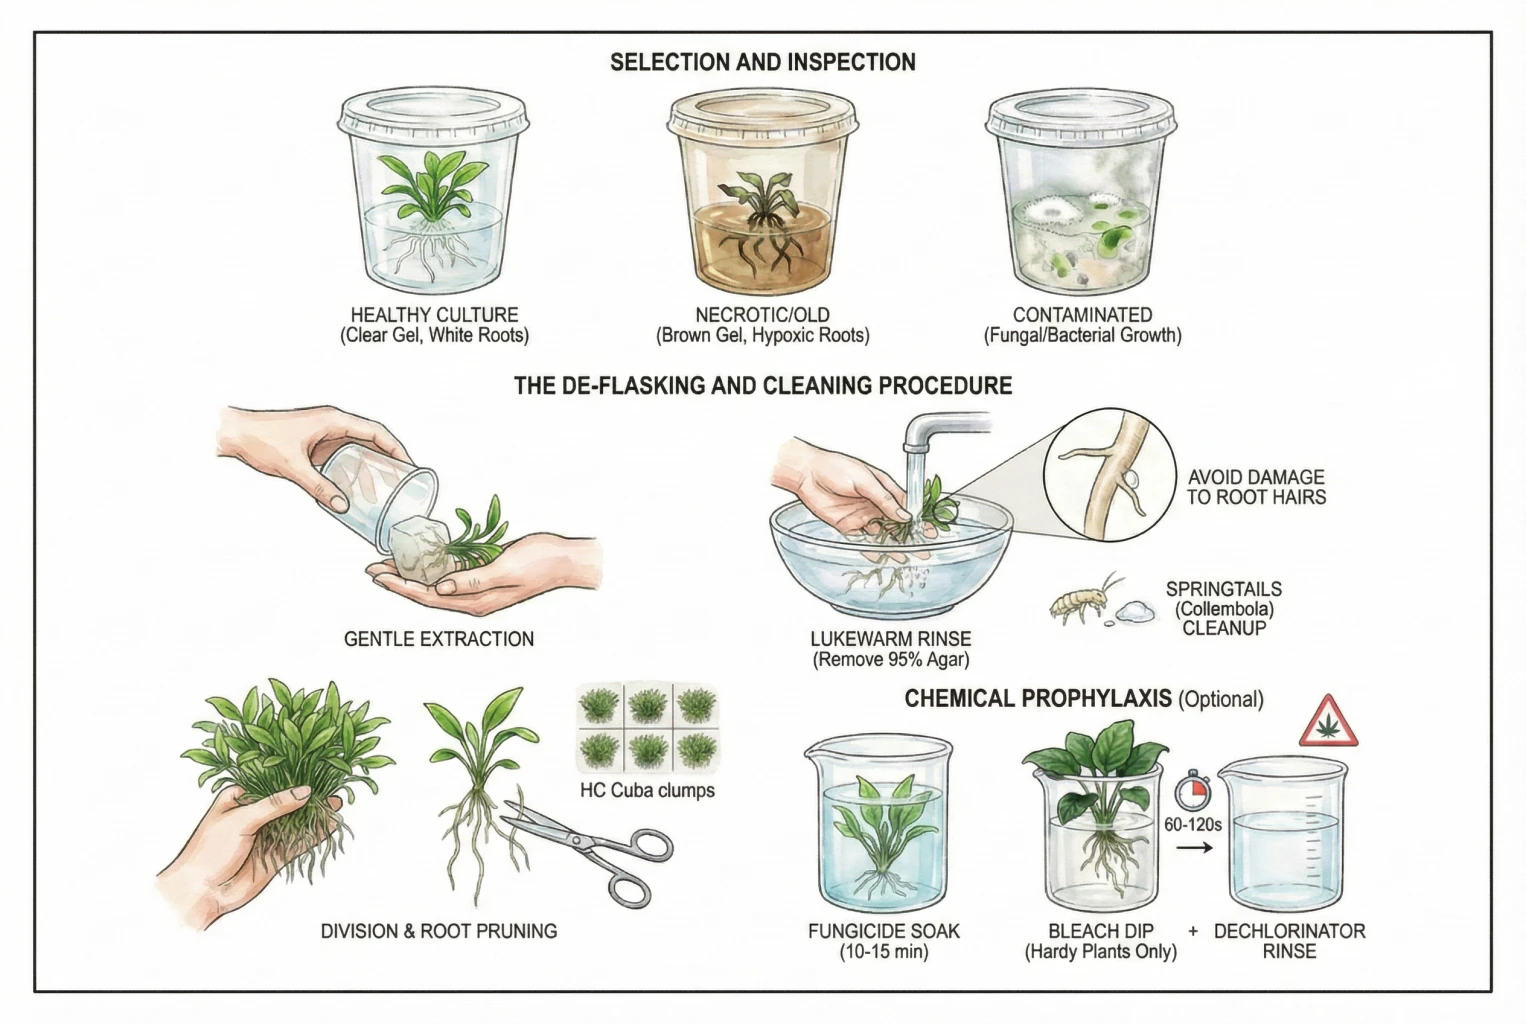
The instant you break the seal, the plant moves from an axenic (sterile) vessel into ordinary air that carries microbes.
Good preparation lowers the microbial load on the plantlet and gives it time to acclimate behind its existing barriers rather than relying on any instant new defense.
3.1 Inspect Before You Open
What to Check in the Cup
- The gel is ideally clear and firm. Gel that has turned to brown liquid can signal leaking phenolics or necrosis, but browning can also come from tissue age, medium breakdown, or microbial enzymes. Treat it as a reason to inspect closely, not a single diagnosis.
- Roots are usually white or cream when healthy. Brown or black roots can indicate hypoxia or rot, but some species have naturally pigmented roots and the medium itself can stain them, so judge alongside firmness and smell.
- Contamination, white fuzz, slime, fuzzy spheres, is a strong warning sign of a fungal or bacterial problem (green slime may instead be harmless algae or cyanobacteria). Older cultures that have sat for months tend to be harder to acclimate as nutrients deplete and phenolics build up, though this varies by species and protocol. A fresh, vigorous batch is the safer starting point.
3.2 De-Flasking and Cleaning
Rinse and Inspect Before Planting
Once the seal breaks, remove residual nutrient gel because its sugar can support microbial growth, including molds such as Botrytis. Pythium is an oomycete rather than a true fungus, despite often being grouped with molds. The gel also supported the plant physically in culture, so remove it gently to avoid tearing roots.
- Extract the plant mass gently. Tap the inverted container or leverage the gel plug. Don’t pull the delicate stems.
- Rinse in lukewarm (about 20–25 °C) dechlorinated water, massaging gel off the roots with your thumbs (a soft paintbrush helps) and changing the water several times. Aim to rinse until the roots are visibly free of gel without damaging them. Leftover residue can feed microbes, but aggressive scrubbing tears root hairs, so stop once it is visibly clean. In a bioactive vivarium, springtails and other detritivores may consume some leftover gel over time, but treat them as an optional cleanup aid, not a substitute for rinsing or a guarantee against disease.
- Divide and prune. Tease dense clumps into smaller units (for carpeting aquatic plants, cutting the clump into grid squares can be easier than separating stems). Remove only damaged or dead roots with a clean tool. Trimming healthy roots is a trade-off. On some plants it can prompt new substrate-adapted roots, but on fragile terrestrial plantlets it removes working root surface and can reduce uptake, so trim conservatively.
- Prophylactic chemical dips are optional and carry real risks. No specific fungicide or bleach protocol is safe to generalize because proper use requires a registered product, the correct organism and plant, a defined concentration and contact time, and the maker’s protective-equipment, ventilation, and disposal instructions. A rinse alone does not neutralize residues, and a dechlorinator does not sterilize a plant or make it safe for an animal enclosure. Bleach and harsh dips can injure soft-stemmed plants such as Cryptocoryne or begonias. If you consider a dip for a high-value plant, follow a source specific to that species and product and test on a spare specimen first.
4. Vivarium Integration (Terrestrial and Epiphytic Strategies)
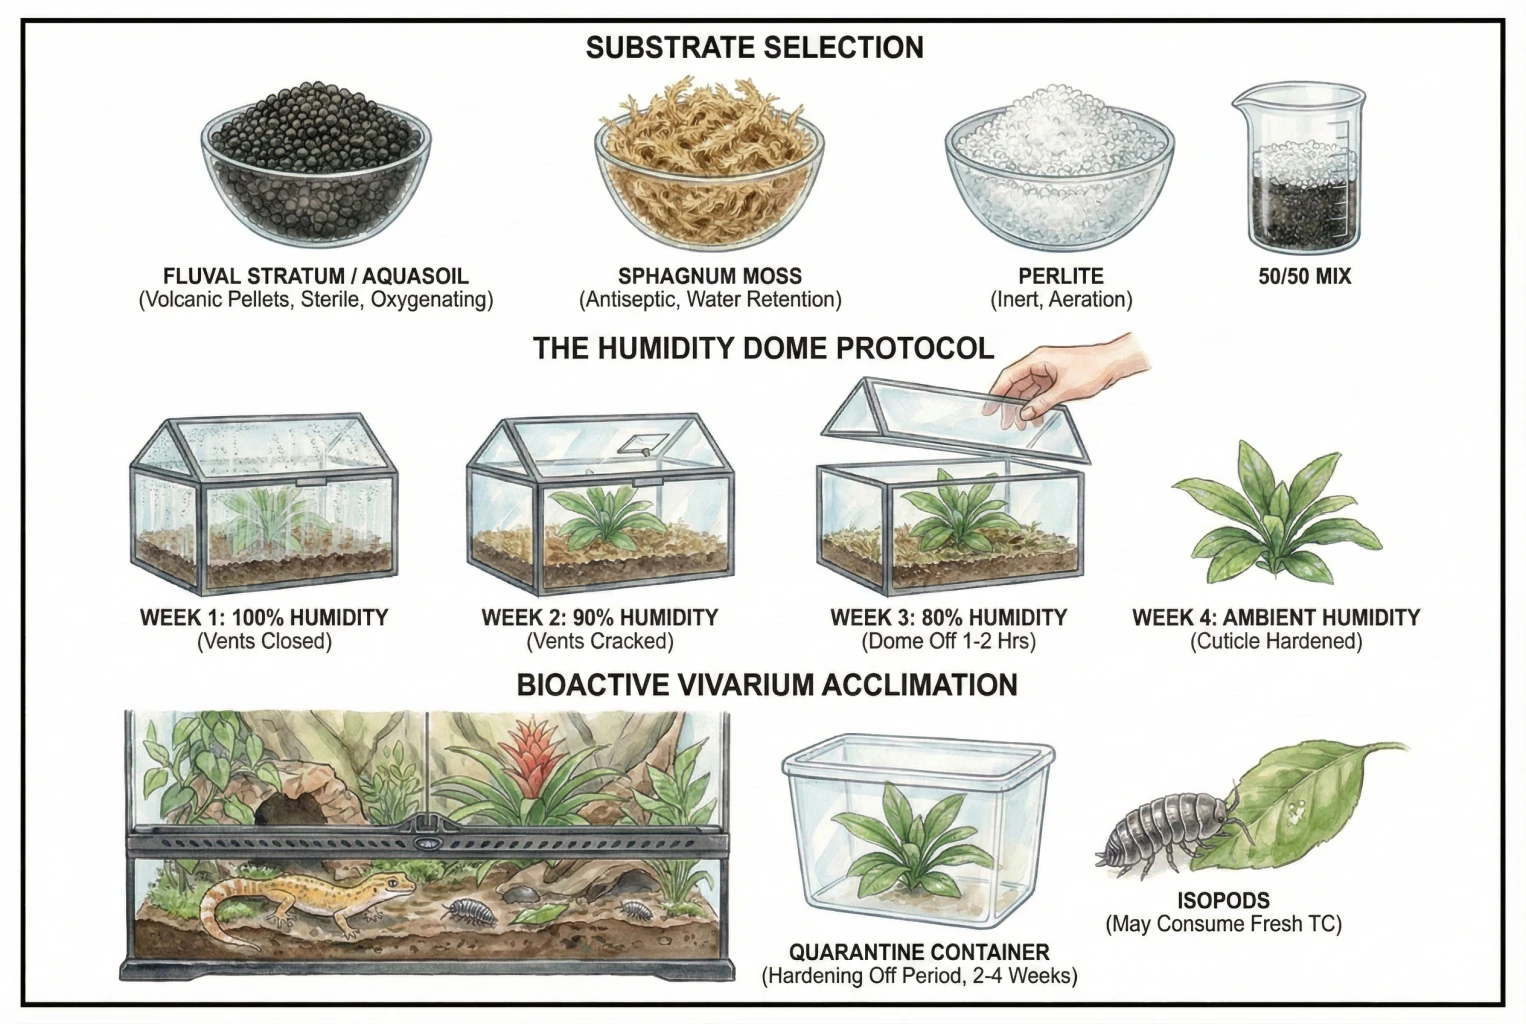
In a vivarium the two main risks are desiccation in low humidity and root rot in soggy, poorly aerated substrate.
Rot is not caused by any single organism, low oxygen, oomycetes and fungi, warm wet conditions, and substrate choice all play a part, so the strategy is to manage vapor pressure deficit and keep the root zone aerated.
4.1 Substrate Selection
Match the Medium to the Plant
Avoid planting a fresh TC plant into dense, water-retentive potting mixes that stay soggy and starve the roots of oxygen.
A more open, well-draining medium generally transitions better. The specifics below are options, not the only valid choices.
- Fluval Stratum / aquasoil. A pelletized volcanic aquarium soil. Fluval describes it as a natural, nutrient-bearing soil whose porous granules support beneficial nitrifying bacteria and can slightly raise ammonia early on, so treat it as a nutrient-active substrate, not a sterile or bacteria-inhibiting one. It is designed for planted freshwater aquariums. Using it for terrestrial acclimation is more of an experiment, worth a small trial first.
- New Zealand sphagnum moss is a common choice for epiphytes and aroids because it holds water while keeping air pockets. It has some natural acidity, but do not rely on claims that it suppresses damping-off. Disease suppression depends on pathogen, water quality, and how the moss is packed.
- Perlite. An inert, expanded volcanic glass that adds aeration and holds little water or nutrient. It has low water-holding capacity (not zero), so on its own it dries fast. Many growers use it in a mix with a more water-retentive medium to balance air and moisture. Any specific ratio should be tuned to the species rather than treated as a fixed recipe.
4.2 The Humidity Dome Protocol
Taper Humidity by Plant Response
The core principle, well supported across the literature, is to start near the culture’s high humidity under a dome and then taper it gradually so the plant develops a functional cuticle and stomatal control before facing dry air.
The rate and duration are not universal. They depend on the species, the plantlet’s condition, and the actual humidity, temperature, substrate moisture, and light, so measure conditions and adjust to how the plant responds rather than following the calendar alone.
The schedule below is one worked example for a responsive plant. Slower-establishing or woody species can take considerably longer (the linked Artemisia study ran for roughly 16 weeks), while some herbaceous species harden in one to two weeks. Watch the plant, not the week number.
- Start (high humidity). Vents closed, substrate moist but not waterlogged. Very high humidity encourages condensation, so ventilate enough to avoid standing water on the leaves.
- Next stage. Begin opening the vents (or poke a couple of holes in a bag). Vent position sets airflow, not an exact humidity. A small hygrometer tells you the real reading.
- Then. Remove the dome for a short period each day and lengthen it gradually. Persistent wilting or curling is a cue to slow down and re-cover, while also checking for over-wet substrate or root problems.
- Finally. Move to ambient conditions once the plant tolerates open air without wilting. Some plantlets reach this in a few weeks. Others need longer, and not every plant hardens off successfully.
Acclimation and hardening of a slow-growing woody species (Artemisia tridentata) from in vitro plantlets
4.3 Acclimating Into Bioactive Vivariums
Quarantine Before Adding a Cleanup Crew
Tissue culture starts from clean stock and is usually free of visible pests, but it is not a guarantee against latent microbes or viruses, so quarantine new plants before adding them to a setup with geckos or frogs.
A freshly de-flasked plantlet is also fragile, and a hungry cleanup crew (isopods, millipedes) may graze on soft new tissue before it toughens up.
Hardening the plant off in a separate container first, often a couple of weeks, but adjust to the plant and the animals involved, lets it establish before it has to withstand the cleanup crew.
5. Aquarium Integration (Submersed Transition and Melt)
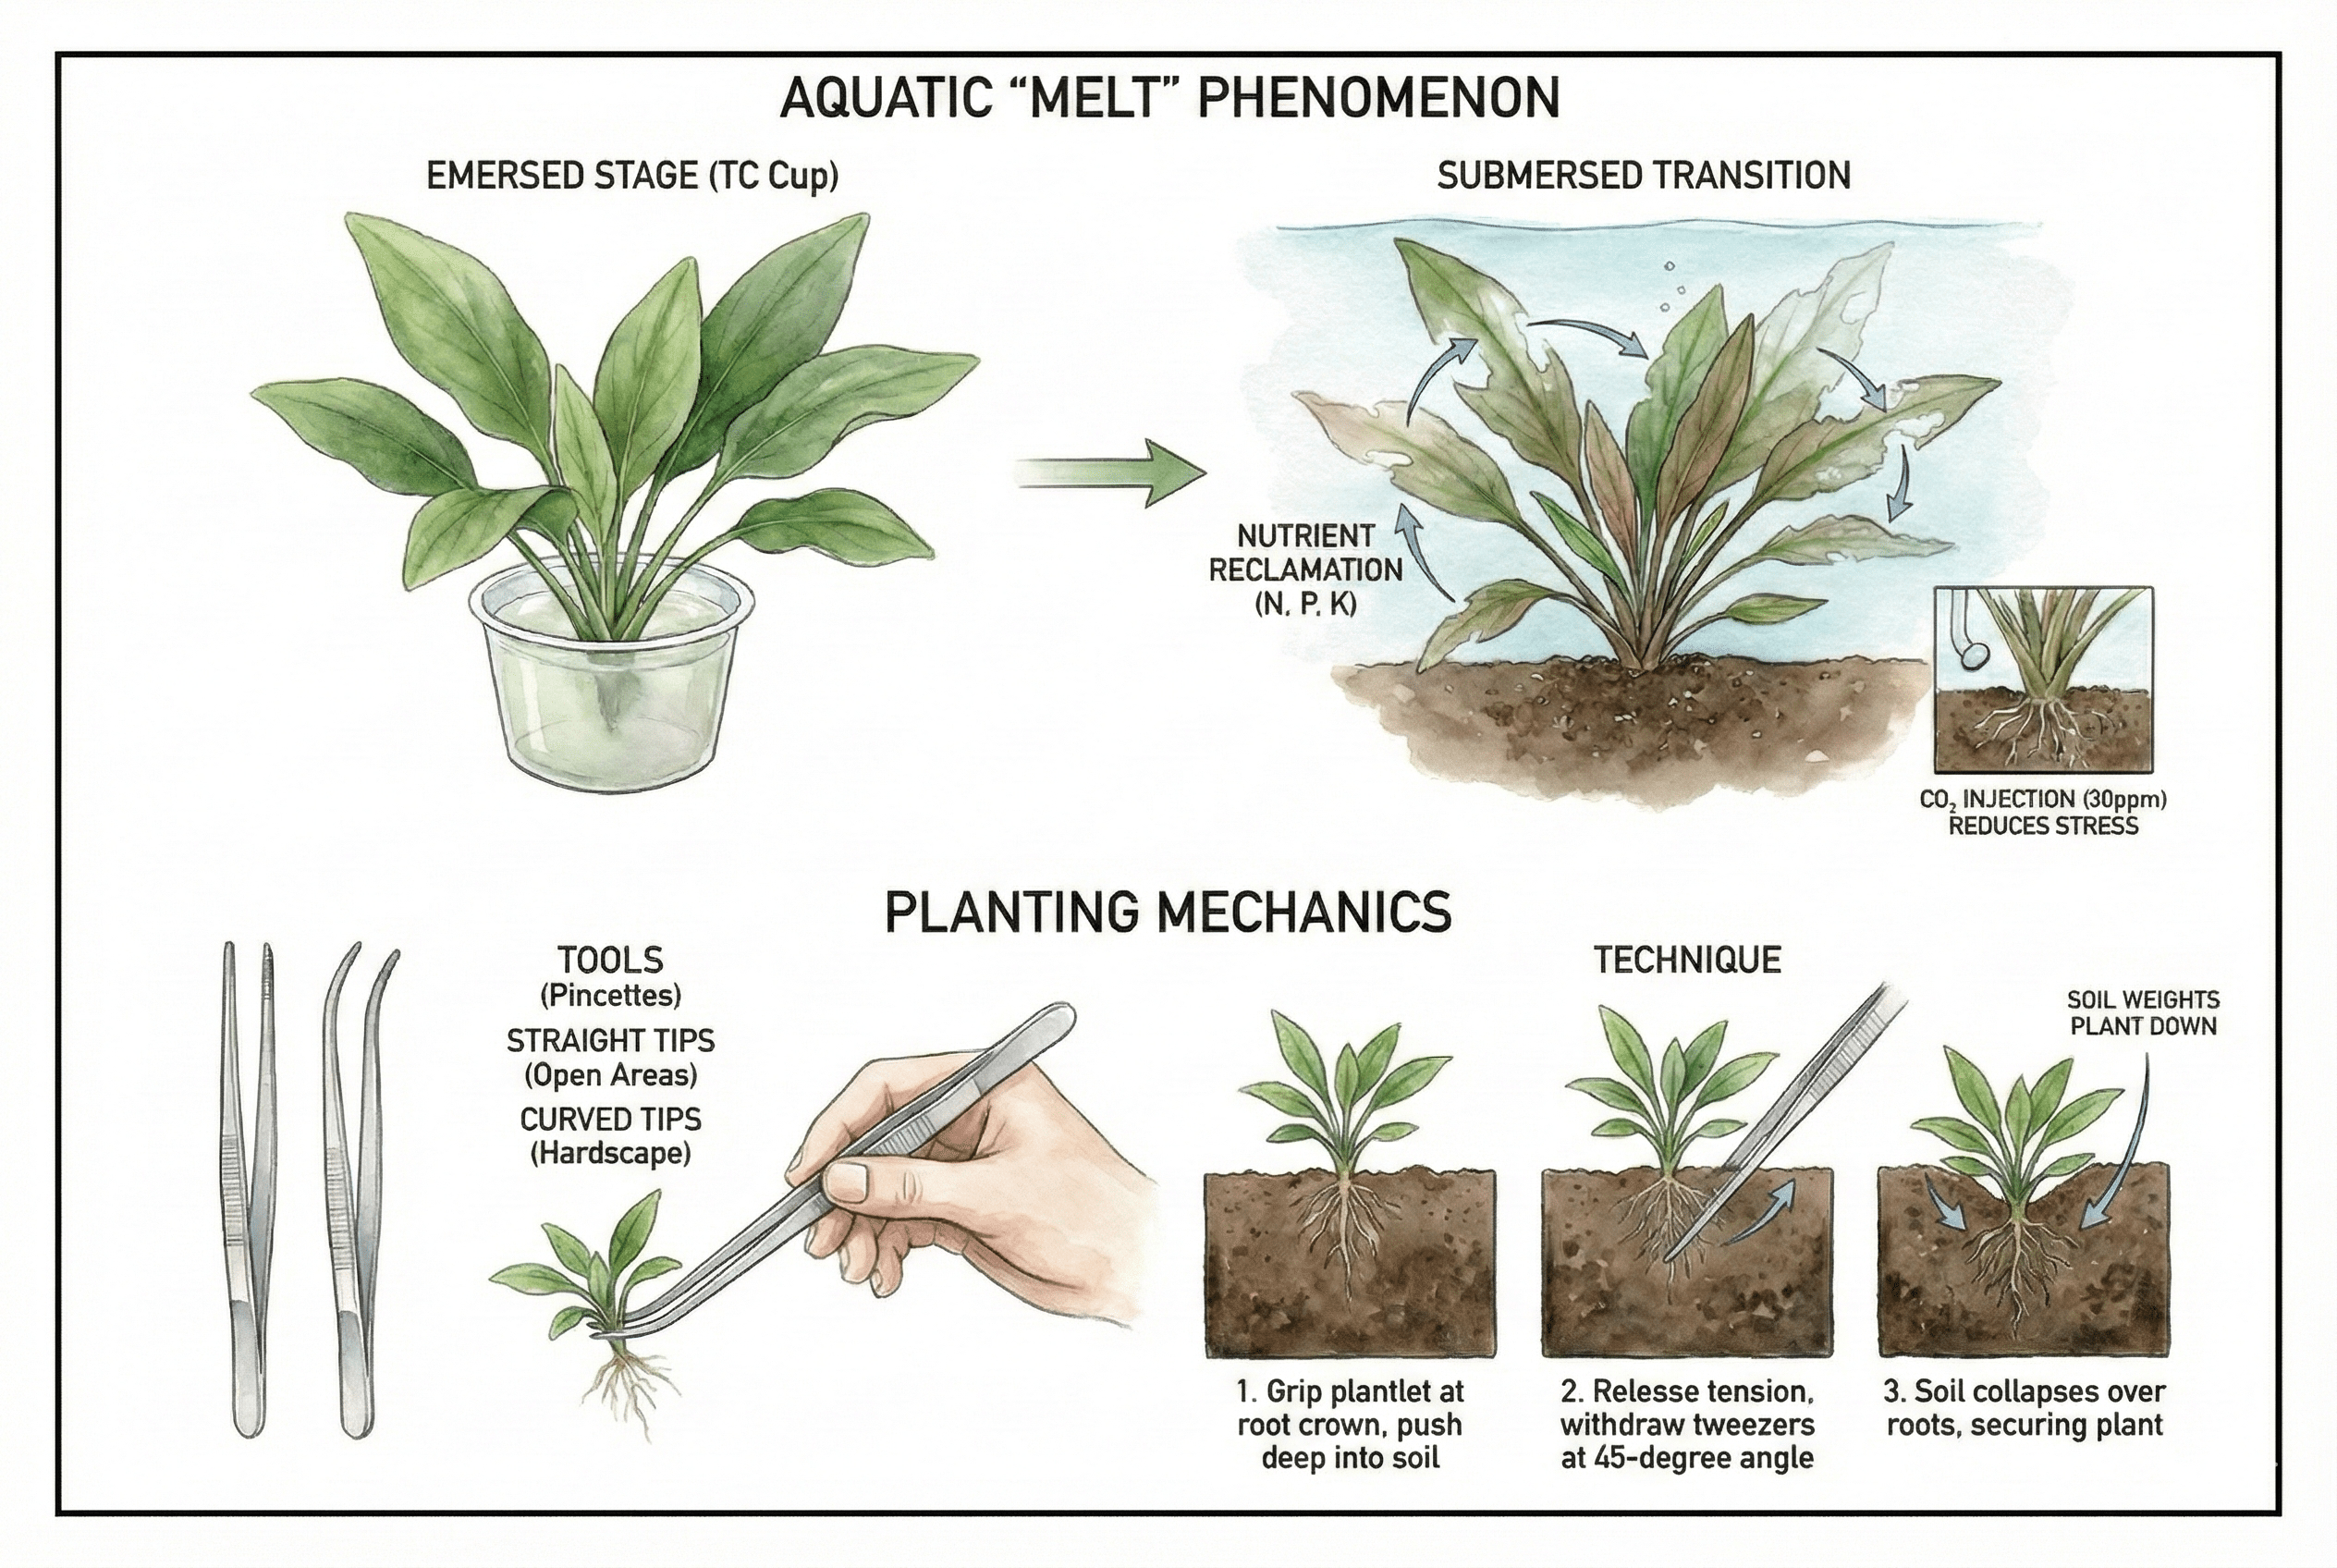
Aquatic plants face a different set of changes. Staying planted against buoyancy, and the shift from air to water, which alters gas exchange, the leaf’s boundary layer, and carbon availability, not just respiration but photosynthesis and leaf structure too.
5.1 The Phenomenon of Aquatic Melt
What Aquatic Melt Means
Melt, rapid leaf disintegration soon after planting, is a common stress-and-adjustment response in species like Cryptocoryne and Echinodorus, not necessarily a failure.
Many culture leaves grow in an emersed (air) form. Submersed conditions favor a different leaf structure, so old leaves are often shed while the plant grows new submersed foliage, and it can move some mobile nutrients out of the dying leaves in the process.
Not every leaf is emersed and not every plant melts, so treat it as a possible transition, not a certainty.
To ease the transition, remove decaying leaves before they rot (decaying matter can add to the nitrogen load) and don’t panic and uproot the plant.
Supplemental CO₂ helps in injected, higher-tech setups (a common target is roughly 30 ppm) but it is not required for every tank, and overdosing CO₂ stresses fish and shrimp, so add it gradually while watching livestock and pH rather than aiming for a fixed number.
5.2 Planting Mechanics
Plant at the Correct Depth
TC plantlets are tiny and buoyant, so fine tools help. Stainless planting tweezers make placement easier (straight tips for open areas, curved tips for working around hardscape) and are gentler on delicate stems than fingertips.
Planting depth depends on the plant. For small stem and carpeting plants, grip near the base and push the roots into the substrate, then withdraw the tweezers at an angle so the substrate closes over the roots. Do not bury the growth point of every species. The rhizome of Anubias and Bucephalandra must stay above the substrate or it rots, while the crown of Cryptocoryne and Echinodorus should sit at the surface. Deep burial suits rootless carpet fragments rather than every plant.
EvaGO Aquarium Tweezers
EvaGO tweezers are useful for placing buoyant aquatic plugs in a deeper tank. Their long curved shape can be awkward in a small shallow container, so choose a shorter tool when reach is not needed.
6. Essential Equipment
For expensive rare plants, dedicated equipment can be worth the cost, though none of it is strictly required. Use the tissue culture acclimation product chooser to compare a chamber, substrate, hygrometer, disinfectant, and light by their role in the process before buying a complete setup.
Humidity Dome
A useful piece is a humidity dome with adjustable vents, which makes it easy to open airflow gradually rather than pulling the cover all at once.
A clear bag or takeout box opened in stages can do the same job less conveniently, so treat the vented dome as a good reusable option, not a necessity.
Viagrow Propagation Dome
Viagrow propagation dome suits a group of plantlets when you want to open airflow in small steps. Check whether it fits your tray and use a hygrometer to see the actual humidity. A clear bag or storage box can do the same job for fewer plants.
Seedling Heat Mat
A seedling heat mat can warm a cold root zone to encourage metabolism and rooting. Warmth alone does not prevent rot, and it is not needed if your room is already warm.
VIVOSUN Heat Mat
VIVOSUN heat mat is useful only when a cold root zone is slowing establishment. It has no thermostat, so pair it with a probe thermostat and measure the substrate. Keep it away from standing water and skip it when the room is already warm.
New Zealand Sphagnum Moss
For substrate, long-fiber New Zealand sphagnum holds water while keeping air pockets, which suits delicate roots, though packing it too densely, or letting it decompose, can still create low-oxygen pockets, so pack it loosely.
Besgrow Spagmoss
Besgrow Spagmoss fits delicate epiphytic roots that need moisture with air pockets. Pack it loosely and do not treat its clean processing as a disease-free guarantee. Shorter, cheaper moss can still work when it stays open and the plant does not need a long-lasting pole or mount.
7. Troubleshooting (Diagnosing Failure)
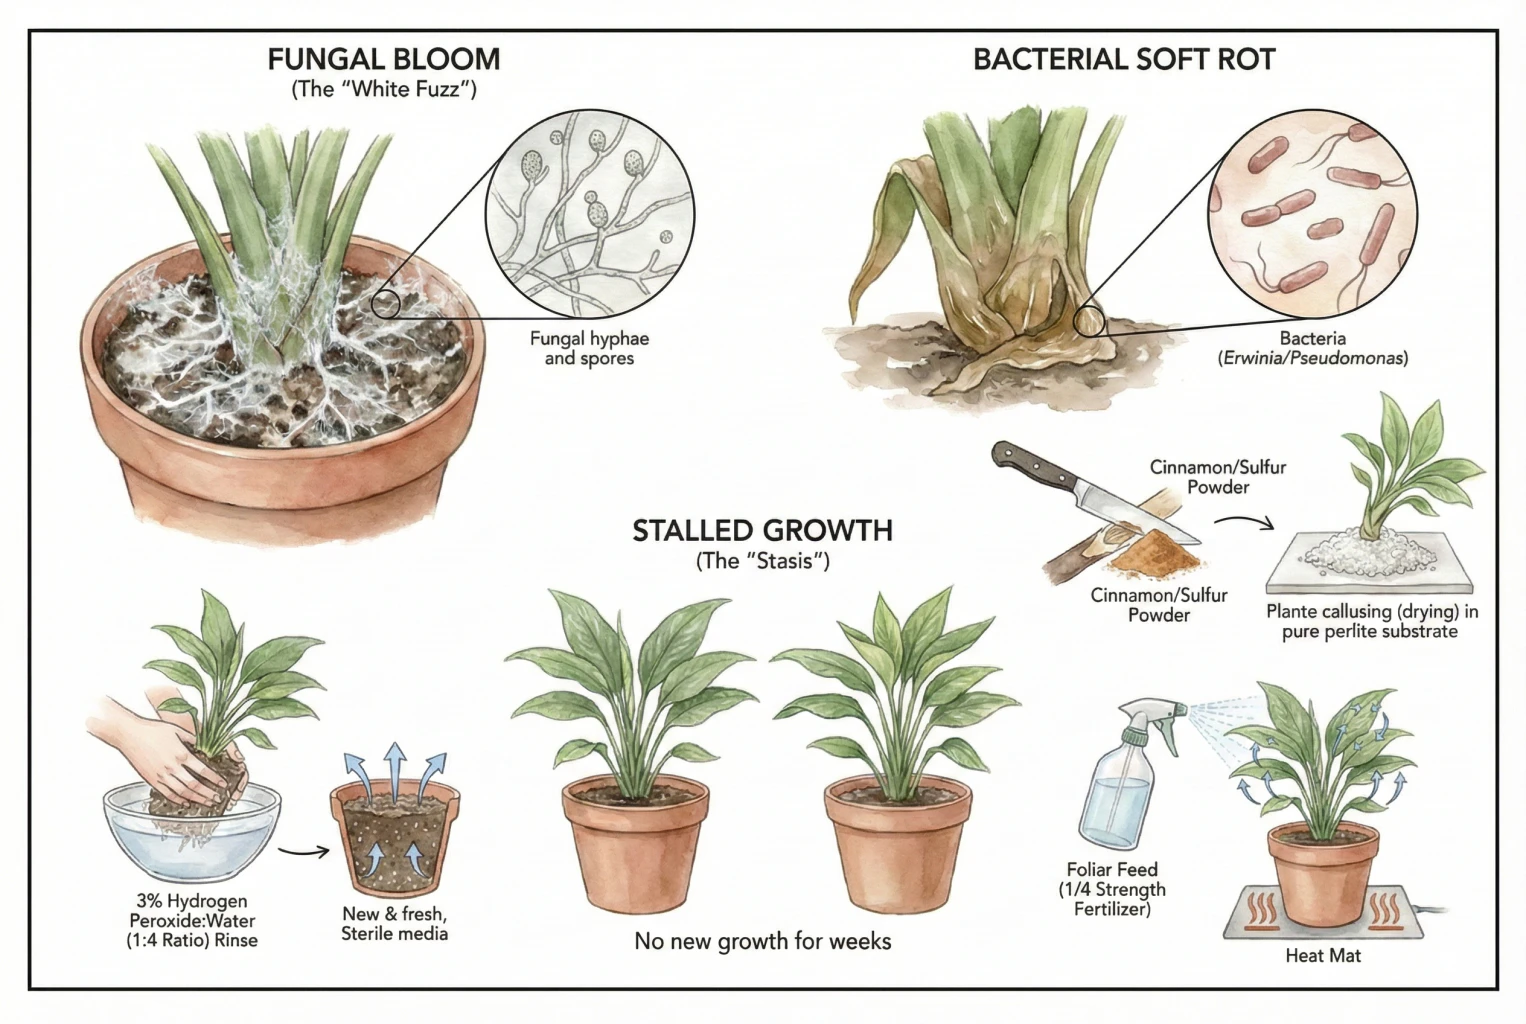
Why Is White Fuzz Growing on a Tissue Culture Plant?
White, cobweb-like mycelium on the substrate or plant base is a sign of fungal growth. Leftover sugar-rich gel is a common contributor, but humidity, poor airflow, and contaminated substrate can all play a part, so incomplete rinsing is not the only cause.
Such fungi are often saprophytic at first, though they can move onto weakened tissue.
Respond promptly. Isolate the affected plant from others, remove obviously infested material, improve airflow (balanced against desiccation risk), and re-pot into fresh, clean medium.
Some growers use a dilute hydrogen peroxide rinse, but its concentration, contact time, and effect vary by species and it can damage tissue. If you try it, use a low dilution briefly and test on a spare plant first rather than treating it as a routine cure.
What Should I Do About Bacterial Soft Rot After De-Flasking?
A stem base that turns translucent, mushy, and foul-smelling and collapses quickly is consistent with bacterial soft rot, typically entering damaged tissue in too-wet substrate.
Symptoms alone cannot confirm the organism. Soft rot is caused by bacteria such as Pectobacterium and Dickeya (formerly grouped under Erwinia) and some Pseudomonas, and a lab or extension service is the only way to identify it for certain.
Soft rot is difficult to treat, and extension guidance generally recommends promptly removing and discarding affected plants and sanitizing tools because there is no reliable cure for infected tissue. Cutting back to healthy tissue may be worth trying only on an isolated high-value plant. Home remedies such as cinnamon or sulfur powder, a one-hour callus step, or repotting into pure perlite are not evidence-based fixes and should not be relied on to stop infection or protect other plants.
Why Has a Tissue Culture Plant Stopped Growing?
The plant survives for weeks but pushes no new growth. Nutrient shortage or a cold root zone are common causes, but low light, root injury, low humidity, pathogens, or natural dormancy can also stall a plant, so rule those out rather than assuming the cause.
Confirm the root-zone temperature first (and that any heat mat is actually working). A very dilute foliar feed can help while roots establish, but over-fertilizing or wetting leaves risks leaf burn and disease, so keep any feed weak and infrequent and follow the product’s label.
8. Conclusion
Tissue culture makes many rare plants available as clean, uniform stock, and acclimation determines whether they survive de-flasking. TC plants can still carry latent pathogens, are genetically uniform, and vary in provenance, so clean is relative. Identify the plant’s condition, rinse off the gel, taper humidity, match substrate and planting depth to the species, and keep conditions clean and measured. Most failures come from rushing the transition rather than from culture itself.
Affiliate Disclosure
This article contains Amazon affiliate links. As an Amazon Associate I earn from qualifying purchases. If you use these links, the site may earn a commission at no extra cost to you. Product availability, price, and specifications can change. Check the current listing before buying.