
Anthurium Female vs Male Stage: Pollination Guide
Identify Anthurium's female stage by stigmatic fluid and male stage by pollen, then collect, transfer, store pollen, and track berry development.
Marcus Hale · Published 2026-03-07 · 15 min read
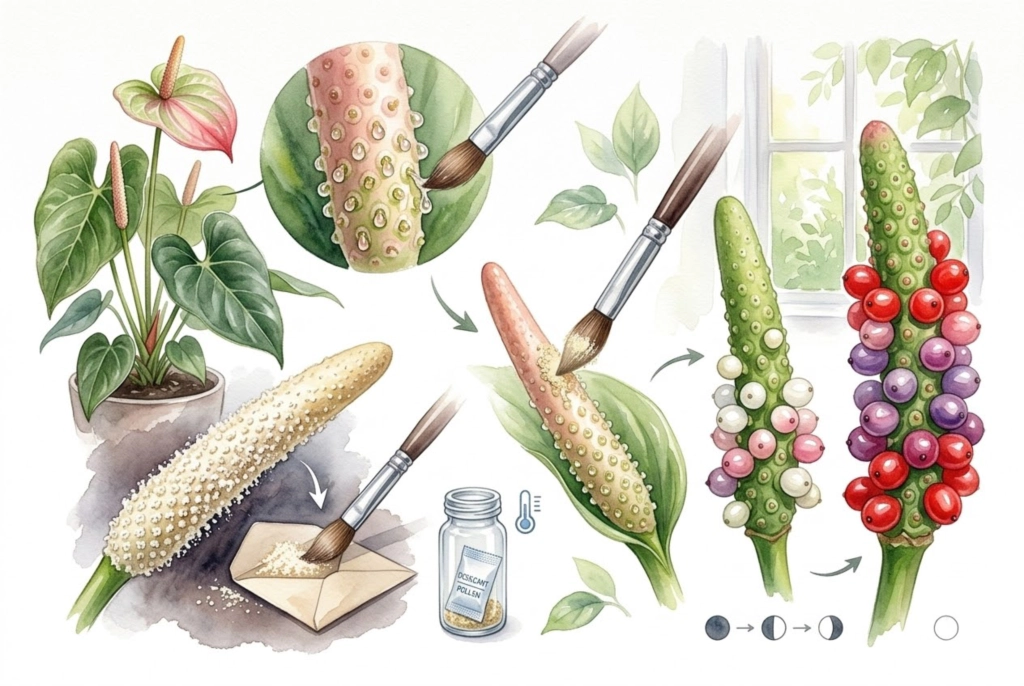
Key Takeaways
- Anthuriums are broadly protogynous, so the female stage usually precedes the male stage. Sticky stigmatic fluid generally appears before powdery pollen, which reduces self-pollination without preventing it. Exact timing varies by species and cultivar, so daily observation matters more than a fixed schedule.
- A wet, glistening stigma is the clearest receptive signal. How long it stays visible varies between species and conditions, so check daily and apply pollen only while the stigma is wet.
- Pollination needs a compatible donor and a receptive inflorescence at the same time. The two inflorescences can be on separate plants, on the same plant, or supplied from stored pollen, so two plants are not always required.
- Stored pollen is an experimental backup when timing is off. Keep it dry and cold, warm a sealed container to room temperature before opening, and confirm viability by fruit set because Anthurium-specific storage life is not well documented.
- Patience is part of the process. Enlarging ovaries and continued development are the clearest success signs. Fruit maturity can take roughly 5-8 months or longer depending on species, so keep the plant evenly watered and appropriately fed.
Successful Anthurium hand-pollination comes down to matching a wet, receptive stigma with fresh pollen from a compatible donor, recording the timing, and then waiting for individual ovaries to enlarge. When the stages do not overlap, carefully stored pollen is an experimental backup rather than a guarantee.
Anthuriums are popular aroids for home collections, and many showy horticultural types have velvety leaves and bright, waxy inflorescences. The genus is diverse, however, so spathe form, color, and flowering timing vary widely between species.
Hand-pollinating an Anthurium to set your own seed asks for closer observation of its flowering stages. If you want to cross two compatible plants or work with a favorite, understand the reproductive cycle first.
Setting seed from one plant on its own, called selfing, is not the same as making a hybrid.
The key skill is telling the female receptive stage marked by stigmatic fluid apart from the male active stage marked by pollen shed. If the two stages do not line up, pollination is much less likely, though stored pollen, partial overlap, and repeated attempts can still help. For chromosome, compatibility, and parent-selection context, see the broader Anthurium pollination science guide.
Anatomy of the Anthurium Inflorescence
Before you can pollinate an Anthurium, you need to understand what you are looking at. The structure that many people call the flower is formally an inflorescence, a group of many tiny flowers.
I assign one labeled brush or disposable applicator to each pollen donor and keep it with that donor’s packet. Cleaning a shared brush by appearance is not enough when an unintended grain can confuse the cross months later.
One photograph captures the donor label, applicator, and recipient tag together before application. That single frame connects the physical tools to the written cross record.
The receptive spadix is divided into zones on the photo, with a tick added for every application. Uneven receptivity and repeated transfers remain visible instead of collapsing into one pollination date.
The Spathe
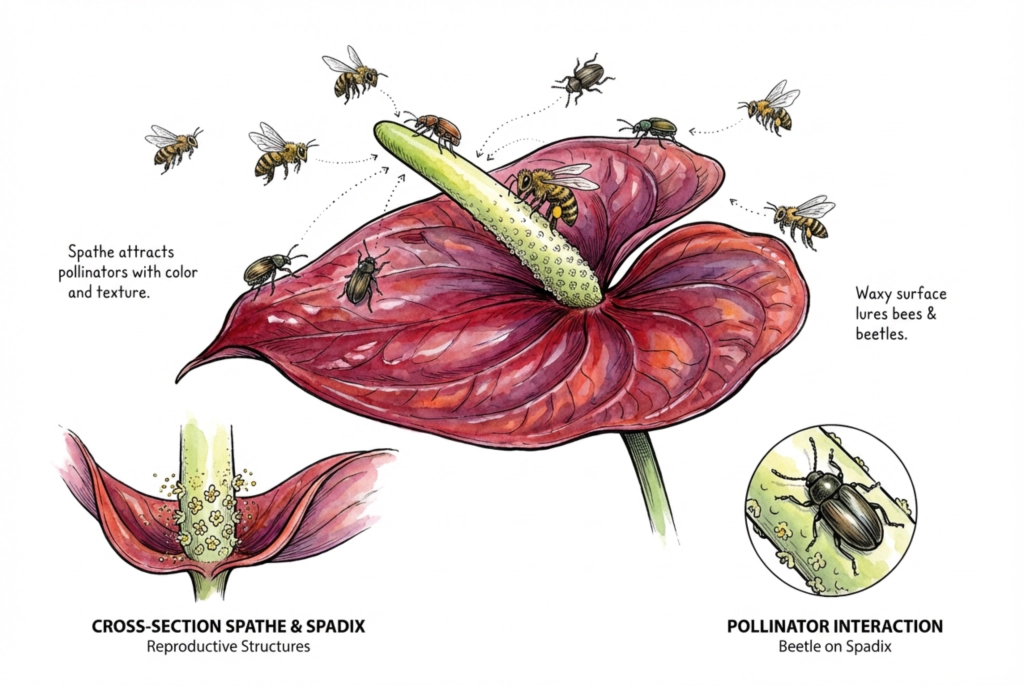
This is the modified leaf (a bract) that subtends the central spike. Often heart-shaped or lance-shaped, and colorful in many showy cultivars.
In some showy horticultural Anthuriums the spathe can help attract pollinators. Across the genus, though, spathe color and function differ. Many species have green or brown, inconspicuous spathes, and reported pollinators range from gall midges to various flies and bees rather than only bees and beetles.
True nectar or stigmatic secretion? Structural evidence elucidates an old controversy regarding nectaries in Anthurium
The Spadix
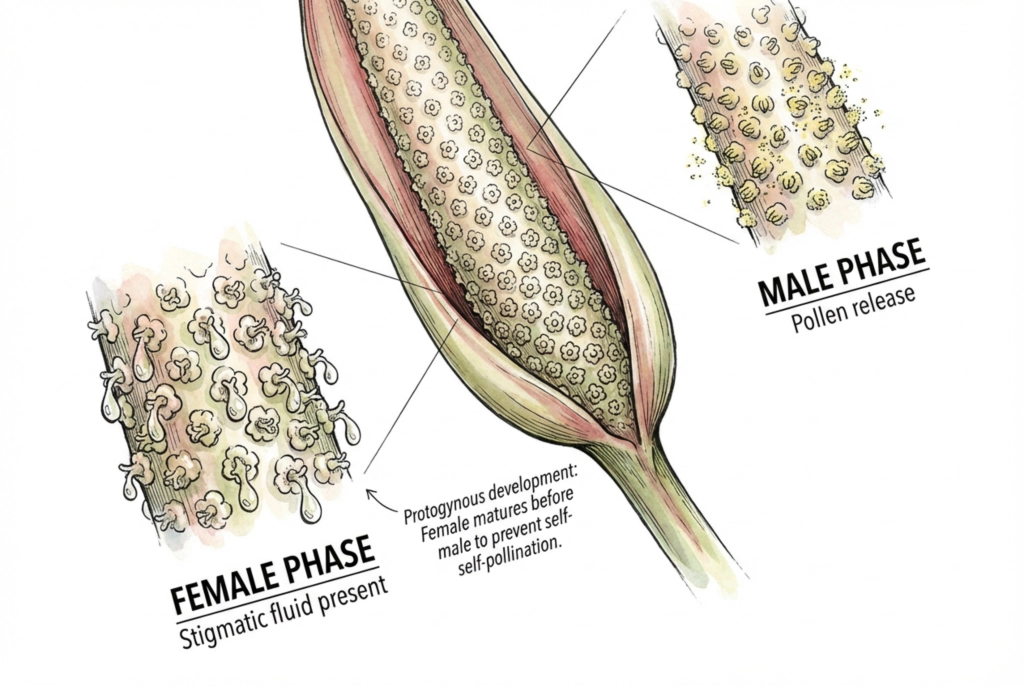
This is the fleshy central spike that protrudes from the spathe and carries the plant’s reproductive flowers.
Look closely and you will see it is covered in many tiny bumps. These are the true, individual flowers.
The exact number varies with the species, inflorescence, and size.
Anthurium flowers tend to be protogynous, meaning the female organs generally become receptive before the male organs shed pollen.
This is a broad tendency in the genus. The timing is not identical across every species, cultivar, or inflorescence.
This pattern, a form of dichogamy, reduces the temporal overlap of the two stages and favors cross-pollination.
It lowers self-pollination rather than preventing it entirely. Pollen can still move between flowers on the same plant (geitonogamy).
Identifying the Female Stage (Stigmatic Fluid)
Watch for the Receptive Window
The pollination window opens with the female stage, but when it starts relative to the spathe unfurling varies with the species, cultivar, and your growing conditions. Watch the spadix daily rather than counting on a set number of days.
Recognizing Stigmatic Fluid
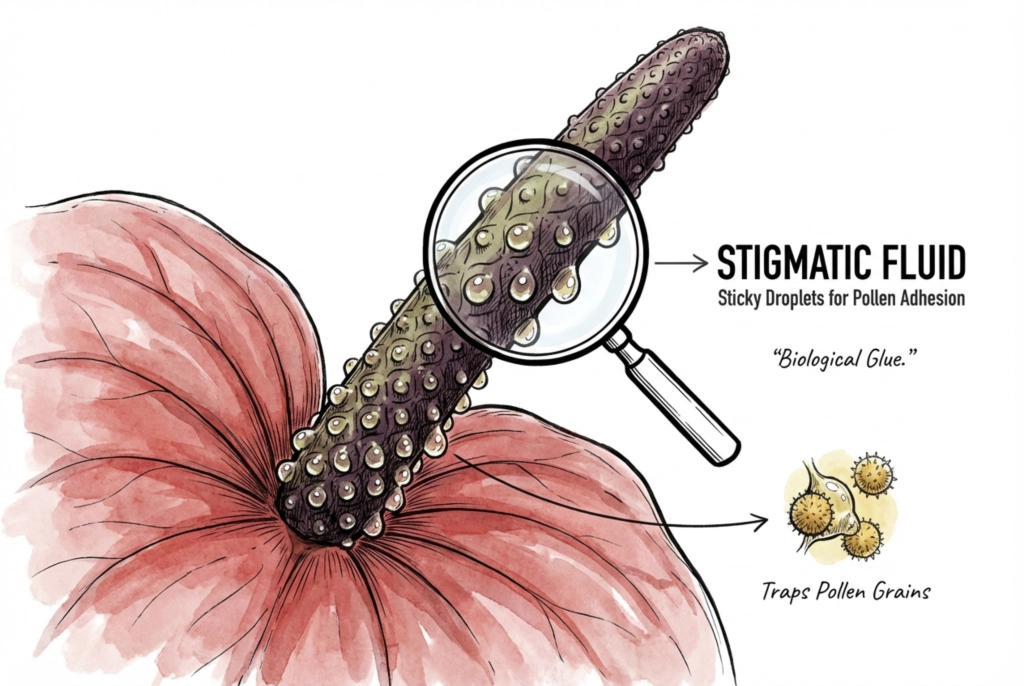
A wet, glistening stigma is the clearest directly observable sign that an Anthurium is in its female stage.
Observed closely under good light, the small bumps on the spadix may show tiny, glistening, sap-like droplets.
How pronounced this is differs between species. In some it is subtle rather than obvious to the naked eye.
The secretion is sticky, and it is thought to help capture and hydrate pollen grains on the stigma.
Note that a study in A. andraeanum found this stigmatic secretion is chemically distinct from the plant’s true (tepalar) nectar, so its exact composition and function should not be overstated.
In some Anthuriums receptivity progresses from the base of the spadix toward the tip over several days, but this is not universal (in at least one field-studied species almost all stigmas opened at roughly the same time).
The Short Receptive Window
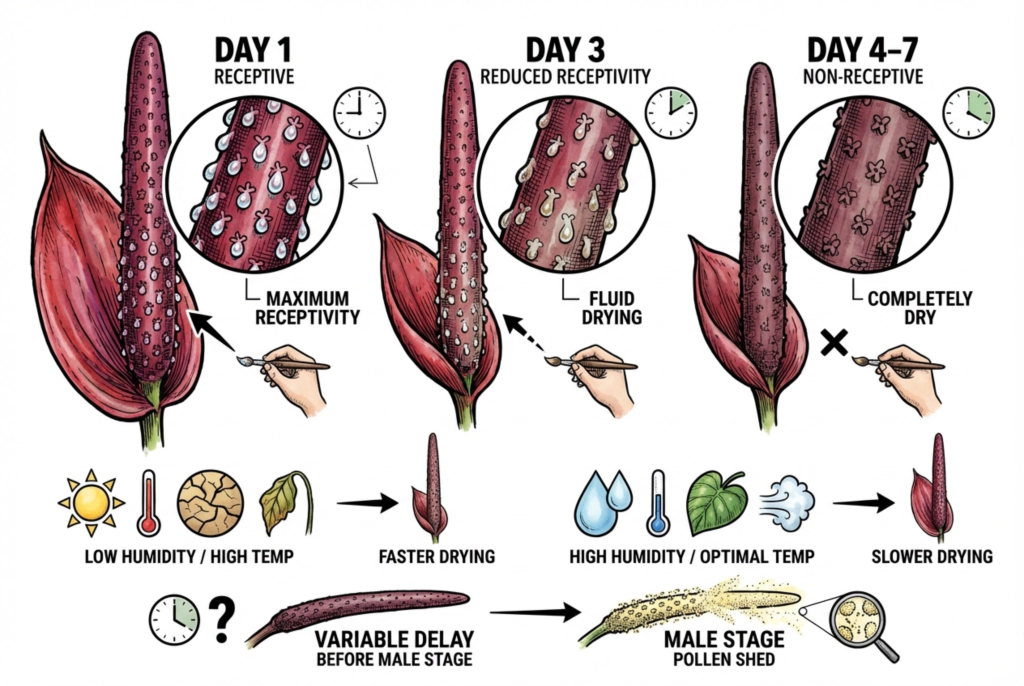
The receptive window is limited, so check daily. How long the stigma stays wet varies between species. One field study of A. acutangulum described a female phase lasting about 4-6 days, but treat that as an example rather than a rule and go by what you actually see.
Low humidity or high temperatures may shorten how long an exposed secretion stays visible, though airflow, developmental change, and observation error can also play a part.
Once a section looks dry and loses its glistening sheen, its chances of setting seed drop, so aim to apply pollen while the stigma is still wet.
Identifying the Male Stage (Pollen Shed)
The Timing Gap Between Stages
After the female stage, there is usually an interval before the male stage begins, and the length varies by species and cultivar.
How long that interval lasts varies by species and cultivar. Sometimes the male stage follows soon after the stigmatic fluid dries, and sometimes a week or more passes.
Note it in your own dated observations.
Recognizing Pollen Shed
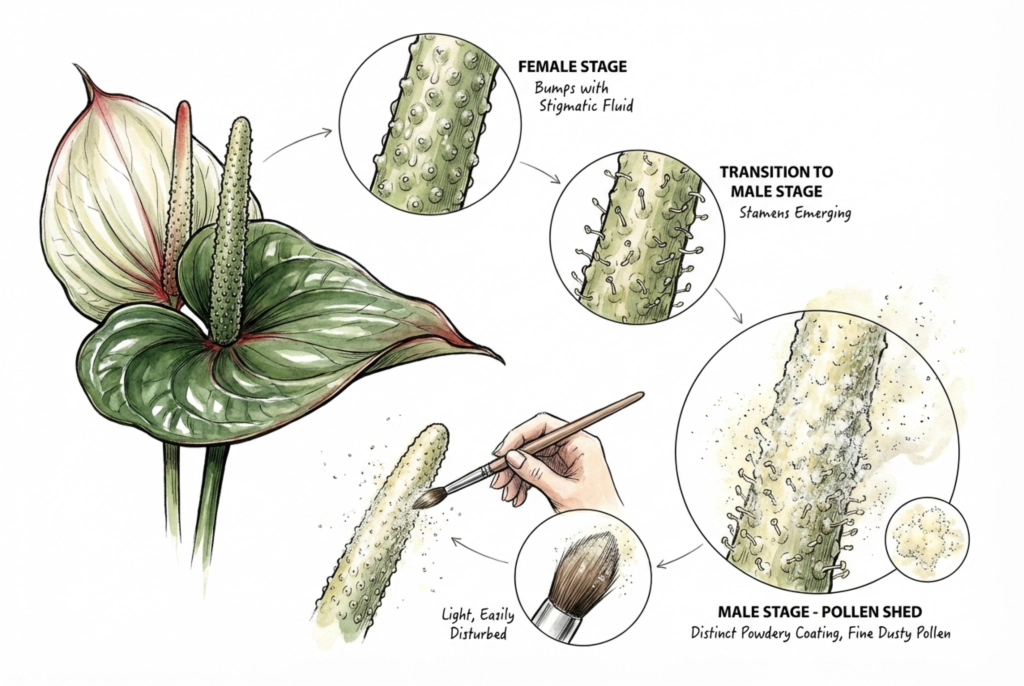
The move to the male stage is generally marked by stamens emerging from the bumps on the spadix and presenting pollen. Anther emergence can be uneven and spread over many days. In one field study the male phase ran for roughly 12-14 days in an apparently random pattern, so watch for actual mature pollen rather than assuming a uniform coating appears at once.
How to Recognize Mature Pollen
Anthurium pollen often looks like a fine, dusty powder and is generally lighter and less sticky than the heavy pollen of a lily, so handle it gently to avoid scattering or contaminating it. Reported colors include whitish, pale yellow, or cream, but color alone does not confirm viability.
During the male stage you may see a powdery coating on parts of the spadix. In some species it appears sparsely or in sequence rather than all over.
Queen Anthurium can be especially difficult to read. The A. warocqueanum pollen-maturity guide separates spadix fading from actual pollen presentation.
Keep Conditions Stable During Pollen Handling
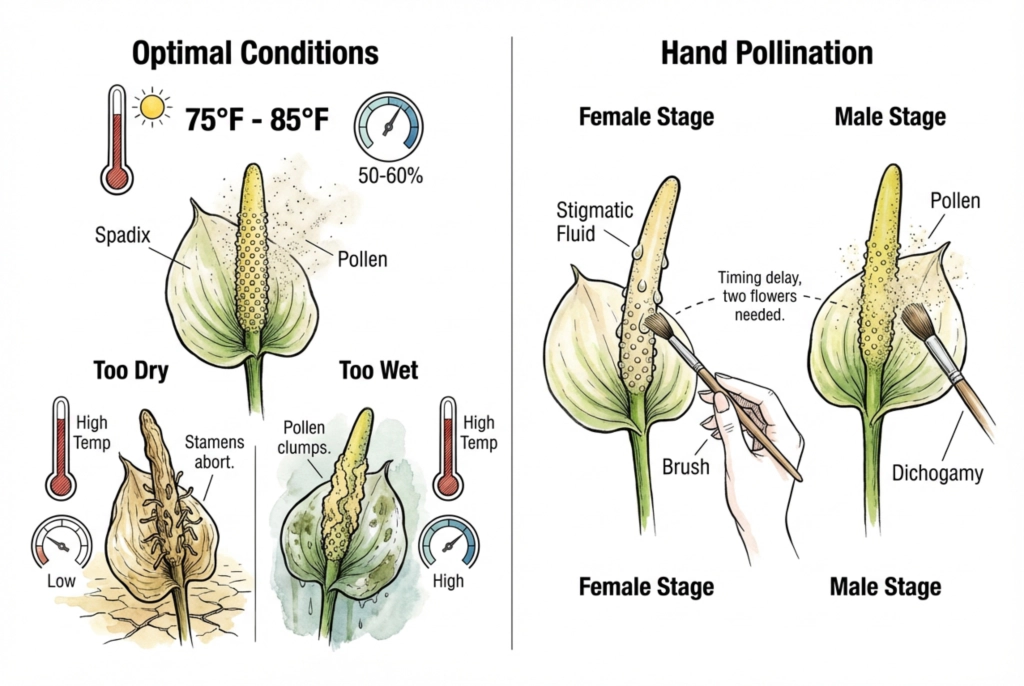
Plant health and environment can affect flower development and pollen quality. Comfortable tropical-houseplant conditions, with warmth and moderate humidity, are a reasonable general target.
There is no cited Anthurium pollen-shed trial establishing an exact optimum temperature or humidity, so these are not measured thresholds.
Very dry or very wet conditions can make pollen harder to collect and handle, but the exact effect depends on the species and your measured conditions, so log temperature and humidity rather than assuming a threshold.
Hand-Pollinate a Receptive Inflorescence
Match the Receptive and Pollen Stages
Because the female and male stages on one inflorescence are usually separated in time (dichogamy), a single inflorescence often cannot pollinate itself while both stages line up.
So you generally need two separate inflorescences (one shedding pollen (male) and one with a receptive, wet stigma (female)).
These can be on different plants, on the same plant, or one supplied from stored pollen. It is not strictly two plants.
Required Tools
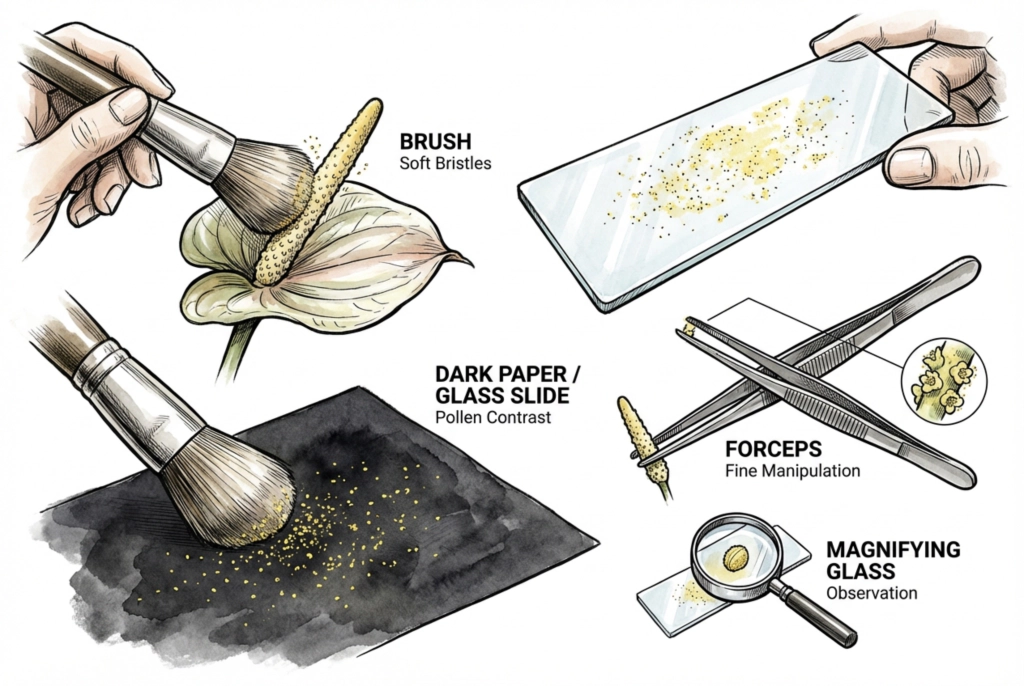
You do not need a laboratory setup. Use clean, dry, soft tools and work gently to limit tissue damage and cross-contamination.
Soft Brush for Pollen Transfer
Use a clean, soft-bristled makeup brush or watercolor paintbrush. Ideally keep a separate, cleaned brush per donor to avoid mixing pollen.
Dark Surface for Collection
A dark piece of paper or glass slide makes pale pollen easier to see while you collect it.
VIVOSUN 30X 60X Jewelers Loupe
VIVOSUN 30X 60X Jewelers Loupe is one optional way to confirm the wet stigma and the first dusting of pollen. High magnification is not required, and a low-power loupe, a phone macro lens, or simply good diffuse light can work just as well. The 60X lens has a narrow field and shallow focus that beginners may find fiddly.
Step-by-Step Technique
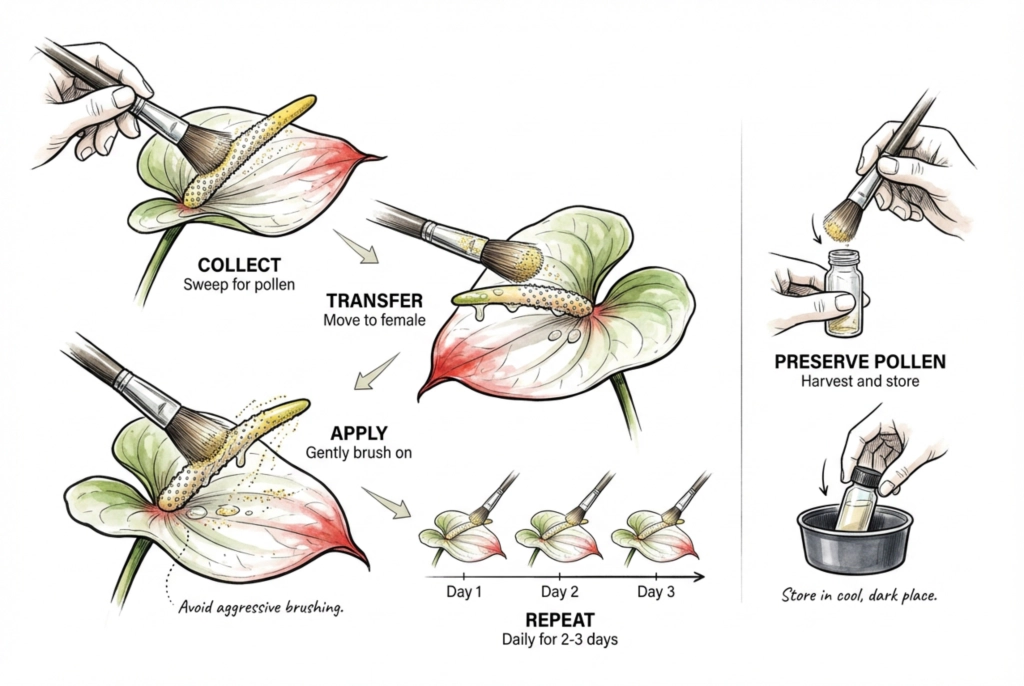
1. Collect Mature Pollen
Confirm the male inflorescence is presenting mature pollen, then gently sweep a clean, dry brush over its spadix to collect the powdery pollen on the bristles. Note which plant it came from.
2. Transfer Pollen to the Receptive Inflorescence
Transfer the pollen to the receptive inflorescence, the one with wet, glistening stigmas.
3. Brush Pollen over Wet Stigmas
Apply by delicately brushing the pollen over the wet stigmas. Use gentle, sweeping motions. Do not jab or brush aggressively. Damaging the tissue risks bruising and contamination, and can reduce seed set on the flowers you disturb.
4. Repeat While Stigmas Stay Wet
Because receptivity can be staggered across the spadix over several days, repeating the transfer on consecutive days can help. UF/IFAS breeding guidance suggests pollinating a spadix more than once for maximum seed. The exact number of days is not a fixed rule, so go by which stigmas still look wet.
Preserving Pollen for Later
When the Stages Do Not Overlap
What if your male inflorescence starts shedding pollen, but your intended female inflorescence isn’t receptive yet?
Storing pollen is one option. Others are waiting for another inflorescence, finding a different fresh donor, or postponing the cross. Fresh pollen is generally more reliable than stored.
For a component-by-component setup, compare vial, desiccant, brush, and humidity-monitoring options in the Anthurium pollen storage product chooser.
Desiccation and Storage
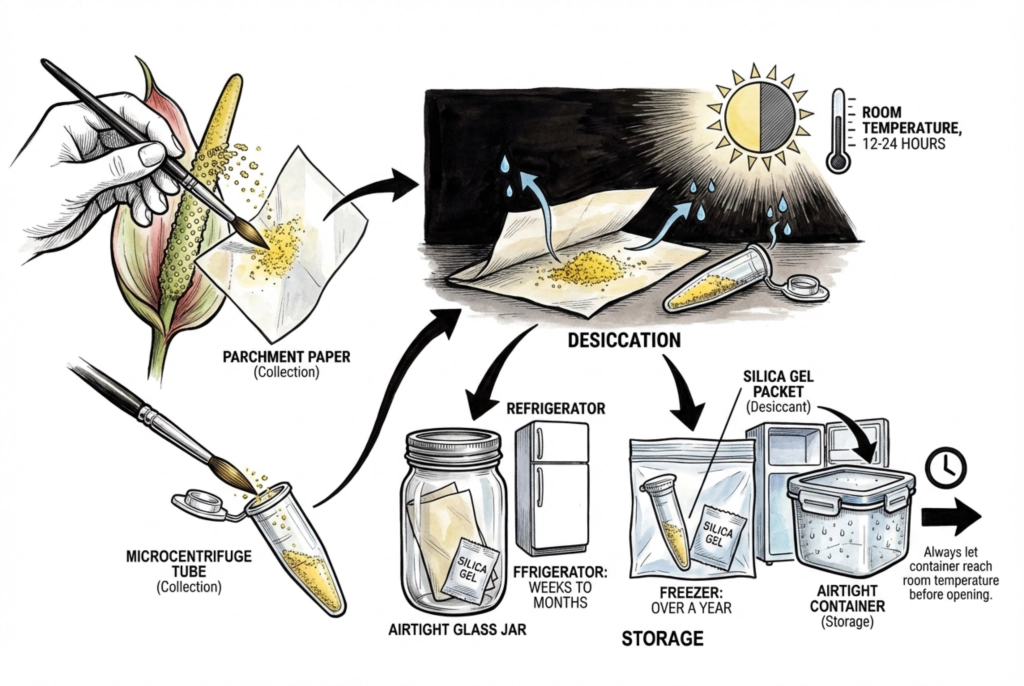
Using your brush, sweep the pollen onto a piece of folded parchment paper or into a small, dry, labeled tube.
Record the donor plant and the date, and store small aliquots so you can thaw only what you need.
Excess moisture shortens the life of stored pollen. Some growers dry pollen briefly before sealing it, but Anthurium-specific drying times and moisture targets are not established, and over-drying could harm desiccation-sensitive pollen, so keep storage experimental and prioritize fresh pollen where possible.
Store the sealed pollen in an airtight secondary container, kept physically separate from a desiccant. Do not let loose beads touch the pollen.
Wisesorb Blue Silica Gel
Wisesorb blue silica is a bulk option that is far more than a small pollen vial needs and adds spill risk. For small storage, a documented cobalt-free or non-indicating sachet in a separate chamber is easier to control.
A desiccant on its own does not guarantee viability.
Cold Storage and Condensation
Cold storage generally slows the loss of pollen viability, and lower temperatures may extend it further.
Exact refrigerator and freezer lifetimes for Anthurium pollen depend on temperature, moisture, and genotype, and are not well documented. The study above only tracked apple pollen to about six months, so do not assume a set number of weeks or a year-plus in a home freezer.
Always let a sealed container return to room temperature before opening it, to prevent condensation.
Store single-use aliquots so you can avoid repeated freeze-thaw cycles.
Impact of Storage Temperature on Pollen Viability and Germinability
Troubleshooting Common Mistakes
Even experienced breeders face failures, so use the following pitfalls as checkpoints rather than assuming one missed cross proves the plant is sterile.
No Pollen Production
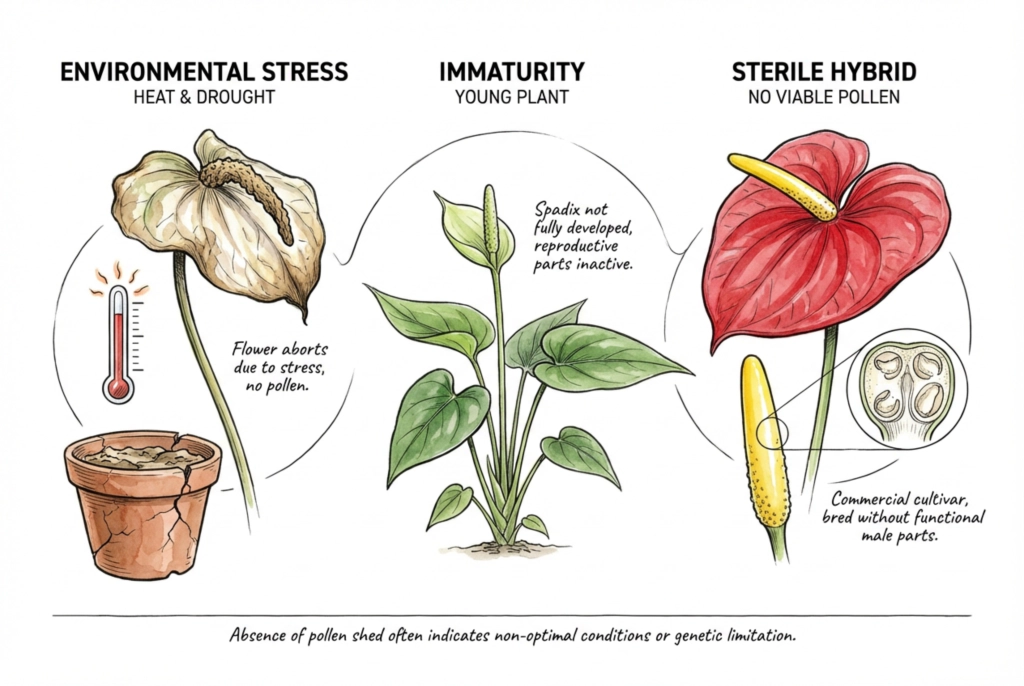
If your plant goes through the female stage but you see no pollen, work through the possibilities before concluding it is sterile.
Check that you are watching the male phase at the right time, whether pollen was already shed, the flower’s maturity, and your measured temperature and humidity.
Some commercial cultivars do have poor or no functional pollen, but that is a diagnosis of last resort, not a first assumption.
Fluid Drying Too Fast
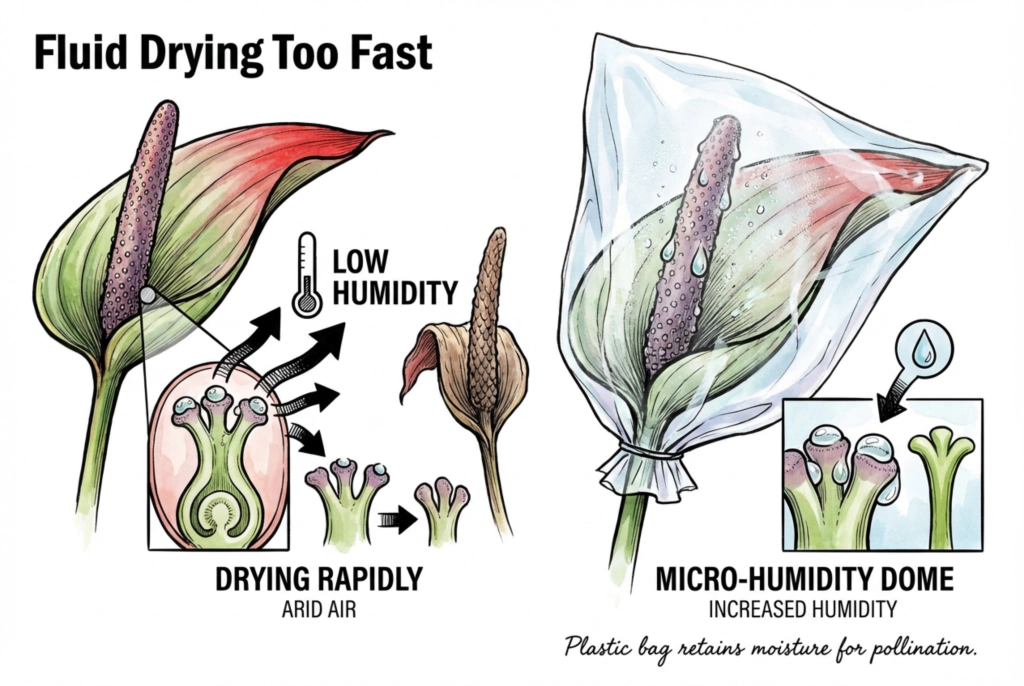
If the stigma seems to dry quickly, measure your humidity rather than assuming the room is too dry. Developmental change, airflow, temperature, or damage can also reduce visible fluid.
Avoid sealing a plastic bag tightly over a wet inflorescence. Without ventilation it can trap condensation and heat and invite fungal or bacterial rot.
UF/IFAS guidance notes that no special humidity manipulation is needed after transferring pollen.
If you must isolate an inflorescence (for controlled parentage), use a clean, breathable material with ventilation, watch for condensation, and keep it brief.
Assess Whether Pollination Took
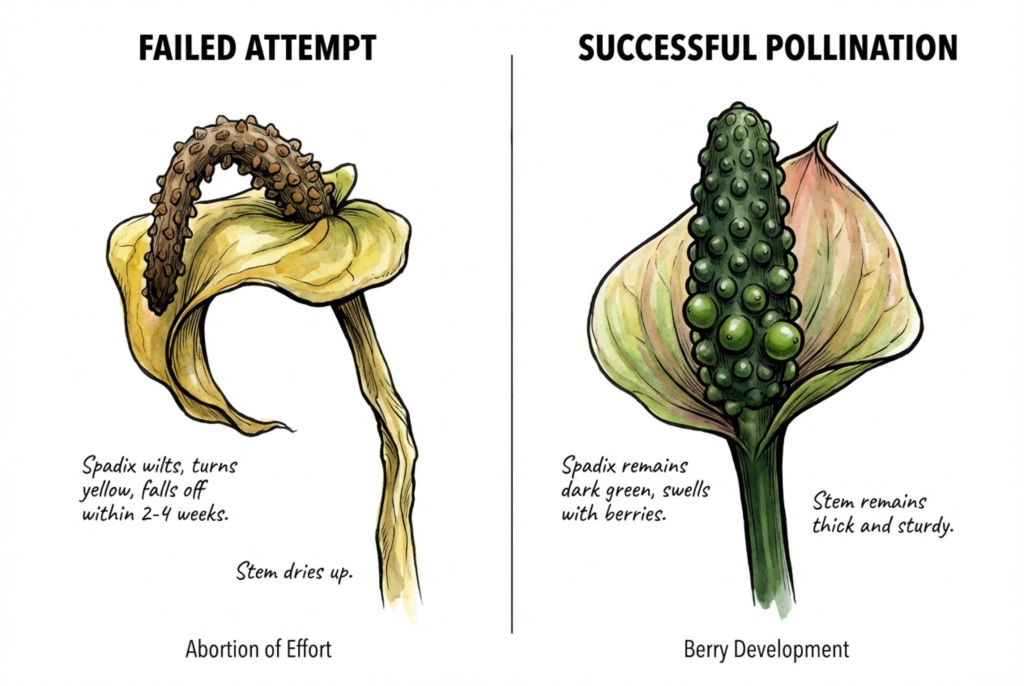
If a cross does not take, the inflorescence may yellow and drop rather than develop, though normal senescence can look similar, so distinguish a failed set from an aging inflorescence.
One small field study of A. acutangulum saw abortion at about two weeks, but that is a single species and a tiny sample, so do not treat a fixed 2-to-4-week window as a genus-wide failure clock.
Post-Pollination (Berry Development)
Confirm Success Before Harvest
Early signs may appear within a few weeks, but a clear result can take longer. Watch the individual ovaries and the overall spadix rather than relying on one early color change.
The most direct sign of a successful cross is that the individual ovaries (the bumps) begin to enlarge and keep developing.
Spadix and stem color and thickness vary by species and cultivar, so on their own a dark-green spadix or a sturdy stem are weaker indicators than swelling ovaries.
Waiting for Berries
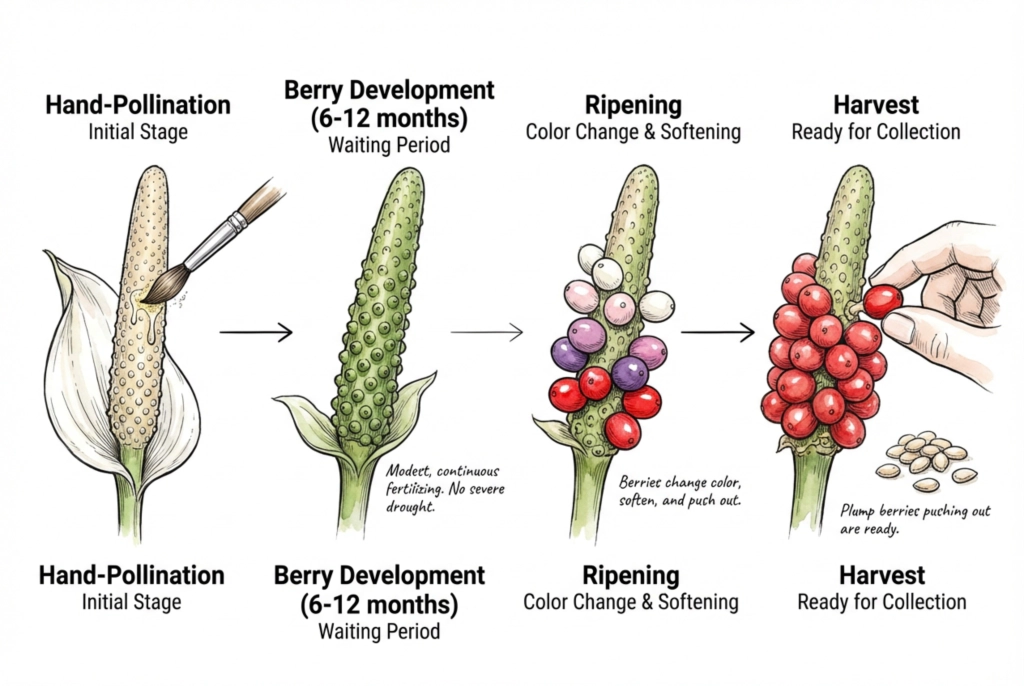
Now wait, because berries develop slowly and unevenly across the spadix. Early changes may be subtle, so record dates and avoid squeezing the developing berries.
Reported maturity varies. UF/IFAS guidance for cultivated Anthurium suggests up to roughly 5-8 months, and an A. andraeanum study observed mature seed at about 24 weeks.
Some collector species may run longer, so 6-12 months is possible but not a universal range.
Avoid severe drought stress while the fruit develops. Aim for even substrate moisture, good drainage, and healthy roots, and keep notes on the plant’s conditions.
Keep nutrition appropriate to your setup rather than assuming a berry-specific benefit, and avoid changing several variables while you wait for fruit development.
Fertilizer During Berry Development
SUPERthrive Foliage-Pro 9-3-6
SUPERthrive Foliage-Pro 9-3-6 fits a grower who already uses a complete foliage fertilizer and wants to keep feeding consistent during berry development. Match it to the medium, water, and existing feeding plan, then follow the label to avoid salt buildup. It is not a berry-fill treatment, and the plant can fruit without adding a special fertilizer.
Signs of Berry Maturity
As the berries ripen, the hard bumps soften and change color. Mature color differs by species and cultivar, for example white, pink, purple, or red, so it is not a single sequence every spadix passes through.
When the berries look plump and protrude from the spadix, check color, softness, and how easily they detach for your species before harvesting, cleaning, and sowing.
Timing and Observation Set Your Seed
Hand-pollinating Anthuriums is largely a matter of observation and patience. Learning to tell the wet, glistening female stigma from the dry, powdery male pollen is the core skill.
Compatibility, pollen viability, avoiding contamination, and fruit maturation all still matter.
With good timing and a gentle touch, you can improve your chances of setting seed. Whether the result is a hybrid depends on using two distinct, compatible parents with controlled parentage. Seed set alone, which may come from selfing, does not make a hybrid. The Anthurium hybridization genetics guide covers that next decision.
Affiliate Disclosure
This article contains Amazon affiliate links. As an Amazon Associate I earn from qualifying purchases. If you use these links, the site may earn a commission at no extra cost to you. Product availability, price, and specifications can change. Check the current listing before buying.