
Microgreens Grow Kit Product Chooser: Trays, Light & Seed
Microgreens grow kit product chooser: pick a 1020 tray, full-spectrum LED, mat, and food-safe seed by PPFD, DLI, and FDA safety.
Jordan Cole · Published 2026-08-06 · 17 min read
Key Takeaways
- Spend on light and seed first. They have the biggest effect on harvest color and food safety.
- Target 150–250 umol/m2/s for 14–16 hours. That produces a practical DLI of roughly 12–17 mol/m2/d.
- Pair a with-holes top tray with a no-hole bottom tray. This lets the mat wick water from below while the canopy stays dry.
- Sow roughly 10–15 g of small seed or 30–40 g of large seed per 1020 tray.
- Buy screened, Non-GMO, high-germination seed. Seed quality is your strongest food-safety lever.
Most microgreens failures trace back to two parts of the setup, not ten. The seed decides your food-safety risk. The light decides whether your greens are richly colored or pale and leggy.
Get those two right, pair them with a clean tray and a sterile mat, and the rest is timing. Buy each of the four roles by the measurable requirement it must meet, then choose a product that fits that requirement. It also flags who should skip each item and which all-in-one kits waste your money.
What do you actually need to buy for microgreens?
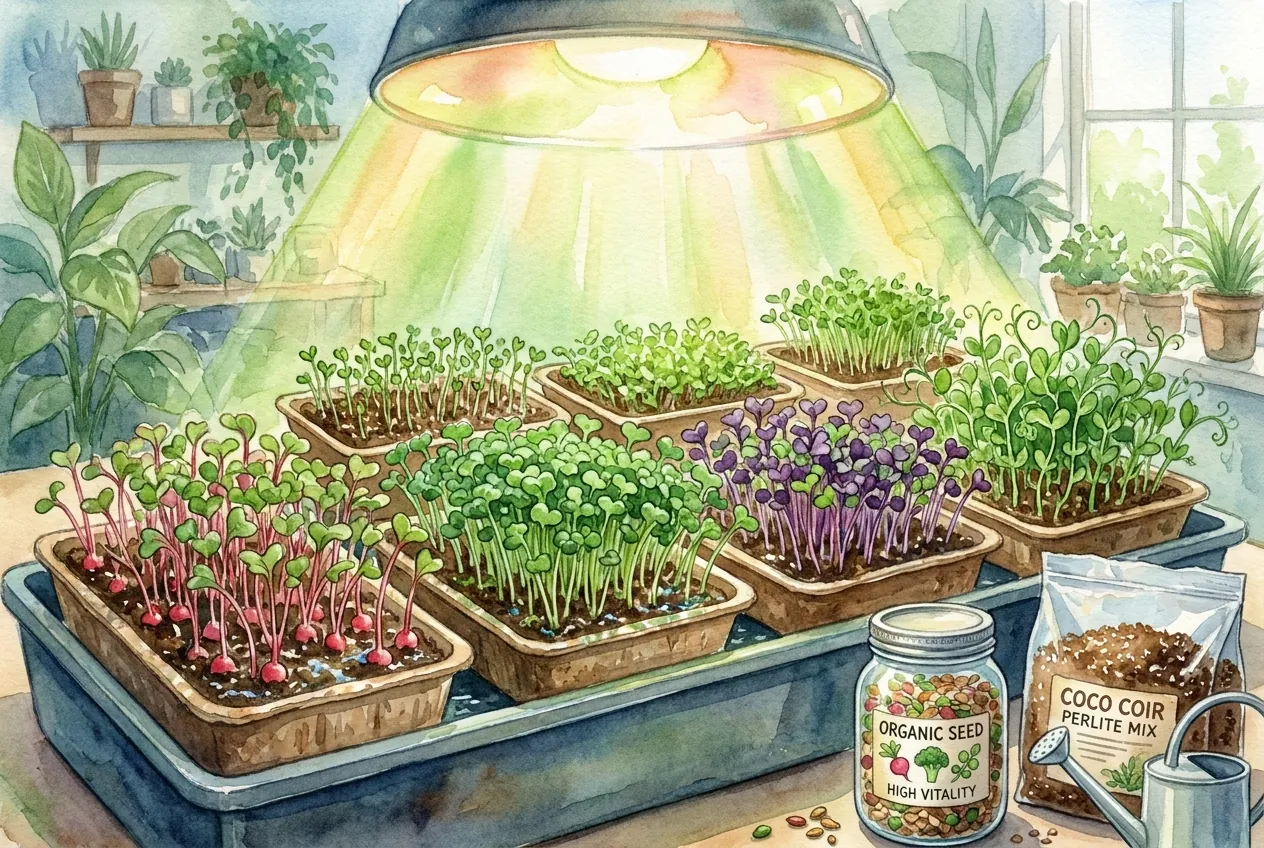
You need four things. A tray and cover set, a full-spectrum LED light, a clean growing medium, and food-safe seed. An optional fifth is a fine-mist bottle for the moist germination phase. You do not need an all-in-one kit, and the cheap ones usually skimp on the two parts that matter most.
The buying verdict up front. Buy the four roles separately unless a kit publishes both its light output and its seed testing. Most bundled kits hide a weak decorative LED and unscreened seed. Because seed is your single most important food-safety control and light sets final quality, a kit that skimps on those two erases the savings.
Here is the whole decision in one table.
| Role | Critical spec | Target value | Why it matters |
|---|---|---|---|
| Tray + cover | Food-grade material, no-hole bottom + with-holes top, depth | Food-grade PP, ~1.25 in deep, 10x20 (1020) | Bottom-watering keeps the canopy dry and cuts damping-off. A blackout cover stretches stems |
| Grow light | Canopy PPFD, DLI, photoperiod, wattage, CRI | ~150-250 umol/m2/s, ~12-17 mol/m2/d, 14-16 h, >=20-30 W per 1020, CRI >=90 / sunlike | Sets color and prevents leggy pale stems after blackout |
| Medium | Thickness, water-holding, pathogen load | 8-10 mm hemp/coco mat or fine coir, sterile out of pack | Even moisture with a low pathogen load versus reused soil |
| Seed | Screening, germination, density by seed size | Pathogen-screened, Non-GMO, high germ. ~10-15 g small seed to ~30-40 g large seed per 1020 | Seed is the top food-safety control. Density controls yield versus mold |
Choose each role for the way you plan to grow, then adjust light, moisture, and density from the crop’s response.
Each role below leads with the mechanism, then names the spec, then the product that meets it.
I stack empty trays with the planned blackout weight, humidity cover, and harvest-height crop marker before buying a rack. A shelf that fits a bare 1020 tray may not leave room to lift a weighted tray or raise the light as stems grow.
Before buying, I rehearse carrying one wet tray from watering area to shelf and then to harvest without twisting it. This catches narrow aisles, low shelf lips, and spill paths that no equipment specification includes.
How much light do microgreens need after the blackout period?
Aim for a canopy PPFD around 150-250 umol/m2/s over a 14-16 hour photoperiod, which lands you in a daily light integral (DLI) of roughly 12-17 mol/m2/d. Below that band, stems stay pale and stretched. Far above it, you hit a saturation point where extra light stops adding biomass and can start to harm the crop.
Color and sturdiness depend on this for a simple reason. During the blackout phase the seedling grows in the dark and etiolates, elongating its hypocotyl instead of building leaves. Once you uncover the tray, light is what greens the cotyledons and firms up the stems.
What DLI target is supported by research?
A 16-hour photoperiod at about 250 umol/m2/s produces a DLI near 14.5 mol/m2/d, the center of the target band. In a controlled microgreen study, treatments explicitly paired those numbers. 250.8 umol/m2/s over 16 hours equalled 14.5 mol/m2/d. The same work found that matching the DLI with continuous 24-hour lighting cut electricity cost per unit of fresh biomass by 8-38 percent.
Light response differs by crop. Start near the middle of the range with a 14–16 hour day, then adjust if the greens are pale, leggy, bleached, or running hot.
| PPFD (umol/m2/s) | Photoperiod (h) | DLI (mol/m2/d) | Note |
|---|---|---|---|
| 166.6 | 24 | 14.4 | Same DLI, lower intensity, longer day |
| 250.8 | 16 | 14.5 | Center of the target band |
| 376.8 | 16 | 21.7 | Above the practical need for microgreens |
Do not treat the highest number as the goal. Increasing PPFD raises biomass only up to a saturation point, past which there is no further gain and excess light can be detrimental.
Which grow light meets the PPFD spec?
Choose by Canopy PPFD
For a single 1020 tray, a 2-foot full-spectrum strip run close to the canopy clears the threshold. For a whole rack, a panel is more efficient. The spec you are buying against is 150-250 umol/m2/s at the canopy, a 14-16 hour timer, at least 20-30 W per tray, and CRI 90 or a sunlike full spectrum for true harvest color.
The Barrina T5 kit suits one to three trays on a shelf. Keep the strips close enough to reach the canopy without warming or bleaching the crop. It is not a good fit for lighting a wide 2×4 area from one fixture.
The Spider Farmer SF600 makes more sense for several trays over a wider area. Skip it for one small tray, where its coverage and output are unnecessary.
If you want the underlying PPFD and DLI science before you buy a light, our PPFD and DLI light-science guide and aroid grow-light product chooser both break down the meter numbers.
Which tray and cover setup should you buy?
Buy a pair. A with-holes top tray nested inside a solid no-hole bottom tray, plus a cover for germination and blackout. This pairing is what enables bottom-watering, where you add water to the no-hole tray and let the mat wick it up. Bottom-watering keeps the canopy dry, which cuts damping-off and mold versus soaking an exposed canopy from the top.
The cover does double duty across two phases. A humidity dome holds moisture during the 2-4 day germination window. A solid, weighted blackout cover then stretches the stems by keeping the seedlings in the dark so they elongate uniformly, making them easier to harvest above the tray lip.
What tray spec actually matters?
Buy the Two-Tray Pair
The specs that matter are food-grade material, a ~1.25 in shallow depth, the standard 10x20 (1020) footprint, and a matched no-hole plus with-holes pair. Depth matters because shallow trays put the canopy near the tray lip for a clean cut. Food-grade material matters because you are growing food in direct contact with the plastic.
The Bootstrap no-hole tray is the reservoir half of a bottom-watering pair. It is useful for repeat grows, but it needs a draining top tray rather than being used on its own.
The Bootstrap hole tray holds the mat and seed above the reservoir. Pair it with the solid tray to keep roots evenly moist without leaving the seed surface wet.
Buying two tray types does cost more up front than a single flat, but top-watering a single flat is exactly what raises your damping-off risk, so the extra tray earns its keep.
Which growing medium is safest and holds moisture best?
Choose a sterile, evenly moisture-holding mat. An 8-10 mm hemp or coco-fiber pad, or fine coir. A clean mat matters because reused garden soil carries a pathogen and weed-seed load, while a fresh fiber mat starts sterile and biodegradable. Even moisture matters because dry spots stall germination and soggy spots invite damping-off.
Penn State Extension lists coconut coir and natural-fiber mats (cotton, kenaf, hemp) among the most popular microgreen media, and notes the medium's water-holding governs how often you water and the final quality. A fiber mat also harvests clean, since you cut the greens above the mat with no soil clinging to the stems.
What medium spec meets it?
Use a Clean, Evenly Moist Mat
The Terrafibre hemp mat is a simple clean medium for a bottom-watered 1020 tray. Pre-moisten it and seat it in the draining tray. Choose another medium if you want something reusable or are growing crops that need a deeper root zone.
Be aware that single-use mats add per-tray cost and work best for leafy small-seed crops. Skip them if you specifically want a reusable substrate or are growing very large mucilaginous seed that mats prefer soaked. For denser sowing math and yield-per-tray tradeoffs, our high-density microgreens planting guide covers the numbers.
How much seed do you sow per tray, and why does food-safe seed matter most?
Sow by seed size. Roughly 10-15 g per 1020 for small seed like broccoli and radish, up to about 30-40 g for large seed like pea and sunflower. More important than the exact gram count is buying pathogen-screened, high-germination seed. Contaminated seed is the primary source of pathogens in most sprout and microgreen outbreaks, so the seed lot is your single biggest food-safety lever.
Density is a yield-versus-mold tradeoff, not a more is better dial. Fresh yield per tray rises with density up to a species-specific saturation point. Past that point, crowding cuts airflow and drainage, which raises mold pressure, and per-shoot weight and mineral content fall.
How does seeding density trade yield against mold?
Yield per area rises with density, but so does mold risk and so does the loss of per-shoot quality. Research across species shows fresh weight per unit area climbing with seeding density while mean weight per shoot drops, alongside lower calcium, iron, pigment, and ascorbic-acid content at high density. One multi-species study put fresh-biomass saturation at about 12 seeds/cm2 for cress and rocket but only around 2 seeds/cm2 for pea, because pea seed is far heavier.
The home takeaway. Start at the conservative end of the range, especially in a humid setup, and only push density up once your airflow and watering are dialed in. Lower density plus a dry canopy from bottom-watering is your cheapest mold insurance.
| Seed size | Examples | Approx. Rate per 1020 | Mold note |
|---|---|---|---|
| Small | Broccoli, radish | ~10-15 g (conservative home rate) | Crowds fast. Keep airflow up |
| Large | Pea, sunflower | ~30-40 g | Heavier seed, fewer seeds per gram |
Which seed meets the food-safe spec?
Screen Seed Before You Sow
Buy Non-GMO, high-germination seed from a supplier that screens or tests lots, sized to your crop. The broccoli seed is Non-GMO and marketed for high germination. This meets the spec because a 1 lb bag sows many trays at the ~10-15 g small-seed rate, and broccoli is a forgiving, fast Brassica for a first grow.
Use it when you want a single reliable crop rather than a sampler. One caveat. A full pound is a lot if you only grow occasionally, and the smaller variety pack below fits casual growers better.
The variety seed pack bundles Non-GMO broccoli, radish, beet, sunflower, pea, and more in small quantities. This meets the spec because it lets you match density practice to several seed sizes without committing to a pound of any one crop. Use it when you are still learning which crops you like.
The downside is that small packets cost more per gram and run out fast once you find a favorite, so graduate to a bulk bag of your top crop.
What is the safe home food-safety routine?
Buy screened seed, use clean potable water, sanitize trays between grows, and refrigerate promptly after harvest. FDA guidance for sprouted seed benchmarks seed treatment at a 20,000 ppm calcium hypochlorite soak for 20 minutes, but that is a concentrated-chemical step for commercial facilities with PPE and spent-water testing. Do not mix or soak seed in calcium hypochlorite at home. That step exists precisely because seed carries the risk, and buying tested seed is the realistic home version of that control.
Microgreens are lower-risk than sprouts because they grow in light and are harvested above the seed and root line, where conditions are less favorable to pathogens. Per a 2025 review, no published foodborne outbreak has been directly linked to microgreens, versus dozens tied to sprouts. Still treat the moist germination phase as the risk window. Clean water, clean trays, no standing warm slime.
Do you need a mister or sanitizer, and when?
A fine-mist bottle is a genuinely useful fifth item. A surface sanitizer is optional and must be used strictly per label. The mister matters during germination, when you want gentle surface moisture without waterlogging seed that is not yet rooted enough to bottom-water. Once roots reach into the mat, switch to bottom-watering and set the mister aside.
The driew mister is useful for lightly wetting seed during germination without pooling water. Stop misting once roots can wick from below so the canopy stays dry.
Just remember it is a technique aid, not a sanitizer, and it does not treat seed, so do not rely on it for food safety. If you use any food-contact surface sanitizer on trays between grows, follow the product label exactly and never mix cleaning chemicals in an unventilated space.
Who should NOT buy each product class?
Match the product to your scale, not to the biggest number. The wrong pick is usually a mismatch between fixture size and tray count, or a kit that hides its weak parts.
| Product class | Who should skip it | Better move |
|---|---|---|
| All-in-one kit | Anyone if the kit hides its light output or seed testing | Buy the four roles separately against published specs |
| 72 W panel (SF600 class) | Single-tray shelf growers | Use a 2 ft strip. Save the panel for a full rack |
| 2 ft strip (Barrina class) | Tall-tent or whole-rack growers | Use a panel that covers the footprint |
| No-hole-only tray set | Anyone planning to bottom-water | Buy the with-holes plus no-hole pair |
| Single-use hemp mat | Growers wanting a reusable substrate | Use fine coir or a washable medium instead |
The recurring theme. A decorative low-output LED in a bundled kit will produce leggy, pale greens no matter how good the tray and seed are. That is why the light and the seed are the two roles worth spending on first.
What is the full setup protocol from sanitize to harvest?
Run the sequence below once and it becomes muscle memory. Every step maps to a mechanism already covered above.
| Step | Action | Why |
|---|---|---|
| 1 | Sanitize the 1020 trays | Removes carryover from the last grow |
| 2 | Lay an 8-10 mm hemp/coco mat in the with-holes top tray and pre-moisten with clean water | Sterile, evenly moist root zone |
| 3 | Seat the top tray inside the no-hole bottom tray | Enables bottom-watering |
| 4 | Sow at the size-appropriate density, then mist lightly | Balances yield against mold. Wets seed gently |
| 5 | Cover with a dome (germination), then a weighted blackout cover (stem stretch) for 2-4 days | Etiolation lengthens and evens the stems |
| 6 | Uncover and run the LED at 150-250 umol/m2/s on a 14-16 h timer. Bottom-water only | Greens the crop and prevents legginess. Dry canopy |
| 7 | Harvest at cotyledon/first-true-leaf and refrigerate promptly | Peak quality and food safety |
If you are also growing leafy crops hydroponically, the same cold-and-clean discipline that prevents bolting applies to reservoir hygiene, as our hydroponic spinach bolting guide explains.
Common failure modes and how to fix them
Most problems are one of three things. Leggy pale greens, mold, or uneven germination. Each has a mechanism and a fix you already have the parts for.
Why are my microgreens leggy and pale?
They are light-starved after the blackout period. Etiolation in the dark is normal and even desirable for stem length, but once you uncover the tray the crop needs 150-250 umol/m2/s to green up and firm the stems. Fix it by moving the light closer or extending the photoperiod toward 16 hours until you clear the PPFD threshold at the canopy.
Why is my tray growing mold?
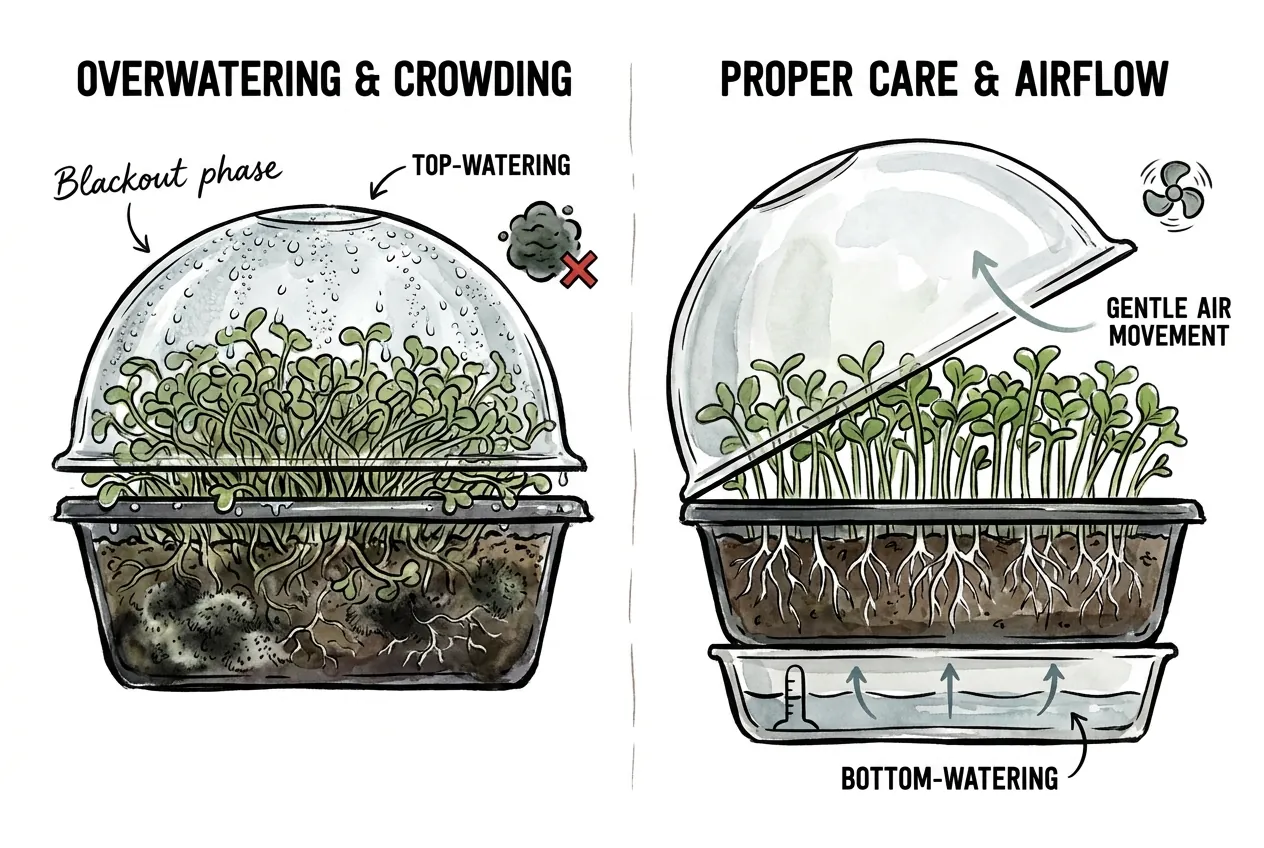
Too much canopy moisture, too high a seeding density, or poor airflow. Fungal growth follows warm, wet, crowded conditions, which is exactly the blackout phase if you top-water. Fix it by bottom-watering only, dropping to the conservative end of the density range, and adding gentle air movement once uncovered.
Why did germination come out patchy?
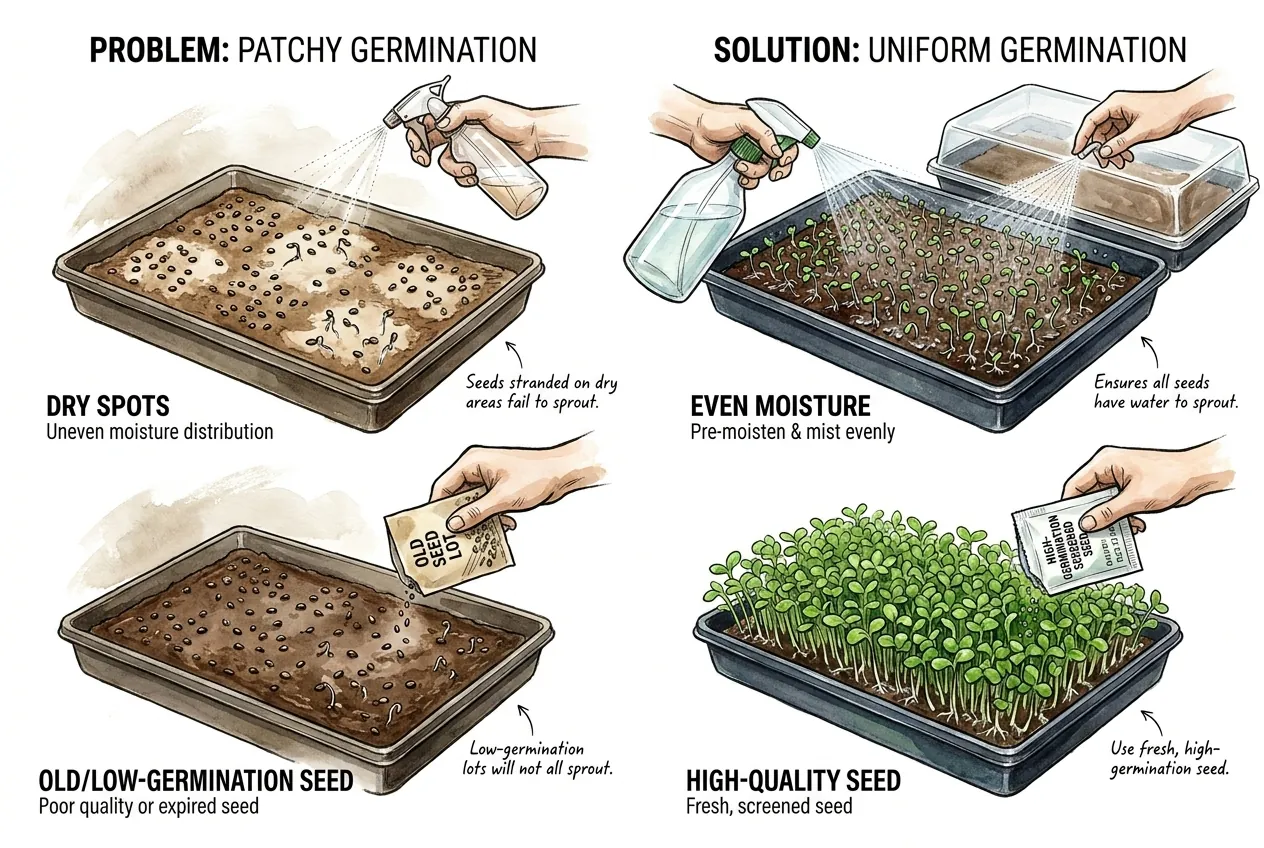
Dry spots on the mat or old seed. An unevenly moistened mat leaves seed stranded, and low-germination lots simply do not all sprout. Fix it by pre-moistening the mat fully before sowing, misting evenly during germination, and buying high-germination screened seed.
Key Takeaways
- Spend on light and seed first. They decide color and food safety more than any other part.
- Target 150-250 umol/m2/s and a 14-16 h day for a ~12-17 mol/m2/d DLI after blackout.
- Buy a with-holes top tray plus a no-hole bottom tray so you can bottom-water and stay dry.
- Sow ~10-15 g small seed or ~30-40 g large seed per 1020. Low density is cheap mold insurance.
- Buy screened Non-GMO high-germination seed. That lot is your biggest food-safety lever.
Affiliate Disclosure
This article contains Amazon affiliate links. As an Amazon Associate I earn from qualifying purchases. If you use these links, the site may earn a commission at no extra cost to you. Product availability, price, and specifications can change. Check the current listing before buying.