
High Density Microgreens Planting: How to Maximize Yield Per Tray
High-density planting can raise yield and turnover per tray, but the right seeding rate is crop- and system-specific and must be trialed. Fast Brassicas like radish and broccoli fit tight cycles, and airflow, tray sanitation, and food safety all need managing alongside density.
Priya Patel · Published 2026-02-17 · 18 min read
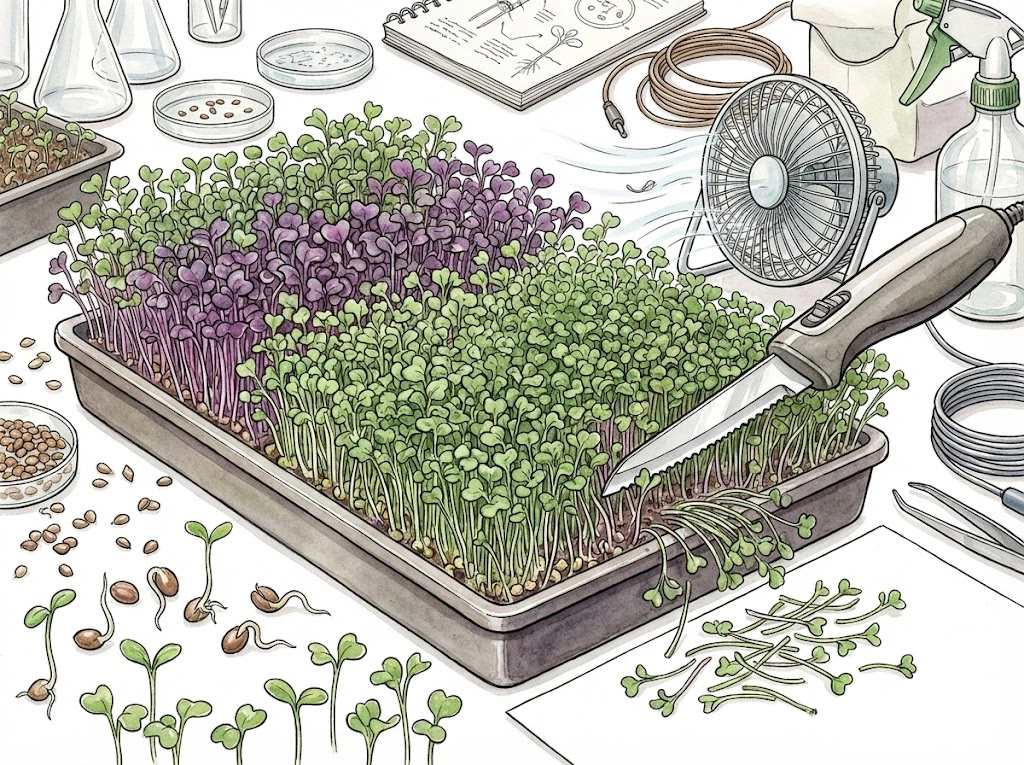
Start With a Controlled Trial
- Higher planting density can raise marketable yield per tray, but revenue also depends on price, sell-through, and costs. The best rate has to be trialed, not assumed.
- Fast Brassicas like radish and broccoli fit short cycles well. That helps annual output where demand and unit economics support it.
- Airflow, tray sanitation, and food safety all need managing alongside density. Harvesting-tool choice depends on your crop and system.
Key Points
Density and Yield
Raising density can raise yield per tray up to a point, but the response saturates and varies by crop, cultivar, and seed lot. Doubling seed does not reliably double weight.
Turnover
Shorter crops fit more cycles per year, but real cycle counts have to include cleaning, drying, reset, and crop failures, not just days-to-harvest.
Crop Choice
Radish, broccoli, and kale are common fast options. Whether they are best for you depends on demand, price, shelf life, and seed cost.
Seeding Rates
Roughly 40–50 g radish and 25–30 g broccoli or kale per 1020 tray are reasonable starting ranges to trial. Verify each cultivar for your seed and setup.
Disease Control
Airflow is one control for damping-off, alongside clean seed, media, and water, drainage, temperature, and sanitation.
Harvesting
Clean, sharp scissors or a knife are standard. Powered tools suit certain mat systems. Weigh cut quality, cleaning, and shelf life, not just speed.
Food Safety
Raw microgreens are a ready-to-eat food. Use food-production seed, potable water, clean substrate, sanitized food-contact tools, and cold storage, and follow current extension and FSMA-aligned guidance.
Planting microgreens at higher density is one way to raise yield and turnover per tray, which can improve revenue per square foot when price, sell-through, and costs cooperate.
It is not a fixed formula, though. The right rate depends on the crop, cultivar, seed lot, substrate, light, and season, so treat any number here as a starting point to trial rather than a guaranteed result.
Set the seeding rate and cycle time for your own operation while managing the environment to keep disease risk down.
Run a low, middle, and high-density trial for each crop and seed lot, then compare marketable yield, quality, losses, labor, and sell-through.
Why does density matter for profit?
Within a limited range, seeding more heavily can raise yield weight per tray, which is why density matters for revenue per square foot.
The relationship is not linear. As density climbs, individual seedlings get smaller and the yield response saturates.
Published trials, including Virginia Tech seed-density work, found the density and yield correlation was weak or absent across several crops, so doubling seed does not reliably double weight.
Extra seed also adds cost, and crowding can raise disease and quality losses, so more is not automatically better.
The practical goal is a rate that gives good marketable yield before disease, weak stems, or downgraded quality set in, and that point differs by crop and setup.
Density Key Point
Aim for a rate that balances yield against airflow, individual quality, and seed cost, rather than pushing density until damping-off appears.
Find it with a low/base/high trial for your own crop, seed lot, and system.
I write the crop, seed lot, dry seed weight, sowing time, and tray position on one code before the tray enters the rack. At harvest I record clean salable weight separately from total cut weight. Wet hulls, damaged stems, and rejected patches can make a dense tray look profitable when it is not.
At least two densities from the same seed lot enter the comparison, with their rack positions rotated on the next cycle. If a higher rate adds biomass but also adds trimming time or discarded material, I treat that labor and waste as part of the density result.
How does turnover speed affect cash flow?
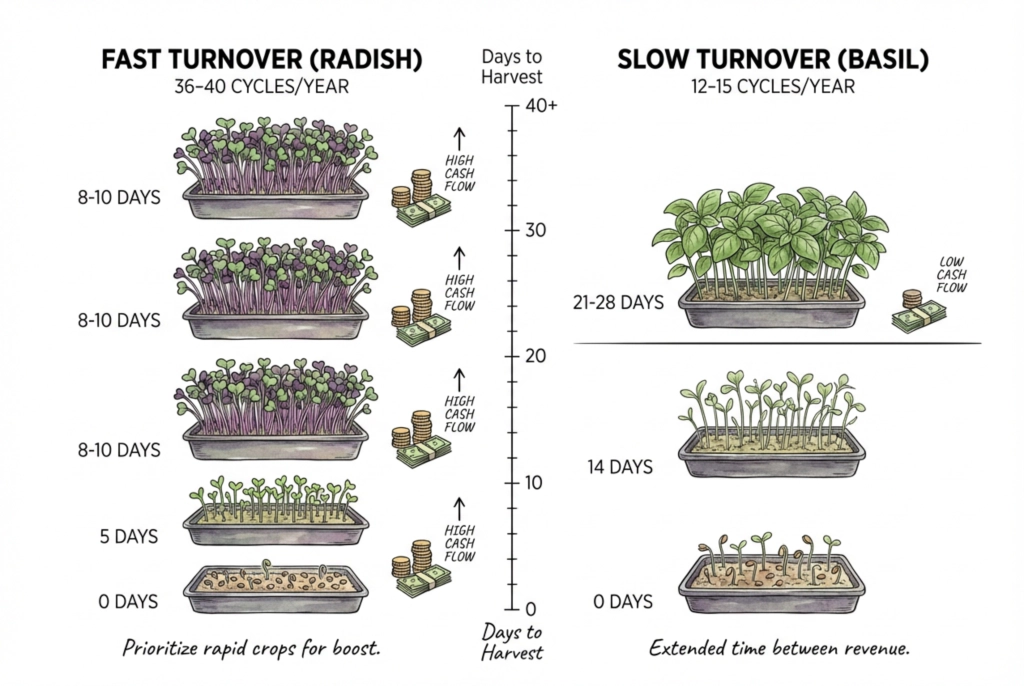
Shorter crops let you re-plant a tray more often, so faster turnover can lift annual output per shelf.
The cycle counts in the table are only a ceiling because they assume no downtime. Cleaning, sanitizing, drying, setup, and failed trays lower the number you can actually grow and sell.
Faster crops can raise total revenue, but only when marketable yield, price, and sell-through outweigh the lower price they often fetch.
A shorter crop selling for less does not always earn more. It depends on the numbers. Prioritizing a quick crop like radish can help cash flow if you have confirmed buyers and the unit economics work.
Approximate cycle potential
| Crop | Typical days to harvest | Max cycles/year (zero downtime) |
|---|---|---|
| Radish | 8–10 | ~37–46 |
| Broccoli | 10–14 | ~26–37 |
| Pea shoots | 10–14 | ~26–37 |
| Basil | 21–28 | ~13–17 |
Which fast-growing microgreens suit high-density trays?
Choose Fast Crops by Market Fit
Radish and broccoli are among the fastest common microgreens, often ready in about 10 days, though the exact timing depends on cultivar, temperature, and seed age.
Whether they are the most profitable choice for you also depends on demand, price, and seed cost, so compare them against other crops for your own market.
These Brassicas germinate quickly, which can give seedlings an establishment head start. Fast growth does not make a crop outcompete pathogens. A short cycle does not stop damping-off inoculum or foodborne organisms carried on contaminated seed, water, or substrate, so clean inputs still matter.
Their fairly upright growth does make one-cut harvesting easier.
Can I grow sunflower at high density?
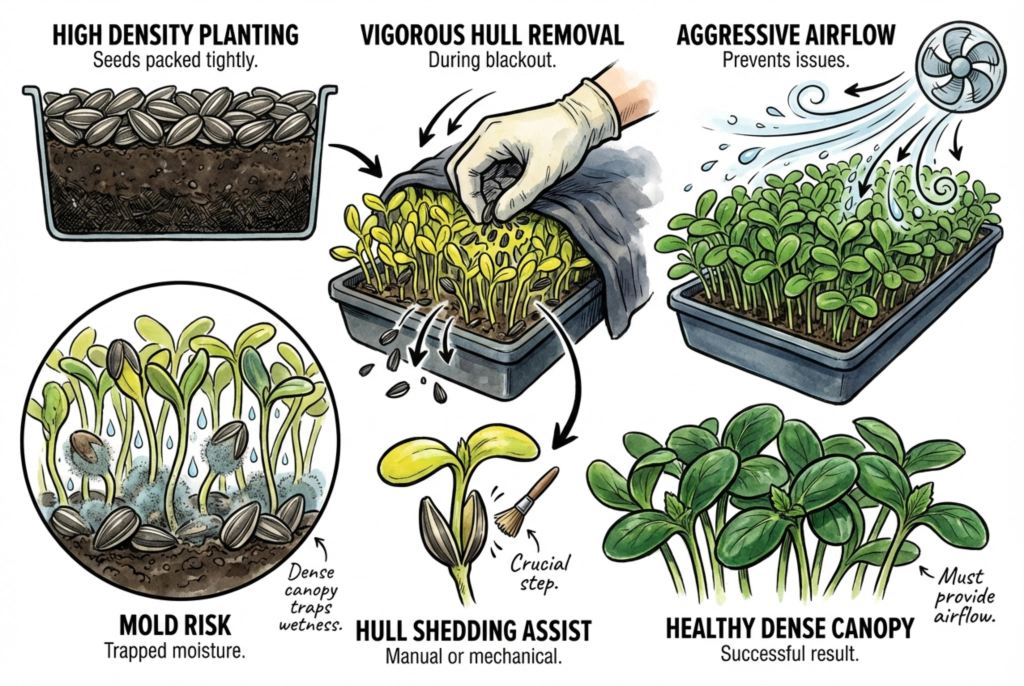
Yes, sunflower can be grown at high density. Its large cotyledons build a dense canopy that can hold free water and slow drying, which can raise mold risk when the canopy stays wet (how much depends on airflow, irrigation, and temperature rather than a fixed exponential curve).
Manage that by keeping air moving over the trays and helping hulls shed, but do so gently. Brushing or handling seedlings too hard bruises the cotyledons and can spread contamination.
During blackout the trays are usually covered, so direct fan airflow may not reach them (plan hull removal and airflow around your stacking method rather than relying on force).
What about basil and cilantro?
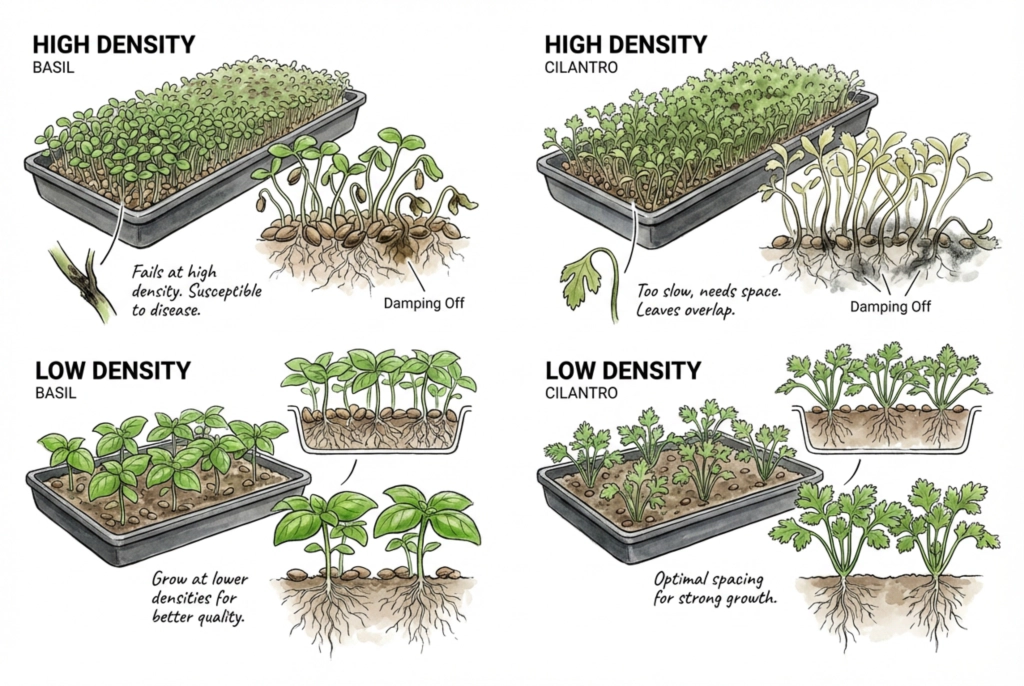
They do not fail at high density. Both basil and cilantro are grown commercially as microgreens.
They just tend to be slower and often do better at a lower seeding rate, with a longer cycle and attention to light and moisture.
Slower does not mean unprofitable. Flavor, price, and demand can make them worthwhile.
Because they germinate and grow more slowly, dense stands of these crops can be more prone to damping-off if moisture and airflow are not managed.
Trialing a lower density is a reasonable starting point (to judge whether it actually improves quality, compare stem size, leaf area, shelf life, and yield per area rather than assuming it).
Hort Americas, Mastering Leaf Area Index (LAI). General background on canopy measurement. It is not evidence that basil or cilantro fail at high density.
What is the optimal seeding density for microgreens?
Trial the Density Instead of Chasing a Fixed Number
A good seeding density balances yield against airflow, individual quality, and cost. Published and supplier ranges are useful starting points, but treat them as a range to trial for your cultivar, seed lot, and system rather than a single proven number. Recommendations in the literature vary widely (for radish, roughly 100 to over 400 g/m² across sources).
Choosing a rate in the appropriate range helps avoid overcrowding, though the point at which a stand is too dense is best judged by measured stand and canopy rather than feel.
Too high a rate can encourage weak, etiolated stems and, with poor moisture and airflow, raise disease risk. Rot is not an inevitable result, so use symptoms as a signal to adjust density rather than as proof of a fixed threshold.
What are the specific rates for 1020 trays?
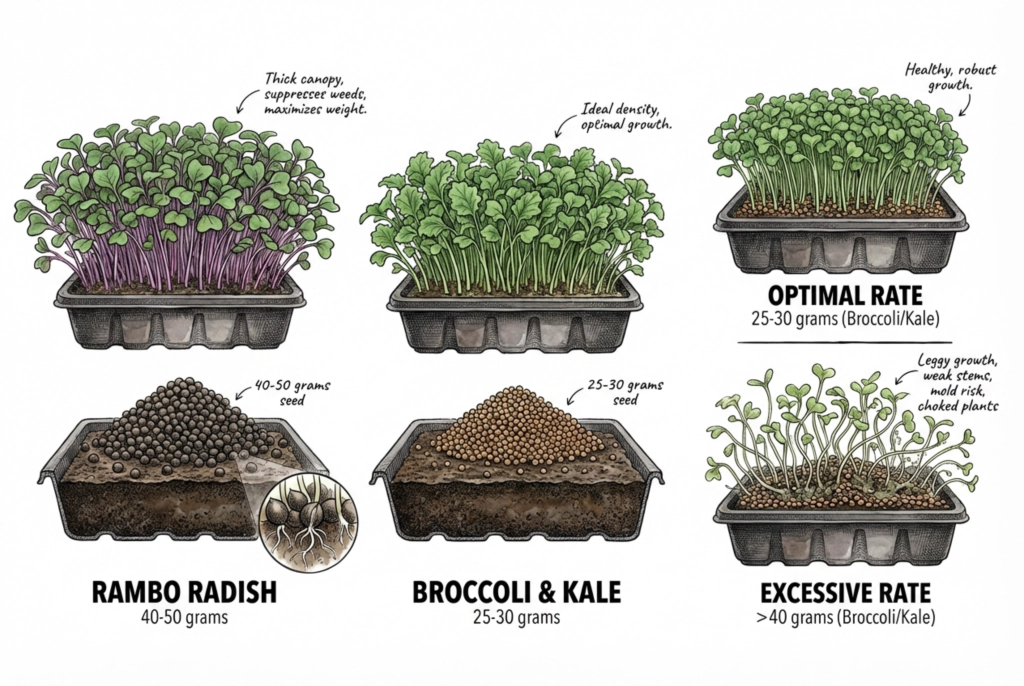
As a starting trial range, about 40–50 g of Rambo radish and 25–30 g of broccoli or kale per 1020 tray are plausible commercial starting points.
Broccoli and kale differ in seed size and count, so validate each separately rather than assuming one rate suits both, and pin the target down using germination and 1,000-seed mass, not weight alone.
Recording density in seeds/m² alongside grams per tray makes it repeatable.
These rates build a fairly thick canopy. On a clean, weed-free substrate there should be no weeds to suppress in the first place, so canopy density is not really a weed-control tool here. Weed seed in the medium would itself be a quality and food-safety problem.
Whether a given rate maximizes marketable weight without crowding is something to confirm with a low/base/high trial. Pushing the rate too high tends to produce thin, etiolated stems, with the exact point depending on light (DLI), temperature, and harvest stage.
Does the medium affect seeding rate?
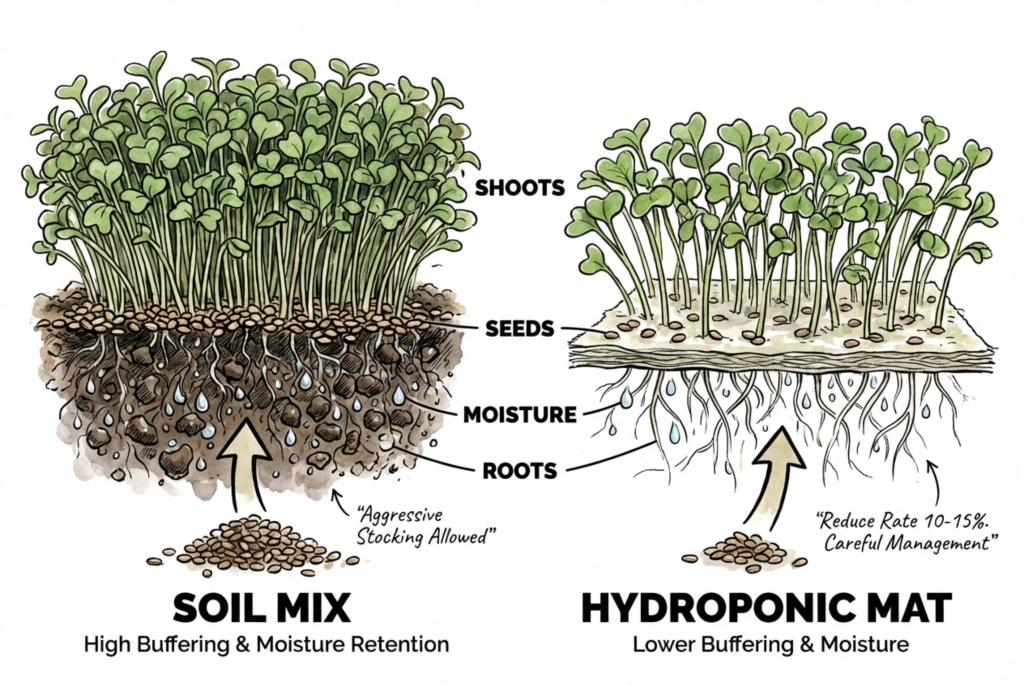
The medium does affect how a rate behaves, but there is no fixed rule that mats need 10–15% less seed.
Water-holding depends on the specific material. Some soil and peat mixes hold a lot of moisture, but some mats, including hemp, can hold more than others, so the assumption that soil always holds more is not reliable.
Published hydroponic systems use densities both higher and lower than soil.
Rather than a blanket adjustment, test each material for its water-holding, irrigation needs, anchorage, and contamination risk, and set the rate from those trials.
Both soil and mats need careful, system-specific irrigation management. Neither medium permits aggressive stocking on its own, since aeration, watering, light, and disease load all factor in.
How do I prevent disease in high density crops?
Protect Airflow and Sanitation Together
Airflow helps, but it does not prevent disease on its own. Damping-off can involve water molds such as Pythium and Phytophthora, as well as fungi such as Rhizoctonia and Fusarium. Crowding, excess moisture, and poor aeration all raise the risk.
Use gentle airflow together with clean seed, clean media and water, drainage, suitable density, and temperature control.
Pythium is an oomycete, or water mold, not a true fungus, and stagnant air does not create it. Wet substrate, contaminated water or inoculum, and susceptible roots are the more direct causes.
Treat fans as one environmental control alongside clean seed, media, and water, good drainage, appropriate density, and temperature management, rather than as a primary defense.
What airflow setup do I need?
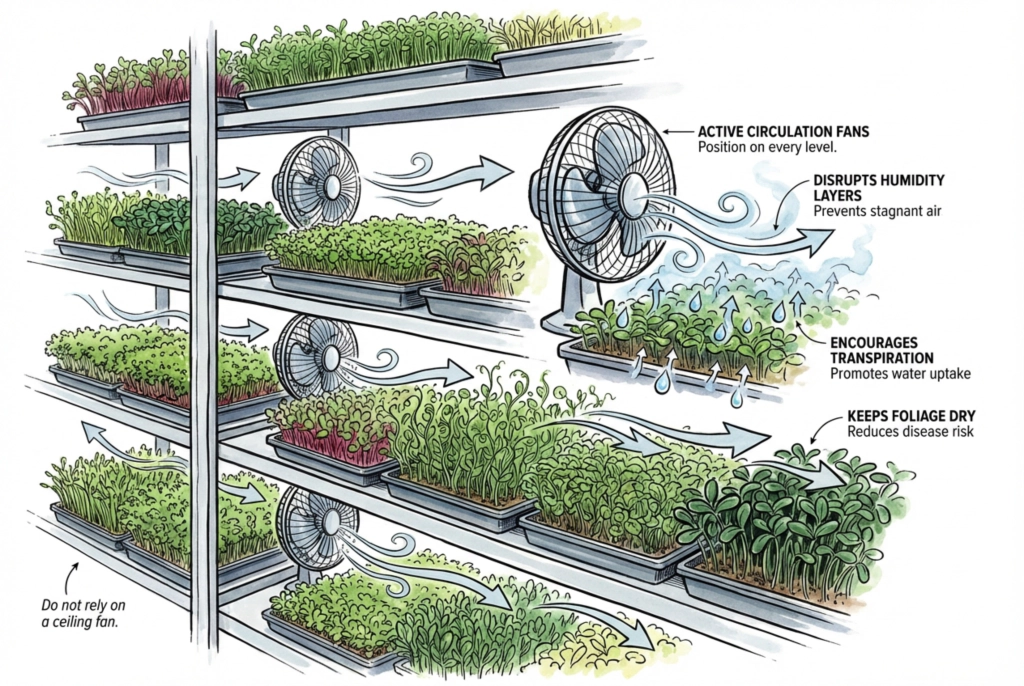
On a dense rack, shelf-level circulation fans can reduce dead zones that a single ceiling fan misses, since each shelf can trap still, humid air.
How many fans you need depends on your rack, so map the actual airflow rather than assuming a fixed rule (aim for gentle, fairly uniform movement across the canopy).
Air moving across the trays lowers the humidity right at the leaf surface, which can shorten how long foliage stays wet and modestly increase transpiration.
Avoid a direct blast, though. Too much airflow can dry tray edges, lodge tender seedlings, make irrigation uneven, and stir up dust or aerosols that spread contamination.
Watch for edge drying and back the fans off if you see it.
How much does humidity matter?
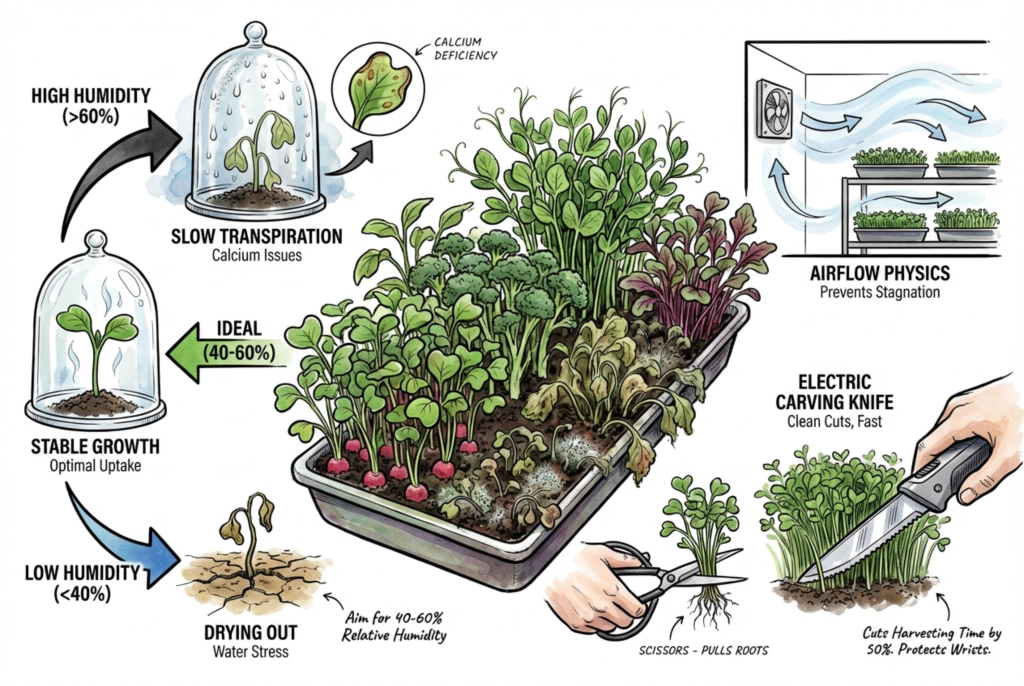
Very high humidity and condensation can raise disease risk, so it is worth managing, but it is not simply an enemy to minimize.
Virginia Tech guidance gives a common range of roughly 50–70% RH for many microgreens. A lower target like 40–60% can work in some facilities, but there is no single universal ideal, and the right band depends on temperature, VPD, crop, and stage.
Persistently high humidity can slow drying and contribute to leaf disorders in some crops. Very dry air can desiccate seedlings.
Set a sensible temperature and humidity target for the crop, place sensors where the trays actually grow, and watch for condensation rather than assuming one stable reading is always safe.
What about biological controls and sanitation?
Clean Before You Sanitize
Sanitation starts before you seed. Scrub used trays to remove visible debris and biofilm, because sanitizer does not work properly over organic matter.
Then sanitize with a product whose label allows food-contact surfaces, following that label’s dilution, contact time, and any required rinse and air-dry. Verify the concentration with a test strip.
Avoid vague instructions such as a 10% bleach solution. Household bleach diluted that heavily can reach several thousand ppm, far above typical food-contact sanitizer levels. Regular bleach guidance for food contact is on the order of 1 tablespoon per gallon, under 100 ppm.
If you use hydrogen peroxide, use a product labeled for food-contact use at its labeled concentration, not an unspecified food-grade soak.
Cleaning and sanitizing reduce microbial load, but no sanitizer kills every lingering spore. Effectiveness depends on cleaning first, coverage, concentration, contact time, and the organism.
Keep a record of what you used and at what strength.
Some labeled Bacillus-based biofungicides can be applied to the medium or irrigation, and certain strains establish in the root zone and may suppress pathogens through competition or antibiosis.
This is strain- and product-specific, though. A species name alone is not a prescription. Only use a specific product currently labeled for your edible crop, site, and target (for example, Pythium), and follow its rate, timing, and pre-harvest interval.
In microgreen trials, efficacy was system-dependent and some products reduced disease-free biomass, so treat it as one tool, not a guarantee.
Do not spray hydrogen peroxide on the growing crop to spot-treat mold. Without a product labeled for that edible crop there is no basis for the concentration, and you risk tissue injury, residue, and worker exposure.
A sanitizer is not a plant rescue spray. And removing a visibly moldy patch does not make the rest of the tray safe to sell. Visible disease can signal wider contamination.
Isolate the affected lot, inspect the whole tray and its neighbors, and follow clear no-sale and disposal criteria, keeping an incident record, rather than trying to salvage part of a contaminated tray.
Happy Hydro, Let’s Talk Air Temperature and Humidity in Your Grow Room. Background on grow-room climate. It does not validate any bleach, peroxide, biofungicide, or food-safety practice above.
How do I keep raw microgreens safe to eat?
Build Food Safety Into Every Turn
Microgreens are usually sold raw, so plant-disease control is not the same as food safety.
Managing airflow and damping-off protects crop quality, but it does not remove foodborne hazards such as Salmonella, pathogenic E. coli, or Listeria, and washing cannot undo contamination that has already been internalized.
Because of that, food safety needs its own plan alongside growing.
Start with appropriate untreated or food-production seed from a supplier you can trace by lot. Use potable, E. coli-free water. Keep workers healthy and hands clean. Use a clean substrate. Harvest above the medium so tools do not contact soil and roots. Use clean, sanitized food-contact tools, and package and cold-store promptly.
Check which FSMA and local rules apply to your operation, and use current extension microgreen food-safety guidance as your primary reference.
What is the best harvesting tool?
Choose the Tool for the Crop and Surface
There is no single best tool (it depends on your crop, system, and scale). Clean, sharp scissors or a knife are standard options and work well for soil trays.
A powered tool such as an electric knife or shears can speed some jobs, particularly in mat systems where the mat is stood up and the crop is shaved.
Claims that one tool universally beats another, or cuts labor by a fixed percentage, lack a shared test, so weigh the options for your setup.
Any comparison should look at more than speed. Cut quality and bruising, how much the blade contacts media and roots, cleaning and sanitation, effect on shelf life, and ergonomics and blade safety.
Note that some growers report shorter post-harvest life with electric clippers or knives, so a faster cut is not automatically a better one.
Why not use a sharp chef knife?
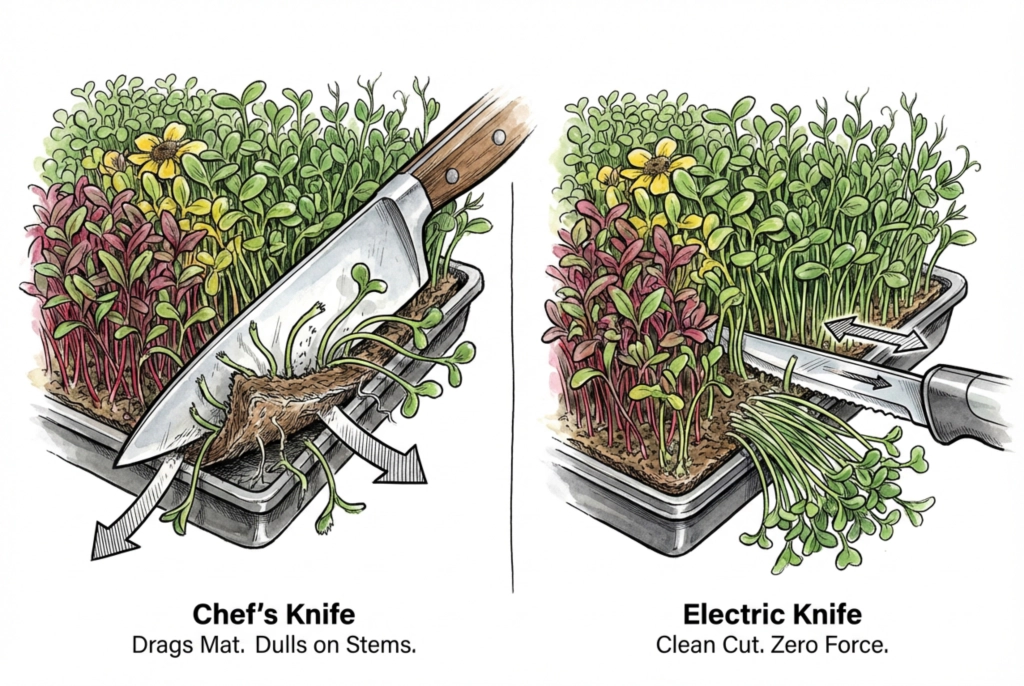
A dull knife or poor technique can drag the mat, but a sharp, sanitized knife or scissors used at the right angle is a perfectly standard option. The real issue is technique and maintenance rather than whether the blade is a chef knife.
Fibrous stems do dull blades over time, though cutting only the stems and keeping the blade off the medium slows that, so blade care matters more than tool type.
A powered knife reduces some of the repetitive hand motion, which can ease wrist strain over a long harvest.
It does not eliminate force or guarantee a clean cut every time. You still guide and support the tool, and cut quality depends on blade sharpness, sanitation, and stem density.
With any powered blade, mind the guard, keep it away from cords and wet areas, and clean and sanitize it between uses.
Keep the blade above the medium so it does not drag up roots or soil.
How do I wash and store greens?
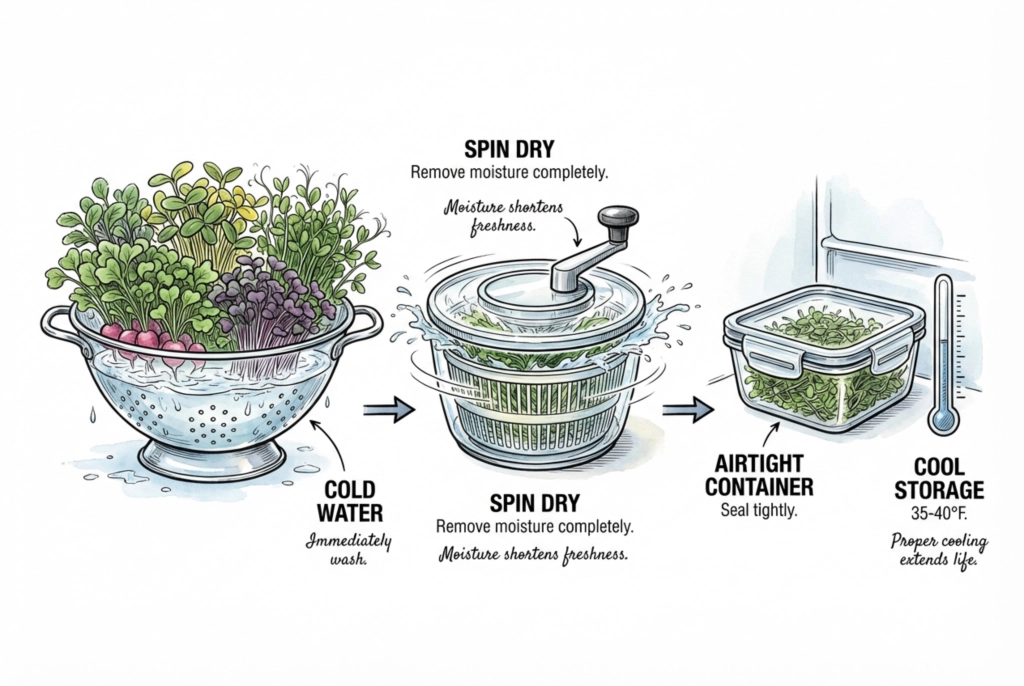
Choose a Wash and Storage Path
Washing is not automatically the right first step. Current direct microgreen guidance from Penn State advises against post-harvest washing unless it is necessary, because it can spread contamination and shorten shelf life.
There are two paths. Sell unwashed with a wash before eating note to the consumer, or, if you do wash commercially, use potable, E. coli-free treated water with a validated procedure. That procedure may use single-pass or batched water, a clean sanitized sink and spinner, and cross-contamination controls. Cold water alone is not a validated process.
If greens are washed, spin off free surface water with a clean, sanitized spinner.
Chill the product quickly and store it in the dark at roughly 35 to 40°F, while keeping it at or below 41°F. The exact optimum depends on the species, and crops such as basil are sensitive to chilling.
Cooling helps shelf life but cannot correct contaminated wash water or poor hygiene.
A sealed package can slow water loss, but true airtightness can trap respiration gases and condensation, so match the film and fill weight to the crop rather than assuming airtight is best.
Be careful with the claim that moisture ruins shelf life. Free surface water and condensation are what you want to avoid, not humidity in general. Storage that is too dry causes wilting.
How do I turn high turnover into steady sales?
Sell a Repeatable Product
Define the Product Before Selling It
Microgreens are cut young, around the first true leaf, while baby leaf or baby greens is a later, larger stage. They are different products, so keep them distinct when talking to buyers.
High-volume sales depend on lining up demand before you scale production. Useful tools here are buyer agreements, forecasts, and a waste allowance.
Chefs often value a consistent supply, though quantity and specifications vary by kitchen, so do not treat every chef as the same buyer.
Farmers-market demand can swing, but regular customers and pre-orders can steady it, so calling it unpredictable is a stereotype rather than a rule.
Indoor production can improve scheduling and environmental control, but equipment failures, disease, energy issues, and human process mean it does not guarantee reliability on its own.
Convert that scheduling advantage into concrete buyer plans and service levels such as standing orders, delivery windows, and agreed pack sizes rather than assuming it sells itself.
Should I package in bags or clamshells?
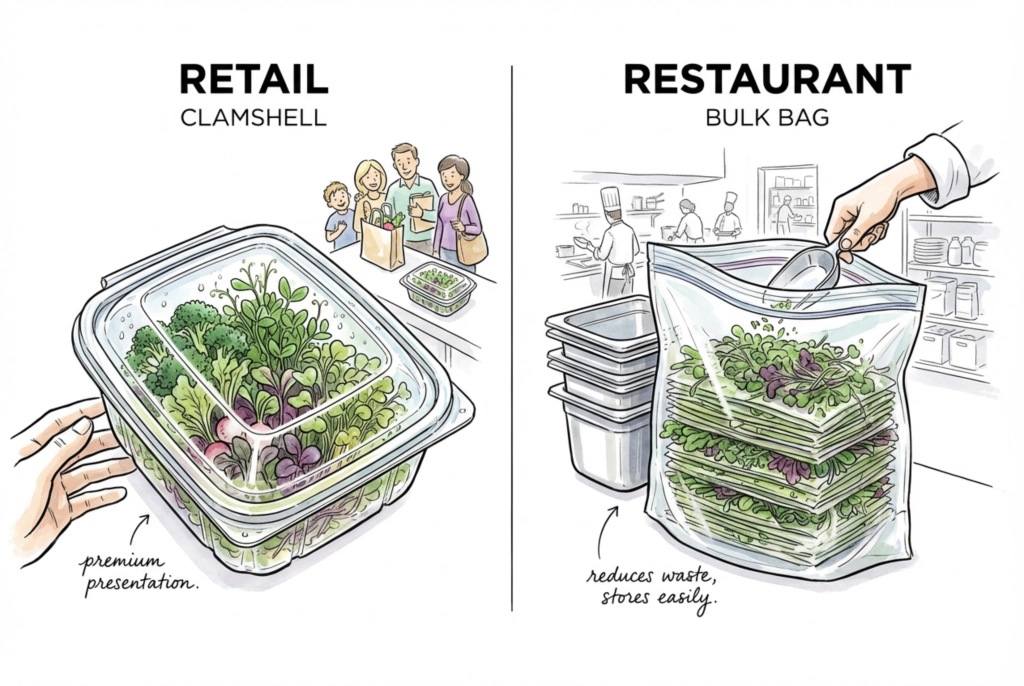
Both clamshells and bags are real options rather than a fixed rule. Clamshells are common for retail display and can protect the product, but they add plastic and volume. Claims about a premium look or universal consumer preference are marketing impressions, not survey findings. Preference varies with price, sustainability, and market segment.
Check the pack weight, ventilation, and cost with your actual buyer.
Bulk bags can suit restaurant volume and pack compactly, but they risk compression and condensation, and stacking can crush the crop, so a cold-chain tote design helps. Measure packaging waste and food waste separately before claiming that one format reduces either.
Clear packaging lets buyers see the product, but it does not prove freshness, and condensation or light exposure can lower perceived quality.
Confirm food-contact grade and any local labeling requirements for whichever you choose.
How do I price for profit?
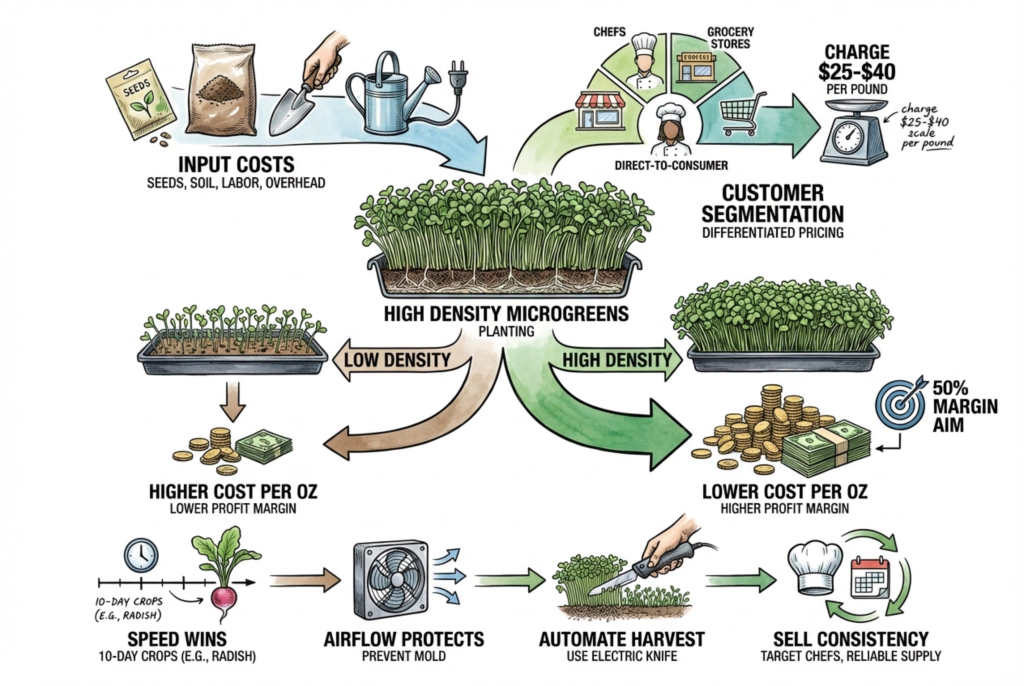
Prices of roughly $25–40 per pound appear in some markets, but that figure is meaningless without the region, crop, pack size, wholesale-versus-retail channel, and year attached. Extension guidance stresses that the target market drives price.
So use it as an example to check locally, not a number to charge everywhere.
Calculate a Margin You Can Explain
Calculating your cost per tray is essential, and it has to include seed, medium, energy, labor, overhead, rent, depreciation, packaging, marketing, delivery, waste, and any compliance costs rather than just seed and time.
Setting a target margin is reasonable, but state which margin you mean, whether gross, contribution, operating, or net. A percentage such as 50% is not actionable on its own, and enterprise budgets like the Missouri Extension microgreens budget show how to fill in these inputs for your own operation.
Higher density can lower cost per ounce, but only when the extra saleable yield outweighs the added seed, disease and quality losses, labor, and any unsold stock.
Work out that break-even for your crop and market before assuming density automatically improves the bottom line.