
Bucephalandra Emersed Box Overheating Fix
A Bucephalandra emersed box at 30°C is a condensation trap. Cool the peak, read VPD instead of raw humidity, add gentle venting, and water in the morning so leaves dry.
Marcus Hale · Published 2026-07-15 · 21 min read
Key Takeaways
- A 30°C sealed box combines heat with saturated air rather than healthy humidity.
- Read VPD rather than raw humidity because 30°C at 95% RH leaves almost no drying pull. Wet surfaces then stay wet.
- Cool the box before making large humidity changes.
- Use small vent pulses and gentle airflow rather than suddenly removing the full lid.
- Water the substrate in the morning and judge recovery by firm rhizomes and stable new growth.
If your Bucephalandra emersed box hits 30°C and the lid is sweating, the box is not giving the plants a tropical paradise.
It is building a warm, sealed condensation trap where leaves stay wet, airflow stalls, and stressed tissue becomes easier for fungi and bacteria to colonize.
The fix is not to rip the lid off and dry everything out. The fix is to lower the peak temperature, break the stagnant boundary layer, and keep humidity high enough for emersed leaves while letting wet surfaces dry between misting cycles.
The quick fix is to aim, as a practical rule, for a calmer box in the mid to upper 20s°C. Look for light morning condensation and no dripping lid during the hottest part of the photoperiod.
Why does a 30°C Bucephalandra emersed box become a trap?
Heat Plus Saturated Air
A 30°C Bucephalandra emersed box becomes a trap because heat, sealed humidity, and low airflow push the air toward saturation.
The humidity is there, but the plant is also sitting in wet, stale air.
Bucephalandra is a rheophytic aroid from Borneo. That habitat clue matters.
Rheophytes deal with wet rocks, splash, and very humid forest air, but they are not naturally wrapped in a still plastic lid with a light baking the roof.
A common sealed-box mistake is to copy the humidity of that habitat but overlook the air movement.
In nature, stream edges give wet roots, oxygenated surfaces, and changing air around leaves, while a tub lets water vapor pile up until the coolest surface becomes a drip line.
Warm air can hold more water vapor than cooler air. In a nearly sealed box, evaporation from moss, wet substrate, and leaves fills that extra capacity.
When the lid or a leaf surface cools below the dew point of that humid air, moisture condenses on it.
How little cooling it takes depends on how close to saturation the air already is. Near 95% RH, a surface only slightly cooler than the air can start to bead.
That is why a box can look both too humid and too hot at the same time. The leaves are not simply being pampered.
They are losing the leaf-air gradient that supports steady transpiration.
Borneo and its disproportionately large rheophytic aroid flora
I log temperature at the lid, substrate surface, shaded corner, and center instead of trusting one wall-mounted sensor. A small sealed box can develop a hot upper pocket while the lower display still looks acceptable.
With one sensor, I wait two minutes at each marked position and accept the value only when readings 30 seconds apart differ by no more than 0.2 °C. I repeat the route two hours before lights-out for three days. That timing captures accumulated daytime heat, while three maps separate a persistent upper hot pocket from sensor lag or one unusual room day.
After routine care, I record how quickly temperature and humidity return and whether leaves remain visibly wet. A box that recovers humidity instantly but keeps gaining heat needs a different response from one that dries for hours after opening.
What does the condensation pattern tell you?
Read Condensation as a Climate Signal
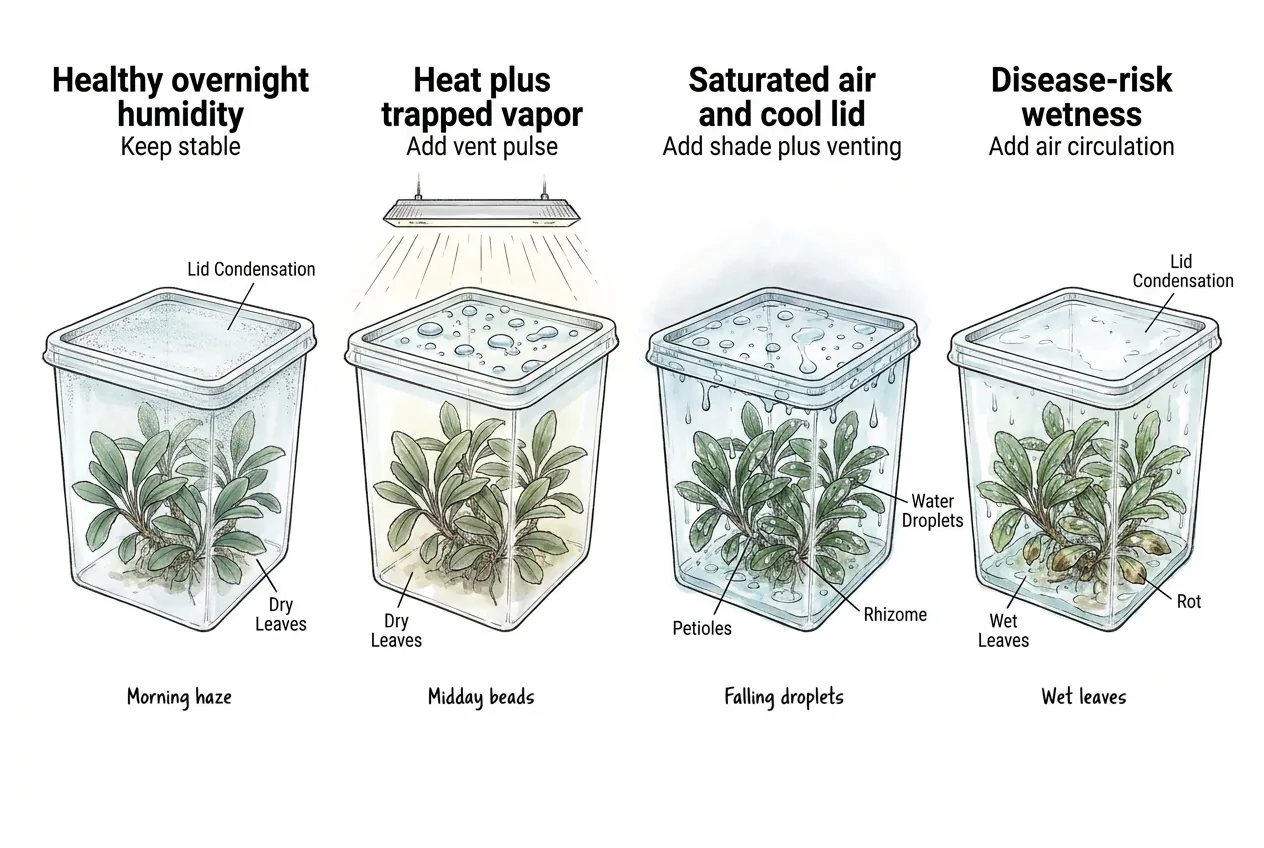
Condensation tells you where the box is saturated and where a surface has dropped below the dew point, so water falls out of the air.
A little dawn fog that clears quickly is common and usually not alarming. Midday dripping that lasts is a warning.
What matters is not the fog itself but how long leaf surfaces actually stay wet.
Read the lid like a climate log. Morning fog that clears within a few hours usually means the night was humid and the day has enough warmth or exchange to move moisture.
Droplets that grow larger under the light can mean the box is producing more vapor than it can vent, though a cool lid or existing droplets merging can look the same, so read it alongside temperature and how long leaves stay wet.
Leaf condensation matters more than lid condensation. Water on plastic is annoying.
Water that sits on petioles, leaf bases, and old tissue for hours is the disease-friendly part.
Use this simple scale as an observation heuristic, not a diagnostic instrument. It sorts what you see into first adjustments. It does not measure dew point, leaf temperature, or overnight leaf-wetness duration, which are what actually drive disease risk.
| Condensation sign | What it usually means | First adjustment |
|---|---|---|
| Light morning haze that clears | Overnight humidity with a normal drying rhythm | Keep stable, but confirm leaves are not wet for hours |
| Lid beads by midday | Heat plus trapped vapor | Add vent pulse |
| Droplets fall from lid | Saturated air and cool lid | Add shade plus venting |
| Leaves stay wet all day | Disease-risk wetness | Reduce misting and add airflow |
The goal is not a bone-dry lid. Bucephalandra still needs high humidity during emersed adjustment.
The goal is a box that breathes enough to stop wet leaves from becoming the default state.
UMass Disease Management
Why is 30°C worse inside a sealed box than on an open shelf?
Thirty C is worse inside a sealed box mainly because evaporative leaf cooling and air movement are restricted.
In open air, leaves can shed heat through transpiration and moving air. In a saturated, still box, that escape route weakens.
High humidity slows transpirational cooling and stagnant air thickens the boundary layer around the leaf. That is a different thing from high humidity blocking CO₂ diffusion, which it does not simply do on its own.
Think of the leaf surface as a tiny weather station. It needs a difference between moist internal leaf air and the outside air.
When the outside air is almost saturated, water movement slows and leaf surfaces remain wet.
At the same time, respiration keeps running and warm conditions raise metabolic demand. Weak transpirational cooling and a thick, still boundary layer make it harder for the leaf to shed heat and keep water moving.
This is a qualitative picture. The exact balance depends on light, stomatal response, air speed, and CO₂ that this setup does not measure.
The result is soft growth, distorted new leaves, and sudden melt on already stressed imports.
This does not mean Bucephalandra instantly dies at 30°C. It means 30°C plus sealed wetness is a risk stack.
One hot afternoon is survivable, but a week of dripping lids, wet leaves, and no air exchange is the problem.
How should you use VPD instead of guessing from humidity?
Use VPD to Read Drying Power
Use VPD as the practical gauge because it combines temperature and relative humidity into one number, rather than reading humidity on its own.
Relative humidity alone is easy to misread, because the same RH value means very different drying conditions as temperature changes.
VPD means vapor pressure deficit. In plain English, it is the drying pull between the leaf and the air.
If it runs too high, Bucephalandra can dry at the edges, if it runs very low, the air has little drying power, so any water on leaves lingers.
Low VPD does not create a water film by itself, but it lets one persist, and prolonged leaf wetness is what raises disease pressure.
For a small Bucephalandra box, treat roughly 0.45 to 0.85 kPa as a greenhouse-derived practical reference, not a Bucephalandra-specific lab target.
Newly transitioned plants can sit near the lower end, while established emersed clumps often tolerate the middle better.
The table below is a rough calculated illustration of why warm, nearly saturated air can still be a problem.
It is an air VPD approximation. Each value is the saturation vapor pressure at that air temperature multiplied by (1 − RH), which only equals the true leaf-to-air VPD when leaf temperature matches air temperature.
Under an LED, radiant heating or transpirational cooling can push leaf temperature a degree or two off the air, and that difference shifts the real number.
If you want the leaf-relevant value, measure leaf temperature with an IR thermometer and recalculate.
| Air temperature | 95% RH | 90% RH | 85% RH | 80% RH |
|---|---|---|---|---|
| 24°C | 0.15 kPa | 0.30 kPa | 0.45 kPa | 0.60 kPa |
| 26°C | 0.17 kPa | 0.34 kPa | 0.50 kPa | 0.67 kPa |
| 28°C | 0.19 kPa | 0.38 kPa | 0.57 kPa | 0.76 kPa |
| 30°C | 0.21 kPa | 0.42 kPa | 0.64 kPa | 0.85 kPa |
Warm air that is almost saturated leaves very little drying room, so wet leaves can stay wet for too long. A slightly cooler, less saturated box still needs real air exchange to clear moisture from the leaf surface.
Why Greenhouse Growers Track Vapor Pressure Deficit, Not Relative Humidity
What numbers should you actually aim for?
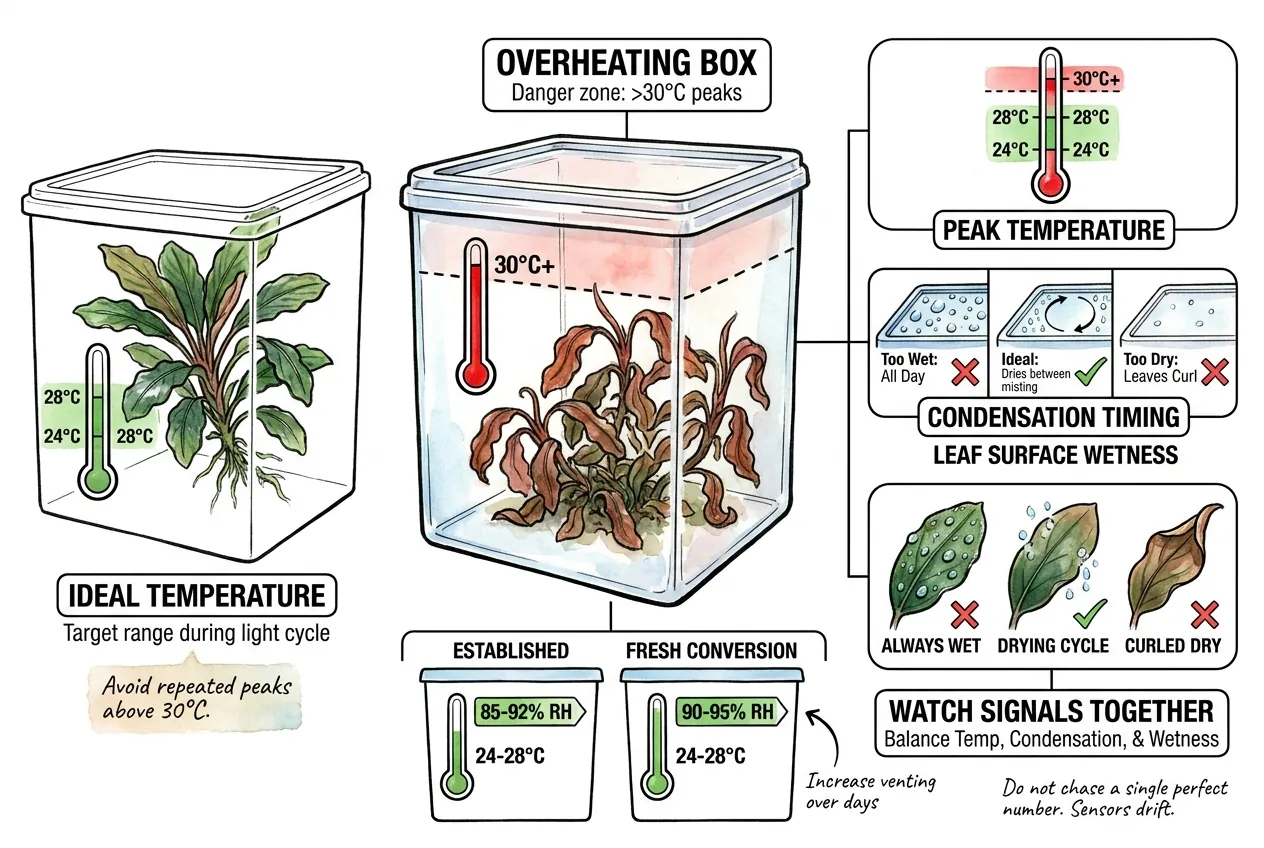
As a rule of thumb, aim for the mid to upper 20s°C during the light cycle and avoid repeated peaks above 30°C. Keep relative humidity high, but let it breathe enough that leaves dry between misting events.
For established emersed Bucephalandra, start around 85% to 92% RH in the mid to upper 20s°C. Fresh conversions or weak imports can start closer to 90% to 95% RH, then gain venting gradually as the leaves remain firm. These are starting points, not species-specific targets, so adjust them from your plants and sensors.
Do not chase a single perfect number. Sensors in small boxes drift, and the lid can be cooler than the plant canopy.
Watch three signals together. Peak temperature, condensation timing, and leaf surface wetness.
If the box is near 30°C and very humid, cool first. If it is cooler with curled leaf tips and low humidity, humidify first. If leaves stay wet all day, add airflow before adding more mist.
Where should the sensor sit?
Place Sensors at Canopy Height
Put the sensor at canopy height inside the box, shaded from direct light and not touching wet moss.
A shelf sensor outside the tub tells you the room climate, not the Bucephalandra climate.
Small boxes have steep microclimates. The air under the lid can be hotter than the air near the substrate, while leaves touching moss can stay wet much longer than leaves on raised rhizomes.
Use a basic thermometer-hygrometer for trends, but check its stated accuracy near saturation and compare it with a second sensor when possible. In a small, warm box, a small RH error can change the apparent humidity picture.
If the reading jumps from 25°C to 30°C after the light turns on, the light and lid design are the first suspects.
For diagnosis, keep a short two-day log around lights on, midday, lights off, and the first hour after lights off.
Those readings reveal whether the problem is daytime heat, overnight saturation, or both.
Digital hygrometer with min/max logging
A basic digital thermometer-hygrometer that shows temperature and relative humidity on one screen and records the daily high and low is a spec-based option for reading the box climate. The min/max memory is how you catch a hidden 30°C afternoon peak you never saw.
Many indoor hygrometers have no water-resistance rating, and their accuracy may decline near saturation. Place the sensor at canopy height, shaded, off wet moss, and clear of lid drip. Treat an uncalibrated unit as a trend logger rather than a reference instrument.
For a condensing enclosure, use a sensor explicitly rated for the humidity and water exposure at that location, or keep the display outside and use a suitable protected probe. If you are weighing which sensor and airflow gear to run together, choose a fan, humidifier, and sensor around target VPD.
How do you cool the box without drying Bucephalandra out?
Cool Before Venting
Cool the box by removing heat before removing humidity. Shade, distance from the light, lid spacing, and vent timing should come before large permanent openings.
The fastest passive fix is light distance. Raise the light or move the box sideways until midday air temperature trends out of the upper-heat range.
If the lid is clear and close to a strong LED, it acts like a little greenhouse roof.
The second fix is a controlled vent. As a rough starting point, crack the lid a few millimetres during the warmest part of the photoperiod, then adjust by what your temperature and humidity readings do.
The exact gap that gives a given air-change rate depends on lid area, box volume, room humidity, and any fan, so treat the millimetre figures as a place to start, not a fixed spec.
If humidity crashes, use two shorter vent pulses instead of one long opening.
The third fix is thermal buffering. A heavier tray or simply moving the box off a hot dark shelf can reduce fast spikes.
A shallow water reservoir has limited buffering value unless the water mass is large, and an open water surface can raise humidity and condensation load, so watch RH if you add one.
Do not flood the plant base to cool the box. Saturated substrate creates a second problem.
Work in this order.
- Move the box out of direct sun.
- Raise or dim the light.
- Add a small daytime lid gap.
- Add gentle air movement outside or across the vent.
- Reduce morning mist if leaves remain wet after several hours.
When powered airflow is near a humid or wet box, use low-voltage or aquarium/terrarium-rated gear.
Keep plugs and controllers out of splash paths, use a drip loop and a GFCI-protected outlet, and unplug equipment before moving wet parts.
UMass Greenhouse Disease Management
Should you use a fan inside the box?
Keep Powered Airflow on the Dry Side
Use a fan only if it is gentle and indirect. Bucephalandra wants air exchange, not a desk-fan blast on wet new leaves.
For a small tub, the safest fan position is outside the box, moving room air across a vent gap. That pulls saturated air out without stripping every leaf.
Keep an electronics-cooling fan on the dry side unless its manufacturer explicitly rates it for the humidity, mist, and condensation it will encounter.
For a cabinet or larger propagation bin, use the smallest circulation fan and bounce air off a wall.
Watch the new leaves. If the newest leaves curl, crisp, or fold within a day, the airflow change was too abrupt. Reduce fan time and restore a smaller lid opening.
The ideal movement is gentle. A useful visual check is that condensation clears and leaves do not flutter. A slight stir in the moss is fine, but moss movement depends on its type, moisture, and how it is anchored, so pair it with fan run time, vent gap, and your sensor trend rather than using it as a measurement.
If the plant looks windblown, the fix became another stressor.
Small USB fan with a speed controller
A small USB circulation fan with an inline speed controller can provide gentle air exchange from outside the box. Compare the exact unit’s airflow, noise, dimensions, operating-humidity range, and water-resistance rating with the vent path. Keep an unrated electronics-cooling fan on the dry side rather than inside the humid enclosure.
Nudge the speed up only if midday condensation refuses to clear. The tradeoff is one more powered device near a humid box, so run the cord on a drip loop and keep the fan and controller out of any splash or condensing exhaust.
How fast should you open the lid for acclimation?
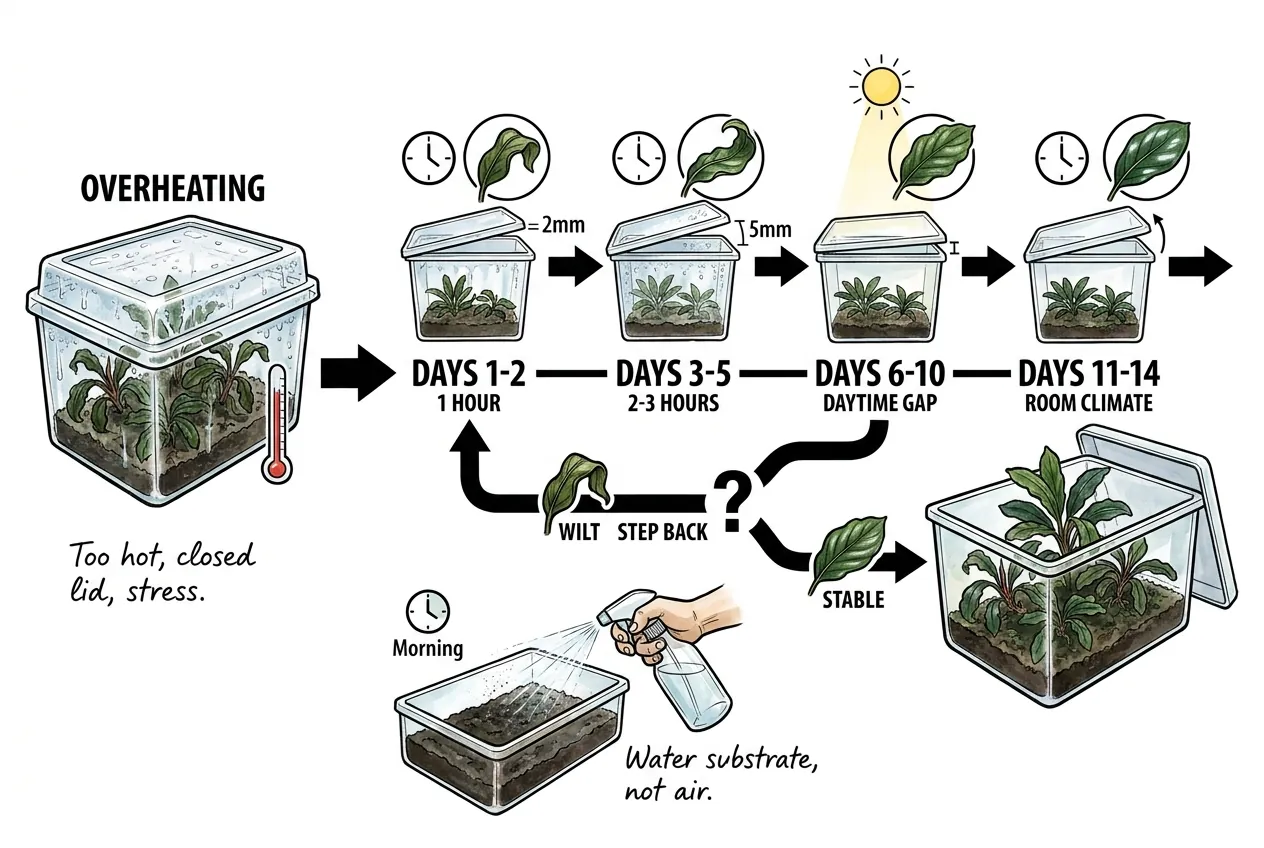
As a conservative rule of thumb, open the lid in steps over about one to two weeks if the plants are freshly converted or recently shipped.
Established emersed Bucephalandra can handle faster changes, but stressed rhizomes recover better from small repeated adjustments.
Start with one daytime vent pulse. Then add a second pulse or widen the gap only if leaves stay firm.
The goal is to increase VPD slowly while keeping the rhizome hydrated.
Use the schedule below as a conservative decision guide, not a fixed calendar. The day numbers and millimetre gaps are not from a controlled trial, and the right pace depends on tub size, room climate, fan use, and plant condition.
Let the what to watch column, not the day count, drive when you advance or roll back.
| Day range | Vent action | What to watch |
|---|---|---|
| Days 1 to 2 | 2 mm gap for 1 hour | Leaf curl or limp petioles |
| Days 3 to 5 | 2 to 5 mm gap for 2 to 3 hours | Condensation clearing |
| Days 6 to 10 | Small daytime gap through warm hours | New leaf texture |
| Days 11 to 14 | Adjust for room climate | Stable leaf sheen, no dripping |
If leaves wilt, step back one level for a couple of days before trying again. Wilting is feedback that the last change was too fast, so ease off rather than pushing through it.
What should you change about watering and misting?
Water to Create Drying Windows
Water the substrate, not the air, and mist early enough that leaves dry before the cool part of the cycle.
Evening misting is one of the easiest ways to build the condensation trap.
In a sealed box, every extra spray becomes air moisture. If the lid is already dripping, more mist does not make Bucephalandra safer. It lengthens leaf wetness and keeps old tissue soft.
For Bucephalandra on rock, keep the moss pad or root zone evenly moist. The rhizome should not sit in stale water.
For Bucephalandra in cups or trays, use a loose, airy medium and avoid a perched waterline against the rhizome.
The best watering test is tactile. Moss should feel cool and moist, not soupy.
Roots should have moisture access, while the leaf surface should get dry periods.
UMass Greenhouse Disease Management
How wet should the moss or substrate stay?
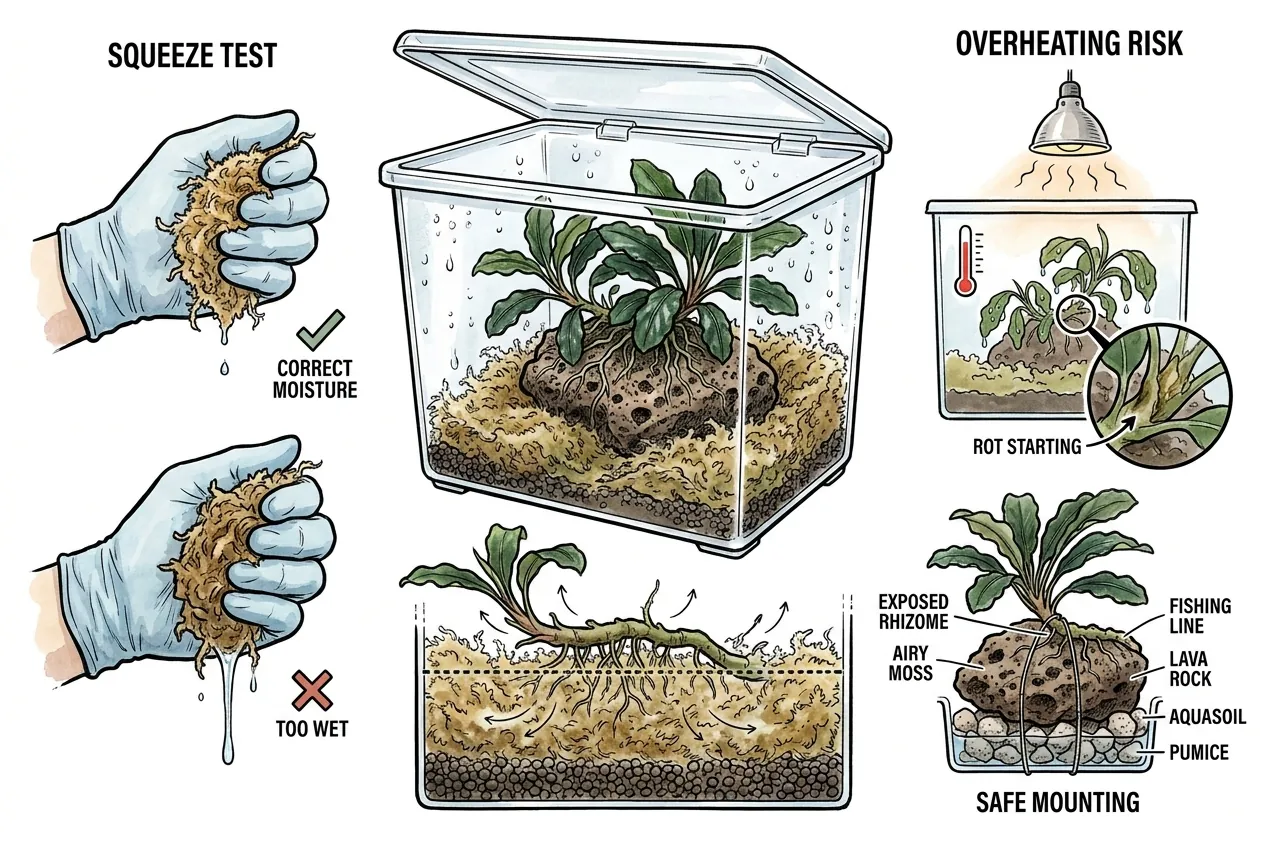
Keep moss moist enough that root tips do not dry, but not so wet that squeezing it would release water. Bucephalandra roots like moisture and oxygen together.
The rhizome is the part to protect. If the rhizome is buried in wet moss, old leaf bases stay damp and rot gets a place to start.
Mounting the rhizome on top of moss or rock is safer than tucking it into a swampy pad.
If you use sphagnum, fluff it. If you use aquasoil, keep the waterline below the rhizome.
If you use lava rock or pumice, let the rock wick water while the crown stays exposed.
During heat waves, reduce misting frequency before reducing root moisture. Warm wet leaves are riskier than moist roots in airy media.
When is misting useful?
Misting is useful during transition, after trimming, or when new emersed leaves are still thin.
It is not useful as an automatic hourly ritual in a box already near saturation.
Mist in the morning. Then check whether leaves are dry by midday.
If they are still wet, the problem is not too little mist. It is too little drying power.
Fine mist tends to pool less than heavy droplets, which collect at petiole bases where old tissue and microbes gather.
It is not automatically safer, though. Total water volume, misting frequency, and how long leaves stay wet matter more, and very fine mist can raise box humidity faster.
If you need more humidity, reduce vent time or add a passive evaporation surface away from the leaves, and watch your readings, since more open water can also raise condensation and leaf wetness.
Do not solve low humidity by keeping leaves wet all day.
How do you diagnose damage from heat, dryness, rot, and transition melt?
Diagnose Before Trimming
Diagnose by matching symptoms to timing, but treat timing as a clue, not a confirmation. Heat and condensation damage tends to appear after hot wet periods. Dryness after venting or low humidity. Rot begins at soft rhizome or old tissue.
These symptoms overlap heavily, though. Limpness, glassy patches, yellowing, melt, and curling can also come from shipping stress, the emersed-to-submersed transition, root or rhizome disease, or chemical, salt, or nutrient injury.
Timing narrows the candidates rather than proving a cause.
Heat-stressed Bucephalandra may show limp leaves during the hot part of the day, glassy patches, yellowing older leaves, or sudden melt on tender imported growth.
These signs often show up after the box has been running warm for a stretch, but the temperature number alone does not confirm heat as the cause.
Dryness stress looks different. Leaf edges curl, tips crisp, and new leaves feel papery, though salt buildup, excess light, or root damage can produce similar edges, so check watering and roots too.
Condensation is light or absent, and the substrate may still be moist while the air dries too fast.
Rot is a tissue problem, not just a climate reading. A healthy rhizome is firm, while a rotting rhizome is soft, dark, and sometimes smells sour.
Firmness, colour, and smell are useful signs but do not identify the specific pathogen. Climate correction helps, but tissue that is already mushy or detached should be removed.
Leave firm yellowing leaves and simple transition melt alone, since cutting healthy tissue only adds wounds and entry points.
What does the first-week rescue protocol look like?
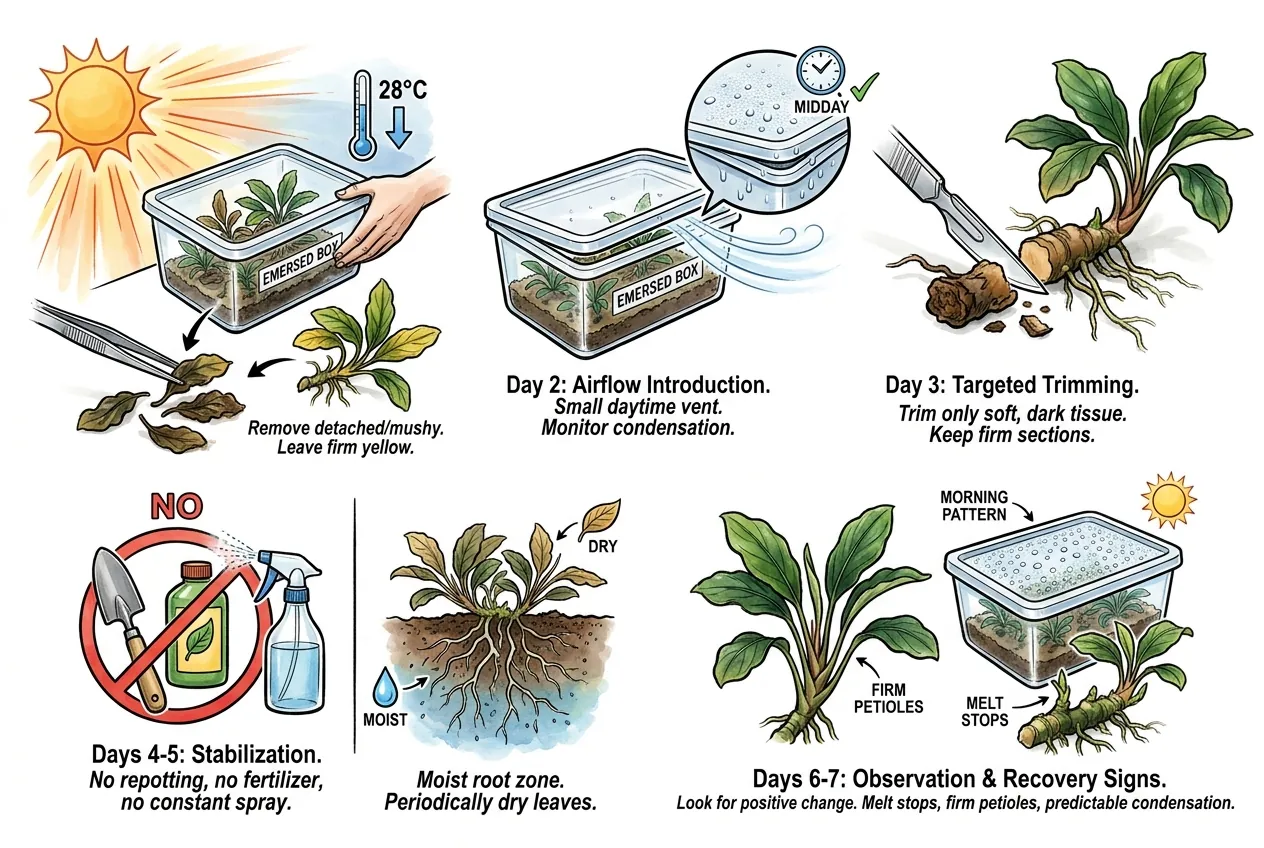
The first-week rescue protocol is cooling first, airflow second, trimming third, and patience last.
Treat it as a conservative sequence, not a lab-validated calendar.
| Period | Rescue action |
|---|---|
| First day | Move the box out of sun, reduce light intensity, and bring the heat trend down. Remove dead leaves that are already detached or mushy, but leave firm yellowing leaves alone. |
| Second day | Add a small daytime vent and watch whether condensation clears by midday. If the box dries too fast, shorten the vent period rather than resealing it all day. |
| Third day | Inspect rhizomes and trim only soft, dark tissue with a sterilized blade. Disinfect the blade before you start, again between plants, and again after cutting into any diseased section, and seal and discard the removed material rather than leaving it in the box. Keep firm rhizome sections, even if the leaves look ugly. |
| Days four to five | Stabilize instead of repotting, fertilizing, or constantly spraying. Keep the root zone moist and the leaf surface periodically dry. |
| Days six to seven | Look for the direction of change. A plant is improving when melt stops spreading, petioles firm up, and condensation follows a predictable morning pattern. If instead the rot keeps spreading, softness reaches most of the rhizome, or the smell worsens, isolate it, get a firmer diagnosis, and be ready to discard tissue you cannot save. |
When should you isolate a plant?
Isolate a plant when rot is soft, spreading, or touching neighboring rhizomes. Do not isolate just because one old submerged leaf is melting.
Use a smaller recovery cup with moist, airy media and a vented cover. Keep it slightly cooler than the original box.
The purpose is to protect the rest of the collection while giving the damaged rhizome stable humidity.
If mold appears only on dead leaf scraps, remove the scraps and improve airflow. If mold appears on firm living rhizome tissue, inspect for hidden softness.
The climate may have exposed a rot problem that was already underway.
Sterile technique matters. Sterilize the blade before cutting and re-sterilize it between plants and after each cut into diseased tissue, work with clean hands or gloves, cut back to firm tissue, and bag and discard the removed pieces instead of dropping them in the box.
Avoid burying the wound in wet moss, and let air reach it inside a humid but breathing recovery cup.
What is the stable setup after the trap is fixed?
Stable Box Traits
The stable setup is a warm-humid box that has a daily drying rhythm. It should not be a sealed sauna, and it should not be an open dry shelf.
A good Bucephalandra emersed box has five traits.
- Peak temperature usually stays out of the upper-heat range.
- Morning condensation clears instead of growing all day.
- Leaves dry between misting events.
- Rhizomes sit above constantly wet media.
- Air exchange is small, steady, and adjustable.
Once the box is stable, change one variable at a time. If you increase light, watch temperature before changing humidity.
If you widen the lid gap, watch leaf edges before reducing watering.
A stable, unremarkable box is the goal. Bucephalandra does not need a dramatic daily intervention.
It needs a microclimate that stops swinging between sealed wet heat and sudden dry correction.
What daily checklist prevents relapse?
Use a 30-second daily check instead of guessing. Read the box at the same time each day, preferably near the warmest part of the light cycle.
Check temperature first. If it is near 30°C again, address the heat before changing anything about misting, and do not treat one number as the whole diagnosis.
Then check the lid, if droplets are growing at midday, add venting or reduce light heat.
Check the leaves last. A little dew at lights-on is common, but what matters is how long it lasts. Leaves that are still wet through the afternoon, or wet for many hours overnight, are the concern.
Dry curling new leaves mean the correction went too far.
The maintenance rule is humid roots, breathing leaves, and a cooler peak. If those three conditions hold, the 30°C condensation trap is gone.
What should you avoid doing?
Avoid the three panic fixes of full lid removal, constant misting, and fertilizer after melt. Each one feels active, but each can deepen stress.
Full lid removal can shock thin emersed leaves. Constant misting keeps the disease window open.
Fertilizer does not repair heat-stressed tissue, and stressed roots use nutrients poorly.
Also avoid chasing spotless old leaves. Bucephalandra often sacrifices older submerged or stressed leaves while adapting. The real win is a firm rhizome and clean new growth.
If new leaves emerge smaller but firm, accept the reset. Smaller stable leaves beat large soft leaves produced in a saturated hot box.
Match every piece of gear to the conditions it will actually face. Use an indoor hygrometer as a protected trend sensor unless its stated accuracy and water-resistance rating cover the box. Keep an unsealed electronics-cooling fan on the dry side rather than sealing it inside a condensing enclosure.