
How Often to Water Monstera: Signs, Soil & Root Rot
Learn when to water a Monstera using pot weight, soil moisture, and root signs, plus how drainage, potting mix, and water quality help prevent root rot.
Jordan Cole · Published 2025-12-24 · 19 min read
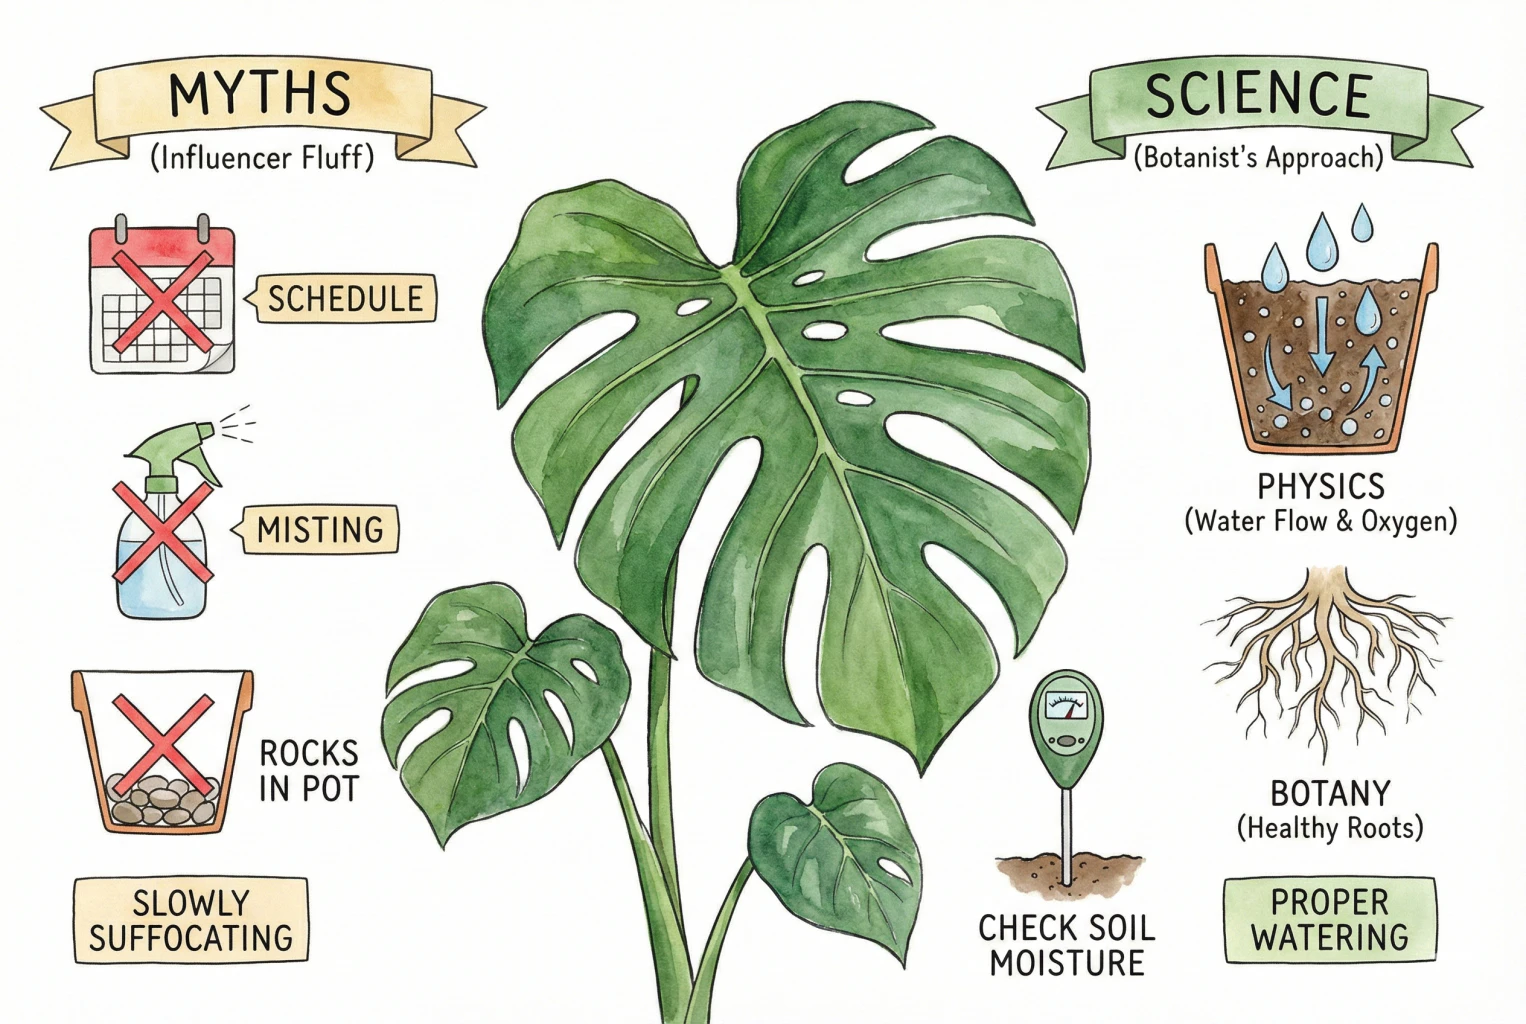
Key Takeaways
- Watering a Monstera is as much about air in the root zone as water. It is a hemiepiphyte whose wild roots grow in airy, chunky debris, so a dense, constantly saturated mix can hold too little oxygen for roots to respire and prolonged low oxygen can start root decline.
- An airy, bark-based aroid mix gives roots a better balance of moisture and oxygen. Bark, perlite, and pumice raise air-filled porosity. A clear nursery pot lets you watch the roots and the moisture on the pot wall, which is a useful extra signal, not a full diagnosis.
- Read the plant and pot rather than a calendar. Combine pot weight, how the top few centimeters feel, and a skewer pushed toward the bottom of the pot. A moisture meter can also help if it is the right type and calibrated for your mix.
- Water thoroughly and let the pot drain fully. This wets the whole root ball and lets air return to the pore spaces. Leach more heavily only when salts have built up.
- Routine misting does little for lasting humidity, and yellowing leaves do not prove thirst. Overwatering is one possible cause, so check the roots and recent conditions before adding more water.
Water a Monstera when the pot and root zone are becoming dry, not on a fixed calendar. Combine pot weight, the moisture in the upper and lower mix, and the plant’s recent conditions, then water thoroughly and let excess drain.
Read the Pot Before Reaching for Water
If your Monstera is turning yellow, deciding whether to water can feel ambiguous. Shortcuts such as a weekly schedule or misting for humidity treat every plant, room, and pot as if they dry at the same rate.
A more reliable decision combines soil physics, root biology, pot weight, and direct moisture checks so you can tell whether this particular pot is still wet.
After a complete watering, I let the pot drain for 30 minutes and record its wet weight. I then weigh it at the same time daily until the top five centimeters are dry and a central wooden skewer emerges barely damp. That second weight becomes my trigger because it belongs to this root ball instead of an internet schedule.
The range is reset after repotting, adding a pole, or changing season. Those changes alter water mass and drying even when the plant looks the same.
Moisture near the root-ball center is compared with the pot wall. Water can channel down a chunky edge while the center stays dry, or leave a dense core wet after the outside looks ready.
Why Monstera Roots Need Air and Water
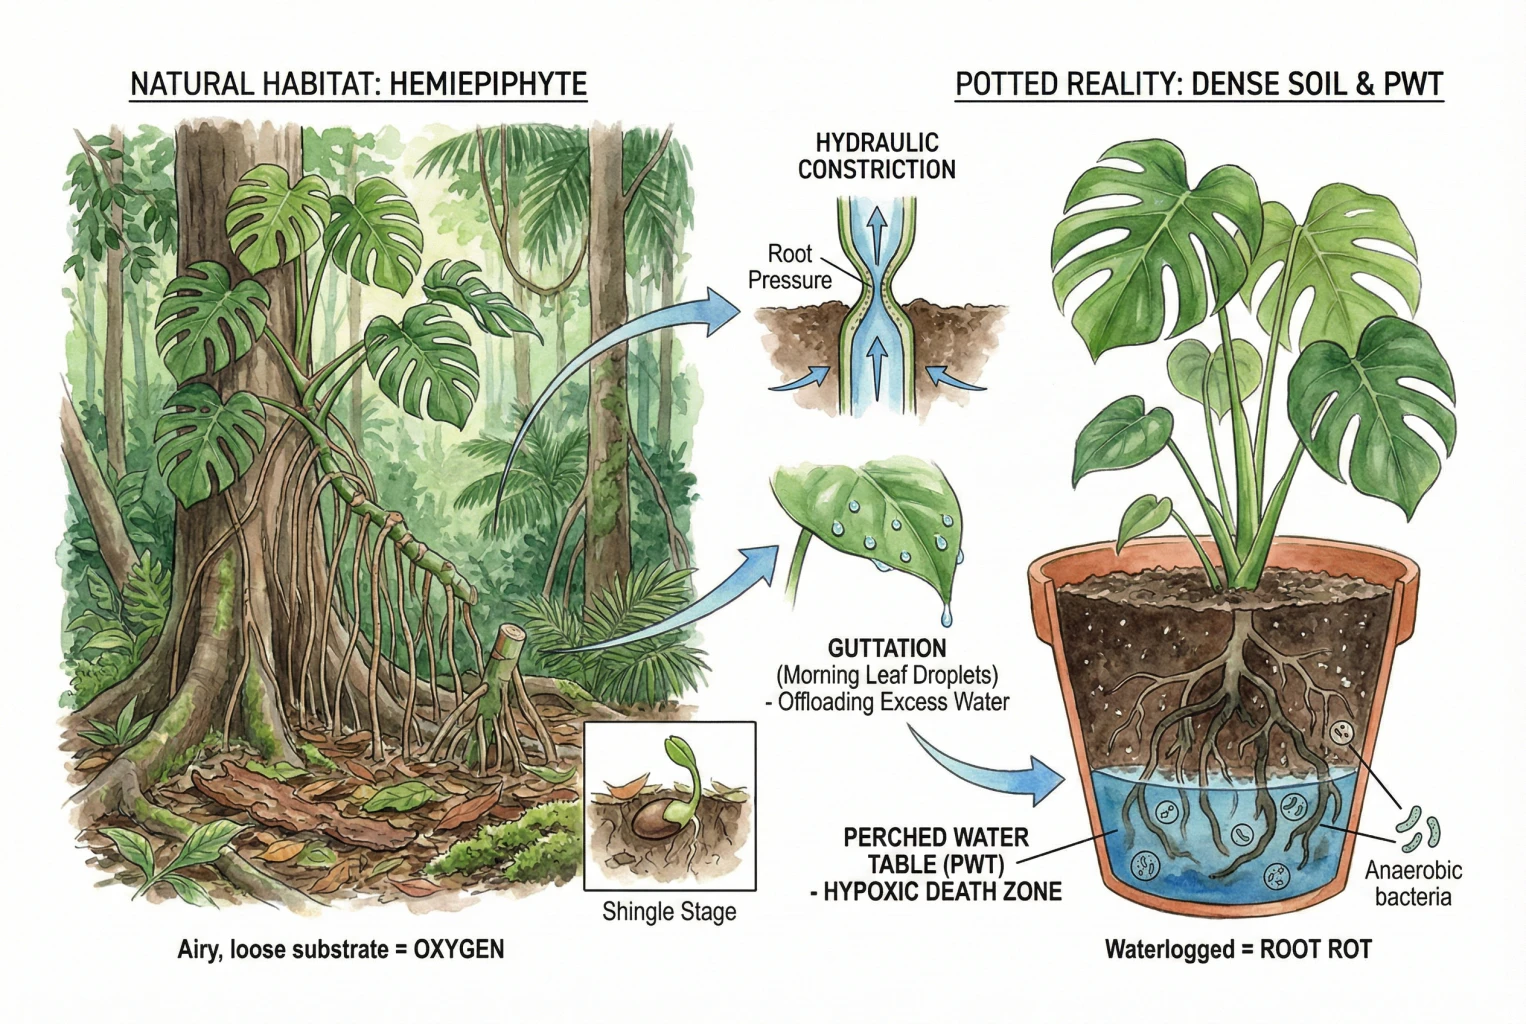
Monstera is a climbing hemiepiphyte, which means it can begin life on the forest floor and later climb while sending roots through loose organic debris. That background matters indoors because its roots are adapted to a mix with both moisture and plenty of air, not a pot that stays saturated.
A Hemiepiphyte’s Root Environment
In the wild, Monstera deliciosa climbs through loose organic debris rather than growing in compacted soil. Its aerial roots are normal climbing and anchoring structures, not a sign that the pot needs more water.
As the plant climbs, it develops larger leaves and more aerial roots. Indoors, give those roots a support if useful, but keep the planted roots in an airy mix that can drain after watering.
What the Wild Root Environment Implies Indoors
The wild root environment is loose, airy, chunky organic material, rotting bark, leaf litter, and moss, so the roots are used to a lot of air around them.
That doesn’t translate into an exact recipe, but it does explain why a dense, peat-heavy mix that stays saturated for long periods can be a problem. When the pore spaces stay full of water, there is little oxygen left for the roots, and prolonged low oxygen is hard on them.
How wet a given mix gets, and for how long, depends on the ingredients, the pot, and how often you water.
Hydraulic Architecture and Guttation
Monstera can move water to its leaves even when evaporation is low. This may leave droplets at leaf tips by morning, a normal process called guttation.
Guttation alone does not mean overwatering. Check pot weight, moisture deeper in the mix, and root condition before changing the watering routine.
The Wetter Zone Near the Pot Bottom
After you water and the pot drains, a wetter layer can remain near the bottom of the container.
Gravity pulls water down, but the substrate holds onto some of it (capillarity), and the zone where those forces roughly balance is often called the perched water table (PWT).
Ground Drainage
Water can keep draining downward, though real drainage is limited by soil layers, texture changes, and the water table rather than being infinite.
Pot Drainage
Water cannot drain past the bottom, so a wetter, lower-oxygen layer can sit there for a while.
How tall that wetter layer is, and how long it lasts, depends on the substrate’s particle sizes, the pot’s height and shape, and how much water the plant is using.
A fine, dusty mix in a short pot holds a taller wet zone than a chunky mix in a tall pot. Roots and evaporation also open air spaces back up over time.
Specific figures quoted for a fixed depth only apply to a particular measured mix and pot, not to every standard potting mix.
Roots need oxygen to respire, and when it runs low they take up water less effectively. Prolonged low oxygen can cause non-infectious root decline on its own, while persistently wet conditions can also make infection by water molds such as Pythium more likely. Pythium is an oomycete, a fungus-like water mold, so distinguish abiotic low-oxygen damage from an actual infection.
The practical goal of watering is therefore to keep a workable balance of air and water in the root zone.
Mechanisms of Waterlogging Tolerance in Plants
A Repeatable Monstera Watering Routine
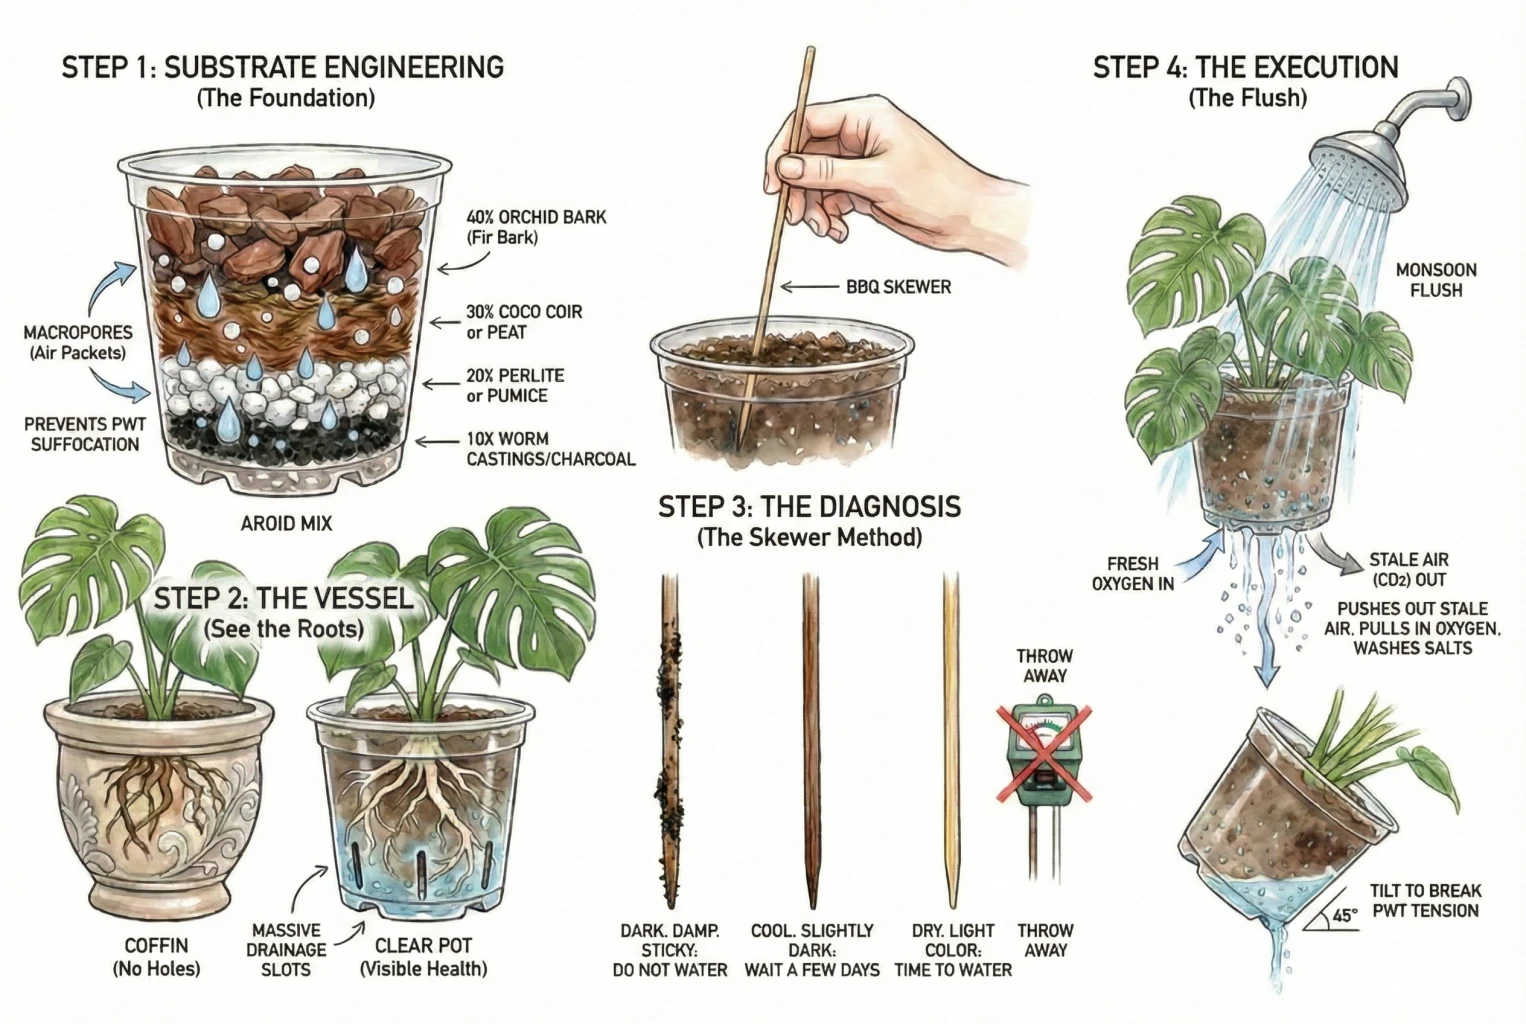
Water based on what the pot and plant are doing, using the same checks in the same order each time.
Build an Airy Mix
Watering is easier when the mix drains well and holds some air. Many bagged houseplant or potting soils are peat- or coir-heavy and can stay wet for a long time in a pot, though performance varies by brand, particle size, and how compacted they become.
Peat holds a lot of water, which is why a peat-heavy mix on its own can stay soggy, but it isn’t worthless. It becomes a problem mainly when it is the whole mix. A common approach is to blend a chunkier aroid mix. The ratios below are a reasonable starting point, not a tested optimum. Adjust them for your light, humidity, pot, and watering habits, and blend everything into one uniform mix rather than layering it.
If you are choosing components rather than following a premixed recipe, use the aroid potting mix product chooser to compare bark, perlite, pumice, coir, and charcoal by the role each material plays.
Bark for Air Space
Use about 40% orchid or fir bark. The large chunks create air pockets and help the mix drain and dry.
Coir or Peat for Moisture
Use about 30% coco coir or peat to hold moisture for the plant. They behave differently, so choose one rather than treating them as interchangeable in the same batch.
Perlite or Pumice for Mineral Aeration
Use about 20% perlite or pumice for mineral aeration that resists breaking down, though particles can still settle as the mix ages.
Castings and Charcoal Are Optional
Use about 10% worm castings and a little horticultural charcoal if desired. Castings add slow-release nutrients and microbial life, while charcoal is optional rather than a fixed percentage.
Ready-Blended Orchid Mix as a Coarse Component
A ready-blended orchid mix saves you from gathering bark, charcoal, and perlite separately. A typical coarse orchid blend is built from western fir bark, hardwood charcoal, and sponge rock (a perlite-type mineral), so treat it as the airy part of a Monstera mix rather than a complete potting medium.
Use a Blend as a Coarse Component When
A bark- and mineral-dominant blend supplies the airy portion of a custom Monstera substrate when you are prepared to add a moisture-holding component and manage nutrition separately. Check the exact bag for bark type and particle size, mineral aeration, charcoal, fine material, wetting agents, and added fertilizer.
Skip It as a Stand-Alone Mix When
Skip it when you want a complete, ready-to-use substrate. A pure orchid blend with no coir or peat holds little water and can dry quickly indoors when used alone. That said, some blends already include coir, peat, or fine material, so read the disclosed ingredients and watch how the bag holds water in your conditions before deciding whether it is a component or a complete medium.
Use a Draining Pot That Fits the Plant
Avoid potting directly into a decorative container with no drainage. Water collects at the bottom with nowhere to go.
Either use a pot with drainage holes, or keep the plant in a nursery pot and set that inside the decorative one (a cachepot) so you can lift it out to drain.
A clear nursery pot has the bonus of letting you watch the roots.
Clear Nursery Pots
A clear nursery pot adds root and pot-wall visibility, but it is still only one signal in watering and root diagnosis. Small clear pots, roughly 6- to 7-inch diameter and a similar height, suit smaller plants whose roots and pot-wall moisture you want to inspect. Thin-walled clear pots at this size usually lack large side slots and may not stably support a large, top-heavy Monstera.
Choose Clear Pots for Root Visibility
Choose a clear pot when you value root and pot-wall visibility for a small or medium plant. Drainage-hole pattern, side ventilation, wall thickness, and rigidity vary from pot to pot, so confirm that the one you pick drains freely and can hold the plant and its climbing support.
For a beginner, the clear wall is useful because it adds a visual clue to the usual weight and touch checks. Condensation does not measure how much water is available, and root color alone is only part of the picture. Firmness, smell, whether the outer layer slips off, and new root growth matter too.
Choose Structure Over Transparency When Support Is the Priority
For a mature climbing Monstera, transparency is secondary to a stable base, rigid walls, free drainage, and any side ventilation a coarse mix needs. A clear pot can still work if it provides those features. Skip only thin or lightly vented pots that cannot support the plant and pole.
Check Moisture Before You Water
Don’t rely on one signal. Cheap resistive-probe moisture meters have real limits because they respond to electrical resistance, which is affected by salts, temperature, and how well the probe contacts a chunky mix. In bark they can read low even when the material is wet.
Other meters use capacitance or TDR sensors, and any meter is more trustworthy when it is calibrated for your particular mix.
A simple, low-cost cross-check is a wooden skewer, alongside the two checks that usually tell you the most. Use pot weight, since a dry pot is noticeably lighter, and feel the top few centimeters of mix before you decide.
- Use a raw wooden BBQ skewer or a disposable chopstick.
- Insert it toward the bottom of the pot, wait a bit, then pull it out. Vary the spot rather than jabbing the same hole each time, so you do not keep damaging the same roots.
Reading the skewer is rough, not exact. Wood species, staining from the mix, and room temperature all affect it, so combine the result with pot weight and how the mix feels.
- If it comes out dark and damp with mix sticking, the lower zone is still wet. Usually wait, especially for a smaller plant in lower light.
- If it feels cool and slightly darker but not clearly wet, check again in a few days.
- If it is dry and light with nothing sticking and the pot feels light, it is a good time to water.
Water Thoroughly, Then Drain
When the checks say it’s dry, water thoroughly rather than in small sips, so the whole root ball wets evenly instead of the water channeling straight through dry spots.
- Take the plant to the sink or shower.
- Run lukewarm water through the pot until it runs freely from the bottom. There’s no magic number of seconds (how long depends on the pot volume and how fast your mix takes up water) so water until it’s evenly moist and draining, not until a stopwatch says so.
- As water enters, it pushes air out of the pore spaces, and as the water drains, air is drawn back in. Watering resets the air-water balance rather than pumping fresh oxygen into the mix, and thorough watering also carries away some accumulated fertilizer salts.
- Leach more heavily only when salts have actually built up. Running a lot of water through every time increases nutrient and water loss and runoff, so for routine watering, moderate drainage is enough.
- Let it drain fully before returning it to a cachepot or saucer. Tilting the pot can help the last of the water run out.
Humidity, Water Quality, and Aerial Roots
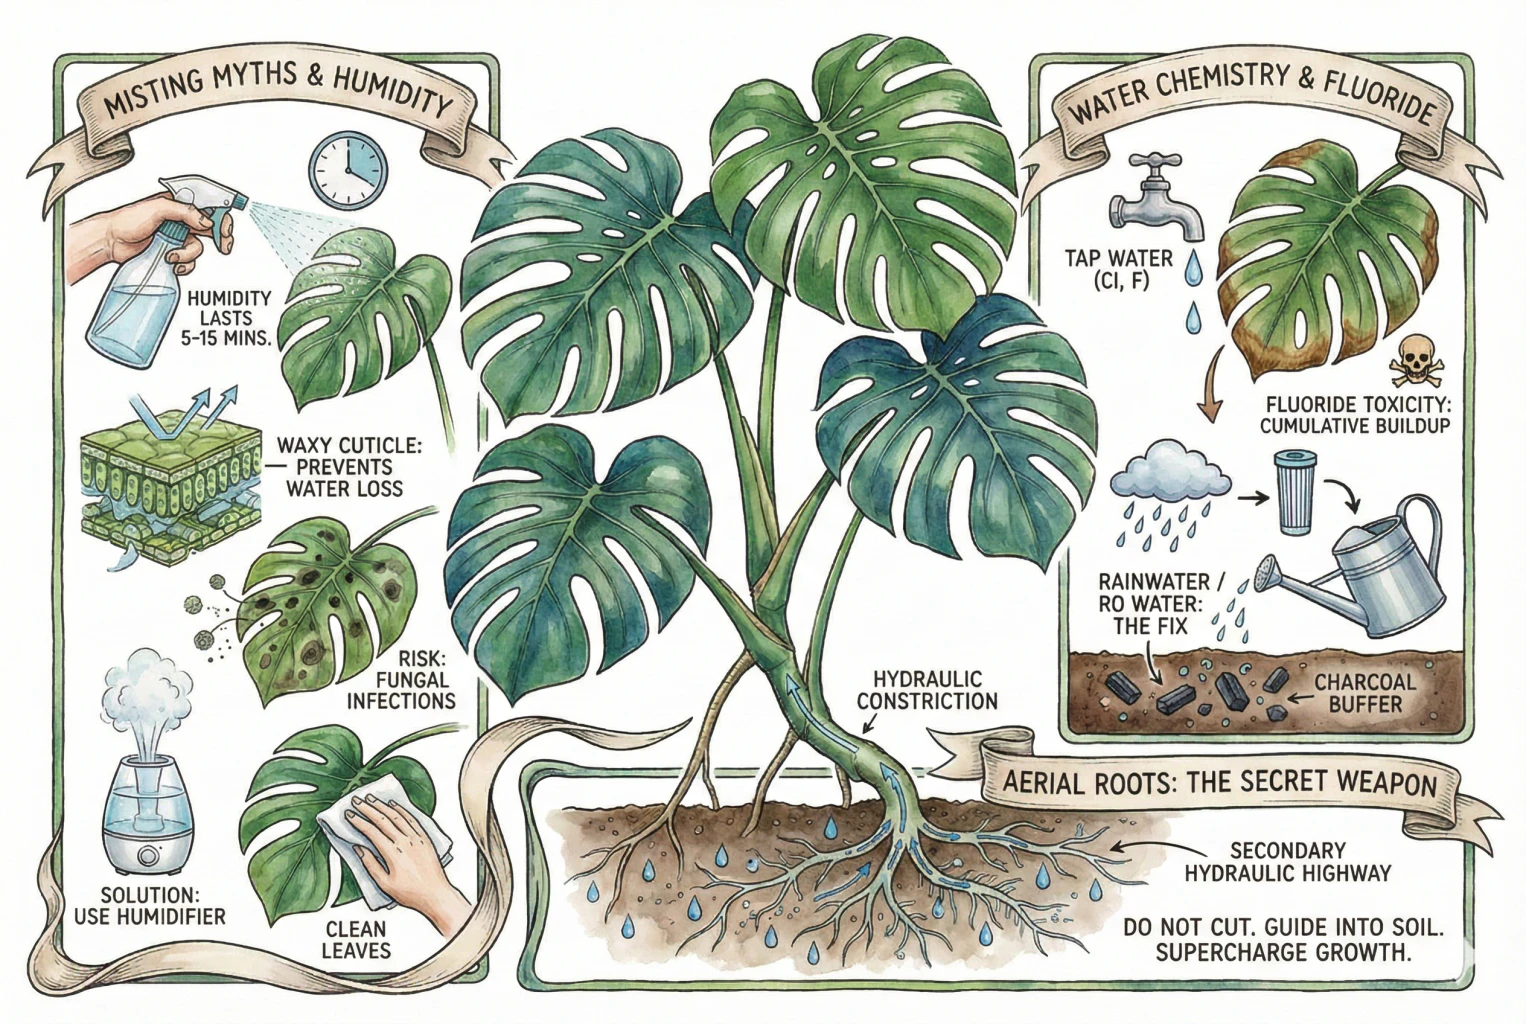
Misting, water chemistry, and aerial roots affect different parts of the watering decision and should not be treated as interchangeable fixes.
Misting Does Not Maintain Room Humidity
Spraying a Monstera can wet the leaf surface briefly, but the resulting humidity increase disappears as the water evaporates and does not maintain room humidity.
Short-Lived Leaf Humidity
Misting raises humidity around the leaf only until the water evaporates, usually for a short time. The duration depends on room size, airflow, and temperature, so a fixed misting interval is not a measured humidity plan.
Leaf Uptake Is Not Room Humidity
Monstera leaves have a waxy cuticle that mainly limits water loss. Some plants can absorb a little water through their leaves, a process called foliar water uptake, but no Monstera-specific measurement shows that misting meaningfully hydrates the plant. Leaf hydration and room humidity are separate questions.
Wet Leaves and Disease Spread
Leaves that stay wet in stagnant air can favor leaf spot problems, including fungal diseases such as anthracnose and bacterial diseases such as Pseudomonas. Water splashing and misting can help spread both.
Steady Humidity Needs Measurement
If you want steadier humidity, use a humidifier and check the actual level with a hygrometer. Keep humidity below the point where condensation or building mold becomes a problem, keep the tank clean, and wipe leaves with a damp cloth using a fresh cloth between plants.
Foliar water uptake. Processes, pathways, and integration into plant water budgets
Check Local Water Quality
Tap water varies by location. Whether it is disinfected with chlorine or chloramine, whether it is fluoridated, and how hard it is all depend on your water system, so the first step is to check your local water-quality report rather than assume.
Hardness and fluoride are separate properties. The broader houseplant water-quality guide explains when rainwater or reverse osmosis is worth considering.
Fluoride Is One Possible Contributor
Some houseplants are sensitive to fluoride and can develop tip or margin necrosis as it accumulates. A Monstera-specific sensitivity threshold is not well established, so treat fluoride as one possible contributor to brown tips rather than a confirmed cause.
When a Water Switch Is Worth a Trial
If persistent brown tips coincide with high fluoride, salt, or sodium in the water report, switching to rainwater or reverse-osmosis water is a reasonable trial. Rainwater is usually low in minerals but can pick up contaminants from a roof or storage, and horticultural charcoal is not equivalent to engineered carbon filtration.
Keep or Direct Aerial Roots
As a Monstera gets larger, it produces aerial roots along the stem. They are a normal feature, not a defect or a demand for more frequent watering.
- You usually don’t need to cut them. Healthy aerial roots aren’t a problem. Trim them only if they’re in the way, and know that removing a few won’t harm a healthy plant.
- You can direct an aerial root into the soil or onto a damp moss pole so it can act as an absorptive root. This may help water and nutrient uptake, but the claim that it bypasses the stem base and dramatically boosts growth in a potted M. deliciosa has not been tested. Treat it as an option to try, not a guaranteed upgrade.
Monstera Watering FAQ
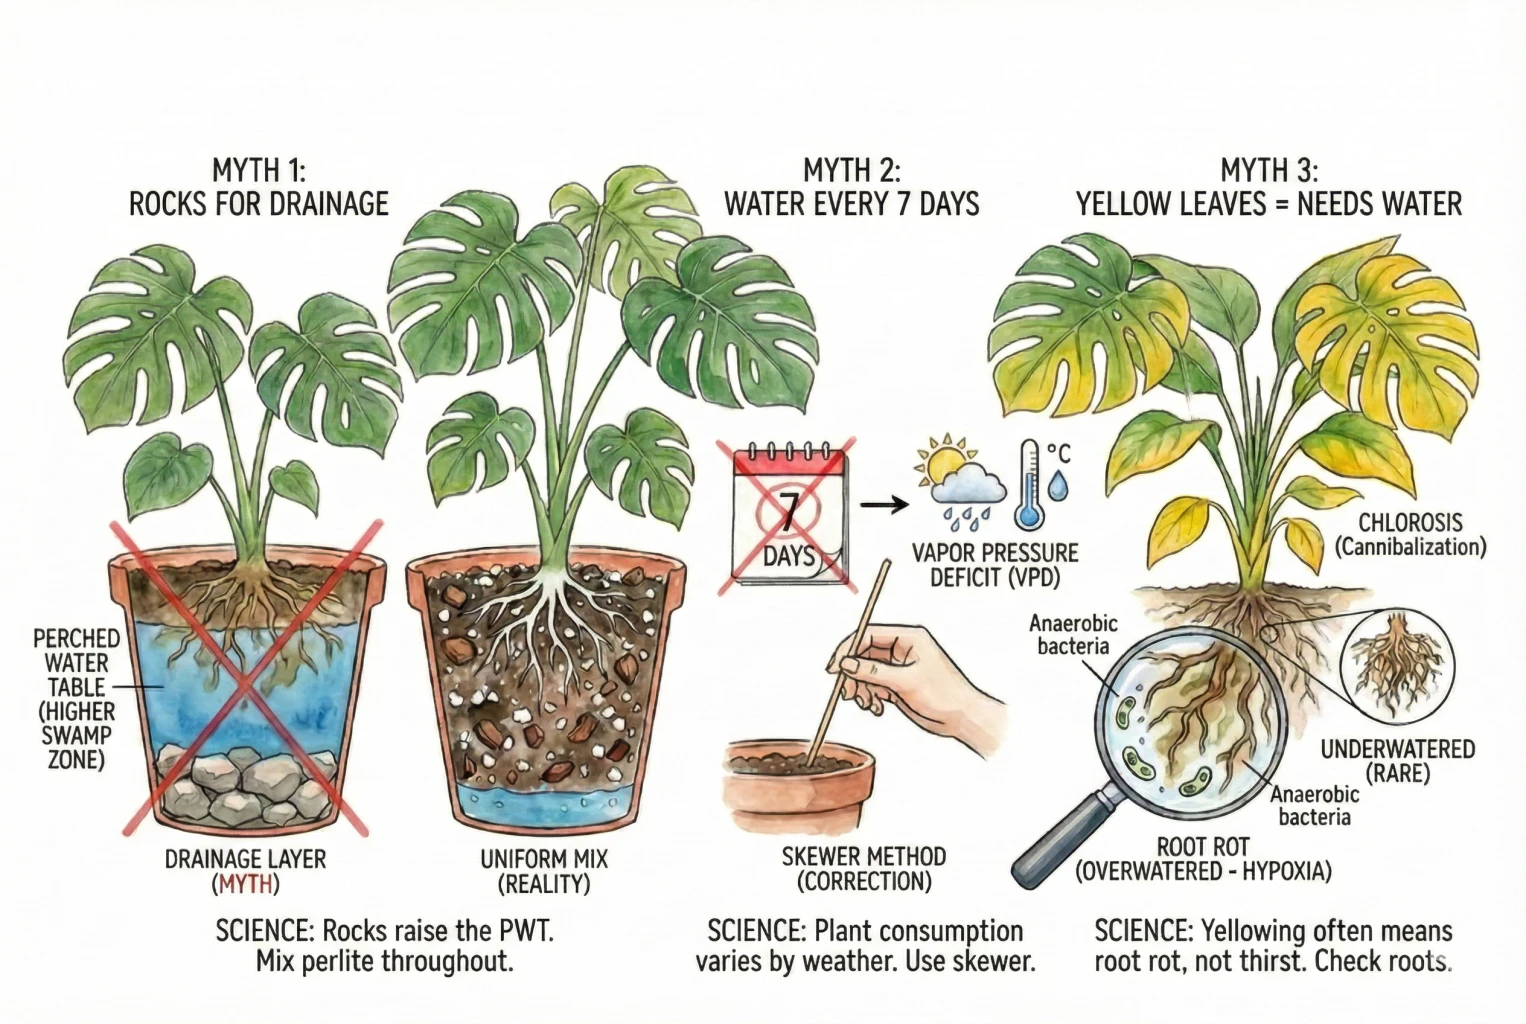
Do rocks in the bottom improve drainage?
A Rock Layer Can Hold Water Above Soil
The classic warning is that a coarse layer under the soil can create a capillary barrier, so water tends to hold in the finer mix above until it is close to saturated before it moves down into the rocks.
That’s a real effect, and it’s a good reason not to reach for a rock layer by default.
But the evidence isn’t a universal law. A 2025 container experiment found that a drainage layer often reduced or barely changed overall water retention depending on the media and materials, rather than always raising it. The researchers didn’t test living plants and stressed that results depend on the materials and the layer depth.
A rock layer also takes up volume that roots could use.
Use One Draining Mix Instead
For most pots, a single well-draining mix throughout, in a pot with drainage holes, is the simpler, safer choice.
If you want faster drainage, blend more perlite or bark into the whole mix rather than layering rocks at the bottom.
Should you water Monstera every 7 days?
Why a Fixed Interval Fails
A fixed interval cannot account for changing conditions because rooms and plants dry at different rates. Use the calendar as a reminder if useful, not as the decision itself.
What Changes Drying Speed
How fast a pot dries depends on the atmosphere’s drying power, driven partly by temperature and humidity (vapor pressure deficit), but also on light, the plant’s size and leaf area, and the pot and mix.
So the same plant might dry in a few days during a hot, dry spell and take much longer in cool, humid weather. The exact numbers vary too much to pin down in advance.
Check the Pot Before Watering
Keep a calendar as a reminder if it helps you remember, but check the pot and mix before pouring on schedule.
Do yellow leaves mean Monstera needs water?
Yellow Leaves Have Several Causes
Yellowing lower leaves have many possible causes, and reaching for the watering can is often the wrong first move.
Check Before Adding Water
Possible causes include natural aging of old leaves, too little light, under- or over-watering, nutrient issues, pH or salt problems, pests, cold, and root disease.
Overwatering leading to root problems is common, but a fixed percentage or claim that it is the usual cause is not supported for Monstera.
Inspect Roots and Recent Conditions
Before watering more, check the roots and the recent history. Firm white or light roots and a light, dry pot point toward underwatering. Brown, mushy, foul-smelling roots whose outer layer slips off point toward overwatering or root disease.
Color alone isn’t conclusive (go by firmness, smell, and overall pattern). If yellowing is the main symptom, follow the Monstera yellow-leaf checklist before changing the watering routine.
Monstera Watering Checklist
Keeping a Monstera healthy is less about luck than about paying attention to what the pot and roots are telling you. Use the same four checks each time so a change in light, season, or room conditions is easier to notice.
- Air matters as much as water. An airy, bark-based mix drains and dries well.
- Make sure water can drain. Use a pot with drainage holes (a clear one lets you watch the roots), and skip the rock layer for most pots.
- Check before you water. Combine pot weight, the feel of the top few centimeters, and a skewer, rather than trusting any single tool.
- Water thoroughly, then drain. Wet the whole root ball and let the excess run out.
Monstera Watering Reference Tables
Example Aroid Mix
| Component | Approx. Share | Role |
|---|---|---|
| Orchid or fir bark | ~40% | Adds large air pockets. Helps the mix drain and dry. |
| Coco coir or peat | ~30% | Holds moisture the plant draws on. Also buffers nutrients. |
| Perlite or pumice | ~20% | Mineral aeration that resists breaking down. Raises porosity. |
| Worm castings (and a little charcoal) | ~10% | Slow-release nutrients and microbial life. Charcoal is optional. |
Water Options
| Water | What to watch for | Notes |
|---|---|---|
| Tap water | Chlorine or chloramine, and possibly fluoride, depending on your system | Fine for many plants. Check your local report. High fluoride or salts can contribute to brown tips over time in sensitive species. |
| Rainwater | Possible contamination from roof or storage | Usually low in minerals, but collection and storage determine whether it is suitable. |
| Distilled / RO | Very low in minerals | Low-risk for salts. Pair with a complete fertilizer since it adds no nutrients. |
| Softened water | Added sodium, if it uses a sodium-exchange softener | Best avoided when sodium is added. Check whether your softener uses that process. |
Troubleshooting Matrix
| Symptom | Common causes to check | What to do |
|---|---|---|
| Yellowing lower leaves | Natural aging, low light, over- or under-watering, nutrients, salts, pests | Check the roots and recent watering before adding water. Overwatering and root problems are common but not the only cause. |
| Droopy leaves, heavy wet pot | Roots damaged and unable to take up water, often from staying too wet | Inspect the roots. If they are brown and mushy, dry out and repot into fresh, airier mix. |
| Droopy leaves, light dry pot | Underwatering and loss of turgor | Water thoroughly and let it drain. Soaking the pot briefly can help rewet a very dry mix. |
| Crispy brown tips or edges | Salts, possibly fluoride, or dry air | Flush the mix. Check your water report and consider rain or RO water if salts are high. |
| Frequent guttation droplets | Root pressure with moist mix and low transpiration, often normal | Usually nothing needs fixing. If other overwatering signs appear, let the mix dry more between waterings. |
| Mushy brown roots, bad smell | Overwatering and/or root disease, which can include water molds such as Pythium | Trim the affected roots and repot in fresh, airier mix. Positive identification needs lab testing, so focus on removing rot and improving conditions. |
| Leggy stems, small leaves | Too little light | Move to a brighter spot. A moss pole can support climbing growth. |
Keep the Root Zone Airy
Water only when the pot has become lighter and the root zone is drying, then soak the mix thoroughly and let it drain.
Use a coarse mix and a pot with drainage, and inspect the roots before watering more when yellowing appears.