
Purple Magic Broccoli Fertilizer & Growing Guide
A practical guide to growing Purple Magic broccoli: soil and pH, sensible feeding based on a soil test, harvest timing, and cooking to keep the purple colour.
Marcus Hale · Published 2026-01-19 · 17 min read
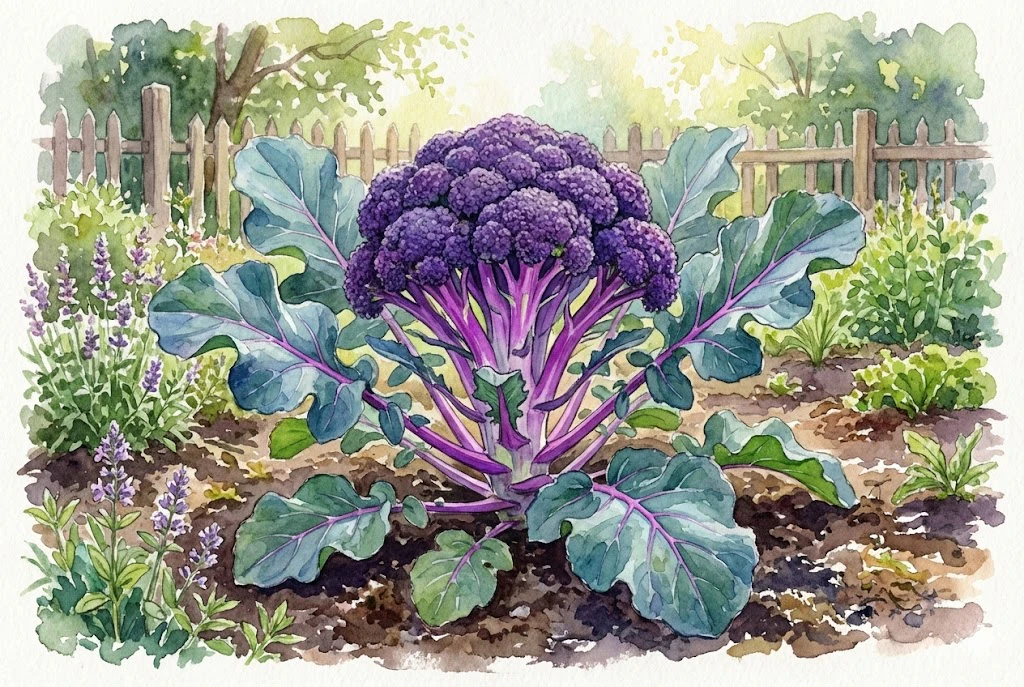
Key Takeaways
Light and Colour
Light and cool temperatures can deepen Purple Magic's colour, but the purple trait is genetic. A shaded plant will show a paler head rather than turning fully green.
Boron With a Test First
Add boron only where a soil test confirms low levels and use an extension-recommended rate. Broccoli has a relatively high boron demand, but deficiency is only one cause of hollow stem alongside excess nitrogen, rapid growth, and wide spacing.
Cooking
Steaming or roasting usually retains more purple pigment than boiling. Exact colour and nutrient retention still depend on time and temperature.
The Appeal of Purple Magic
Purple Magic is a broccoli variety with a purple stem and a deep violet head, which is why many gardeners want to grow it.
It is an F1 hybrid developed by the seed company Sakata and was named a 2024 All-America Selections (AAS) National Winner.
According to the breeder and sellers such as Johnny's Selected Seeds and West Coast Seeds, it is a single-head type valued for its colour, shape, sweet flavour, and relative ease of cultivation in cool-season conditions.
Being an F1 hybrid does not, by itself, mean the plant needs an unusual fertiliser routine – the parent-line crossing that makes it a hybrid is conventional breeding, not genetic engineering.
It does contain more anthocyanins (the class of antioxidants also found in blueberries) than standard green broccoli, and, as with any broccoli, it rewards fertile soil, full sun, even moisture, and timely harvest.
What Keeps Purple Magic Purple
Purple Magic has a genetically purple head and stem. Full sun and cool growing conditions can deepen the color, but soil pH will not turn it into a different-colored broccoli.
Cool Weather and Light Can Deepen the Color
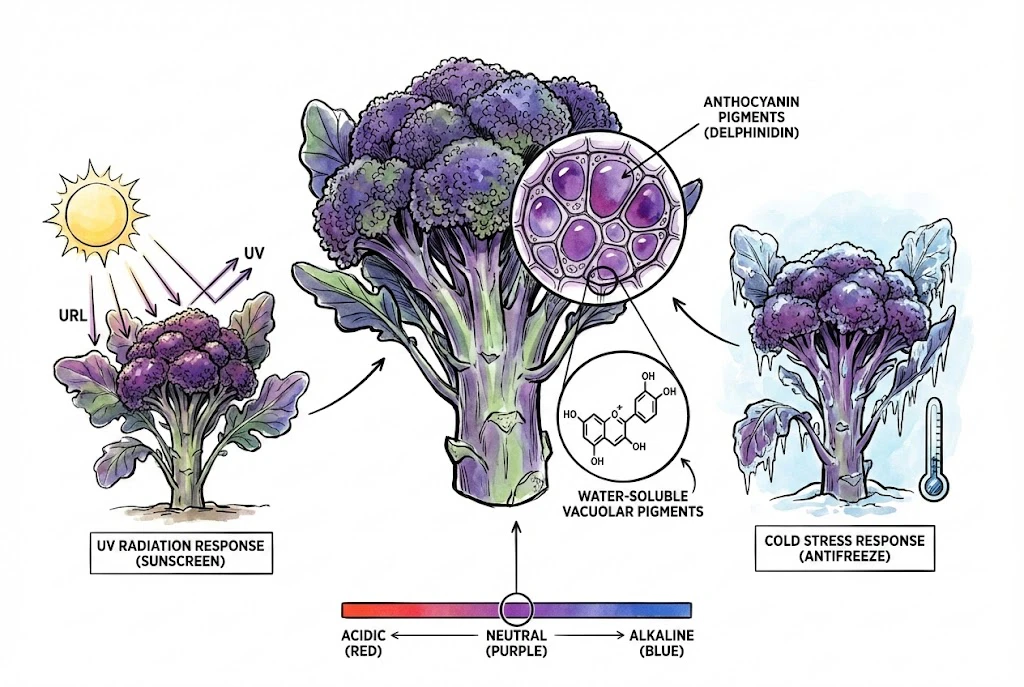
Strong light and cool weather can increase purple pigment in related broccoli varieties. Do not try to stress plants for color. Give Purple Magic full sun, steady moisture, and its normal cool-season growing conditions.
Use Full Sun for Growth and Color
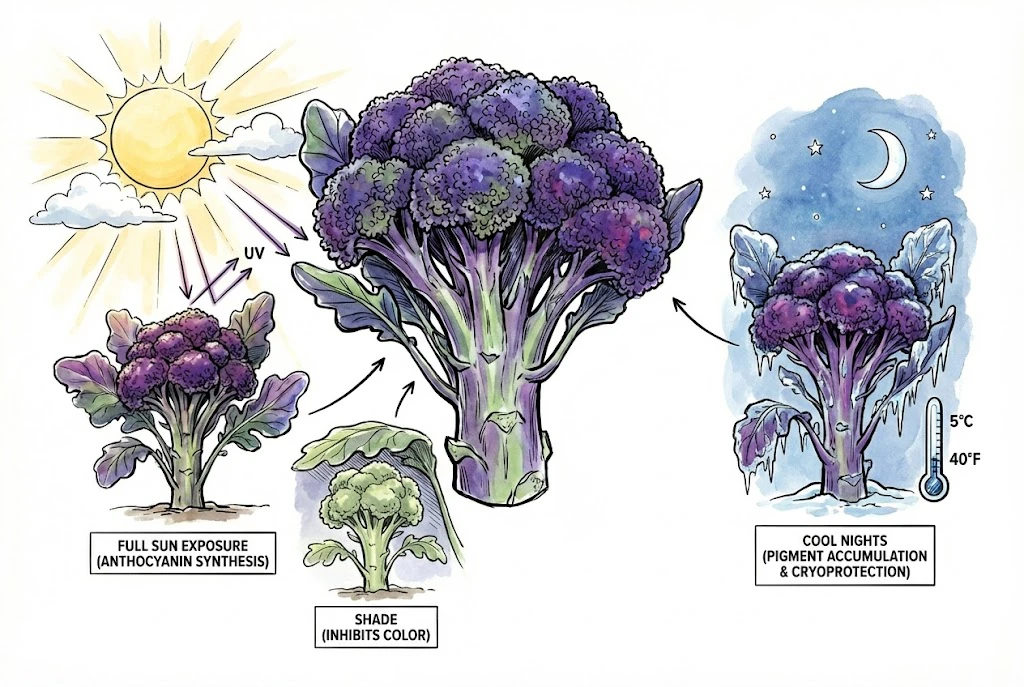
Heavy shade can reduce growth and color. Follow the seed packet for planting season and maturity, because no exact light or night-temperature threshold has been established for this cultivar.
Do Not Chase Color With Soil pH
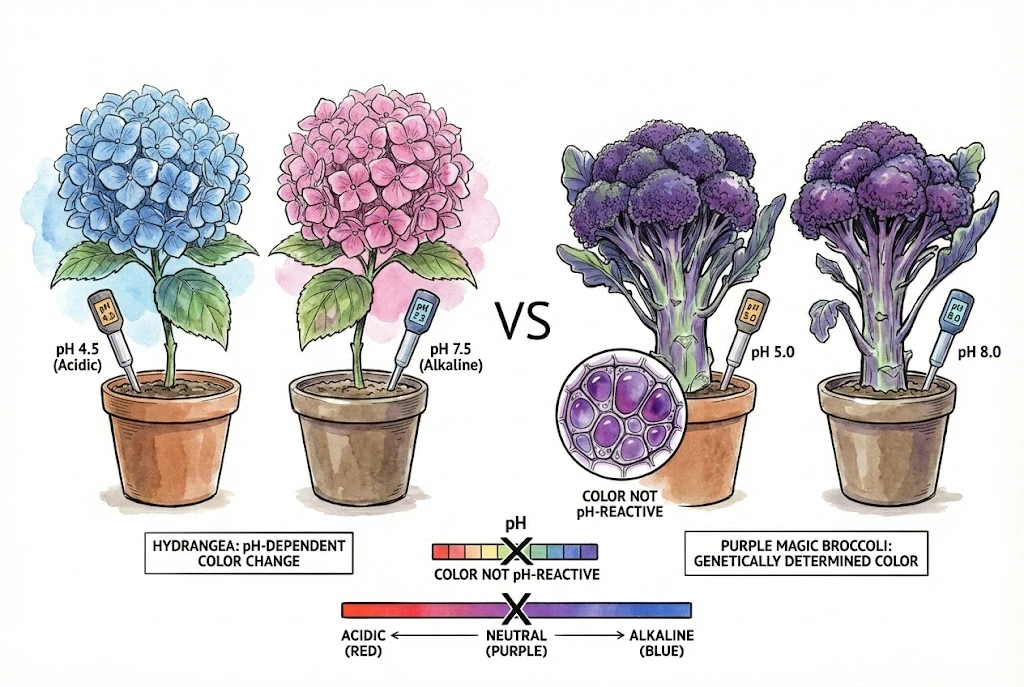
Gardeners often ask whether changing soil pH will alter the broccoli's colour, the way it does with hydrangeas.
In practical terms, no. You cannot recolour Purple Magic by adjusting soil acidity, because its purple is a genetic (genotype) trait rather than a soil-driven one.
Soil pH still matters for nutrient availability and plant health, but it does not reprogram this cultivar’s head color.
The Foundation (Soil Chemistry and Preparation)
Foliar sprays cannot make up for poor soil on their own. Broccoli is a fairly heavy feeder, so it draws meaningfully on soil fertility, and low fertility can reduce yield.
The best starting point is a soil test, which tells you what your soil already supplies before you add anything.
The Ideal pH Range
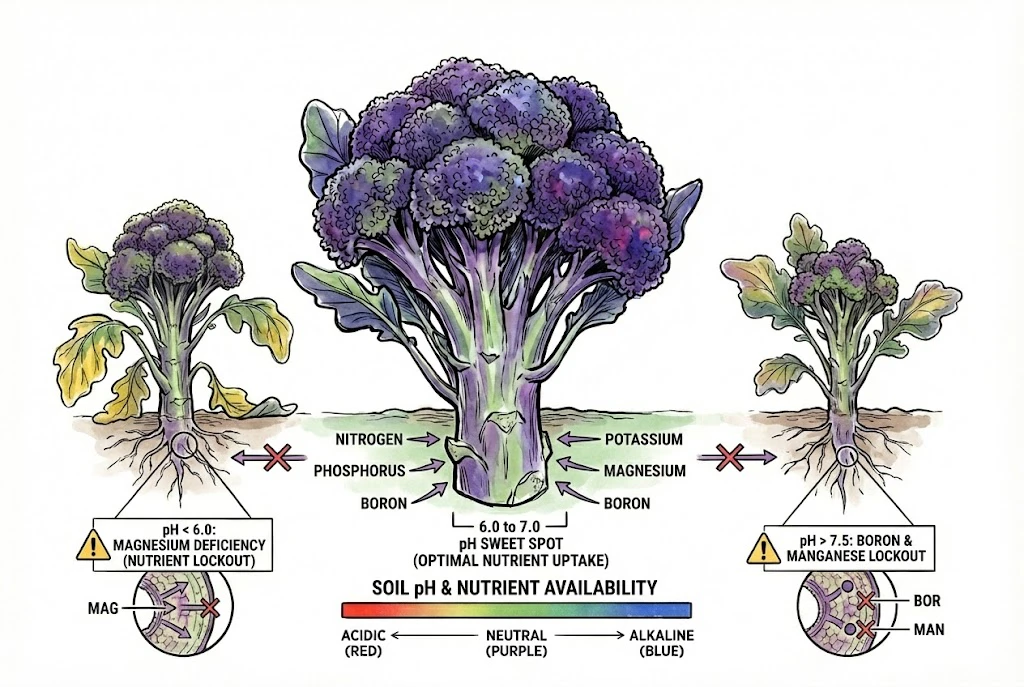
Broccoli generally does well at a soil pH of about 6.0 to 7.0, and some sources extend the workable range to 7.5.
Within this range, most essential nutrients tend to stay reasonably available to the plant.
Well outside it, nutrient availability can shift – strongly acidic soils can make some nutrients less available, and alkaline soils can reduce boron and manganese uptake.
These are tendencies, not automatic diagnoses. An actual deficiency depends on your soil's total nutrient levels, texture, and organic matter, which a soil or tissue test confirms.
Soil Texture and Stability
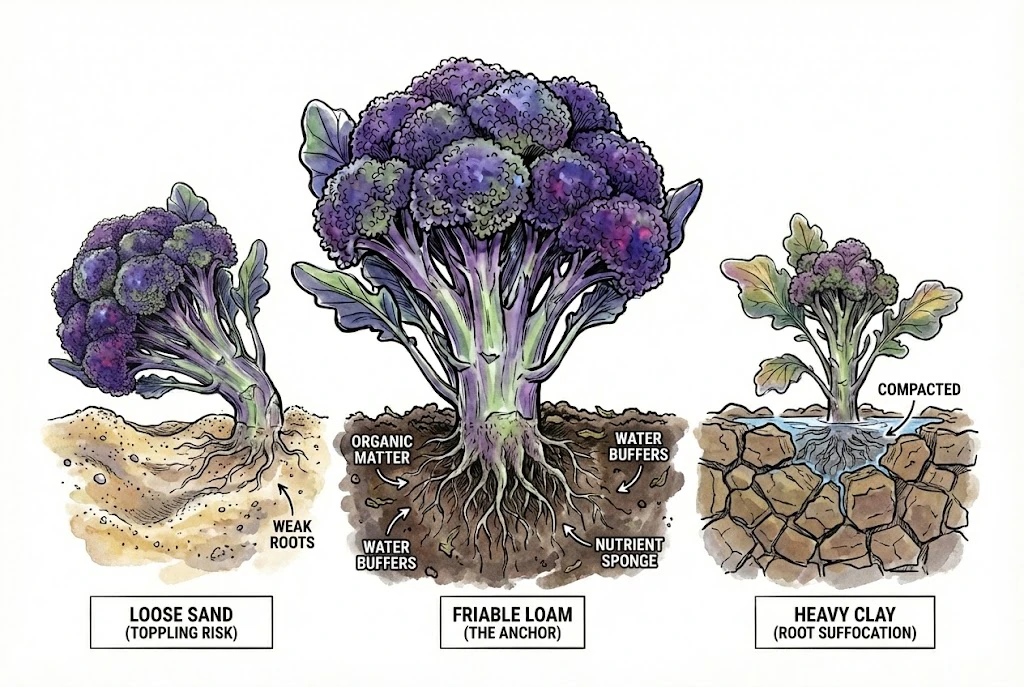
Purple Magic grows upright and forms a substantial head, so it benefits from soil that supports steady root growth.
Very sandy soils tend to drain and dry quickly and hold fewer nutrients (they leach), while dense or compacted clay can restrict drainage and root growth.
Both can be managed – well-structured clay can still be productive, and drainage, compaction, and organic matter usually matter more than texture alone.
A friable loam rich in organic matter is a good target, because it balances moisture retention with drainage and holds nutrients well.
The Growth Cycle (A Timeline)
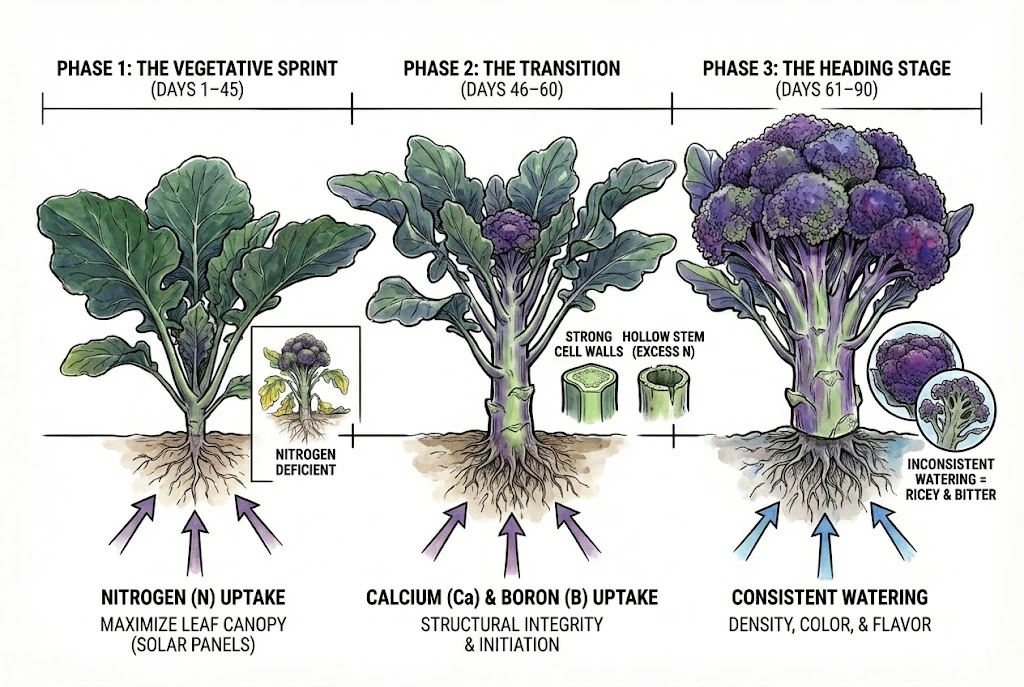
Days to harvest vary by seller and conditions. Johnny's and West Coast Seeds list about 62 days from transplant, Sakata lists 70–85 days for fall/winter crops, and Park Seed lists 90 days.
Use your seed packet's figure and expect it to move with the weather.
It is useful to think of the crop in stages – establishing leaves, initiating a head, and filling it out – but treat these as a rough teaching device.
Nutrient uptake is continuous, and no Purple Magic feeding trial has been published that fixes a specific nutrient schedule to specific days.
Early Growth (Establishing Leaves)
The Objective
Build a healthy leaf canopy.
A good frame of leaves supports the developing head, so early growth matters. This is a supporting factor, though, not a single rule – head size also depends on cultivar, spacing, weather, and overall fertility, not only leaf size before heading.
Nitrogen is the main driver of leaf growth, and early nitrogen deficiency is known to reduce biomass and photosynthesis.
That does not mean nitrogen is an early-only nutrient. Extension guides typically split nitrogen into a starter plus one or two side-dressings, and base the total on a soil test rather than a fixed day count.
Aim for steady, adequate nitrogen rather than pushing soft, excessive growth.
Nutritional and Visual Diagnosis in Broccoli (Brassica oleracea var. Italica L.) Plants. Disorders in Physiological Activity, Nutritional Efficiency and Metabolism of Carbohydrates
Head Initiation
The Objective
Support the switch from leaf growth to forming a head.
Around this stage the plant begins forming its head. Cell-wall integrity matters for firm growth, and calcium and boron are involved in cell-wall function.
How you handle nitrogen depends on your total programme. Standard guides do side-dress nitrogen up to head initiation, and only a large late excess is linked to loose heads and hollow stems.
So manage total nitrogen rather than cutting it off on a fixed date.
Calcium and boron are worth adding only if a soil or tissue test shows a shortfall. Applying them as a routine head hardener without evidence of deficiency can cause imbalances – boron in particular is toxic in excess – so a test comes before any supplement.
Disorders of Cole Crops
Filling the Head
The Objective
The objective is a dense, evenly coloured head with good flavour.
The purple head is now expanding, so keep moisture even. This helps the head fill out and can reduce quality problems. Uneven watering is one contributing factor to loose, ricey heads, but heat, over-maturity, cultivar, and rapid growth are usually the main drivers, and bitterness is not a guaranteed result. Avoid both drought stress and waterlogging as the head develops.
Keep Extra Inputs Optional
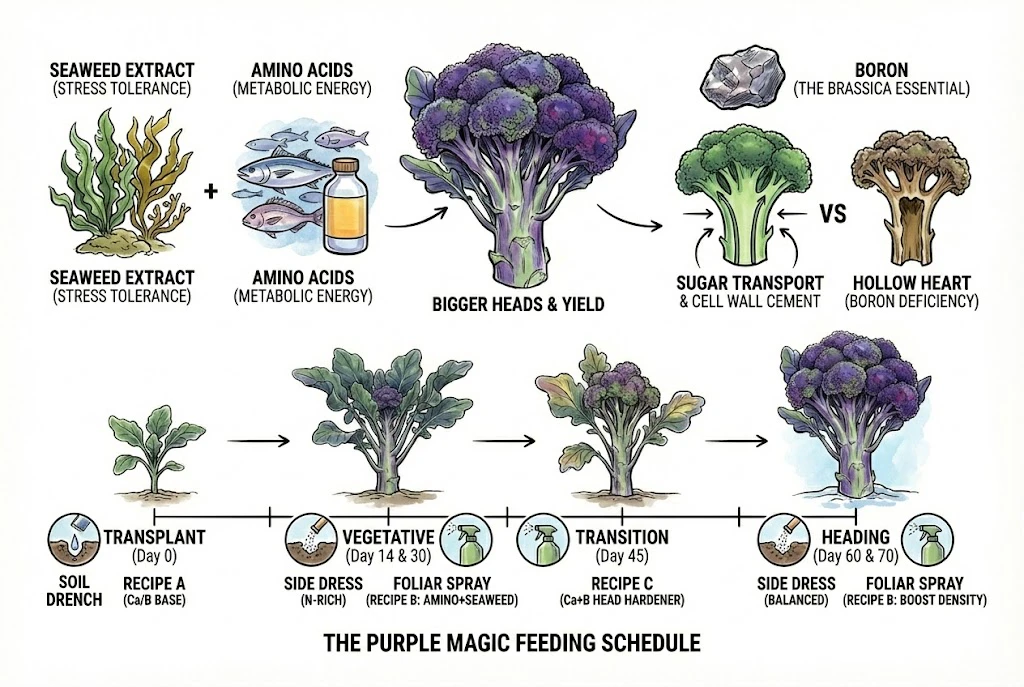
Biostimulants and micronutrients are optional extras, not a requirement. They can help in the right conditions, but a soil test and sound basic fertility come first.
Seaweed and Amino-Acid Products
Seaweed and amino-acid products are optional. One field trial found a modest result with specific products on other broccoli cultivars, not a guarantee for Purple Magic or for any fish-and-kelp substitute.
If you use one, confirm that its label permits foliar use on edible crops, follow the label rate and pre-harvest interval, and do not use it to replace soil fertility, watering, or pest control.
Boron Only After a Test
Broccoli has a relatively high boron demand compared with many crops, and boron is involved in cell-wall function and reproductive growth.
Where soil boron is genuinely low, deficiency can contribute to hollow, browned stems and deformed heads.
But hollow stem also has other causes – excess nitrogen, rapid growth, wide spacing, cultivar, and water or temperature stress – so it is not a boron-only symptom.
Because boron has a narrow gap between the amount plants need and the amount that harms them, do not add it as a routine.
Test your soil first, and supplement only where an extension recommendation calls for it, at the recommended rate.
See the boron recipe note below for why a generic foliar spray is not advised.
Effect of foliar application of bio-stimulants on growth, yield and nutritional quality of broccoli
How to Think About Feeding
There is no verified, day-by-day feeding calendar for Purple Magic, so rather than a fixed schedule, use general principles and adjust to your own soil test and the plant's growth.
I mark five sampling points at the bed center and halfway from the center to each corner. At every point, I number the three nearest non-border plants and use a phone random-number generator to tag one regardless of vigor. At the same time of day, I photograph each selected plant’s newest leaf and developing head against a plain gray card. Five distributed points reveal a bed-wide shift, while random selection keeps weak plants from disappearing from the record.
Soil-test corrections stay separate from optional inputs, and the comparison includes marketable head size as well as color. If a head darkens without improving growth or quality, I do not count that visual change as evidence that extra boron or a biostimulant was useful.
Start From a Soil Test
It tells you your pH and existing phosphorus, potassium, and micronutrient levels, so you feed to fill gaps rather than guess.
Build Organic Matter
Work compost or other organic matter into the soil before planting.
Feed Nitrogen Steadily
Provide nitrogen through leaf and head growth, typically as a starter plus one or two side-dressings, following the rate on your chosen fertiliser's label. Avoid a large late excess, which can encourage loose heads and hollow stems.
Test Before Adding Micronutrients
Add calcium, boron, or other micronutrients only where a soil or tissue test shows a shortfall, at an extension-recommended rate.
Keep Biostimulants Optional
Seaweed, amino-acid, and fish products are optional. Use each product's own label rate and check that it is cleared for foliar use on edible crops.
Because generic products vary widely in their guaranteed analysis (their N-P-K and nutrient percentages), always match the amount to the label rather than to a fixed teaspoon-per-gallon figure.
Do Not Build the Feeding Plan Around DIY Mixes
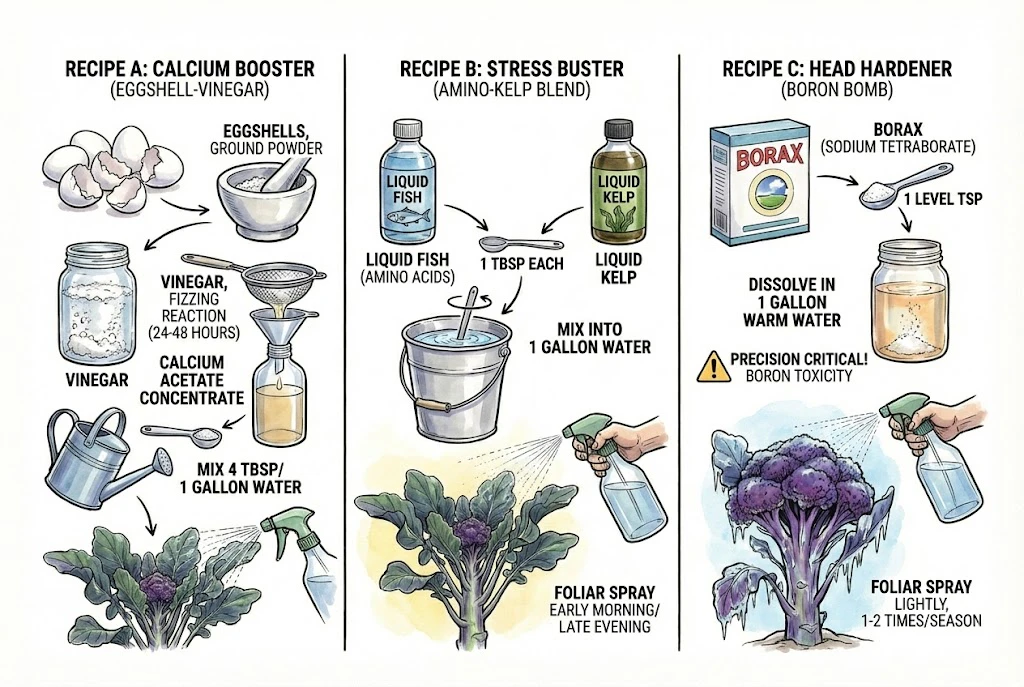
Eggshell, vinegar, fish, and kelp preparations do not have a guaranteed analysis. They cannot tell you whether the crop needs calcium, nitrogen, or micronutrients, so a soil test and a labeled fertilizer are the dependable starting point.
Use Measured Products When a Test Shows a Need
An eggshell-and-vinegar mix can vary widely in concentration and does not diagnose a calcium shortage. Do not use it as a routine head-hardening or deficiency treatment.
Fish and kelp products also vary by brand. If you choose them, use only products labeled for edible crops and follow each product’s dilution, compatibility, and pre-harvest instructions rather than a generic homemade formula.
A Note on Boron (Why There Is No DIY Borax Spray Here)
The Warning
Boron has a narrow window between the amount plants need and the amount that harms them, so it is not something to apply by guesswork.
Do not use a generic borax spray recipe. A teaspoon-per-gallon figure says nothing about how much actual boron reaches a given area, and over-application damages plants.
Do this instead
Only add boron if a soil (or tissue) test shows a low level – extension guidance generally treats soil boron below about 1 ppm as the threshold. Then follow your local extension's recommendation.
For example, some home-garden guidance for confirmed low-boron soils suggests mixing 11%-boron borax evenly into the soil at roughly 1 tablespoon per 100 square feet (as a soil amendment, not a foliar spray), where a single application may last a couple of years.
Applying boron directly to actively growing green foliage can cause severe injury, and extension sources limit foliar boron to specific low rates measured as actual boron per acre for known-deficient fields – not a home spray bottle.
If you do handle borax, use a fertiliser-grade product, keep it and its measuring tools away from food and children and pets, wear gloves and eye protection, and follow the product and extension instructions.
Diagnostics (Troubleshooting Guide)
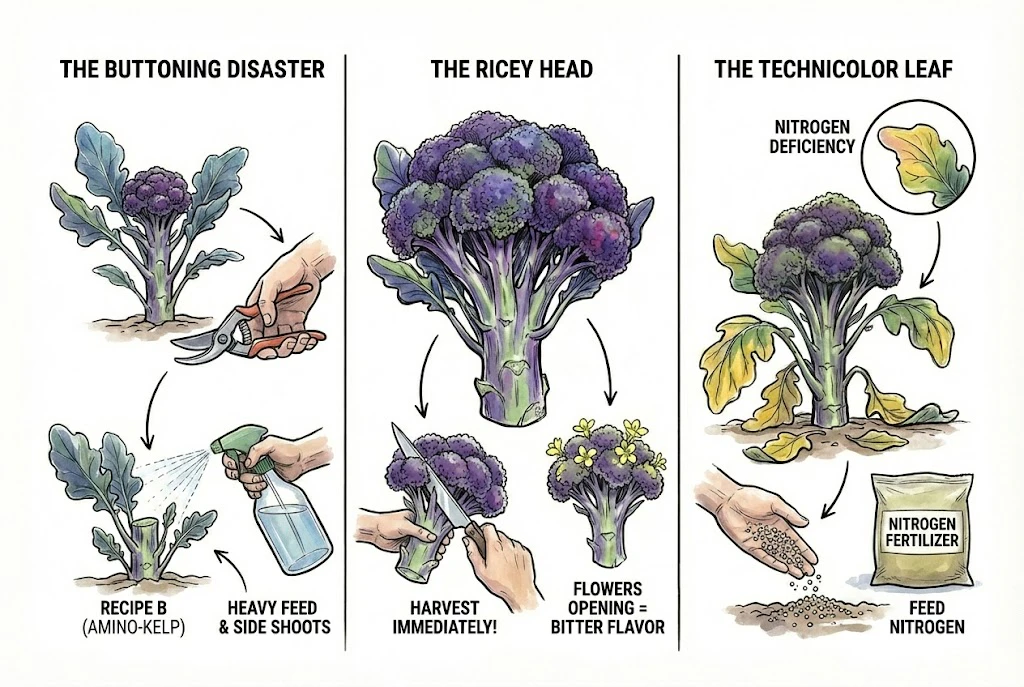
Premature Heading (Buttoning)
Symptom
A small plant forms a tiny head well before it should.
Likely causes
Buttoning is usually a stress response, and several factors can trigger it. Transplant age or size, cold or heat shock, root injury, low fertility, drought, or disease and insect pressure.
It is worth checking these rather than assuming a single cause.
What to do
A buttoned head generally will not recover to a full marketable size, so buttoning is mostly a matter of prevention – use well-timed, healthy transplants and steady conditions.
If it happens, you can leave the plant to see whether it produces smaller side shoots, but avoid a heavy feed as a cure, since pushing excess nitrogen can worsen loose growth and hollow stems.
Ricey Head
Symptom
The purple dome looks fuzzy or velvety and the buds are separating.
Likely causes
This is most often linked to heat stress or an over-mature head, with uneven watering, cultivar, and rapid growth also contributing.
What to do
Harvest promptly while the buds are still tight. Once buds open into yellow flowers the head is past its best. It is still edible, though the flavour tends to be stronger.
Yellowing Lower Leaves
Symptom
Lower, older leaves turn yellow and may drop.
Likely causes
Nitrogen deficiency is one possibility – because nitrogen is mobile, a plant can move it from older leaves to new growth, yellowing the lower leaves.
But the same pattern can come from normal ageing, shortages of other mobile nutrients (such as potassium or magnesium), root or water stress, disease, or insects, so a single symptom is not enough to confirm the cause.
What to do
Check the wider picture first. Overall growth rate, whether the whole plant or just older leaves are affected, soil moisture, and pests or disease.
A soil or tissue test is the most reliable way to confirm a nutrient shortfall. If nitrogen is the likely cause, apply a labelled fertiliser at its recommended rate – excess nitrogen can cause hollow stems, loose late growth, and nutrient runoff.
Watch Out for These Nutrient Deficiency Symptoms | Home and Garden Education Center
Harvest and Post-Harvest
Harvesting Technique
Harvest when the head is a deep purple dome and the buds are still tight, which for this variety is roughly 62–90 days from transplant depending on your seed source and the weather.
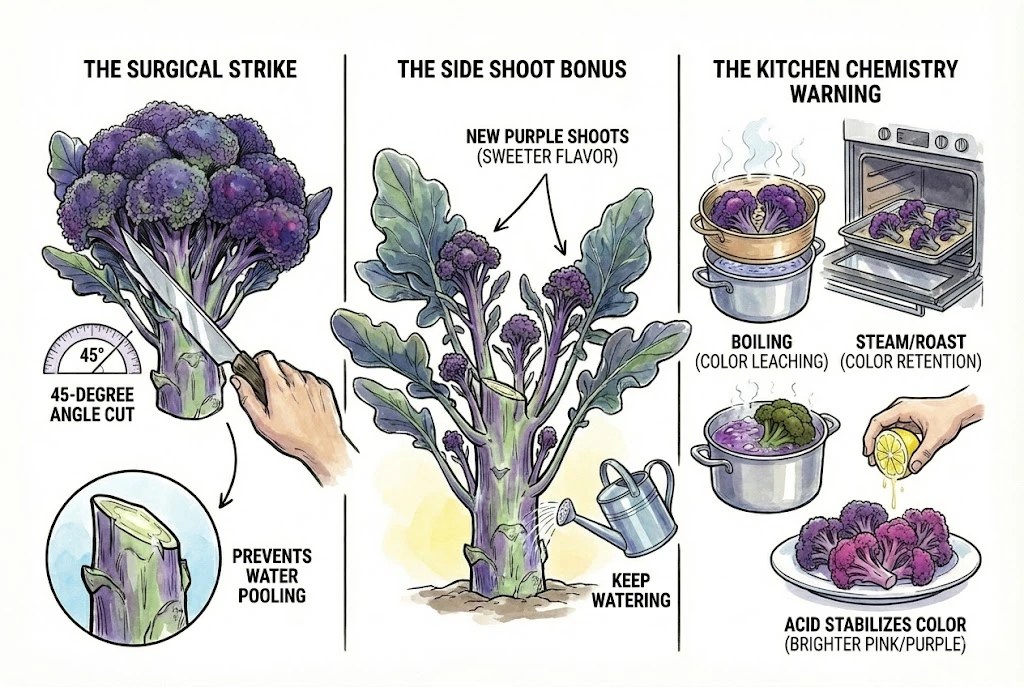
Use a sharp knife to cut the main stem cleanly, leaving several inches of stem below the head.
Some gardeners cut at an angle so water runs off the stem rather than pooling. A clean cut and disease-free conditions matter more than the exact angle, so treat the angle and stem length as optional preferences.
Secondary Growth
After the main harvest, keep watering (without waterlogging).
Purple Magic is described by its breeder as a single-head type, but broccoli can still produce smaller side shoots from the leaf nodes after the central head is cut.
The number is not guaranteed.
Any side shoots are worth trying. Their flavour depends on harvest age, temperature, and cooking rather than being reliably sweeter than the main head.
Post-Harvest Handling
Broccoli respires quickly and is highly perishable, so how you handle it after cutting affects quality as much as cooking does.
Cool the heads promptly – a rinse in cold water or a spell in the refrigerator – and store them cold (near 0 °C / 32 °F) at high humidity, using them within a few days.
Cooking Advice
Anthocyanins are water-soluble, so some pigment can leach into cooking water. Boiling is the method most likely to draw colour out, which can leave the broccoli looking greener. How much depends on the compound, cooking time, and temperature, so it is a tendency rather than a certainty.
To keep more colour
Eating it raw preserves the pigment best, and steaming or roasting generally leaches less than boiling – though longer or hotter cooking can still reduce colour by any method.
About acid
Acids such as lemon juice shift anthocyanin hue toward the red/pink end and can sometimes slow pigment breakdown, so a splash may help visually.
Note that colour retention and total nutrient or antioxidant value are separate things, and no study of Purple Magic specifically with steaming, roasting, or lemon was found, so treat this as a reasonable kitchen tip rather than a proven result.
Antioxidant properties of green broccoli and purple-sprouting broccoli under different cooking conditions
Increasing Production (Indoors & Containers)
The 5-Gallon Bucket Method
Broccoli has a substantial, spreading root system, so it needs a reasonable volume of soil.
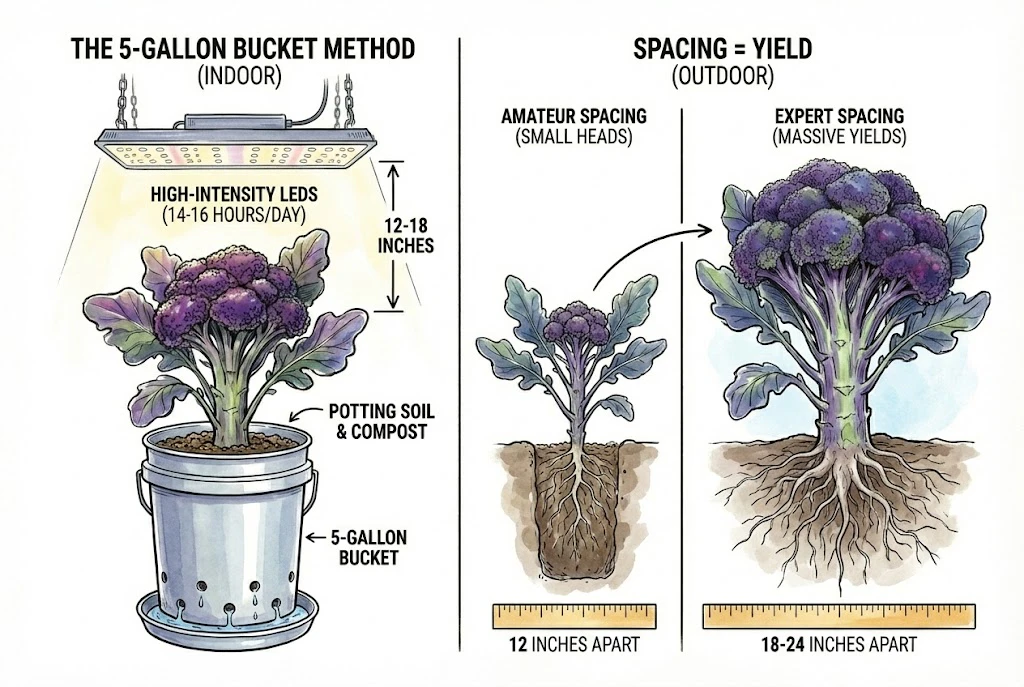
For containers, a 5-gallon bucket with drainage holes and a good potting mix amended with compost is a workable starting point for one plant.
In a hot climate or with frequent watering, a larger container can be easier to keep evenly moist.
Indoors, broccoli needs strong light. A photoperiod of about 14–16 hours is a common starting point, but distance alone (for example 12–18 inches) does not tell you whether the light is adequate – that depends on the fixture's output (its PPFD/DLI at the canopy), heat, and how well it covers the plants.
Follow the grow-light manufacturer's guidance for mounting height and coverage, and watch for stretching, which signals too little light.
Spacing for Yield
Outdoors, spacing is a trade-off rather than a simple rule. Wider spacing tends to produce larger individual heads and better airflow, while closer spacing can raise total yield per area and sometimes reduces hollow stem.
Johnny's general recommendation for broccoli is roughly 10–18 inches between transplants, so a 12-inch spacing is well within normal practice – it favours area yield over the largest single heads.
If your goal is the biggest individual heads, space closer to 18 inches apart to give each plant more root room and light.
Grow Purple Magic on the Fundamentals
Purple Magic
This is an award-winning variety valued for its colour and sweet flavour, and the breeder describes it as relatively easy to grow.
Like any broccoli, it does best with the fundamentals in place rather than an elaborate routine.
A sensible, safe order to work in.
1. Start With a Soil Test
Check pH and existing nutrient levels before adding anything.
2. Time the Cool Season
Buy good seed and use the seed packet's maturity figure with local planting dates.
3. Give Full Sun and Even Moisture
These support both growth and colour. Cool weather can deepen the purple.
4. Feed to the Label and Test
Use compost and steady nitrogen for growth, and add calcium, boron, or other micronutrients only where a test shows a need.
5. Watch and Harvest Promptly
Watch for pests and disease, harvest while the buds are tight, and cool the heads promptly.
6. Cook to Keep Colour
Steaming or roasting leaches less pigment than boiling.
With those basics, Purple Magic is a rewarding crop to grow.