
Onion Fertilizer Guide 2026: Why More Nitrogen Rots Onions
How onion fertilizer timing works: supplying adequate nitrogen for early leaf growth and easing off heavy, late nitrogen for firmer, better-storing bulbs, plus sulfur, flavor, biostimulants, and curing, with the caveats that depend on your soil and cultivar.
Jordan Cole · Published 2026-01-01 · 33 min read

Key Takeaways
- Onions are photoperiodic. They shift from making leaves toward filling the bulb largely in response to day length (with temperature, cultivar, and plant age also involved). Each foliage leaf feeds a scale, so healthy early growth generally supports a bigger final bulb.
- Give onions adequate nitrogen during early leaf growth, then avoid heavy or late nitrogen once bulbing is under way. Excess late nitrogen is a major, well-documented contributor to soft, poorly storing bulbs, though the right total and timing depend on your soil test, cultivar, and target yield.
- Excess late nitrogen (and late watering) is associated with ‘thick necks’ that cure poorly (a common entry point for neck rot (Botrytis) and bacterial rots). Thick-necked bulbs cure and store worse, so use them fresh first. Discard any that are soft, foul-smelling, or moldy.
- Sulfur influences pungency through the flavor precursors that alliinase converts (pyruvate is the usual proxy). Low available sulfur tends toward milder onions. Ample sulfur toward hotter ones. The effect depends on cultivar and how much sulfur your soil and water already supply, so test first.
- Cure with airflow until the neck is dry and tight, store cold (about 32–40°F) in mesh rather than sealed plastic, and keep onions away from ethylene-producing produce and from high-humidity storage meant for potatoes.
Feed Early Growth, Then Protect Storage Quality
It’s easy to kill onions with kindness. If your harvest turns to mush by winter, late-season fertilizer and watering are among the usual suspects, though disease, harvest maturity, handling, and storage conditions all play a part, so it’s worth ruling those in or out too.
An onion’s fertilizer needs change as it moves from leaf growth into bulbing. Match nitrogen, sulfur, water, and harvest timing to the cultivar, soil test, and climate so the bulbs cure firm and store well.
Match Feeding to the Bulbing Stage
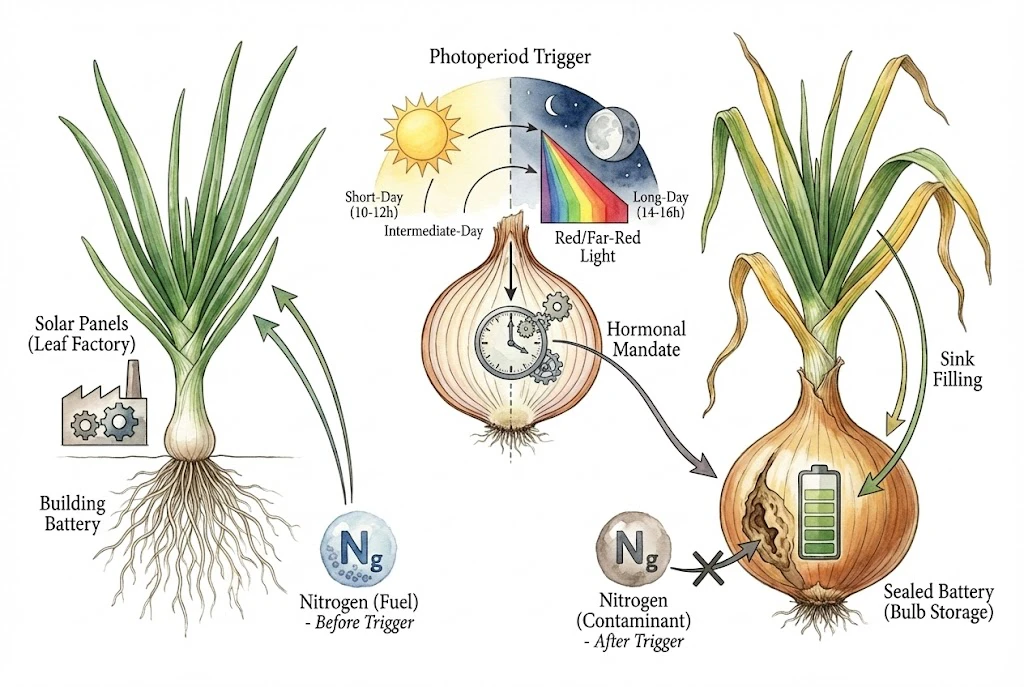
It helps to remember that an onion isn’t growing for us. The bulb is a storage organ that lets the plant overwinter and flower the following year.
Think of the bulb as a battery, with the caveat that this is a memory aid, not the actual physiology.
Early on, the plant invests in leaves that drive photosynthesis. As day length and other cues push it toward bulbing, it gradually redirects sugars from the leaves into the swelling leaf bases that form the bulb.
The leaves don’t switch off instantly. Their function tapers as the bulb becomes the dominant sink.
This transition is driven mainly by day length, working alongside temperature, cultivar, and the plant’s age.
Reading these cues, rather than the calendar alone, is what keeps your feeding and watering in step with the crop.
Use the Right Day-Length Class
Heat alone isn’t what makes onions bulb, so ‘hot weather bulbs them up’ is misleading on its own.
But temperature isn’t irrelevant either. It affects how fast the plant grows and matures, and it interacts with the day-length signal.
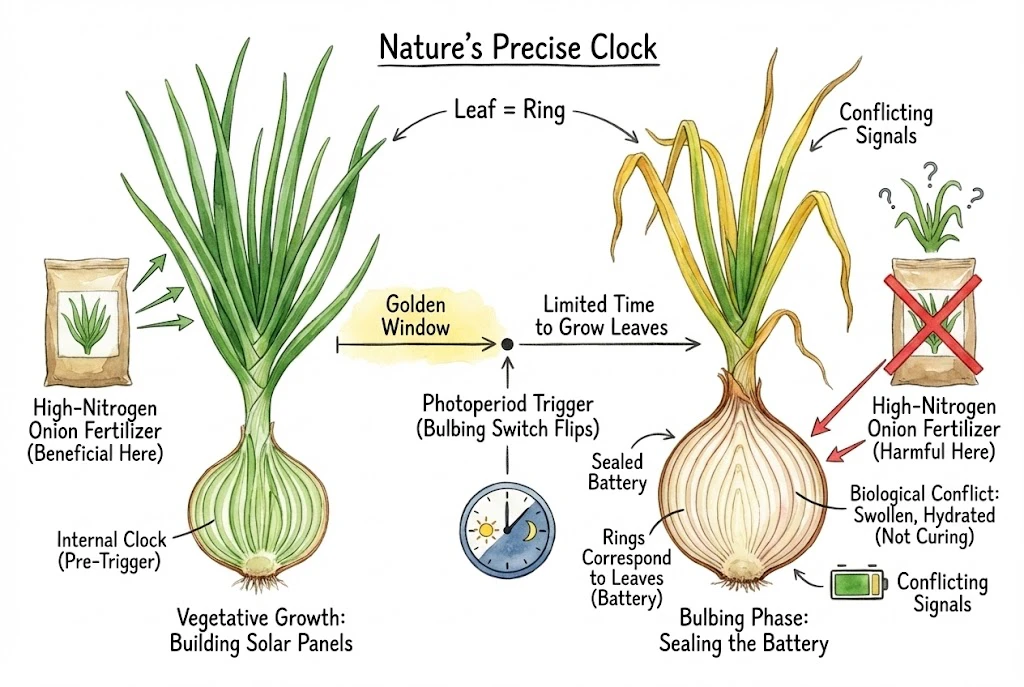
The primary trigger for bulbing is day length. Onions are photoperiodic.
Physiological reviews describe the transition from leaf growth to bulb filling as driven mainly by day length relative to a cultivar-specific threshold, modulated by temperature, light quality, plant age, and nutrition.
The plant is also sensitive to light quality, including the ratio of red to far-red light.
Day length is generally the dominant cue, though the exact balance varies with cultivar and conditions.
This is why onions are grouped as Short-Day, Intermediate-Day, and Long-Day. The classes are practical guides, not rigid switches. The hormonal pathways involved are only partly understood.
As a rough guide, a Short-Day onion tends to bulb around 10 to 12 hours of daylight. The signal is perceived in the leaves. Through FT-like signaling it promotes swelling of the leaf bases and scales that become the bulb (the bulb is a shoot-derived storage organ. The roots don’t turn into it).
New leaf-blade production slows, though scale and inner-leaf development can continue.
Plant that same short-day type in the North in late spring, when days are already long, and it can begin bulbing while still small (often yielding undersized bulbs rather than large slicers).
How small depends on the cultivar, transplant age, and how far past the juvenile phase the plant is.
Conversely, a Long-Day onion grown too far south may not reach the long days it needs to bulb well.
It tends to keep making leaves and form a poor or partial bulb, though season length and temperature also shape the outcome.
Once bulbing is under way, the plant’s use of nitrogen changes. During leaf growth, nitrogen fuels the canopy.
After bulbing begins, heavy nitrogen tends to delay maturity and drive soft, leafy growth rather than adding storable bulb, so the concern shifts from ‘feed’ to ‘don’t overfeed.’
The plant’s priority shifts from building leaves (source) toward filling the bulb (sink). It still takes up some nitrogen during this period, so the goal is to match supply to that reduced demand, not to force continued vegetative growth.
The Leaf-to-Ring Correlation
There’s a useful relationship here. Each foliage leaf contributes to a fleshy scale (a ‘ring’) of the bulb.
So the number and vigor of leaves the plant builds early on generally sets up how large a bulb it can fill.
It isn’t a strict one-to-one count, though. Inner bladeless scales and continued development mean you can’t simply back-calculate ‘13 rings equals exactly 13 leaves at bulbing.’
The dependable takeaway is that more healthy leaf area early tends to mean a bigger bulb.
That makes the period before bulbing the main window for building leaf area, from establishment until day length approaches the cultivar’s threshold.
Transplant age and the juvenile phase (below) affect when that window really opens.
This is the main time to encourage vegetative growth. Once bulbing is induced, adding fertilizer won’t generate unlimited extra foliage.
Fertilizer applied after bulbing has been induced won’t make the plant restart canopy growth from scratch.
Instead, excess nitrogen at that point tends to keep tissue soft and delay maturity rather than adding storable bulb, which is the opposite of what you want as the crop should be firming up.
In short, the useful principle is to build leaf area early and then taper nitrogen as bulbing takes over. Matching supply to a plant whose growth priorities have shifted.
The Juvenile Phase
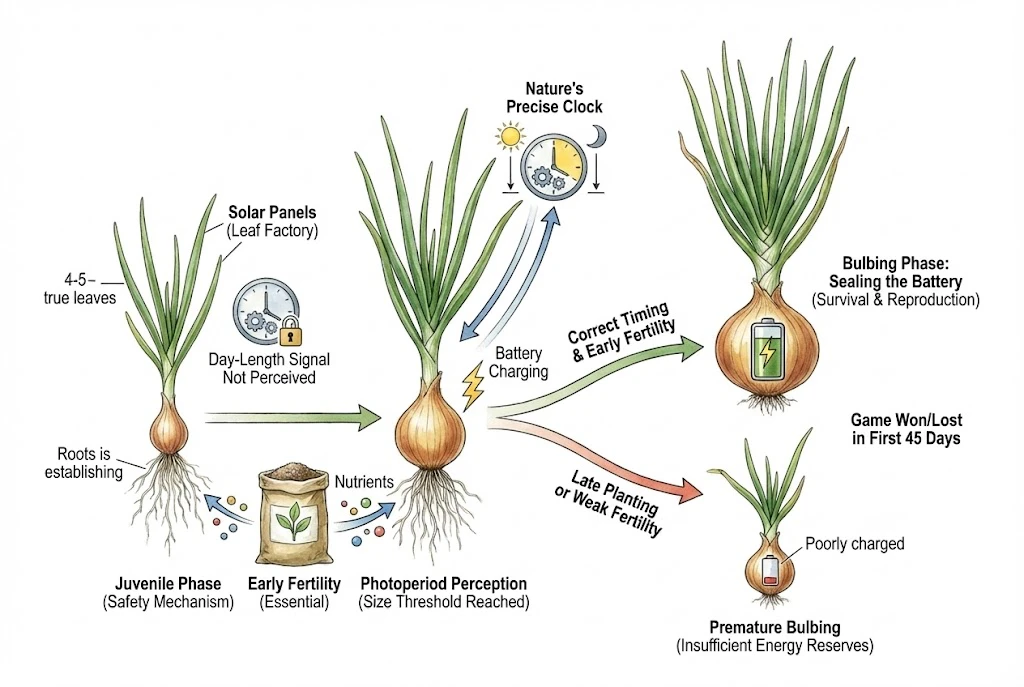
There is a caveat to the photoperiod rules, known as the ‘juvenile phase.’ Young onion plants respond weakly to the day-length signal until they reach a certain developmental stage (reported in some studies at roughly 4 to 5 true leaves, though the exact point varies with cultivar and conditions).
The practical consequence is that a plant which is still very small when it starts sensing inductive day length may bulb early, with limited leaf area and a small bulb as a result.
(Bulbing is a separate process from flowering. The plant isn’t ‘committing to reproduction’ when it bulbs.)
This also means that if you plant too late, or if early growth is weak, the plant can pass through the juvenile phase only to find itself already in long days.
It may then bulb early and small. This is why establishing healthy early growth matters, though transplant age, temperature, and cultivar all shape how much time you really have.
Lost time early in the season is hard to make up later. Just how much the first few weeks matter depends on your planting material (seed, sets, or transplants), day class, latitude, and climate.
Give Adequate Nitrogen Before Bulbing
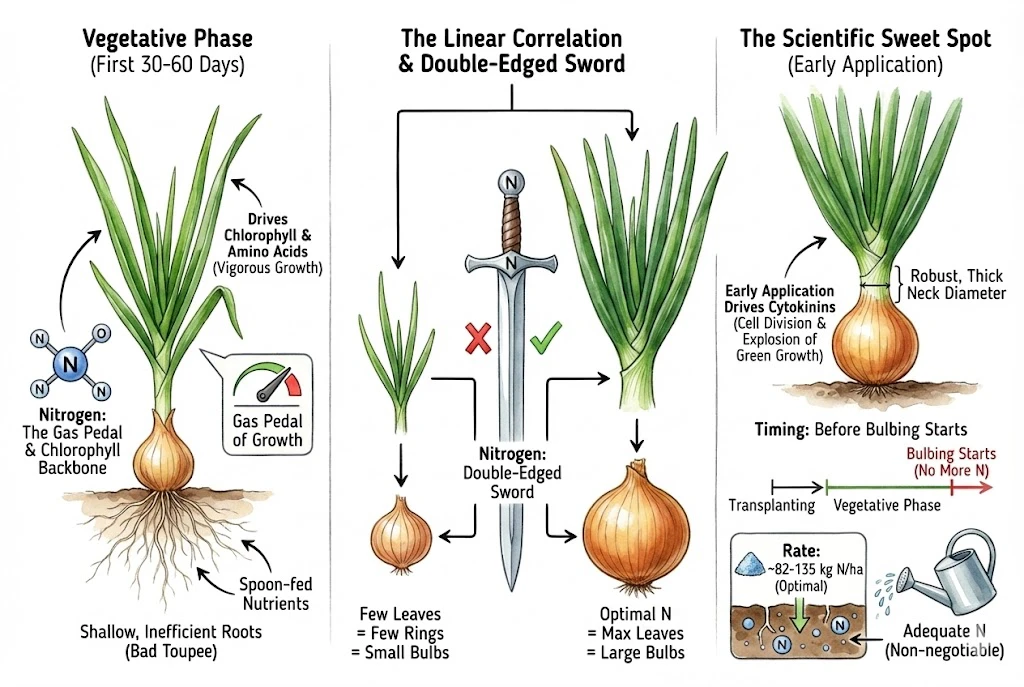
Nitrogen (N) is one of the most consequential, and easiest to misjudge, nutrients for onions. It strongly drives leaf growth.
It’s a component of chlorophyll and of the amino acids that build proteins, so adequate nitrogen keeps plants green, leafy, and vigorous. Too much, though, brings salt and quality problems of its own.
Field trials have looked at when nitrogen helps and when it starts to hurt. The general picture is that nitrogen is genuinely double-edged. Needed early, a liability in excess or too late.
The ‘Vegetative Phase’ Necessity
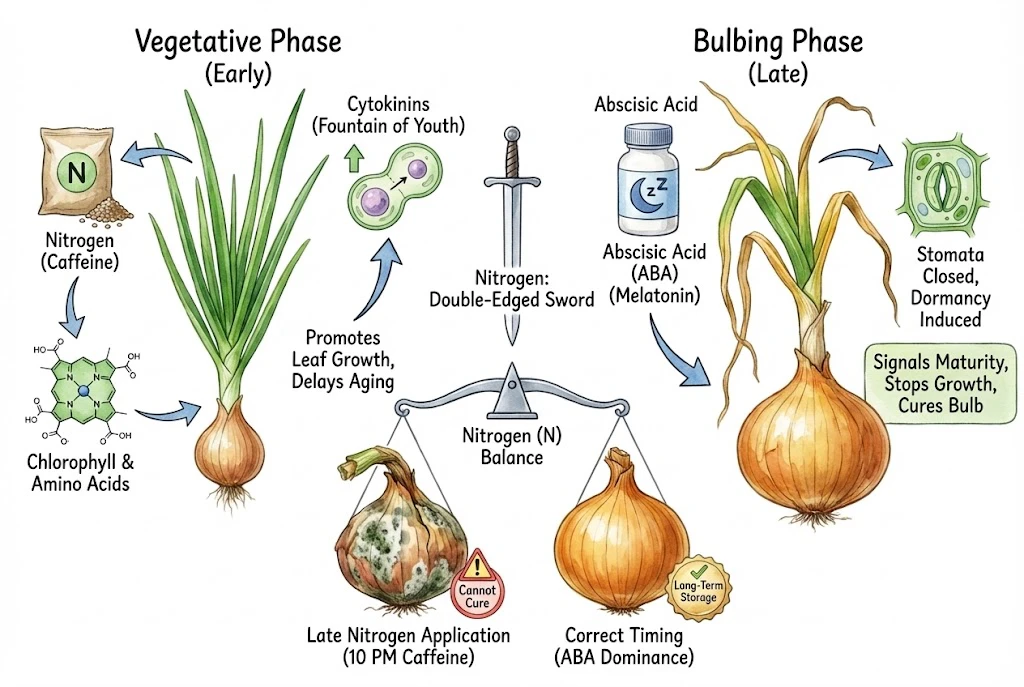
In the early stages, onions are building their canopy on shallow, sparsely branched roots.
They have relatively few of the fine root hairs that crops like corn or tomatoes use to forage for nutrients.
Because of this, nutrient placement matters. Putting nutrients in the root zone, in modest amounts, tends to serve them better than a single heavy dose.
That said, early biomass and nitrogen demand are also low, so ‘front-load everything’ can just increase leaching.
Through the vegetative phase, adequate nitrogen supports the leaf growth that sets up yield.
Trials on nitrogen timing show that supplying nitrogen from transplanting through the vegetative stage matters for yield. The operative word is adequate, not maximal.
Starve the plant here and you get few leaves, and fewer leaves generally mean a smaller bulb.
Leaf area and bulb size tend to move together, though how tightly depends on cultivar, spacing, water, and other nutrition. It isn’t a fixed formula.
Rate and timing, in general terms
- Rate. Some trials fall in a range of roughly 80–135 kg N/ha, but published reviews stress that the optimal rate is site-specific (developed locally from your soil test, residual and irrigation-water nitrate, and target yield). Some extension guidance uses higher typical rates, so treat any single number as a starting point to calibrate, not a target.
- Timing. A good share should be available during leaf growth, but reviews also note that split and controlled-release applications can improve nitrogen-use efficiency, so ‘all before bulbing’ isn’t the only sound approach.
Adequate early nitrogen supports the vigorous leaf growth you want during the vegetative window.
Where that falls on the calendar depends on your latitude and hemisphere.
Aim for strong, healthy green growth, since good early leaf area and stem diameter are associated with larger final bulbs.
For this vegetative feeding, a nitrate source is immediately plant-available, which can be an advantage in cold spring soil where urea conversion is slower (that conversion still proceeds, just more slowly. Soil microbes aren’t simply switched off).
Reviews don’t crown a single best nitrogen form, so this is a practical preference, not a universal rule.
Calcium nitrate is one fast-acting nitrogen source that also supplies calcium. It can suit a measured early-season need, but it is not a storage treatment and it is not automatically the right choice for every soil. Use the exact product analysis to calculate the amount rather than copying a dose from another fertilizer.
Effect of Calcium Spraying on Storage Quality of Onion
A practical caution. Calcium nitrate is a soluble salt and easy to overdo. Base the amount on a soil test rather than a fixed schedule, dilute it, keep it to the vegetative window, wear basic eye protection (the SDS notes it is harmful if swallowed and can cause serious eye irritation), and taper it as bulbing begins (see the section on late nitrogen below).
Why Late Nitrogen Works Against Curing
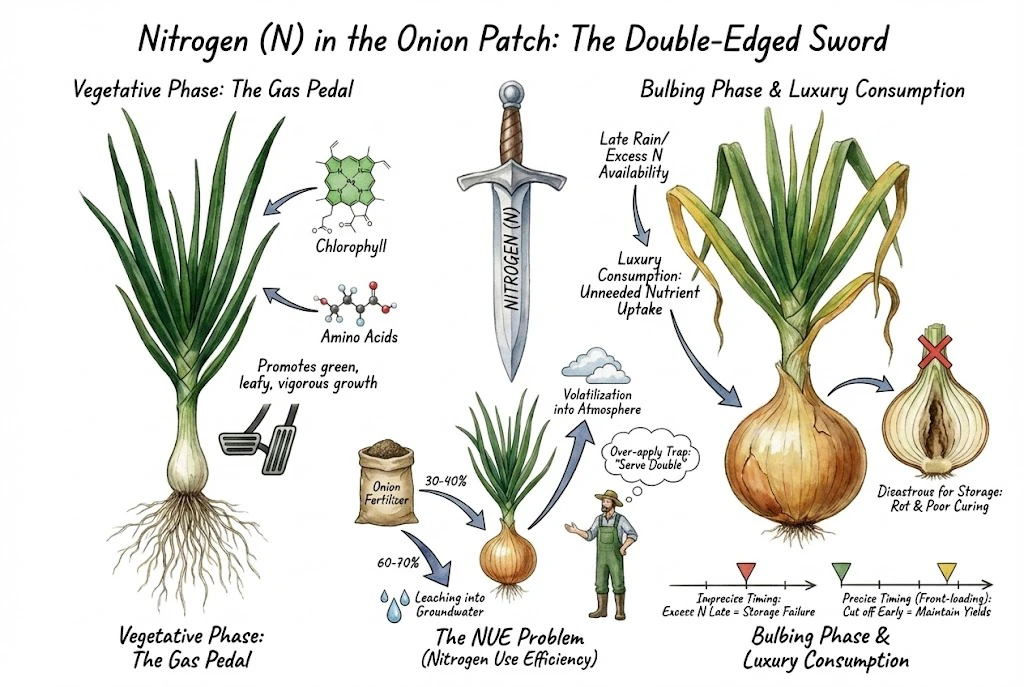
Once bulbing starts, the crop needs its existing leaves to fill the bulb and then dry down. Heavy late nitrogen pushes tender green growth at exactly the point when the neck and outer scales need to firm up.
As bulbs begin to swell, taper nitrogen instead of trying to keep the tops lush.
Neck tissue that stays succulent seals poorly, and a poor seal is a storage risk, though how much nitrogen it takes to cause that depends on dose, cultivar, and conditions.
The Nitrogen Use Efficiency (NUE) Problem
One focus of onion research is Nitrogen Use Efficiency (NUE), because onions’ shallow, sparse roots make them relatively poor at capturing applied nitrogen.
Some trials report apparent fertilizer-nitrogen recovery around 30–40%, but the exact figure depends on cultivar, yield, how it’s measured, soil nitrogen, water, and rate.
The unrecovered portion doesn’t all leach or volatilize. Much of it remains as residual soil nitrogen, is immobilized by soil microbes into organic matter, is lost to denitrification, or is taken up by weeds. The dominant pathway depends on the nitrogen form, pH, moisture, and whether it was incorporated.
Low efficiency tempts growers, and gardeners, to over-apply on the logic that ‘if the plant only eats half, serve double.’
That’s a trap, but the reason isn’t that all the excess simply sits waiting.
Nitrate in particular is already mobile in soil water, so surplus nitrogen can move with rain or reach the plant later in the season. This supports matching supply to demand rather than piling it on.
Field studies find you can maintain yields at lower nitrogen rates when timing is precise.
In the reviews, ‘precise timing’ generally means demand-matched, often split applications, not necessarily front-loading everything and cutting off early.
‘Luxury consumption’, taking up more nutrient than growth requires, does happen. Even in leafy greens it isn’t harmless (it can raise nitrate accumulation and increase losses), and in storage onions surplus late nitrogen works against firm, well-curing bulbs.
Part III. The ‘Thick Neck’ Pathology – A Self-Inflicted Wound
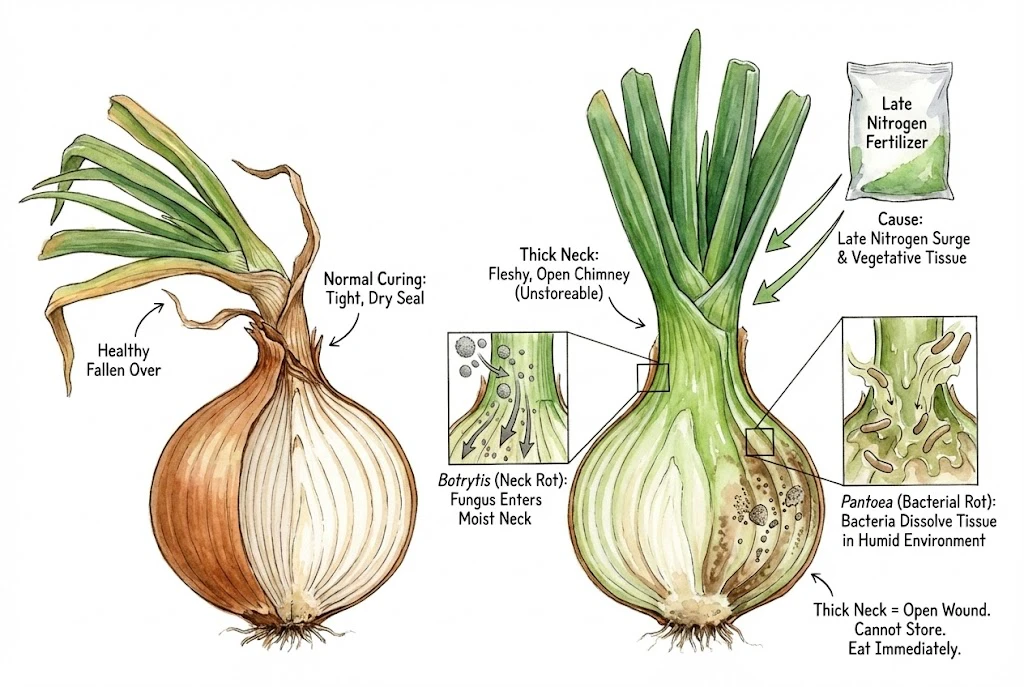
One term worth knowing is ‘thick neck.’ For storage and commercial grading it’s an important defect. Thick-necked bulbs cure and keep poorly.
They can still be fine for fresh use, so ‘worthless’ overstates it, but they’re a poor choice for long storage.
What is a Thick Neck?
A ‘thick neck’ or ‘bull neck’ reflects incomplete maturity. The bulb has stopped enlarging but the neck stays fleshy and green instead of drying into a tight seal.
The result is more of an open, poorly sealed top than a paper-thin one.
Normally, as the bulb matures, the pseudostem just above it weakens and the tops fall over.
This ‘lodging’ is a common visual sign that the bulb crop is maturing, though wind, disease, and cultivar can also affect when tops fall. The neck tissue then dries and shrinks into a thin, tight seal.
In a thick-necked onion this drying is delayed or incomplete, so the neck tends to stay thicker and greener.
It stays green and moist longer, which is what makes it a storage risk.
The Cause (The Late Nitrogen Surge)
Trials link later nitrogen to more thick necks. In one field study (a single cultivar, ‘Red Tropicana F1,’ at one site), very late application, around 12 weeks, cut yield by more than 23% and increased thick and split bulbs.
That’s a useful warning, but the exact timing and magnitude are specific to that trial, not a universal week-by-week rule.
Mechanistically, surplus nitrogen tends to keep neck tissue vegetative.
It stays succulent, full of water and chlorophyll, and is slower to senesce into dry paper.
Temperature, planting density, photoperiod mismatch, and tissue maturity all feed into this too.
Sparse plant populations can make it worse. Widely spaced onions face less competition and tend to grow larger, thicker necks.
Nutrient timing is one important driver, but it works alongside these other factors rather than being the sole cause.
The ‘Green Bridge’ for Disease
A poorly dried neck is one important entry route for several storage diseases, including neck rot (Botrytis) and bacterial rots such as center rot (Pantoea) and sour skin (Burkholderia).
It is not the only route, though. Seed- and soil-borne inoculum, latent leaf infections, wounds, thrips, and rain-splash all matter.
Neck rot is caused mainly by Botrytis aclada (older literature uses B. allii), with other Botrytis species also involved. It frequently infects in the field and can stay latent.
Moisture favors germination and infection, and a thick, green neck that hasn’t dried provides that moisture.
Infection timing and route vary, so this is one pathway rather than the whole story.
The fungus can move through neck tissue into the bulb scales. A bulb may look sound at harvest and only reveal rot later.
Symptoms often appear one to two months into storage, sometimes as soft, water-soaked tissue you can feel by gentle pressure, though appearance alone can’t confirm which pathogen is responsible.
Neck rot is best reduced through an integrated approach. Clean seed and culls, good maturity and curing, sensible nitrogen and moisture, and rotation, not curing and fertilizer alone.
Warm, wet conditions and excess nitrogen can raise the risk of bacterial rots. But Pantoea center rot and Burkholderia sour skin are different diseases with different entry routes (center rot spreads via seed, transplants, weeds, thrips, and rain-splash). Sour skin (Burkholderia cepacia) enters mainly through wounds, so they shouldn’t be treated as one problem.
Once bacteria are established, pectin-degrading activity can break down the tissue that holds cells together, softening the bulb.
Practical rule Thick-necked bulbs cure and store poorly, so use them fresh first rather than for long storage.
Before eating any bulb, check it. Discard any that are soft, slimy, foul-smelling, or moldy, and don’t taste onions you suspect are rotten.
Part IV. The Science of the ‘Cut-Off’
So, when should you ease off nitrogen? The honest answer is that it depends on the crop and the site.
The reviews don’t support a single universal hard stop. What they do support is avoiding excess and late nitrogen once bulbing is under way, while matching the total supply to your soil’s residual nitrogen, cultivar, and target yield.
The Bulb Initiation Threshold
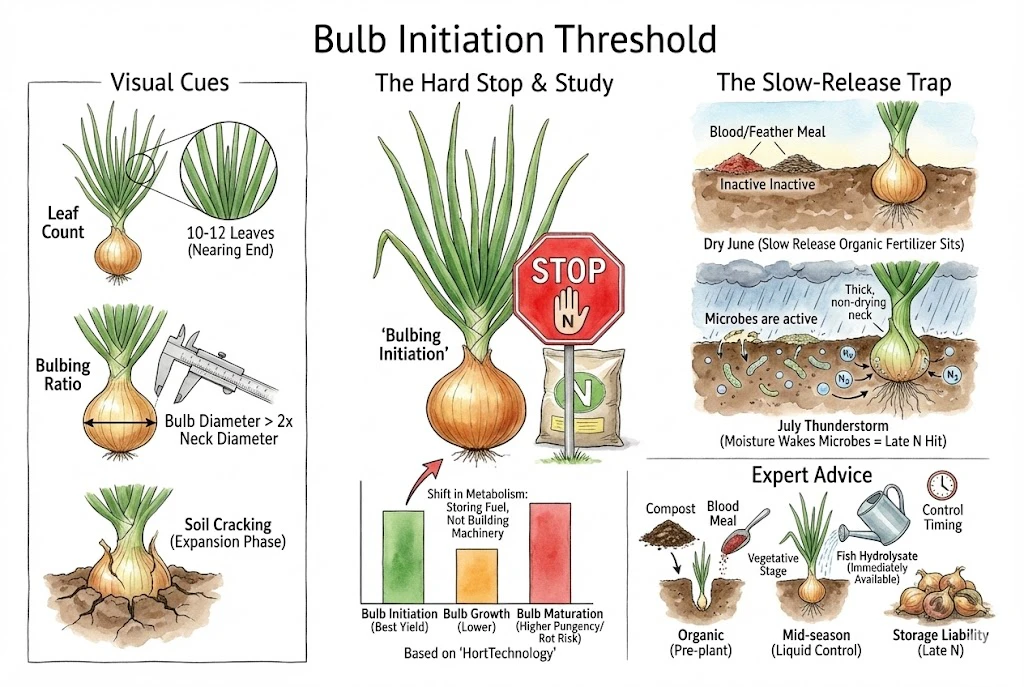
Soil cracking around the base, or the bulb swelling to roughly twice the neck diameter, are signs that bulb initiation is under way.
Treat these as observational cues that expansion has begun, not as the exact instant a metabolic switch flips.
Around this stage, taper nitrogen and avoid heavy late applications. Whether you cut it entirely or supply a modest, demand-matched amount depends on your residual soil nitrogen, irrigation, cultivar, and disease pressure. Some trials actually show a benefit from a limited dose at bulbing (see below).
- For short-day types. This can occur relatively early in the season.
- For long-day types. It typically occurs later.
The precise calendar dates vary widely with hemisphere, latitude, cultivar, and planting date, so watch the plant rather than a fixed date.
Notably, one intermediate-day field trial that compared 0, 20, 40, and 60 kg N/ha at bulb initiation found that the nitrogen-treated plots had heavier, larger bulbs, without worse neck diameter, water content, soluble solids, or pH.
In other words, ‘zero nitrogen the moment bulbing starts’ is not a universal law. Some situations benefit from a modest dose at that stage.
Consistent with the concern about late feeding, applying nitrogen at full maturation tends to raise pungency and rot risk with little yield gain, but dose, site, and cultivar all matter, so this isn’t a blanket ‘no benefit’ result.
There is a point of diminishing returns where extra nitrogen adds storage liability without adding size. The plant’s priorities have shifted toward filling the bulb.
That said, the bulb still takes up some nitrogen while filling, so ‘diminishing returns’ is not the same as ‘zero demand.’
Visual Cues for the Gardener
How do you know when to cut the cord? You cannot rely on the calendar alone, because every season is different.
A cool spring delays bulbing. A warm spring might accelerate growth. You must read the plant.
- Leaf count. If you know your cultivar’s typical mature leaf number (check the seed supplier’s data), approaching it suggests you’re nearing the end of leaf production. There’s no single number that fits every variety.
- Bulbing ratio. A bulb roughly double the neck diameter is a commonly used index that the bulb is now the dominant sink. It’s an operational indicator, not a universal threshold. Classic morphology studies caution that no single ratio marks first bulbing for all cultivars.
- Soil cracking. As the bulb expands it pushes soil aside. Cracking around the base signals active expansion. Use it alongside your soil nitrogen status, weather, and planned harvest when deciding how to taper feeding.
I stretch two strings corner to corner and tag the nearest onion that is not already marked at each one-quarter and three-quarter point on the diagonals plus the plant nearest their center crossing. I exclude only plants within one row spacing of the bed edge and choose the next inward plant when a mark lands there. Each week, I photograph all five necks and bulbs from soil level with a small ruler in frame. The five-point X spans rows and bed length, so one irrigation lane or unusually early bulb cannot set the whole stopping date.
The last nitrogen date goes directly beside that photo series. If a product releases gradually, I count its remaining release window too, since stopping soluble feed does not mean the root zone has stopped receiving nitrogen.
The Danger of ‘Slow Release’
Organic sources Nutrient release from compost, blood meal, feather meal, and manure can be difficult to predict and varies widely among materials. They do not all behave like one slow-release fertilizer.
If you apply a slow-release organic source and conditions stay dry, mineralization slows and much of the nitrogen isn’t released yet.
It isn’t doing nothing (microbial turnover continues on the soluble fraction) but availability lags.
A later warm rain can raise microbial activity and release nitrogen. The amount and rate depend on the material’s carbon-to-nitrogen ratio, particle size, soil temperature, and moisture. Release rarely happens in one sudden surge.
The practical point is to match nitrogen availability to the crop’s stage. Incorporating organic sources well before planting is reasonable, though reviews also note that controlled-release and split supply can reduce leaching, so pre-plant-only isn’t automatically ‘best.’
A liquid source (such as a fish hydrolysate) is easier to time because you choose when to apply it.
Even so, actual availability still depends on mineralization, the product’s analysis, and rate, so ‘exact control’ overstates it.
Nitrogen nutrition and fertilization of onions (Allium cepa L.) – A literature review
Part V. Flavor Chemistry – Sulfur and The Tears
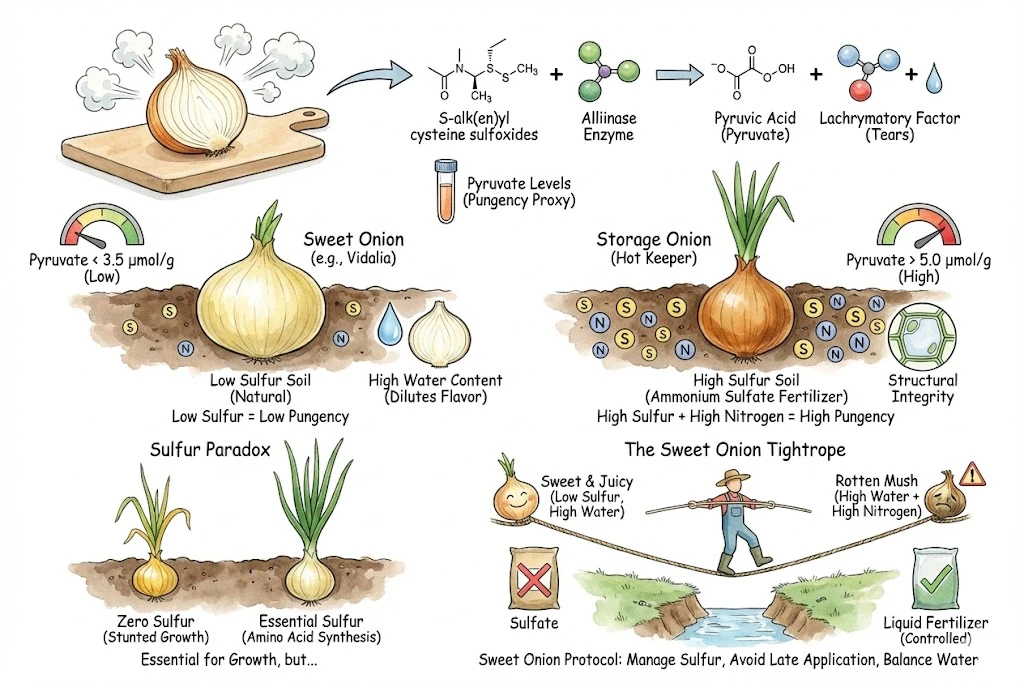
Why are some onions mild (Vidalias, Walla Wallas) and others sharply pungent? Cultivar is the biggest factor, and soil and water chemistry also play a part.
The Pyruvic Acid Connection
Onion pungency traces back to sulfur-containing flavor precursors, the S-alk(en)yl cysteine sulfoxides (ACSOs).
Cutting the onion ruptures cells and releases the enzyme alliinase.
Alliinase breaks the ACSOs down into sulfenic acids, ammonia, and pyruvate. A separate enzyme, lachrymatory-factor synthase, then converts one of the sulfenic acids into the lachrymatory factor (the gas that makes you cry), so alliinase doesn’t produce the tear factor directly.
Pyruvate is a stable co-product of this reaction, not the cause of the heat, and it’s widely used as a proxy for pungency. Higher pyruvate generally correlates with a hotter onion, though the relationship depends on cultivar and measurement method.
- Milder onions. Often measure below roughly 3.5 micromoles of pyruvate per gram fresh weight.
- More pungent storage types. Can measure well above 5.0.
Treat those figures as rough operational ranges, not fixed categories. Recent sweet-cultivar trials span roughly 2.4–6.0, and genotype, growing year, and method all shift the numbers.
Sulfur availability influences these flavor precursors. In some field trials, sulfur fertilization raised bulb sulfur and pyruvate (one two-cultivar, multi-site study reported pyruvate up about 35% on average with added sulfur) increasing pungency and flavor-precursor levels.
The response depends on cultivar and on how much sulfur the soil and water already supply. Where sulfur is already sufficient, extra sulfur may not change pungency.
- Ample sulfur (often alongside higher nitrogen) tends toward more pungent onions.
- Low available sulfur tends toward milder onions, though cultivar, water, and maturity also matter.
The Paradox of Sulfur
Here’s the grower’s balancing act. Sulfur is an essential nutrient. It’s needed to build the amino acids cysteine and methionine.
A severe sulfur deficiency can cause yellowing and stunted growth, since the plant can’t make those proteins.
(In a real garden, yellowing has many causes, so confirm sulfur is the issue rather than assuming it.)
For milder onions, keeping available sulfur on the lower side is one factor. Vidalia, Georgia, is known partly because its soils are naturally low in sulfur.
Growers there manage sulfur carefully. Enough to grow the plant, without pushing pungency higher than the market wants.
If you’re growing sweet varieties, avoiding unnecessary late-season sulfate sources (such as ammonium sulfate) can help.
Test your soil and water first, though, and note that ammonium sulfate also adds nitrogen, acidifies soil, and contributes salts, not just sulfur.
For pungent storage onions, adequate sulfur supports the organosulfur flavor precursors. Those compounds show antimicrobial activity in the lab, but that isn’t the same as fewer rots in the cellar. The multi-site sulfur trial cited above found no significant effect of sulfur on sprouting, decay, mold, or storage life.
So treat ‘sulfur builds a storage defense’ as unproven for real-world storage.
The Water Factor
Water deficit can also raise pungency. The effect isn’t only concentration. Water stress can shift the plant’s metabolism and flavor-precursor levels, and the response depends on cultivar and when the stress occurs.
For a milder onion, keeping available sulfur low and irrigation consistent both help. Keep in mind the storage caveat, too.
Excess nitrogen combined with wet conditions raises the risk of soft, disease-prone tissue, though whether that turns into rot also depends on pathogen presence, drainage, cultivar, and curing, so it isn’t a fixed equation.
This is why growing sweet onions takes some balancing (between mild and juicy on one side and soft and disease-prone on the other).
A soil and water test is the practical starting point, since a low-sulfur recipe shouldn’t be applied blind.
Sulfur and nitrogen fertility affects flavour of field-grown onions
Part VI. The New Frontier – Biostimulants
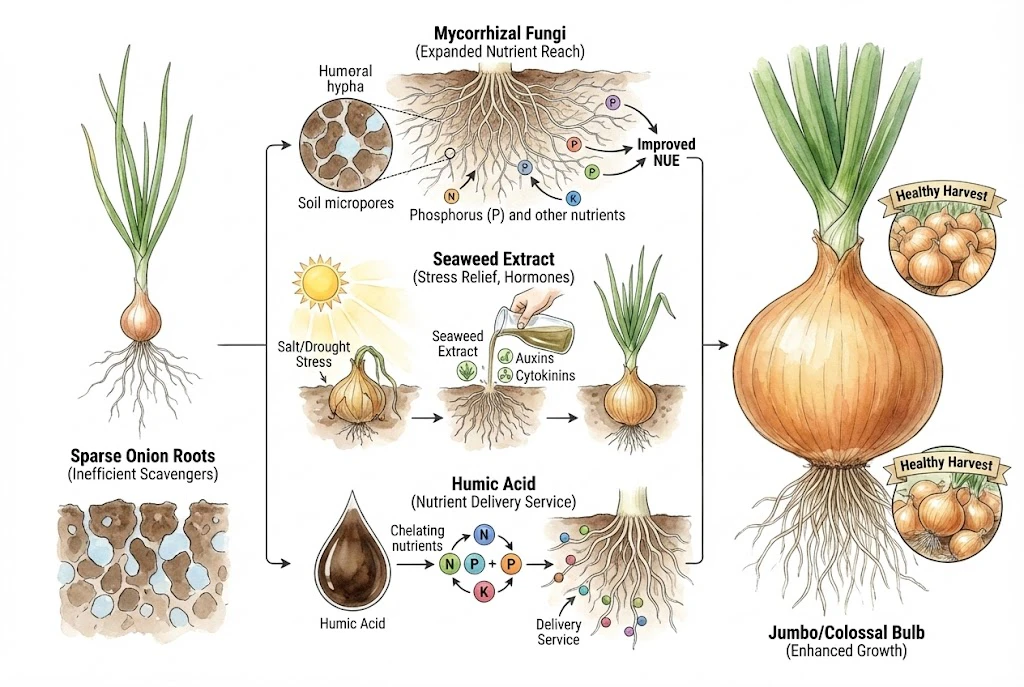
Garden centers now stock plenty of ‘biostimulants,’ ‘microbial inoculants,’ and ‘seaweed extracts.’ Are they useful, or marketing?
The honest answer is
Sometimes useful, under the right conditions. Whether a given product helps depends on your cultivar, soil fertility, the specific inoculum or extract, and what outcome you’re measuring.
The Mycorrhizal Advantage
Onions have sparse, lightly branched roots and can benefit from associations with arbuscular mycorrhizal fungi (AMF), especially for phosphorus uptake.
How much benefit you see depends on the fungi already in your soil, your soil’s phosphorus and nitrogen status, and management.
Some trials with microbial biostimulants (for example mixtures containing Bacillus species and mycorrhizal fungi) have improved root or yield metrics.
- Why. The fungal hyphae extend the soil volume the roots can explore, reaching nutrients in micropores that the onion’s own roots can’t.
- The catch. Results depend on the specific organisms, viable counts, and soil, so a phosphorus-uptake benefit doesn’t automatically translate into better nitrogen-use efficiency or work in every garden.
Seaweed and Stress
Seaweed extracts (such as Ascophyllum nodosum–based products) contain bioactive compounds and can show hormone-like activity, though the measurable phytohormone content varies by product and extraction, so ‘contains plant hormones’ shouldn’t be assumed without a product assay.
Some algae-based biostimulants have helped onions tolerate stress, for instance, one saline-irrigation study using a freshwater-algae formulation on two cultivars saw treated plants outperform untreated controls.
That trial doesn’t, however, establish the effect of an Ascophyllum product in a hot, dry garden.
A common single-ingredient option is a liquid Ascophyllum nodosum (seaweed) extract. Important caveat. Some of these products’ US labels and safety data sheets state they are not intended for agricultural use on any food crop.
Onions are a food crop, so check the label on the bottle you buy and follow its directions and any use restrictions. Applying it to onions may fall outside the labeled use.
If you do use a seaweed biostimulant where the label allows it, early applications (a root dip at planting, or a drench on young plants) are the usual approach.
Be skeptical of ‘double your yield’ claims. These are stress-relief aids, not miracle products.
Under good soil, water, and weather you may see little difference. A one-year field trial on four onion cultivars reported changes in yield and quality after foliar application of an Ascophyllum nodosum extract, but the response varied with cultivar and concentration. One trial does not establish that another formulation or growing environment will respond the same way, and it does not support claims that a seaweed product makes the difference between a harvest and a failure.
Effect of Seaweed Extract on Productivity and Quality Attributes of Four Onion Cultivars
Humic Acids
Humic substances can complex nutrients in the soil and influence soil chemistry, which may improve availability in some situations, but not always. The response depends on soil pH, organic matter, the product’s chemistry, and rate.
Some onion trials that included humic acid reported larger bulbs and a shift toward larger size classes, while others saw little effect.
Treat a shift toward jumbo-grade bulbs as possible under the right conditions, not guaranteed, since it varies with product, control, and site.
Use a Stage-Based Feeding and Watering Plan
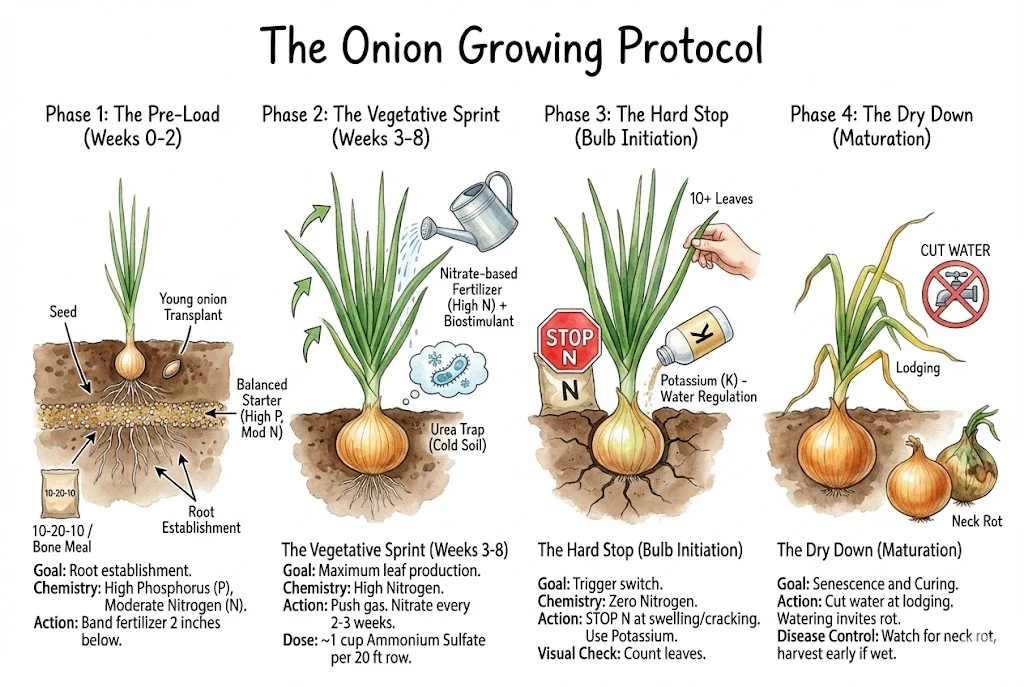
Here is a stage-based framework you can adapt. Think of it as a starting point to calibrate against your own soil test, cultivar, and conditions, not a fixed recipe to copy exactly.
This schedule assumes a spring planting of an intermediate- or long-day onion. Beyond adjusting dates for your latitude, tailor it to your cultivar, planting material, soil nitrogen, irrigation water, and target yield.
Phase 1. The Pre-Load (Weeks 0–2)
Goal
Root establishment.
Chemistry
Adequate phosphorus (P) and moderate nitrogen (N) (amounts guided by a soil test.)
Action
Start with a soil test. If phosphorus is low, band a starter fertilizer 2 inches to the side and 2 inches below the seed or transplant.
Keeping that offset matters. A concentrated fertilizer band placed directly under the seed or root can cause salt injury.
- Why. Phosphorus moves very little in soil, so it needs to be placed where the roots will grow. Where soil phosphorus is already sufficient, extra P isn’t needed and can add to environmental losses (another reason to test first).
- Product. A fertilizer such as a 10-20-10 (that ratio is a nutrient balance, not necessarily what your soil needs), or bone meal for organic growers, applied weeks ahead and after checking soil pH and phosphorus status.
Phase 2. The Vegetative Sprint (Weeks 3–8)
Goal
Healthy leaf production.
Chemistry
Adequate nitrogen (matched to your soil test, not maximized.)
Action
This is the main window for nitrogen feeding.
- Frequency. A nitrate-based fertilizer (such as calcium nitrate) can be applied every 2–3 weeks, but adjust the interval and amount to rainfall, soil, and your overall nitrogen budget rather than on a fixed schedule.
- Cold soil. In cold spring soil, urea converts more slowly, so a nitrate source is more immediately available. Soil microbes aren’t simply ‘asleep,’ and nitrate isn’t always superior (temperature, pH, placement, and loss pathways all matter).
- Biostimulant. A humic or seaweed drench may help uptake in some conditions. First confirm the product’s label allows use on food crops (see the seaweed-label caveat above, some carry a not for agricultural use on food crops restriction), and weigh the cost.
- Dose. Size the amount from your soil test and a target rate. Do not use a fixed cup-per-row rule without converting it for the product’s nitrogen analysis and your row spacing. Weigh the product, calculate nitrogen per unit area, and start on the low side.
Phase 3. The Hard Stop (Bulb Initiation)
Goal
Manage the transition into bulbing.
Chemistry
Taper nitrogen. Avoid heavy or late applications.
Action
As the bulbs swell (roughly twice the neck diameter) or the soil starts to crack, cut back on nitrogen.
- Base how far you cut back on your residual soil nitrogen, cultivar, irrigation, and disease pressure. Some trials show a modest dose at bulb initiation still benefits size, so ‘zero’ isn’t automatically right.
- Keep monitoring irrigation, pests, disease, and maturity through this stage. Easing off nitrogen doesn’t mean walking away from the crop.
- Potassium mainly supports osmotic regulation, enzyme activity, and stress tolerance. It is not a structural component of cell walls. Only add K if a soil test shows it’s needed. Many soils already supply enough.
- Visual check. A good stand of healthy leaves is a positive sign, but leaf number alone doesn’t set the right nitrogen or final size. Use your cultivar’s data as the reference.
Phase 4. The Dry Down (Maturation)
Goal
Senescence and curing.
Action
Reduce, then stop, irrigation (timed to maturity, not to the first sign of lodging.)
- Extension guidance (e.g. Utah State) is to keep water available until bulbs reach full size and the tops begin to senesce, then stop roughly two weeks before lifting. Cutting water the moment tops start to droop can shortchange bulbs that are still filling.
- Late excess irrigation, like late nitrogen, keeps the neck green and raises rot risk once bulbs are mature, so the aim is to dry the crop down at the right time, not to confuse water with fertilizer.
- Disease. In wet climates, watch for neck rot near harvest. If disease pressure is high, harvesting a little early and curing under cover can help. Accepting that you may trade some size, and paying attention to skin set and sanitation. Don’t leave bulbs sitting in wet soil.
Onion. Soil and Fertility (Utah State University Extension)
Cure and Store Bulbs for the Longest Life
You’ve grown them. Now, don’t ruin them in the last week.
The Curing Chemistry
Curing is mainly a post-harvest drying process. The outer scales and the neck lose moisture and form a protective, sealed skin. The neck tissue needs to dry down and tighten.
- Warmth and airflow. Warm temperatures (around 28°C / low 80s°F) with good airflow speed drying. Hormones such as ABA are involved in dormancy, but curing quality is best understood as controlled drying and wound protection rather than a hormone you can switch on.
- The neck seal. Aim for a neck that is dry and tight. If it’s still soft or you can slide a finger in, it hasn’t cured and it’s a poor candidate for long storage.
The Curing Environment
A reasonable home-curing range is warm temperatures (about 75–85°F) with good airflow and low humidity. The right duration and target relative humidity depend on your cultivar and conditions.
In a humid climate, curing under cover usually beats leaving bulbs in a wet field.
Bring them into a shed, garage, or porch, space them out on a clean surface, and run a fan.
Both airflow and warmth matter for fast drying, so neither is universally ‘more important.’
One caution. If you suspect bacterial disease, don’t heat-cure. Warmth can spread it. In that case dry quickly with forced air at lower humidity (under about 70% RH) and cull affected bulbs, since fans won’t cure an already-infected onion.
The Storage Myth
It’s better not to store onions and potatoes together, but the usual explanation is off. The real reason is humidity. Potatoes keep best in humid storage, onions in dry storage, so a shared closed bin suits neither.
Healthy potatoes are actually very low ethylene producers, and the claim that ‘potato ethylene makes onions sprout’ isn’t supported. Some studies find continuous ethylene actually suppresses onion sprout elongation.
That said, external ethylene (from ripening fruit, for example) can encourage onion sprouting and decay, so keeping onions away from ethylene-producing produce is still sensible.
Onions want cool, dry, well-ventilated storage. Potatoes want cool, humid, dark storage.
Store onions in mesh bags or crates rather than sealed plastic, which traps condensation. (Perforated or controlled-atmosphere commercial packaging is a different matter.)
They need airflow. A good target range is about 32–40°F (0–4°C) at moderate humidity (roughly 65–70% RH), with pungent storage cultivars keeping far longer than mild, sweet types under the same conditions.
Cold slows respiration and disease sharply, but not to nothing. At 0–4°C respiration is still on the order of 3–4 ml CO₂/kg·h, and some rots can continue, so cold storage delays problems rather than stopping them entirely.
Practical Grower’s Guide (Troubleshooting Your Onions)
Problem. ‘My onions are small.’
- Likely factors. Too little healthy leaf area before bulbing, but that has several possible causes.
- Consider. Late planting, weak early growth or low early nitrogen, wrong day class for your latitude, poor transplant quality, tight spacing, drought, or root disease. A soil test helps narrow it down rather than assuming nitrogen deficiency.
- Fix. Match the day class to your latitude, plant on time, band phosphorus if a test shows it’s low, and supply adequate (not excessive) nitrogen through early leaf growth (sized from a nitrogen budget, not pushed as hard as possible).
Problem. ‘My onions have thick necks and won’t dry.’
- Likely factors. Large green tops with a thick neck often point to excess nitrogen or a day-class mismatch.
- Consider. Late nitrogen (after bulbing began) or excessive late irrigation, plus photoperiod mismatch, shade, low planting density, and planting date.
- Fix. Next season, taper nitrogen and avoid heavy late applications, and irrigate to maturity rather than beyond it. Thick-necked bulbs cure and store poorly, so use them fresh first, and discard any that are soft, foul-smelling, or moldy rather than storing them.
Problem. ‘My onions rotted from the inside out.’
- Likely factors. Soft necks, off odor, or visible rot suggest neck rot or a bacterial rot, but appearance alone can’t confirm which pathogen, and unsafe bulbs should be discarded, not tasted.
- Consider. A wet neck is one entry route, but so are wounds, seed- or leaf-borne infection, thrips, and sour skin, so a single ‘bacteria entered through the neck’ explanation is often incomplete.
- Fix. Harvest at proper maturity, make sure necks are fully dry before topping, and cure under cover with airflow if it’s wet. Separate any diseased bulbs (fans won’t cure an already-infected onion), and avoid heat-curing suspect bulbs, which can spread bacterial disease.
Problem. ‘My sweet onions are hot.’
- Likely factors. Higher-than-wanted pungency reflects a mix of genotype, sulfur and nitrogen supply, water stress, and maturity, so ‘too hot to enjoy’ is partly personal taste, not a single diagnosis.
- Consider. Late sulfate applications or dry, hot conditions can raise pungency, but you can’t pin the cause without knowing your soil and water sulfur, cultivar, and irrigation history.
- Fix. For sweet varieties, avoid unnecessary late sulfate (test soil and water first) and keep irrigation consistent. Harvest maturity and your own taste preference matter too.
Know When to Ease Off
One of the harder habits for a gardener to unlearn is over-tending. We tend to want to keep feeding and watering right up to harvest.
Onions, though, do much of their best work when we ease off at the right time. The plant’s needs genuinely change as it moves from leaf growth into bulbing and maturation.
Feeding heavy nitrogen late in the season works against that transition, keeping tissue soft when the crop should be firming up.
Bottom line Excess and late nitrogen tend to hurt onion quality. This is a well-supported direction rather than an absolute rule, and the right total and timing still depend on your soil test, cultivar, and climate.
Too much late nitrogen tends to produce lush green tops over a poorly maturing bulb, contributes to thick necks that cure and store badly, and can shift flavor and reduce storage life.
So the takeaway is
Supply adequate nitrogen early, sized from a soil test rather than pushed as hard as possible.
Consider biostimulants where the label allows and the conditions warrant. As the days lengthen and the bulbs swell, taper nitrogen and, near maturity, water.
Let the crop dry down and cure once bulbs reach full size (matching your management to maturity rather than to a fixed date).
By harvest, healthy plants will have brown, fallen tops, which is what you want.
Well-cured, firm bulbs of a good storage cultivar can keep for months in cool, dry, ventilated storage.
That payoff comes from getting the timing right, not from any single product.
Much of growing good storage onions comes down to knowing when to ease off, on nitrogen and on water, as the crop matures.