
Paludarium Expanding Foam: The DIY Build Handbook
Build a paludarium background with expanding foam safely. Plan cure time, ventilation, buoyancy, anchoring, carving and livestock-safe sealing.
Priya Patel · Published 2025-12-17 · 17 min read

Expanding foam can form a durable paludarium background when the product is labeled for wet environments and the cured structure is anchored and coated according to current product guidance. Handle the uncured chemical with ventilation and appropriate protection, and treat cure, buoyancy, and livestock contact as separate checks rather than as one blanket aquarium-safe claim.
Why Expanding Foam Works for Backgrounds
Before spraying chemicals around, understand what is happening inside the can.
I make a full-size cardboard outline of the background and mark doors, vents, drains, and glass-cleaning clearance before opening the foam. On a separate protected sample, I observe how the chosen product expands and cures under the manufacturer conditions.
The real application stays inside the conservative boundary rather than being trimmed around critical hardware later. The sample also shows how easily the cured surface carves before I commit the enclosure to that texture.
The Cure Is a Reaction, Not Drying
Foam doesn’t dry like paint. It cures through a chemical reaction that gives off heat.
One-component cans like Great Stuff Pond & Stone contain a pre-reacted isocyanate prepolymer (the current safety data sheet for that can lists MDI and polymeric MDI, not TDI) along with blowing agents and other additives.
Pull the trigger and the pressure drop boils off the propellants (the SDS lists propane, isobutane, and dimethyl ether), which froth the mix to fill the gap.
The hardening is a moisture-cure. The isocyanate reacts with water, from humidity in the air and any mist you add, forming a polyurea/polyurethane solid and releasing CO₂ that expands the foam further.
So both the propellant and the water reaction contribute to expansion.
Humidity Controls Cure Speed
Cure speed depends on moisture. In very dry air the foam can skin over while curing more slowly underneath. DuPont’s own instructions say a light water mist can speed the cure, so lightly misting the surface before foaming is a manufacturer-supported tip. Water is a reactant that gets consumed, not a catalyst. Follow the can’s bead-size, temperature, and humidity guidance rather than soaking the tank.
Thick Beads Skin Over
The surface cures into a skin while the inside keeps expanding, so a single massive blob can cure unevenly and stay soft in the center. Building in thin passes gives more predictable cells. Manufacturer instructions specify bead size, roughly a 1-inch diameter, for this reason.
Thin Passes Limit Heat
The reaction is exothermic, so a thick layer traps heat in its core and can cure poorly. Thin passes stay cooler and set more evenly. Product test data confirming that the core literally chars is not available here, so treat that as a caution, not a certainty.
Open-Cell vs. Closed-Cell
Cell structure matters in a tank that holds water. Closed-cell foam resists water uptake better than open-cell foam, so it’s the sensible choice for a paludarium.
Great Stuff Pond & Stone is officially a closed-cell polyurethane that forms a water-resistant outer coating. That’s consistent with its low density and tendency to float.
Other Great Stuff products vary, so check the individual technical data sheet rather than assuming every can behaves the same.
Closed-cell foam and a water-resistant outer coating are not the same as being fully waterproof, because each product has its own water-absorption figure.
Carving is worth thinking about. A serrated knife opens the cells at the cut face, which can expose the surface to more water uptake and affect how well a coating sticks.
That doesn’t turn the bulk foam into an open-cell sponge (you’ve only cut the surface cells) but a freshly carved face is more absorbent than the original skin.
How much this matters depends on the exact foam, how deep you cut, how much it’s exposed to water, and any coating you apply, so test on a scrap rather than assuming the worst.
As a practical precaution, it’s reasonable to coat or seal carved surfaces that sit in the splash zone (see the sealing options below). No manufacturer requirement is cited here that every carved surface must be sealed.
Isocyanates (The Real Hazard)
Uncured expanding foam is a serious respiratory hazard because isocyanates can sensitize the airways. They also irritate the eyes and skin, and once someone is sensitized, re-exposure can trigger severe attacks.
The can itself adds more hazards. The SDS classifies it as a flammable aerosol under pressure, so keep it away from ignition sources, don’t puncture or incinerate it, and protect your eyes and skin as well as your lungs.
Use sensible precautions. Work outdoors or in a well-ventilated area, keep ignition sources and pets away, wear gloves and eye protection, and keep the chemical off your skin and clothing.
A dust mask is not respiratory protection here. If you use an air-purifying respirator, the SDS calls for an organic-vapor cartridge with a particulate pre-filter on a NIOSH-approved, properly fitted respirator. In enclosed, poorly ventilated, or high-concentration conditions, supplied-air respiratory protection may be needed.
There is also a dust stage later when you carve, which needs particulate protection of its own.
Do not use smell as your safety gauge. The SDS lists this product as odorless with no odor-threshold data, so noticing an odor or its absence tells you little about actual exposure or cure.
Judge cure by manufacturer guidance instead.
Cure and Re-entry
Wait for a full cure before adding frogs or fish, but understand the cure time is conditional, not a fixed number.
DuPont’s 8-hour figure is measured under specific conditions (about 70°F, 50% relative humidity, a 1-inch bead). The EPA describes one-component foam cure as roughly 8–24 hours but variable with formulation and application, and recommends following manufacturer-specific ventilation and re-entry guidance.
A thick custom background can take longer, so give it several days, keep ventilating, and confirm the foam is fully hard and stable before livestock go in (don’t treat any single hour count as a guarantee).
Is Isocyanate Exposure and Occupational Asthma Still a Major Occupational Health Concern? Systematic Literature Review
The Build Process
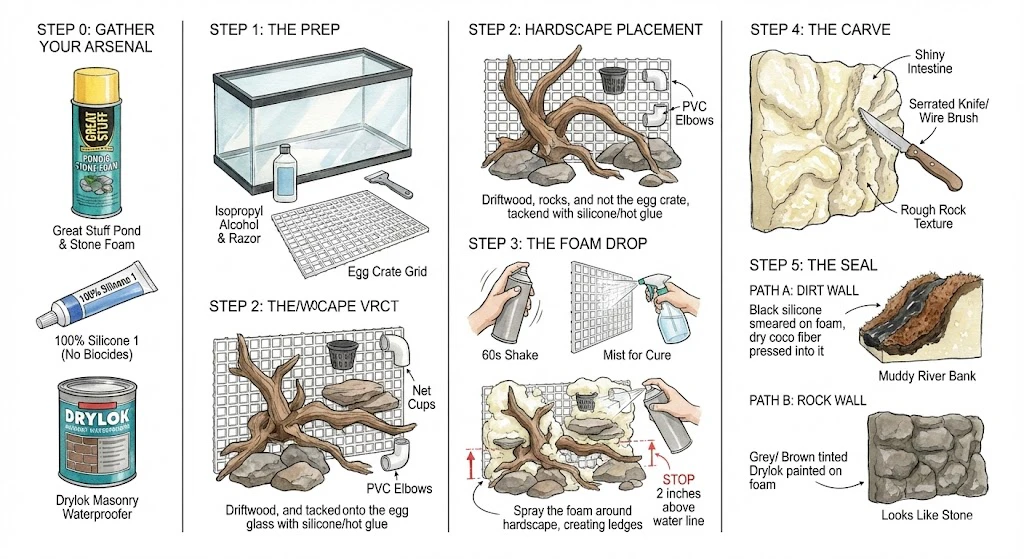
Step 0. Gather the Materials
You need the right materials. Pay closest attention to the sealant and the coating, since those are the ones that contact water and animals, and always check each product’s own label before you rely on it.
Great Stuff Pond & Stone Foam
Great Stuff Pond & Stone foam is the most relevant foam of the bunch. DuPont markets it as a closed-cell foam that is safe for use around ornamental fish and plants and holds up in wet conditions.
The black color is useful mainly for looks (a missed patch reads as a shadow rather than a bright blob).
Don’t rely on the color as UV protection, though. DuPont says to paint or cover foam for outdoor use because exposed cured foam eventually discolors and crumbles regardless of pigment.
So plan to coat or cover it, not to leave black foam bare in the light.
Black Pond & Stone costs more than standard Gaps & Cracks. If you’re coating everything in silicone and dirt anyway, the color premium buys little. The black mainly helps hide small uncoated spots on visible rockwork.
Either way, don’t leave any spot bare for the long term. Even black foam should be covered, since exposed foam degrades under light.
Follow the can’s directions for ventilation, cure, and coating, and confirm the exact product’s label rather than trusting a package photo.
Silicone Adhesive
For adhesion, hobbyists generally use a 100% silicone and specifically avoid Kitchen & Bath products marketed as mold-free, because added mildew-control biocides are an unnecessary variable in a closed system with animals.
That’s a reasonable precaution, but treat 100% silicone as a starting filter, not a safety guarantee. Verify the specific product you buy is labeled by its manufacturer for aquarium or continuous-water use before you put it in a tank with livestock. The aquarium-safe adhesive comparison separates silicone, cyanoacrylate, epoxy, and foam by use case.
Many general-purpose window-and-door silicones are not (see the important caveat under the product below).
GE Advanced Silicone 2 Is Not Aquarium-Rated
GE Advanced Silicone 2 Window & Door sealant is a neutral-cure, low-odor silicone that the manufacturer markets with 10-year mold-free protection based on a biocide, not the acetoxy Silicone 1 formulation without that additive. More importantly, GE’s technical data sheet says not to use it for aquariums, underwater or continuous-water contact, or structural repair.
Do not treat it as a proven aquarium-safe bonding or coating material. If you need a sealant that stays submerged or bonds a load-bearing background, choose a product its own manufacturer labels for aquarium and structural use, and confirm that on the current label rather than an old package photo.
Masonry Waterproofer
For realistic rock texture, hobbyists sometimes use a masonry waterproofer to add a paintable, stone-like surface over carved foam.
The product family matters because the choice of DRYLOK type is a safety decision, not just a finish preference.
DRYLOK Extreme Is Not for Aquatic Life
DRYLOK Extreme masonry waterproofer has a smooth finish rather than a sanded one and contains a mildew-control biocide.
DRYLOK’s own FAQ says that biocide can harm aquatic life and directs you to use DRYLOK Original, not Extreme, for fishponds and bird baths.
DRYLOK also recommends its masonry waterproofers for bare masonry and concrete, not for carved polyurethane foam, so foam isn’t a supported substrate.
In short, don’t treat Extreme as a proven non-toxic-once-cured coating for a splash zone shared with frogs or fish.
If you want to try a masonry coating here, choose the formulation the manufacturer allows near aquatic life, follow its label, including any minimum coats and do-not-thin directions, and test adhesion on a foam scrap first.
Risks of Using Antifouling Biocides in Aquaculture
Step 1. Prep (Don’t Skip)
Lay the tank on its back so gravity helps, and remove grease from the bonding surface (even a fingerprint of oil hurts adhesion).
On glass, isopropyl alcohol works, and a razor can lift old sealant (watch for scratches and cuts, and keep the blade flat).
Do not use a razor on acrylic, and go easy with solvents there. Acrylic can craze or stress-crack from incompatible cleaners, so check the panel maker’s cleaning guidance.
See the acrylic section below before prepping an acrylic tank.
Then bond a grid of egg crate (light-diffuser panel) to the back glass. The foam expands through the grid and keys around it, adding a mechanical grip that pure surface adhesion doesn’t give you.
How strong that grip is depends on the grid material, how well the foam fills it, the bonded area, and the load, so treat it as a helpful technique, not an unbreakable lock.
Think of it as rebar for your fake rock. It makes delamination less likely, but it doesn’t guarantee against it.
For a large or partly submerged background, plan the bond area, cure time, and load path deliberately, and test a dry-fit under load before trusting it with animals.
Step 2. Hardscape Placement
Arrange driftwood and rock using the load paths and water flow established in your paludarium hardscape plan, tacking them to the egg crate with dabs of silicone (or temporary hot glue).
This is also when you foam in net cups or PVC elbows as permanent planting pockets.
Step 3. The Foam Drop
Shake the can a full 60 seconds (this matches DuPont’s instructions and mixes the contents properly). A light water mist on the egg crate and glass helps the cure.
Work at a moderate temperature and follow the can’s guidance on can orientation and bead size.
Then build in controlled passes. Lock the base of the wood first, then create ledges and bumps.
Keep the foam comfortably above the water line. A couple of inches is a common starting point, but adjust for splash, condensation, potential flood level, and how your animals move, rather than treating any single number as a safe margin.
Don’t rely on foam alone for underwater structure because of its buoyancy. Use rock or glass stilts for submerged support and design the attachment as a structural problem, not just a sealing one.
Step 4. The Carve
Cured foam has a glossy skin, so carve through it into rock texture with serrated knives, hacksaw blades, and wire brushes.
Nature isn’t smooth (gouge holes, undercut the wood for shadows, and use the)hardscape shape guide to plan depth before removing material.
Carving throws off particulate, so wear a proper NIOSH-rated dust respirator (not a loose cloth mask), plus eye protection and cut-resistant gloves, and clean up the dust rather than leaving it in the enclosure.
Step 5. The Seal
Coco-Fiber Dirt Wall
Smear an aquarium-safe silicone over the carved foam and press dry coco fiber or peat into it for a river-bank look that plant roots can grow into.
Masonry-Coated Rock Wall
A tinted masonry coating can give a paintable, stone-like surface (dry-brush lighter shades for highlights).
If you use a masonry coating, tint and apply it per its own label (many are formulated to be applied in a minimum number of coats and not thinned) and use the formulation the manufacturer allows near aquatic life, not DRYLOK Extreme (see the caveat above).
As a practical precaution, coat carved surfaces that sit in the splash zone, and choose whichever coating you use for its manufacturer-stated safety around animals, not its texture alone.
Design Tradeoffs and Material Details
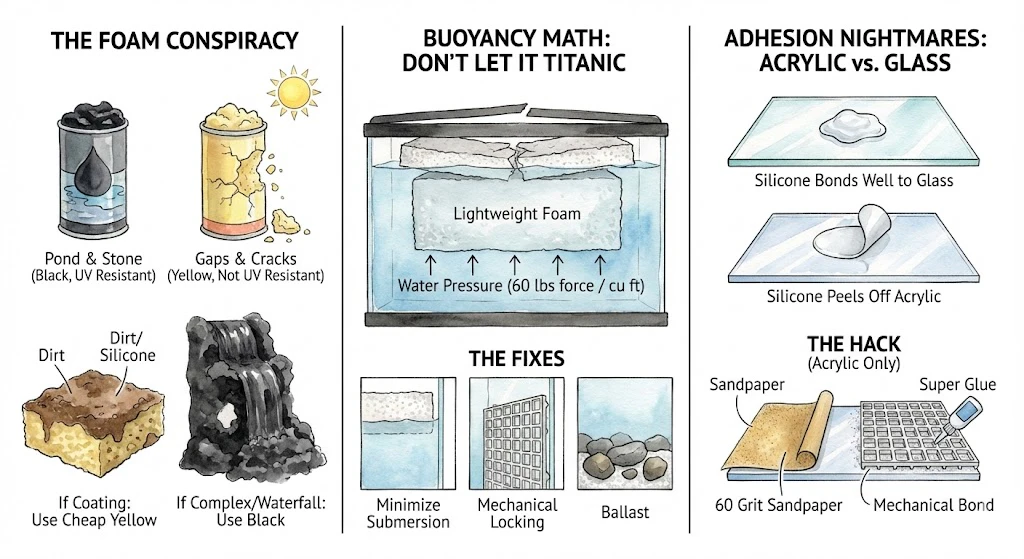
Pond & Stone vs. Gaps & Cracks
Both cans are polyurethane foam, but no published composition comparison establishes that they are chemically identical. The clearest practical difference is color.
Pond & Stone is the one DuPont markets as safe around ornamental fish and plants, which is the relevant point for a paludarium. The black color also hides small uncoated spots better than cream foam.
Don’t read the black pigment as a license to leave foam exposed, though. DuPont tells you to cover foam used outdoors because exposed foam degrades under light regardless of color, so both cans should ultimately be coated.
Use the black mainly to make any missed spot on visible rockwork read as shadow, not as a substitute for a protective coating.
Buoyancy Math (Don’t Underestimate the Lift)
Foam floats strongly, so a submerged background can place a substantial upward load on its bond. Water weighs about 62.4 lbs per cubic foot, so a fully submerged cubic foot of near-weightless foam experiences roughly 62 lbf of upward buoyant force from the water it displaces. Subtract the weight of the foam and anything attached to it, and the net lift can be on the order of 60 lbf.
This is buoyancy, which is proportional to the submerged volume, and not water pressure. The real number depends on how much of the structure is actually underwater and what it weighs.
Rock and wood have their own displacement and weight too.
A force like that can, over time, stress the bond between the background and the glass, and a background that detaches could rise, crack a lid, or endanger the animals.
Whether and when that happens depends on the actual bond strength, area, and load, so treat it as a real risk to design against, not a certainty on any timeline.
Helpful controls include keeping as much of the foam above the waterline as possible. Give any submerged bond adequate area and full cure before loading it, and consider ballast to offset lift.
Adding a large amount of glue or dropping in a heavy rock is not a substitute for thinking about capacity. Heavy rock adds its own point load on the glass, tipping, and animal-crush risk.
For anything sizeable or submerged, size the bonded area, load path, and a safety margin to the load, and dry-test under load before adding water and livestock.
Adhesion (Acrylic vs. Glass)
Silicone bonds chemically to glass but grips foam mainly by mechanical key, which is what the egg crate provides.
On acrylic or plexiglass, silicone generally adheres poorly, though how poorly depends on the specific product, surface prep, and load.
The general-purpose GE silicone linked above is not rated for aquarium or structural use on either material.
Bonding a large, buoyant grid to an acrylic tank is a structural joint, so avoid untested DIY shortcuts.
Scuffing acrylic with coarse sandpaper and gluing with generic cyanoacrylate is not a validated method. Acrylic can craze or crack from surface damage, notches, stress, and incompatible adhesives or solvents, and acrylic fabricators recommend purpose-made cements with controlled edge preparation for structural joints.
If you’re building on acrylic, follow the tank maker’s or an acrylic fabricator’s guidance, test any adhesive on a scrap coupon for compatibility, and add mechanical support rather than trusting a sanded-and-super-glued grid to hold a buoyant background.
A Note on Spray Rubber Sealants
People sometimes coat foam with rubberized spray sealants such as Flex Seal because they’re fast.
There is no single Flex Seal formula, though. The Spray, Liquid, Paste, and Caulk differ in ingredients and cure.
Flex Seal’s own guidance puts full cure for the Spray at around 24 hours and the Liquid at roughly 24–48 hours, varying with thickness, temperature, and humidity, so a blanket claim that it releases vapors for weeks is not accurate.
Check the specific product’s safety data sheet and label before using it.
Whatever you use, the deciding factor is what the exact product’s manufacturer says about continuous water contact, animal contact, and substrate compatibility (a product’s popularity in the hobby isn’t proof it’s safe in a sealed enclosure).
Verify the label rather than gambling on a familiar name or a fast shortcut.
Troubleshooting (Q&A)
Is expanding foam toxic to frogs or fish?
Safety depends on the product and the conditions. Uncured foam is genuinely hazardous. The EPA describes correctly applied, fully cured foam as typically relatively inert. A conditional statement, not a promise that every cured polyurethane is harmless.
Improper cure, migrated contaminants, cutting or sanding dust, UV degradation, heat or fire, animal chewing, and detached debris are all real post-cure concerns, so full cure is not the whole safety story.
The main mistake is rushing the cure. Give it a full cure with ventilation and confirm the foam is hard and stable before adding animals, and don’t use smell as the test, since this product is listed as odorless with no odor-threshold data.
Does carved expanding foam soak up water?
It can absorb some water. Closed-cell foam resists water but isn’t perfectly waterproof, and carving exposes surface cells that take up more water than the intact skin.
It won’t wick through the whole block, but a carved face in the splash zone is worth coating.
Use a coating whose manufacturer allows it around aquatic life, not either of the two products flagged above, and high-and-dry areas can often be left raw.
Why did my foam background pull away from the glass?
Several things can cause this, weak surface prep or contamination, inadequate adhesion, buoyancy, curing issues, material incompatibility, or differential movement, so don’t assume it’s simply thermal expansion.
Foam sprayed straight onto glass with no egg-crate key is more prone to letting go.
Before patching, figure out what actually failed. Injecting fresh silicone into a wet, dirty, hidden gap rarely gives a reliable bond and can hide the real load problem. The paludarium adhesion guide explains how joint type and surface preparation change the repair.
The safer fix is usually to remove livestock, drain, inspect, clean the surface properly, and rebuild the bond (with an egg-crate mechanical lock and an appropriate adhesive) rather than trusting a blind injection under load.
Treat Foam as Chemistry, Not Decor
Building a paludarium background with expanding foam is doable, but it’s a chemistry and structural project, not a decorating one.
Use a closed-cell foam that its maker says is safe around fish and plants, let it fully cure with good ventilation, plan for buoyancy and the load path, coat carved surfaces with a product allowed near aquatic life, and protect your lungs, eyes, and skin throughout.
Do those things and you can build a lightweight, durable hardscape. Cut corners (especially on product choice or cure) and you risk a background that detaches or exposes animals to uncured chemicals.
The single most important habit is to read each product’s current label and technical data before you trust it in a tank with livestock.
Affiliate Disclosure
This article contains Amazon affiliate links. As an Amazon Associate I earn from qualifying purchases. If you use these links, the site may earn a commission at no extra cost to you. Product availability, price, and specifications can change. Check the current listing before buying.