
Moss Propagation Box Guide: Setup, Growth & Mold Control
Build a moss propagation box with a monitored reservoir, airy low-nutrient substrate, low-mineral water, and springtails, then propagate and acclimate moss.
Priya Patel · Published 2025-12-02 · 21 min read
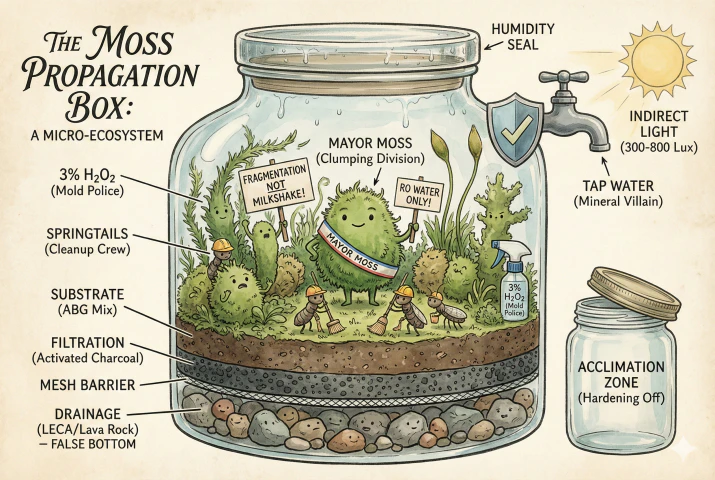
Key Takeaways
- A moss propagation box keeps humidity high and steady, but the useful moisture level depends on species, sensor placement, and how much liquid water sits on the leaves and substrate.
- Build distinct layers with a visible reservoir, mesh barrier, charcoal, and low-nutrient substrate. The false bottom stores excess water but does not guarantee an unsaturated root zone, so watch the waterline and remove water if it climbs.
- Use low-mineral water such as RO or collected rainwater, then test it. Local source water varies in hardness, alkalinity, disinfectants, and other dissolved material.
- Propagate by fragmentation or division and press the pieces into firm substrate contact. Avoid dairy-based slurry in a warm, sealed box because it can spoil and encourage mold.
- Springtails can graze some mold, but physical cleanup, airflow, moisture correction, and gradual hardening off still determine whether the culture succeeds.
Set Up a Box Moss Can Actually Grow In
Growing mosses in a controlled box combines humidity and light management, clean water, and careful handling of a small living system. Unlike vascular plants, which rely on extensive roots for water and nutrients, mosses mostly take up water over their surfaces and track environmental moisture more closely, which makes them well suited to propagation but sensitive to abrupt changes.
A moss propagation box is a sealed or partly vented container that holds humidity while giving you control over light, water, and airflow.
A reliable moss propagation system depends on three things working together. An airy substrate, a visible and controlled water reserve, and a humid atmosphere that does not stay stagnant.
The goal is a low-maintenance vessel that works for a tabletop grower or someone producing stock for bioactive vivariums. It still needs regular monitoring, not zero attention.
When the box will supply a larger bioactive terrarium, finish the destination’s drainage, substrate, and cleanup crew before transferring the moss.
I begin with a three-millimeter shim at one corner and photograph condensation and moss tips two hours after lights-on for three days. The shim restores the vent after cleaning or moving the box, while the fixed point in the light cycle keeps condensation patterns comparable.
I change the gap by one three-millimeter step every three days while checking the center and four corners. Three days exposes a persistent pattern before the next adjustment. When the center stays wet and an edge dries, I redistribute airflow rather than opening the entire box further.
How Mosses Handle Water
Bryophytes are poikilohydric, meaning they regulate internal water content much less tightly than vascular plants and tend to track surrounding moisture. How quickly and completely they do so varies with species, growth form, the boundary layer, and any internal water-conducting tissue.
Hydration is a continuum rather than a simple active-or-dormant switch. Mosses can sit at intermediate water states with partial activity, and desiccation tolerance differs substantially between species. This is why box depth and water choice matter without being dictated by a single trait.
Desiccation tolerance in bryophytes relates to elasticity but is independent of cell wall thickness and photosynthesis
Choose and Place the Container
The vessel shapes gas exchange, light penetration, and humidity retention. A simple plastic box can keep moss alive. A few choices about material, size, and placement can make growth steadier and mold less likely.
Pick a Clear Container With Enough Room
The ideal container is a transparent box with a transparent lid so light reaches the moss, but the optical and thermal properties of the material matter.
Let In Light Without Direct Sun
Photosynthetically Active Radiation (PAR) must penetrate the lid. Clear polypropylene storage bins or polycarbonate containers are standard.
Glass terrariums offer better clarity and scratch resistance but are heavier and often don’t seal tightly enough for high-humidity propagation unless designed for it.
A textured plastic lid can help by diffusing light. Keep the box out of direct sun. A closed, transparent container absorbs sunlight and loses heat slowly because convection and evaporative cooling are limited inside, so internal temperatures can climb well above the room and cook the moss. The speed and size of the rise depend on the container, sunlight, and starting temperature, so avoid direct sun rather than relying on a fixed safe time.
Leave Space Above the Moss
Leave enough room for new growth and to keep the lid off the foliage. Extra headroom does not prevent overheating, so keeping the box out of direct sun still matters most.
Headroom does affect where condensation lands. In a sealed system, water evaporates from the substrate and moss and condenses on the coolest surfaces (the lid and walls).
In a very shallow box, that condensation sits close to the moss, and water dripping from the lid can fall directly onto the foliage.
In some mosses a persistent film of water on the leaves (phyllids) limits CO₂ exchange, and constant waterlogging can encourage decay, though not every wet leaf leads to rot. It depends on the species and conditions.
More height moves the lid away from the moss, but it does not stop condensation from forming or dripping under gravity, so still watch for pooling water on the foliage.
2.2 The Closed System Water Cycle
In a sealed box, water cycles through evaporation, condensation, and precipitation (evaporating from the substrate and moss, condensing on cooler walls, and dripping back down).
Manage Humidity and Condensation
High, steady humidity keeps moss hydrated and photosynthesizing without drying out. A common starting point is roughly 70–90% relative humidity, but treat that as a rough guide rather than a target. Cheap hygrometers drift with temperature and condensation, RH readings depend on where the sensor sits, and what actually matters to the moss is the water on its surface and in the substrate.
Plant anatomy The leafy moss you are growing is the gametophyte, which does not have stomata. The pores found in some mosses occur on the spore capsule, or sporophyte, rather than on these leaves.
Think in terms of surface moisture and turgor, not open leaf pores.
Stagnant, damp conditions can favor fungal problems, so some growers crack the lid occasionally for gas exchange. Venting frequency depends on the container’s leakiness, the amount of living and decaying material, light, and temperature. There is no measured once-a-week rule, so watch condensation, smell, and mold and vent when the box needs it. Keeping the box mostly closed can help protonema and new shoots establish, but growth still depends on light, temperature, CO₂, clean materials, and species.
3. The Bottom Layers (Reservoir and Separation)
Treat the False Bottom as a Reservoir
Many terrariums and propagation boxes start with a coarse bottom layer. In an open pot this improves drainage, but a sealed box has no outlet, so here it acts as a small reservoir that collects some excess water below the substrate where you can see it. It does not by itself keep the substrate unsaturated. Because fine substrate sits on a coarse layer, a capillary break at the boundary can leave a saturated perched zone just above the coarse material. Treat the false bottom as a finite reservoir to monitor, not a guarantee of aeration.
3.1 Layer 1 (The Drainage Reservoir)
Watch the Reservoir Waterline
A shallow reservoir layer (many growers use something on the order of half an inch) gives a little margin if you overwater, but there is no single correct depth. How much water it can actually hold depends on the box’s footprint and how much water you add.
What matters more than a fixed number is watching the visible waterline. Keep it well below the substrate, and if it climbs toward the substrate, siphon or pour off the excess.
A turkey baster or a length of tubing works for removing water without disturbing the layers.
Recognize Anoxia Before It Spreads
If the substrate stays waterlogged, oxygen gets used up and decay sets in, which can harm the moss and its rhizoids.
Severe anoxia can produce foul-smelling reduced compounds, and hydrogen sulfide is possible where sulfate and the right microbes are present, but a rotten-egg smell is not guaranteed, so don’t rely on it alone.
Judge the substrate by its overall condition (smell, color, standing water, and how the moss is doing), and keep excess water out rather than assuming the layer below has solved the problem.
Choose the Reservoir Material
Plain rinsed gravel is the economical choice for a small box that will stay in one place.
LECA Clay Pebbles
Lightweight expanded clay aggregate (LECA) is one practical reservoir material. Check the exact grade’s particle range, dust, strength, pH and EC effect, then choose a size that leaves useful voids and cannot pass through the box’s mesh or false bottom.
Choose LECA when
You are building a larger or frequently moved box and want a lighter layer that leaves visible reservoir space and can be rinsed and reused.
Skip LECA when
Weight does not matter or the budget would be better spent on clean moss stock and a reliable light.
Whatever you use, rinse it thoroughly first. Dust and fines can migrate up into the mesh or form sludge that clogs the voids. LECA can float when first added, so wet it before building the layers and keep the mesh secure. It can be cleaned and reused, but not indefinitely. Salts and biofilm build up, pieces break down over time, and heavily fouled media are better replaced.
3.2 Layer 2 (The Mesh Barrier)
Use Rot-Resistant Mesh
A barrier between the reservoir and the substrate helps, or fine substrate washes down into the voids and fills the reservoir.
Fiberglass window screening is a common, practical choice. It resists rot and passes water while holding back fine substrate.
Fiberglass screen is usually coated (often with PVC), and coatings and formulations differ between products, so pick a plain horticultural or window screen rather than assuming any mesh is chemically inert.
Avoid Organic Fabrics
Avoid organic fabrics like cotton, burlap, or cheesecloth. They decompose fast in a warm, humid box and let the substrate collapse into the layer below.
3.3 Layer 3 (The Charcoal Layer)
Activated Carbon vs Horticultural Charcoal
Many growers add charcoal above the mesh or mixed into the substrate. It plays two different roles worth separating. Activated carbon is processed for high surface area and can adsorb some odors and volatile organic compounds, but how much and for how long depends on the specific compounds, moisture, and its capacity. Its adsorption is finite and it is not a filter that keeps working forever. Horticultural charcoal is coarser and less effective as an adsorbent. Its main value is as a chunky, porous particle that adds air space to the mix.
It too changes over time as it fragments and gathers biofilm.
Use Charcoal as Structure
For most moss boxes, coarse horticultural charcoal mixed into the substrate is a reasonable structural amendment. Don’t count on either type as a permanent chemical safeguard.
4. The Substrate
Use a Low-Nutrient, Open Structure
The substrate anchors the moss and holds moisture. For moss, aim for a low-nutrient mix that stays open rather than compacting, with a pH suited to the species.
Rich, fine potting soils can compact and can feed algae, but they are not all unusable. The concern is high nutrient load and poor structure, not any soil at all.
4.1 The ABG Mix Standard
ABG mix is a widely used bioactive-terrarium substrate associated with the Atlanta Botanical Garden. It is a long-standing community recipe rather than a single published specification, and it works reasonably well for moss. Its reputation for lasting without turning to sludge comes from hobby experience. How well any mix holds up still depends on the species and how you manage water in the box.
Start With a Flexible Recipe
A commonly cited starting mix uses 2 parts tree fern fiber for structure, 1 part sphagnum peat for acidity and water retention, 2 parts orchid bark for bulk and aeration, 1 part sphagnum moss for hydration, and 1 part charcoal. Ratios vary between sources, so treat them as a starting point. Peat harvesting and tree-fern fiber can raise habitat, carbon, and conservation concerns, so many growers substitute coir and other renewable materials where they can.
Compare layer functions, particle sizes, and alternative recipes in the terrarium substrate and soil-mix guide before scaling the recipe to a deep box.
Simpler Mixes for Pure Moss
For pure moss propagation, a simpler mix often works. Sphagnum peat or coco coir as the base (peat leans acidic, which suits acid-loving mosses. Rinsed coir is nearer neutral and avoids peat harvesting), plus perlite or pumice for air space, since a mix that compacts and stays waterlogged can suffocate the moss.
Avoid Fertilized Potting Soil
Avoid all-purpose potting soil that is heavily fertilized. A high nutrient load can encourage algae and mold that outcompete slow-growing moss, and the salts can stress it.
The problem is the fertilizer and fine, dense texture, not soil in general. Moss species differ in what they tolerate.
4.2 Chemical and Physical Soil Properties
Match the substrate to the species, and identify the moss first. As a general direction, cushion mosses such as Leucobryum are associated with acidic conditions, so a peat-heavier mix leans the right way. Thuidium delicatulum (fern moss) is often found on neutral soil or rotting logs, so less peat and more bark or coir suits it better.
Treat these as habitat tendencies, not exact pH set points. Polytrichum, for instance, is a large genus that spans several habitats. Measure the actual pH of your mix when it matters instead of assuming a number.
5. Planting and Establishment
With the structure complete (box → drainage → mesh → charcoal → substrate), the focus shifts to the living elements.
5.1 Preparation and Sourcing
Moisten the substrate before planting (aim for moist, not soggy). A squeeze test (a drop or two but no stream) is a rough guide. Different substrates hold water differently, so use it as a feel-check rather than a precise measure.
Mind sourcing ethics. Do not harvest moss from the wild without the landowner’s or land manager’s permission and a check of local law because some species and sites are protected. Taking small fragments is gentler than removing whole colonies, but a small take is not automatically sustainable. For a rare species, a small population, or a sensitive habitat, even minor collection can matter, and moss can be slow to recover. Try to identify what you are taking, keep the proportion you remove low, and quarantine wild-collected moss before adding it to an established box because it can carry pests or pathogens. Cultivated or nursery moss avoids most of these concerns.
5.2 Propagation Techniques (Fragmentation vs. Division vs. The Milkshake)
Many mosses have a strong capacity to regenerate from small pieces of tissue, a useful trait for propagation, though this varies with species, tissue age, and condition rather than being true of literally any cell in every moss.
Fragmentation for Spreading Stock
The fragmentation method works well for spreading limited stock over a large area, especially sheet mosses. Tear or cut the moss into small fragments (roughly half a centimetre is a common rule of thumb, but there is nothing magic about the exact size), scatter them evenly over the substrate, and press for contact.
Fragmented moss tissue can regrow, often by forming a protonema (a fine, thread-like green stage) that then produces leafy shoots.
Not every fragment takes, and coverage builds over weeks to months rather than on a fixed schedule, so expect uneven fill at first.
Division for Cushion Mosses
The division method suits clumping (acrocarpous) mosses such as Leucobryum, which grow as cushions rather than spreading horizontally. Break a large cushion into small plugs and nestle them into the substrate.
Separate Fast and Slow Growers
Keeping faster- and slower-growing mosses in separate areas can make them easier to manage, since a vigorous spreader can crowd a slower neighbour under the right conditions.
Avoid Dairy Slurry in Sealed Boxes
Skip the moss milkshake approach, which blends moss with buttermilk or yogurt into a paintable slurry, in a sealed box. The dairy adds sugars and proteins that can spoil in a warm, humid, closed container and encourage mold. Plain water-based fragmentation or division avoids that risk and is the simpler default.
5.3 Planting Technique (The Importance of Contact)
Moss has no true roots. It anchors with rhizoids, thread-like filaments whose main job is attachment rather than nutrient uptake the way vascular-plant roots work.
Gently pressing the moss into firm contact with the substrate helps. Good contact aids anchoring and lets water wick up from the substrate, whereas a large air gap underneath can leave a fragment dry and loose.
Contact helps establishment, but it is not the single thing that decides whether the moss survives.
6. Hydrology and Water Chemistry
Water quality is one of the more important variables in moss culture. Many mosses take up water largely over their surfaces rather than through roots, so what is dissolved in the water reaches the tissue readily.
How sensitive a given moss is to dissolved minerals and disinfectants still varies by species and by your local water, so this is a reason to test and choose your water, not to assume every moss reacts the same way.
6.1 The Danger of Tap Water
Disinfectants and Minerals
Municipal water usually contains residual chlorine or chloramine as a disinfectant. Residual levels vary between utilities and over time, and drinking-water limits are set for people, not moss, so tap water is not automatically fatal to moss or springtails, but the disinfectant and dissolved minerals are a reason many growers prefer low-mineral water, especially for sensitive species.
Hardness Is Species-Specific
Tap water also often carries calcium and magnesium. As water evaporates, these can leave visible deposits on the moss and box surfaces, and hard, alkaline water can be unfavourable for mosses adapted to acidic conditions.
It is not a universal poison, though (some bryophytes actually favour calcium-rich (calcareous) habitats) so the effect depends on the species and the water.
If you see whitish scale or the moss browning where deposits form, that is a cue to switch to lower-mineral water.
6.2 The Solution (RO and Rainwater)
RO and Rainwater Are Not Pure
Reverse-osmosis water or collected rainwater is a common choice for low-mineral water. Neither is truly zero dissolved solids. RO is low but not empty, and rainwater picks up ions, dust, metals, and microbes from the air and catchment, but both are usually much lower in minerals than hard tap water. The goal is to keep mineral input low because, in a closed box, salts that enter with the water tend to build up faster than they leave. Some are taken up, adsorbed, or removed when you harvest or drain, so this is a balance rather than one-way accumulation. Measure source-water EC or TDS and pH when mineral sensitivity is uncertain.
Collect Rainwater Carefully
If you collect rainwater, mind the catchment. Divert the first flush, store it clean and covered (to limit metals, bird droppings, and mosquitoes), and check its pH and EC rather than assuming it is pure.
7. The Bioactive Cleanup Crew (Springtails)
A closed, humid box rich in organic matter can favour mold. Broad fungicides can also harm the moss, so many growers lean on a living cleanup crew instead of chemicals, as one tool, alongside managing moisture and airflow.
7.1 Enter the Springtail (Collembola)
What Springtails Eat
Springtails are tiny, hexapod arthropods (detritivores that feed on fungi, decaying plant matter, and bacteria).
They roam the substrate and moss and can graze mold before it spreads, and their waste helps cycle nutrients back into the box.
Their diet and fungal preferences vary, though, so they can also graze beneficial fungi or move spores around. Think of them as a helper, not a guaranteed mold cure.
Evidence Has Limits
Research on the common terrarium species Folsomia candida shows it can interact with and help suppress certain fungi.
That work explores specific fungal pathogens under specific conditions rather than testing mold control in a sealed moss box, so it is supportive background, not proof that springtails will keep any given box mold-free.
Add Springtails Before Mold Becomes a Crisis
Buy a starter culture before mold appears when the box will remain consistently moist, pesticide-free, and warm enough for the population to establish. Skip it if the box will dry out repeatedly, receive broad fungicides, or stay waterlogged because springtails cannot correct those conditions. Culture format also matters. Charcoal cultures are commonly floated out with water, while soil- or substrate-based cultures are usually mixed in whole.
Choosing a Springtail Culture
A temperate springtail starter culture suits a consistently humid, pesticide-free box that needs an established cleanup crew, not an emergency mold treatment. Confirm the species with the supplier because diet and tolerances differ, and remember that container volume does not disclose a live count. Match the introduction method to the culture medium, follow the supplier’s directions, check shipping restrictions, and verify establishment before relying on the population. Springtails will not rescue saturated substrate, and spent medium must be disposed of responsibly so non-native invertebrates are not released outdoors.
Soil Allies. Exploring the Combined Potential of Folsomia candida and Trichoderma against Fusarium oxysporum
8. Maintenance and Environmental Control
A propagation box is low-maintenance but not no-maintenance, especially early on.
8.1 Lighting (The Goldilocks Zone)
Measure Above the Compensation Point
Moss tolerates low light but grows slowly in it. To propagate, you want light above the compensation point, the level where photosynthesis at least matches respiration, but that point depends on the species, temperature, and hydration, so there is no single number that fits all mosses.
Use Indirect Light and Check Heat
Aim for bright, indirect light rather than a fixed lux figure. Published moss-culture studies span a wide range of light levels, from a few tens of µmol m⁻² s⁻¹ up to several thousand lux and beyond, depending on species and setup, so a low reading is not automatically enough and a specific number cannot be transferred between species or systems. Lux does not translate cleanly to the PAR plants use. Keep the box out of direct sun because a closed transparent container heats quickly. A window with bright but indirect light can work, but judge the actual light rather than relying on compass direction.
LEDs Still Add Heat
Full-spectrum LED grow lights are a practical option and run cooler than incandescent bulbs, but they are not heat-free. A full-spectrum label does not guarantee adequate intensity or coverage, and an LED placed close to the lid can still warm the box, so leave a gap and check the temperature.
A measured moss LED schedule provides a safer starting photoperiod than fixture marketing. Adjust it from growth, browning, and algae.
8.2 Mold Management and Remediation
Correct Causes First
Even with springtails, mold can appear, usually on wood, dead tissue, or decaying moss. Deal with it by addressing the cause first. Physically remove visible mold and the decaying material it is feeding on, take out overly wet or rotting debris, and correct excess moisture, poor airflow, or warmth. Improving ventilation and letting the surface dry a little often does more than any spray. Mold is not caused by humidity alone, so excess humidity is not the only explanation to check.
After removing rot and standing water, the terrarium mold-control product chooser separates the cases that call for measurement, airflow, drainage, or a cleanup crew, so the next purchase addresses the actual cause.
Be Cautious with Oxidizers
Be cautious with chemical treatments on living moss. Hydrogen peroxide is sometimes suggested for spot-treating mold, but even though it breaks down to water and oxygen, it is an oxidizer that can damage moss tissue and harm springtails and other beneficial microbes on contact. There is no well-established moss-specific safe concentration or contact time. Claims about no toxic residue refer to breakdown products, not to what happens to living cells during the reaction. If you feel you must try it, treat it as an experiment. Test on a small, expendable patch first, keep it off the springtails, and stop if the moss discolours. Prefer physical and environmental fixes.
8.3 Fertilization (The Foliar Approach)
Why Moss Needs Little Fertilizer
Moss generally needs little nutrition, and excess salts can stress it, so err on the side of under-feeding.
How much a given moss needs, and what nitrogen form it prefers, varies by species. Because mosses take up nutrients over their surfaces, feeding the substrate is not very effective for them and mainly adds salts.
Confirm Growth Before Feeding
Pale colour alone is not a reliable sign of a nutrient shortage, light, water, and species all affect colour, so confirm the moss is genuinely growing poorly before feeding.
If you do feed, use a very dilute foliar spray sparingly (well under label strength), pick a fertilizer suited to plants like moss, and treat it as a low-dose trial rather than a set schedule, watching for any salt stress.
Substrate Biology Supplies Some Nutrients
In a substrate-based box, the slow breakdown of organic matter (and springtail activity) supplies some nutrients on its own, though the amount is hard to quantify, so watch the moss rather than assuming it is always enough.
9. Acclimation and Harvest
Why Hardening Off Matters
Moss grown at near-100% humidity is adapted to those wet conditions, so moving it straight into a 40%-humidity living room can dry it out quickly. Its surfaces lose water rapidly in dry air. This is not an open-pore response because leafy moss has no stomata to open or close.
9.1 The Hardening Off Process
Over a couple of weeks or so, crack the lid gradually to lower the humidity in steps and let the moss adjust.
Treat this as a reversible trial rather than a guaranteed toughening process. Watch the colour, turgor, how well it recovers after you rehydrate it, and whether it keeps growing, and slow down or close the lid again if it starts to suffer.
Different species tolerate drying to different degrees.
Once it is handling drier air, the moss can move to terrariums, vivariums, or (if the species suits your climate and site) outdoor spots.
Match the destination to the species, and quarantine as needed if you are adding it to an existing planting.
A Few Linked Choices Then Attention
Building a moss propagation box comes down to a few linked choices. A layered base that holds a little excess water where you can see it, a low-nutrient substrate that stays open, a decomposer or two to help with mold, and low-mineral water with bright, indirect light.
None of these is a set-and-forget guarantee. They are settings to get roughly right and then adjust.
Make Monitoring Part of the Routine
Plan to check the box regularly rather than expecting it to run itself. A simple routine helps. Watch the waterline and drain excess, look for heavy condensation or pooling water on the moss, check for mold and off smells, keep the temperature and light steady, and see whether the springtails and the moss are actually holding on and growing.
Mosses are an old, resilient lineage, but a healthy box still comes from attention over weeks and months.
When established moss begins browning, separate dormancy, mineral buildup, excess light, and rot with the brown-moss troubleshooting sequence before replacing the culture.