
Scindapsus Treubii Moonlight Edema: The Watery Bumps
Scindapsus Treubii Moonlight can show watery bumps that look like edema. Learn the likely water-balance cause, how to rule out pests and disease, and the cabinet changes that help.
Jordan Cole · Published 2026-06-12 · 20 min read
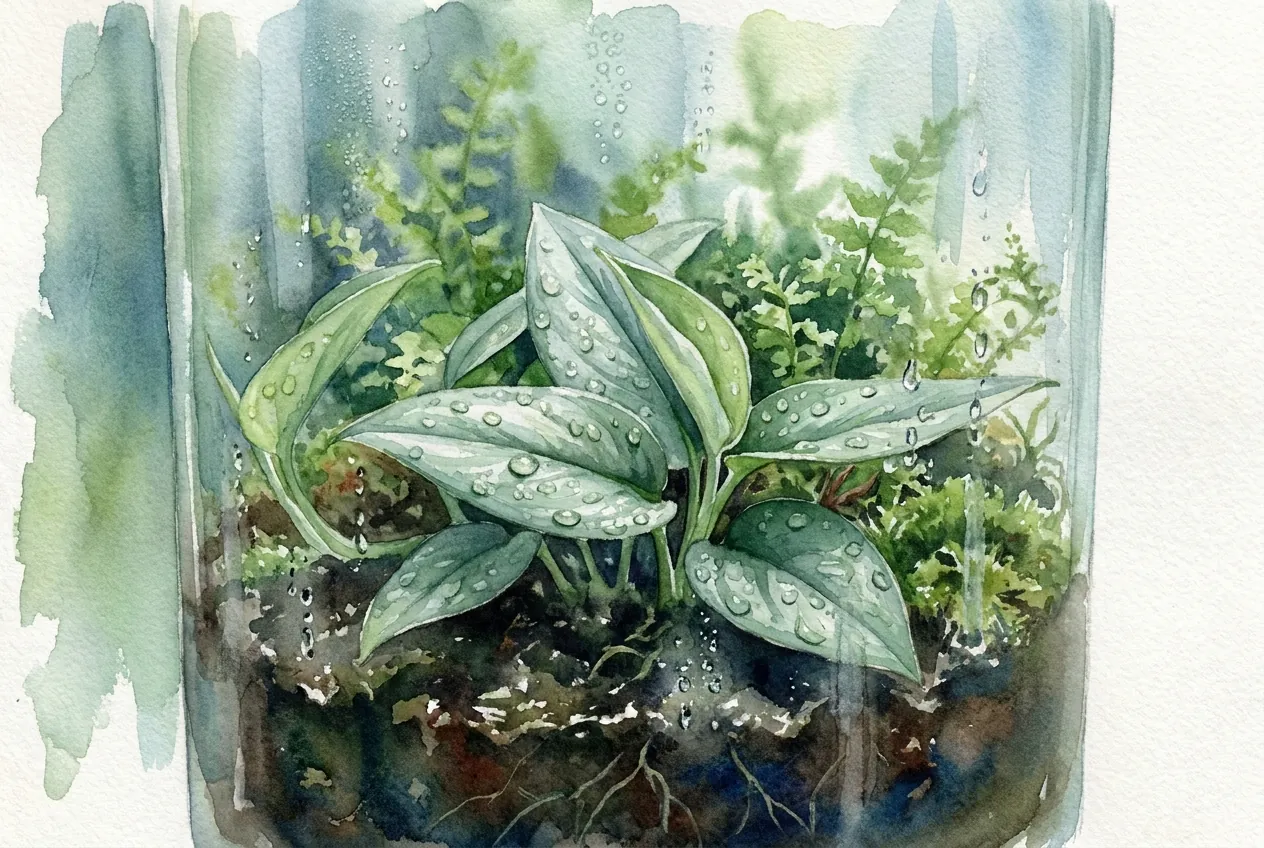
Key Takeaways
- Edema is a water-balance disorder, not an infectious disease or a pest. Once it is confirmed, sprays and fungicides do not correct the cause.
- A humid, still, dim cabinet raises edema risk. Low VPD suppresses transpiration while the root zone stays wet.
- Fused, pest-free bumps on the underside are consistent with edema, but they do not confirm it. Rule out pests and disease with repeated inspection.
- Ease the water balance with gentle airflow first. Then adjust watering to the morning and lower humidity gradually.
- Corky bumps are permanent scars. Judge recovery by clean new growth while keeping the cultivar humid, bright, and gently ventilated.
Translucent, blister-like bumps on the underside of a Scindapsus treubii ‘Moonlight’ are often edema, a water-balance problem rather than a bug or blight. It can appear when roots take up water faster than leaves release it, especially in a closed, humid cabinet.
Bumps alone do not confirm edema, so rule out thrips, mites, and leaf-spot disease before changing the cabinet.
Once pests and disease are unlikely, improve gentle airflow, let the root zone dry appropriately, and lower excessive humidity gradually.
What is edema, and is it a disease or a pest?
Edema is a non-infectious physiological disorder, not a disease or a pest. University of Connecticut Extension states it plainly. Oedema is caused by an imbalance of the plant’s water uptake and water loss.
No fungus, bacterium, virus, or insect is involved.
That changes your response once edema is actually confirmed. A fungicide, miticide, or insecticide does not touch a water-balance problem.
Before you are sure, though, do not use that reasoning to rule pests and pathogens out. Identify what you are dealing with first, and follow product labels if you do treat.
With side lighting, I photograph the same leaf in the morning and evening and mark new translucent or corky points. Edema can be easier to see before a spot hardens and changes color.
The photos are paired with pot weight, night temperature, humidity, and watering time. A pattern after cool wet nights is more informative than humidity alone.
Leaves produced after the watering and airflow change are how I judge the correction. Existing corky tissue will remain, so I do not keep reducing water in an attempt to erase old scars.
Is edema contagious between plants in my cabinet?
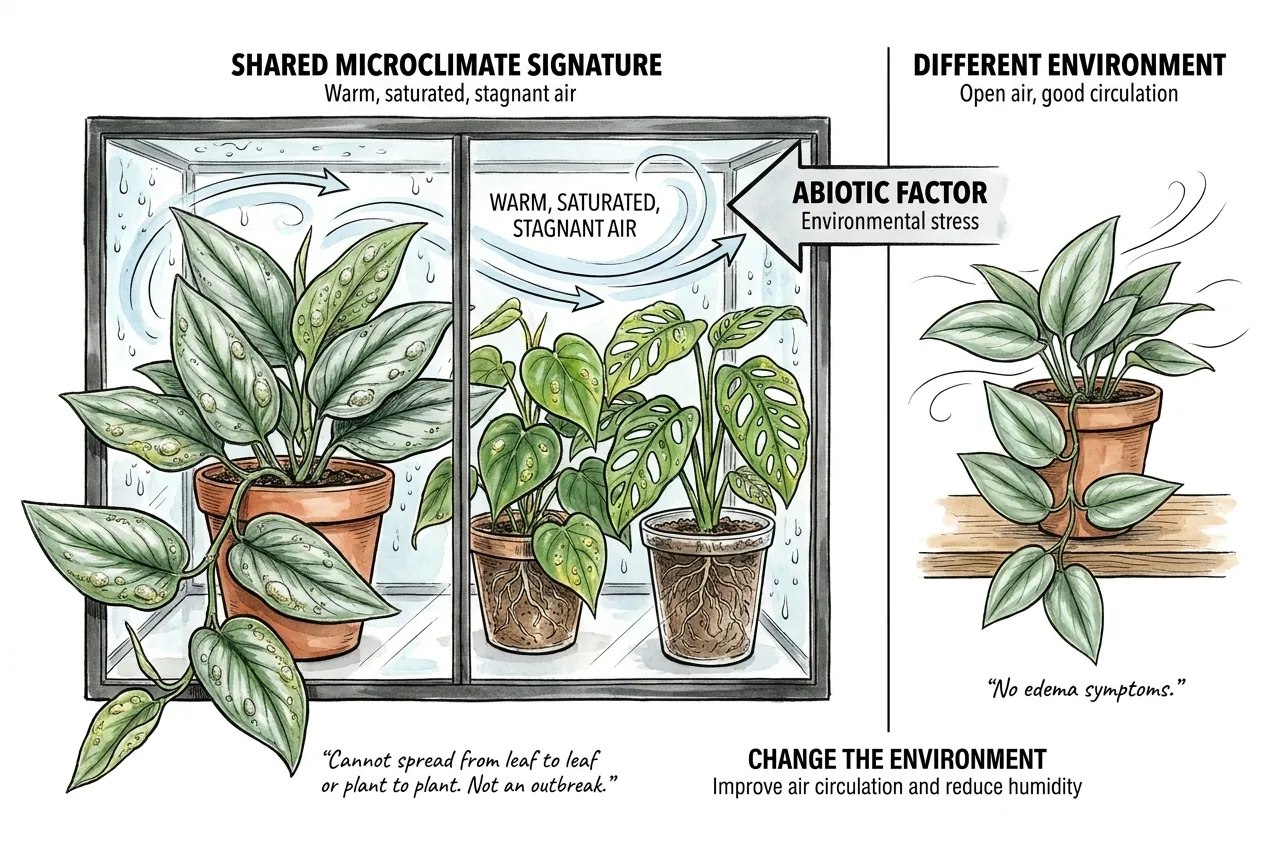
Edema itself is abiotic, so it does not spread from leaf to leaf or plant to plant. If several plants in one cabinet bump up the same week, a shared microclimate is one likely explanation.
It is not the only one, though. A common source of pests, contaminated water, spray injury, or a shared root-zone problem can also affect several plants at once.
Until you have ruled pests and disease out, keep new or unfamiliar plants separated and limit shared tools and water, then work on the enclosure they live in.
Which plants get edema, and why is Scindapsus one of them?
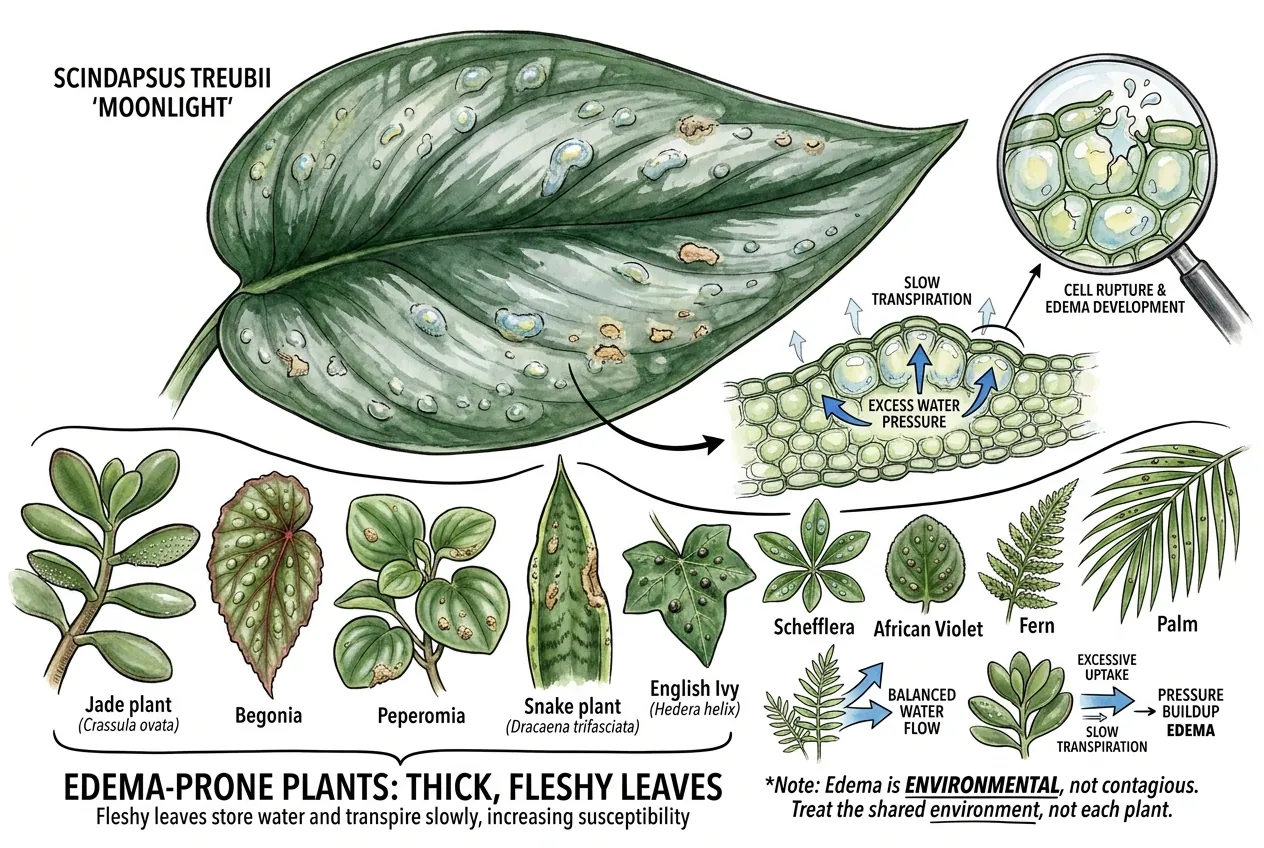
Extension lists of susceptible indoor plants include ivy geraniums, begonias, jade, African violets, English ivy, schefflera, snake plant, peperomia, ferns, and palms.
Those lists do not name Scindapsus, and they span both thick-leaved and thin-leaved species, so leaf thickness is not the only factor.
Susceptibility depends on the species or cultivar and the environment.
Edema can affect many indoor plants, including jade and peperomia. Scindapsus is not universally documented as especially susceptible, so use the symptom pattern and your growing conditions rather than assuming every bump on this plant is edema.
Note
Confirmed edema is not contagious. If several cabinet plants show bumps at once, a shared environment is a likely cause, but rule out shared pests, water, or spray injury before you stop watching each plant.
Why do the watery bumps actually form?
Edema forms when a leaf takes in more water than it can release. The affected tissue swells, ruptures, and later dries into a corky scar.
Humid, still air slows evaporation from the leaf while wet roots can keep supplying water. This imbalance is the part you can change.
Why do the bumps become permanent?
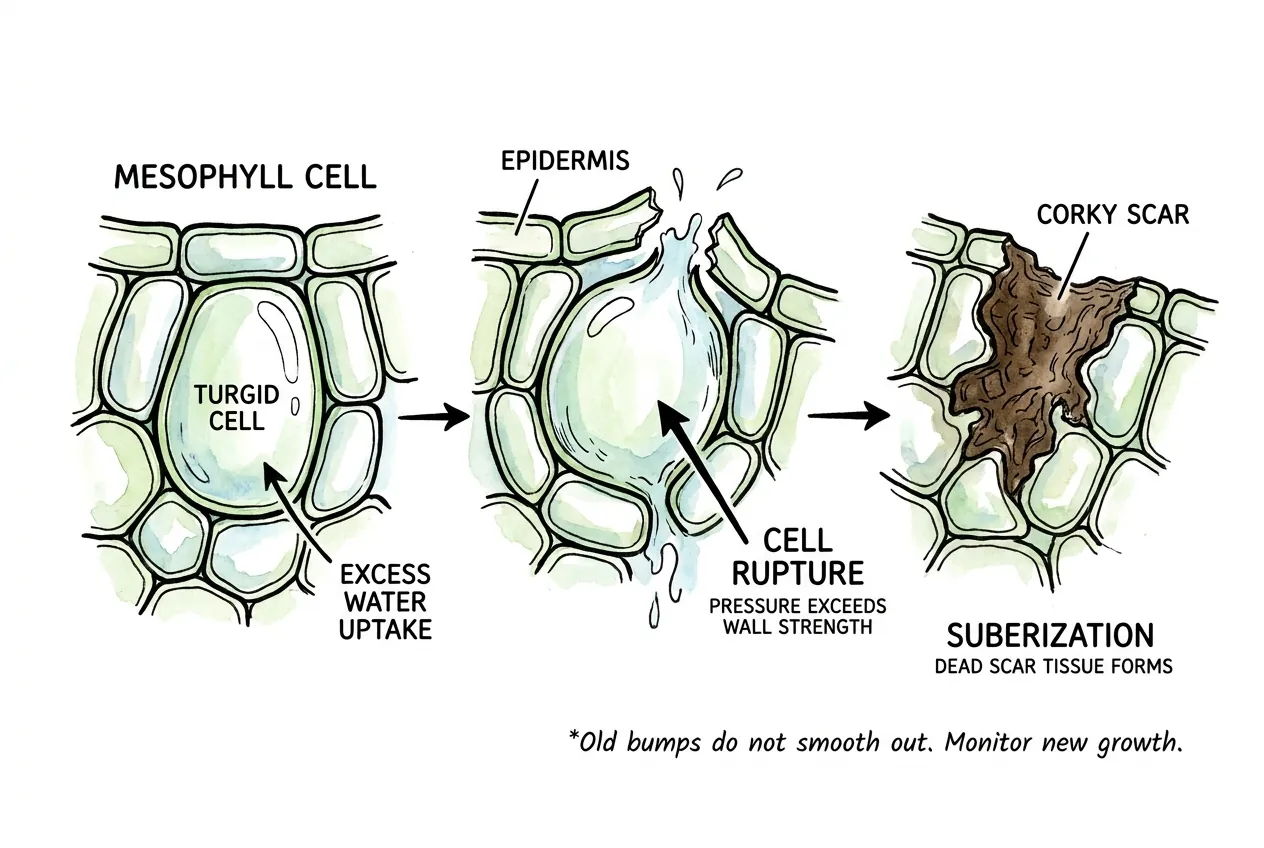
Early water-soaked spots can become raised blisters and then dry, tan or brown corky bumps. Those scars usually remain on the old leaf.
Judge recovery by clean new leaves, not by whether old scars disappear. Take dated photos as you adjust conditions so you can see whether new damage has stopped.
Why are the bumps on the underside and between the veins?
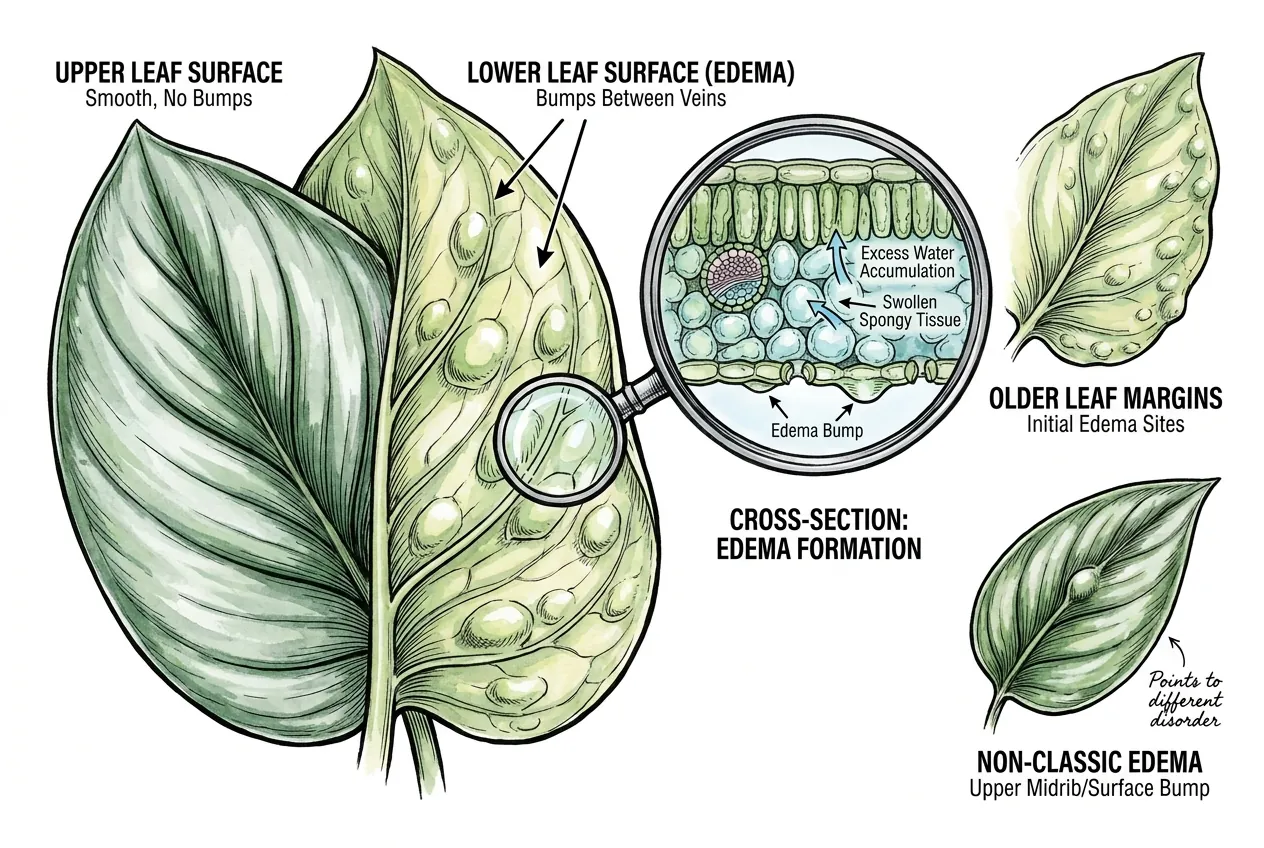
Edema most often shows up on the lower leaf surface, between the veins. Utah State puts the bumps predominantly on the lower leaf surface, and University of Wisconsin Horticulture adds that they form on the undersides of mostly older leaves, often beginning at the leaf margins.
Flip a suspect leaf and inspect the underside first, since that is the most common location. This is a tendency, not a rule. Depending on the species, edema and the closely related intumescence can also appear on the upper surface, along veins, or on stems and petioles.
So bumps on top do not rule edema out on their own.
Is guttation related to edema?
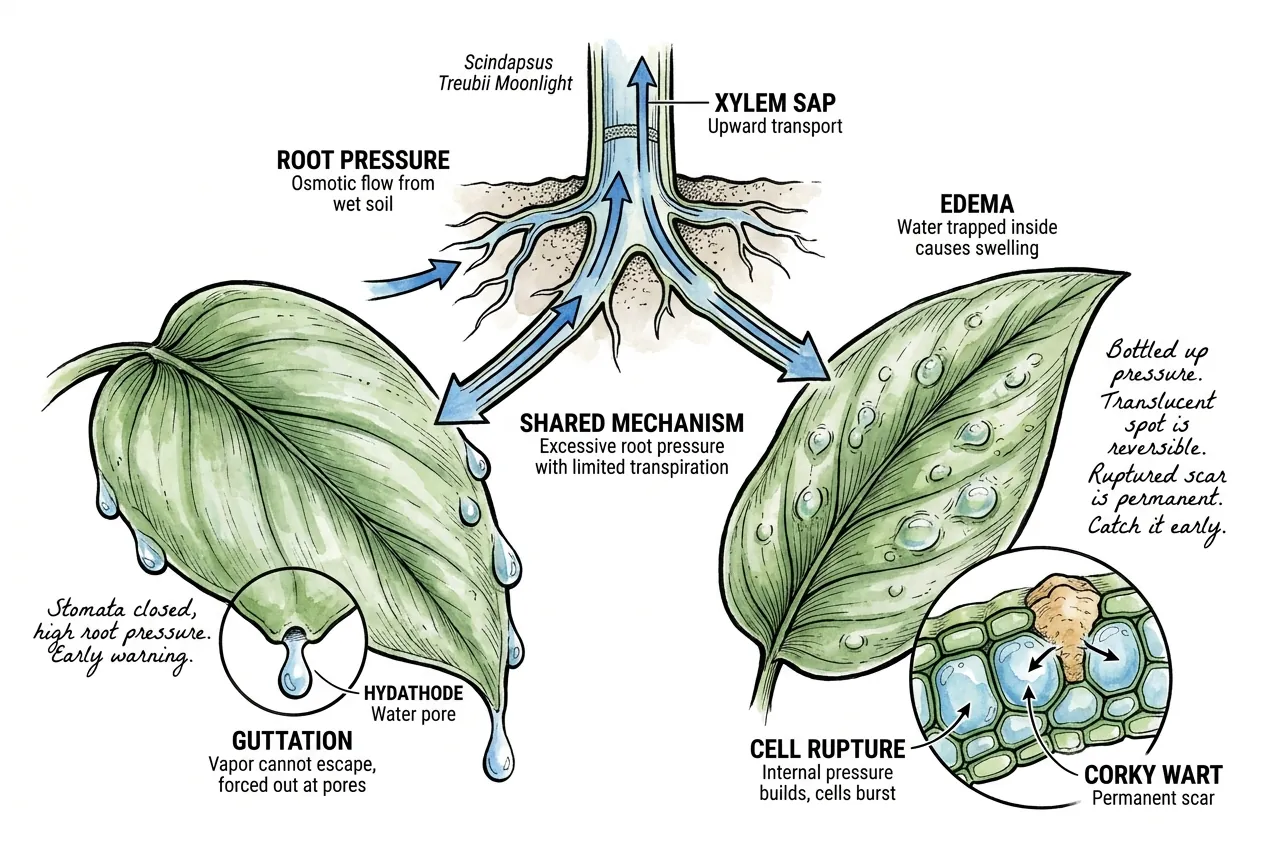
They are related through the same plumbing. Root pressure builds when transpiration stalls and the root zone is wet. It pushes xylem sap upward, and some of it can leave at the leaf edges as guttation droplets.
Root pressure is generated osmotically in the roots and tends to peak at night when stomata close. Beads of water on your leaf tips at dawn inside a closed cabinet are usually guttation, though dew, mist, and condensation can look similar.
Note that guttation is not simply a warning sign of edema. University of Missouri IPM describes guttation through the hydathodes as a pressure release that can actually reduce edema.
So read tip droplets as a sign of high root pressure and low transpiration, the same conditions linked to edema, rather than proof that bumps are coming.
Remember
A translucent water-soaked spot is an early stage, before the cells rupture. Once a spot ruptures into a corky tan wart, that scar is permanent.
Correcting conditions early helps prevent new lesions. It does not restore tissue that has already scarred.
Why a Plant Cabinet Can Trigger Edema
A cabinet becomes risky when warm, wet roots meet dim, still, near-saturated air. The leaf then releases water slowly while the roots may still absorb it.
VPD is a humidity-and-temperature measurement that roughly describes how easily a leaf can release water. You do not need to chase a perfect number. Treat very high humidity, condensation, still air, and wet mix as signs that the cabinet needs more drying capacity.
Use Humidity as a Warning, Not a Fixed Target
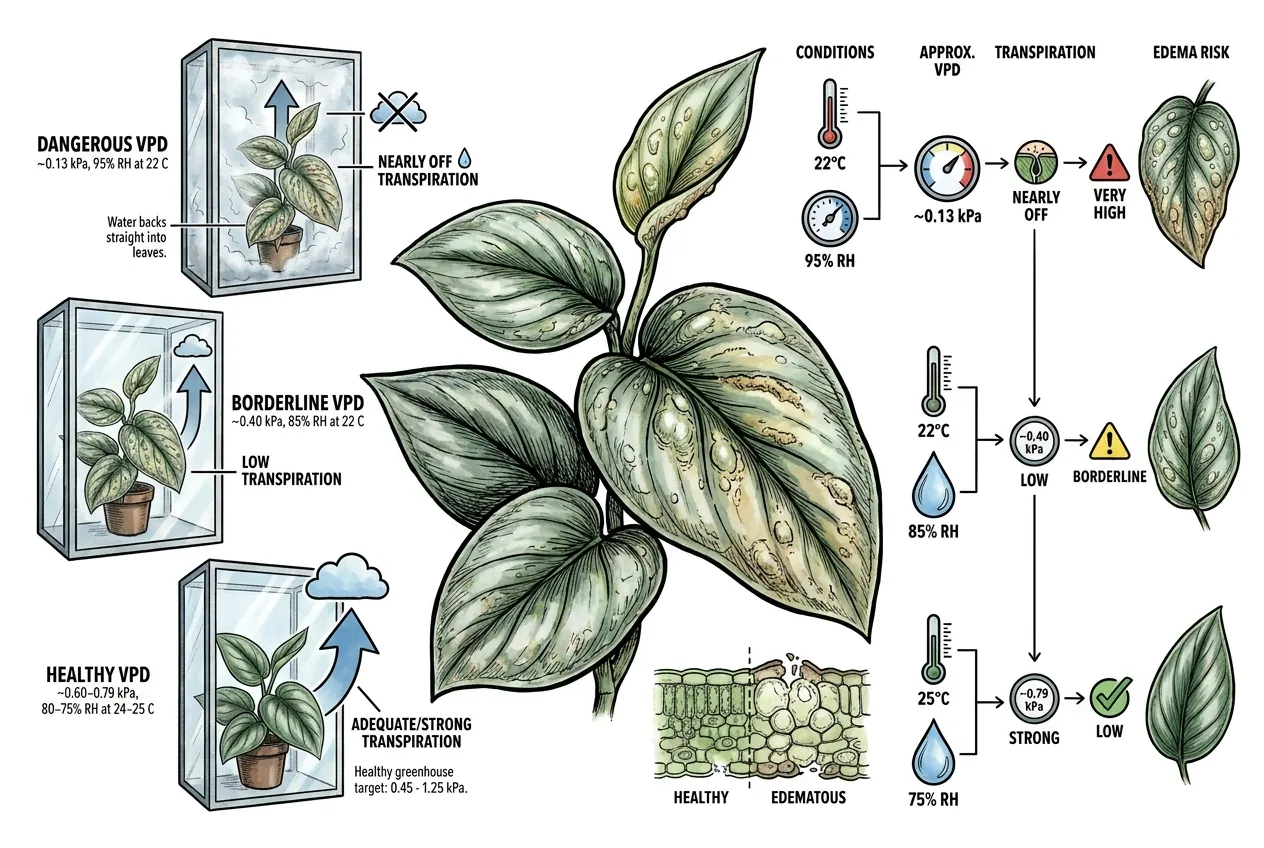
Humidity readings become more useful when you read them with temperature, airflow, light, and soil moisture. The same humidity can be less troublesome in a warm, bright, ventilated cabinet than in a cool, dark, sealed one.
Examples of Cabinet Conditions
These are practical risk cues, not a diagnosed Scindapsus threshold.
| Conditions | What it tells you | Edema risk |
|---|---|---|
| Near saturation with condensation or still air | Leaves release water very slowly | High |
| Very humid, cool, and poorly ventilated | Watch the root zone and add gentle airflow | Higher |
| Humid with gentle airflow and bright indirect light | Monitor for new bumps and saturated media | Moderate |
| Humid but ventilated with a draining mix | Often easier to manage | Lower |
| Moderate humidity with airflow and adequate light | Leaves can usually dry more readily | Lower |
When leaves remain wet, condensation forms, or humidity stays near saturation, improve airflow and let the mix dry more between waterings. Do not compensate by abruptly turning a tropical cabinet dry.
How do low light and poor airflow make it worse?
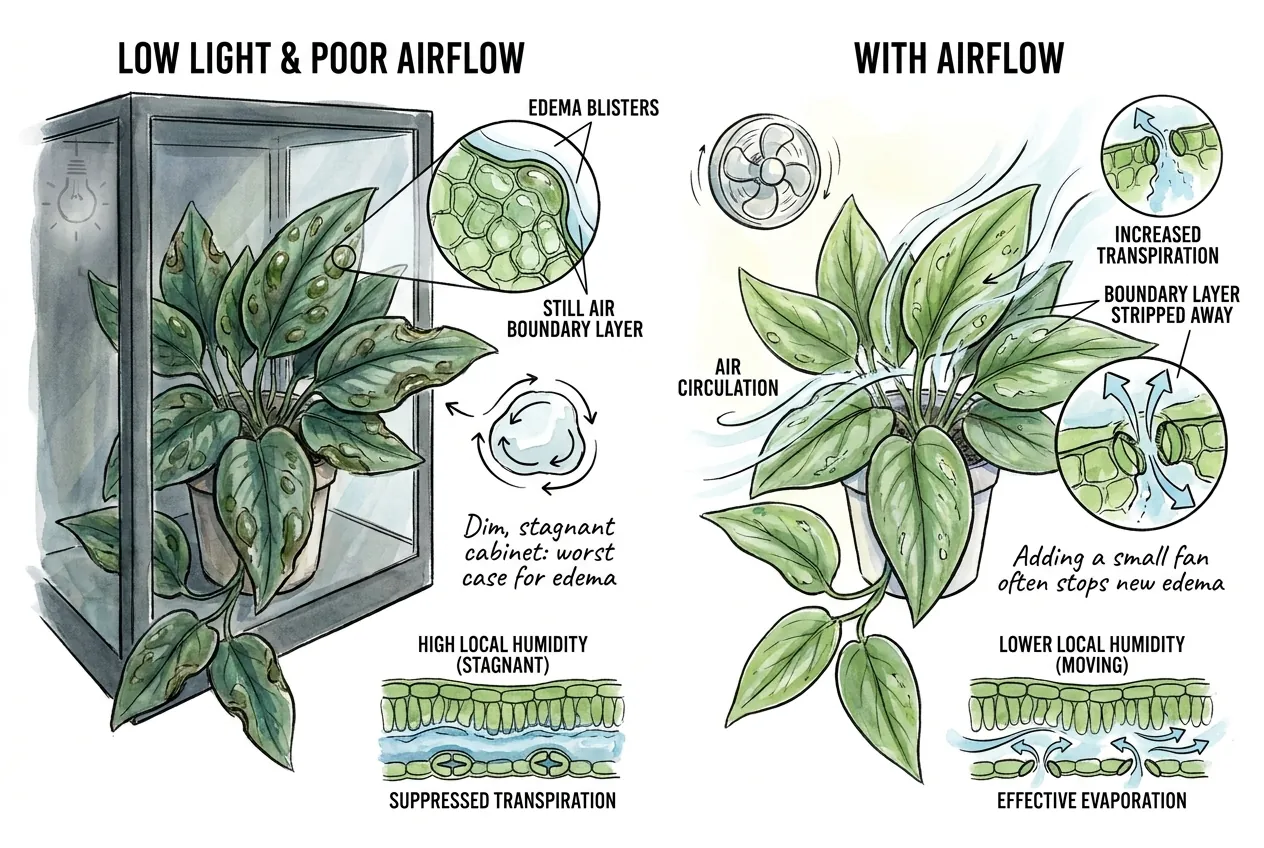
Low light and still air both slow the plant’s ability to release water. A dim, stagnant cabinet is therefore more likely to trigger edema than one with adequate light and gentle circulation.
Still air leaves a humid film around the leaf even when the cabinet sensor looks acceptable. Gentle air movement breaks up that film, which is why a small fan can help before you make a large humidity change.
Check What Changed in the Cabinet
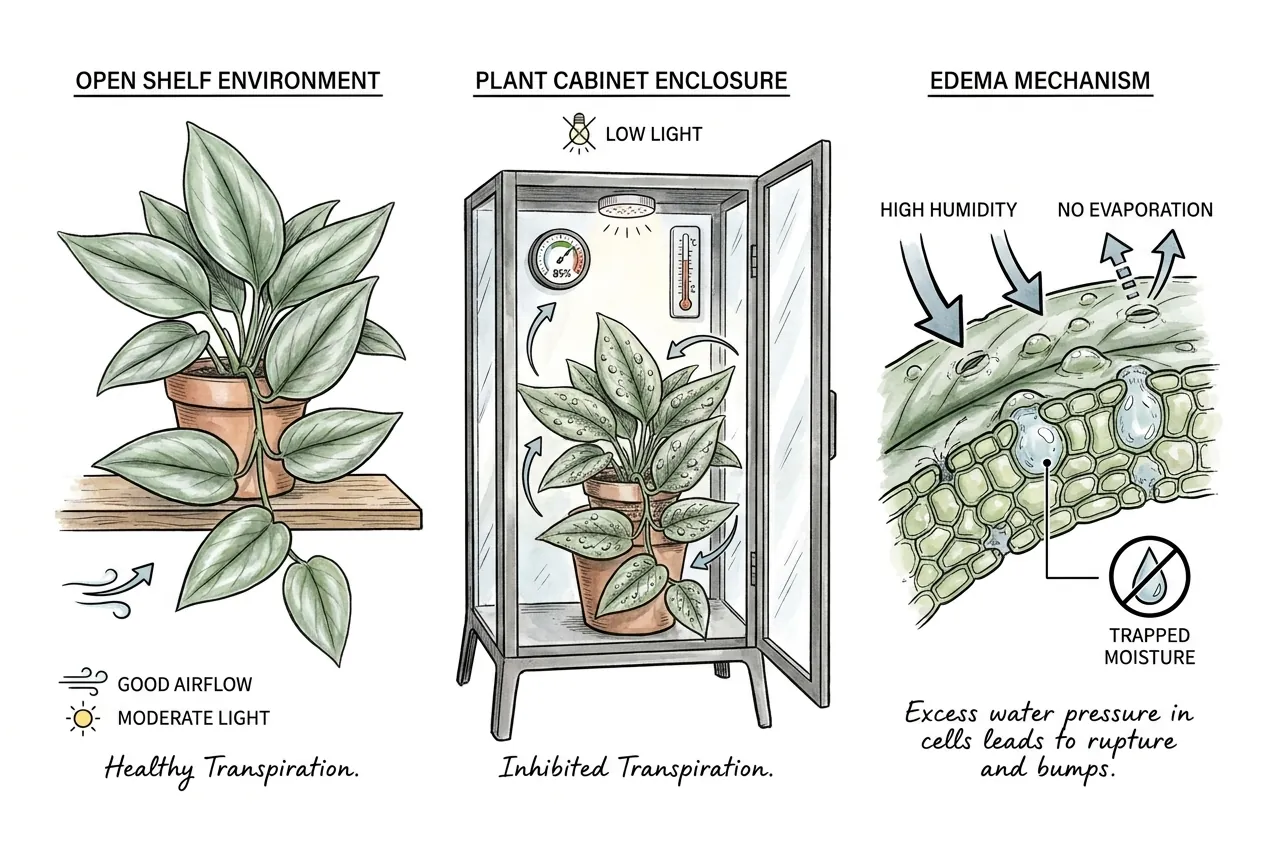
A cabinet can combine high humidity, low light, wet media, and poor ventilation in a small space. If symptoms began after a move, compare the old and new conditions before blaming one setting.
Check for recent changes to light, misting, watering, temperature, airflow, or potting mix. Correct the clearest mismatch first and watch the next leaf rather than changing everything at once.
How do I identify edema on a Moonlight leaf?
Edema is generally described as progressing on the lower leaf surface from translucent water-soaked spots, to raised glassy blisters, to hard tan-to-brown corky warts.
Early spots are often small, on the order of 1 to 2 mm, on the undersides of leaves. Whether it follows this exact sequence on any given Moonlight leaf has not been documented, so use the stages as a rough guide.
Reading the stage helps you judge urgency and tells you whether a spot is early or already scarred. It does not mean an early spot is guaranteed to recover.
What does each stage look like?
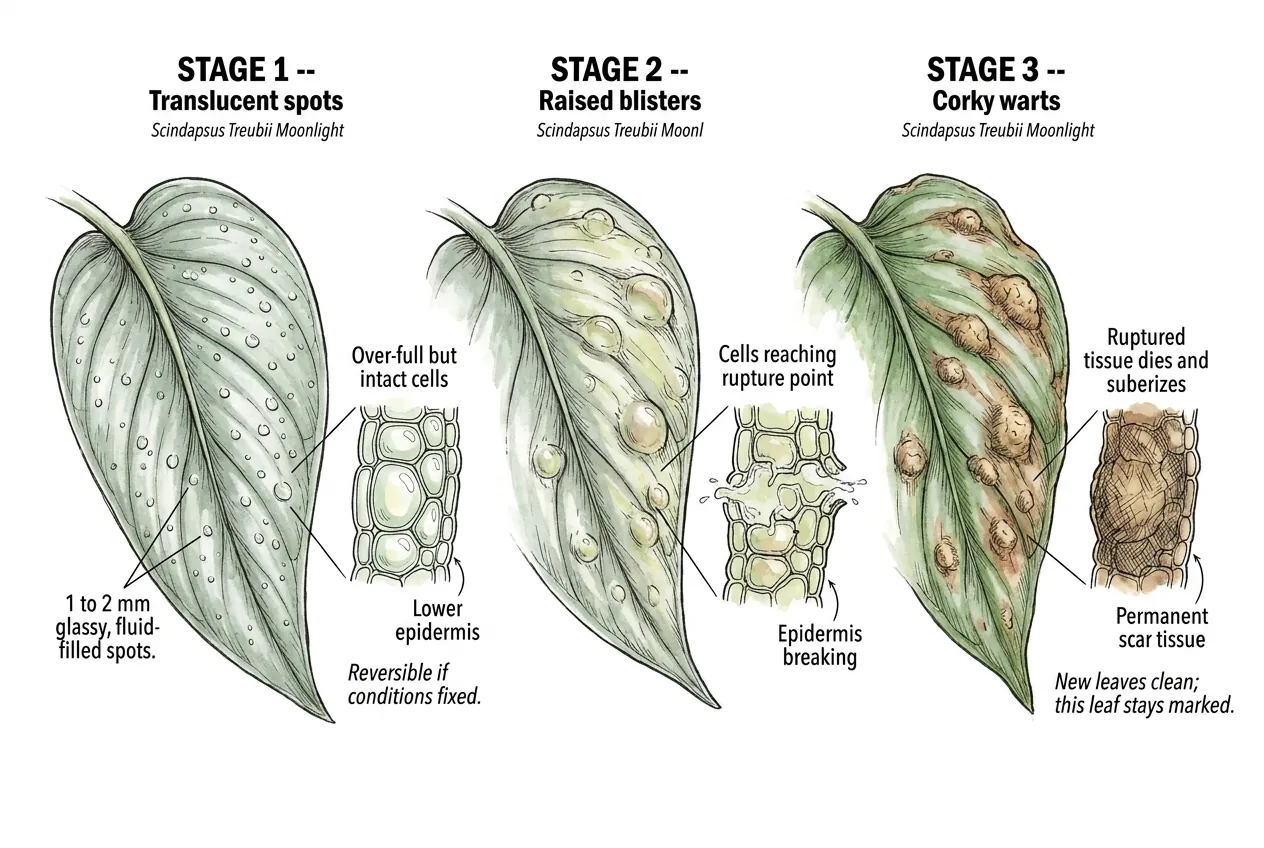
The appearance normally shifts from translucent, fluid-filled spots to tan, corky bumps. Use the stages to decide whether you are seeing new damage or an old scar.
Stage 1 – Translucent spots
Tiny, 1 to 2 mm glassy, fluid-filled spots appear between the veins on the underside, before the cells have ruptured.
Fixing conditions now gives the best chance of preventing these spots from progressing, though you cannot tell from the outside alone whether a given spot will settle or scar.
Stage 2 – Raised blisters
The spots swell into raised, blister-like bumps as the leaf tissue is damaged.
Stage 3 – Corky warts
The ruptured tissue dies and suberizes into hard, tan or brown, wart-like protuberances. This is permanent scar tissue.
Once conditions improve, new leaves usually come in clean, but this leaf stays marked.
How do I avoid confusing edema with the normal silver sheen?
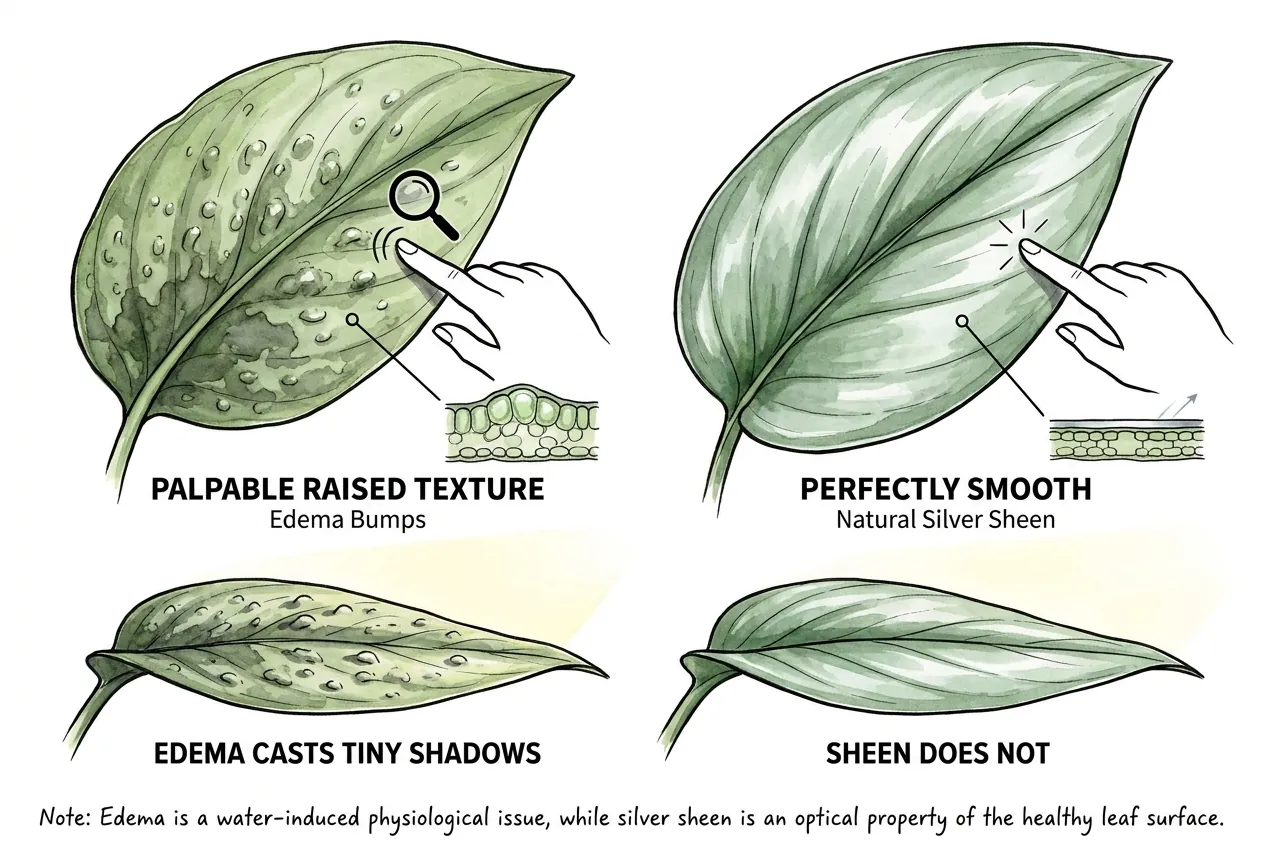
Do not mistake Moonlight’s natural silver sheen for edema, because the sheen is flat and the bumps are raised.
The reflective, satiny silver-green surface that makes this plant desirable is an optical property of the leaf surface, not a lesion.
Two Quick Surface Tests
Run a fingertip across the underside. Edema is palpable raised texture, while the sheen is perfectly smooth. View the leaf under a side light. Edema casts tiny shadows, while the sheen does not.
Many new growers worry about the silver pattern on a healthy Moonlight. A smooth, sheen surface is the plant’s normal silvery coloration, which is distinct from a true variegated form and is not damage.
Is the bump part of the leaf, or sitting on top?
Look and photograph rather than scrape. Do not try to pry or scrape a bump off. Gouging or tearing the leaf damages healthy tissue and can carry microbes into the wound.
Edema bumps are part of the leaf itself, so under a loupe they are continuous with the leaf surface, while many surface pests, such as scale, and mineral deposits sit on top as a separate layer.
Use magnification and a side light to judge whether a bump is fused into the leaf or resting on it, and take a close-up photo for comparison over time.
Note that some pests, eggs, and galls do not lift off cleanly either, so this observation is a clue toward a diagnosis, not a confirmation on its own.
How do I tell edema apart from pests and disease?
Edema is most often confused with thrips and spider mite damage, so scout carefully for the actual pest.
ONfloriculture states that oedema can look very similar to thrip or spider-mite feeding damage, but that scouting will usually reveal low numbers or an absence of these pests.
Pest damage tends to come with the pest, its frass, or its webbing, while edema tracks with humid, low-transpiration conditions.
Low-density pests, eggs, and immature stages can be missed in a single look, so not seeing a pest once is not the same as proving one is absent.
Use the table below as a differential checklist, not a final verdict. Where the pattern is unclear, or symptoms worsen quickly, repeat your inspection over time and consider isolation and an Extension or diagnostic-lab opinion.
Edema versus the common look-alikes
| Symptom source | Telltale sign | Location | Spreads? |
|---|---|---|---|
| Edema | Raised bumps fused to leaf, no pest | Underside, between veins | No |
| Thrips | Silvery scarring, black frass dots, insects | Either surface | Pest spreads |
| Spider mites | Fine pale stippling, webbing | Underside | Pest spreads |
| Bacterial leaf spot | Water-soaked spots, often yellow halos or oozing | Either surface | Can spread plant to plant |
| Intumescence | Crystalline bumps along veins | Often upper surface | No |
| Guttation crust | Flat mineral residue, wipes off | Leaf margins, tips | No |
How do I rule out thrips and spider mites?
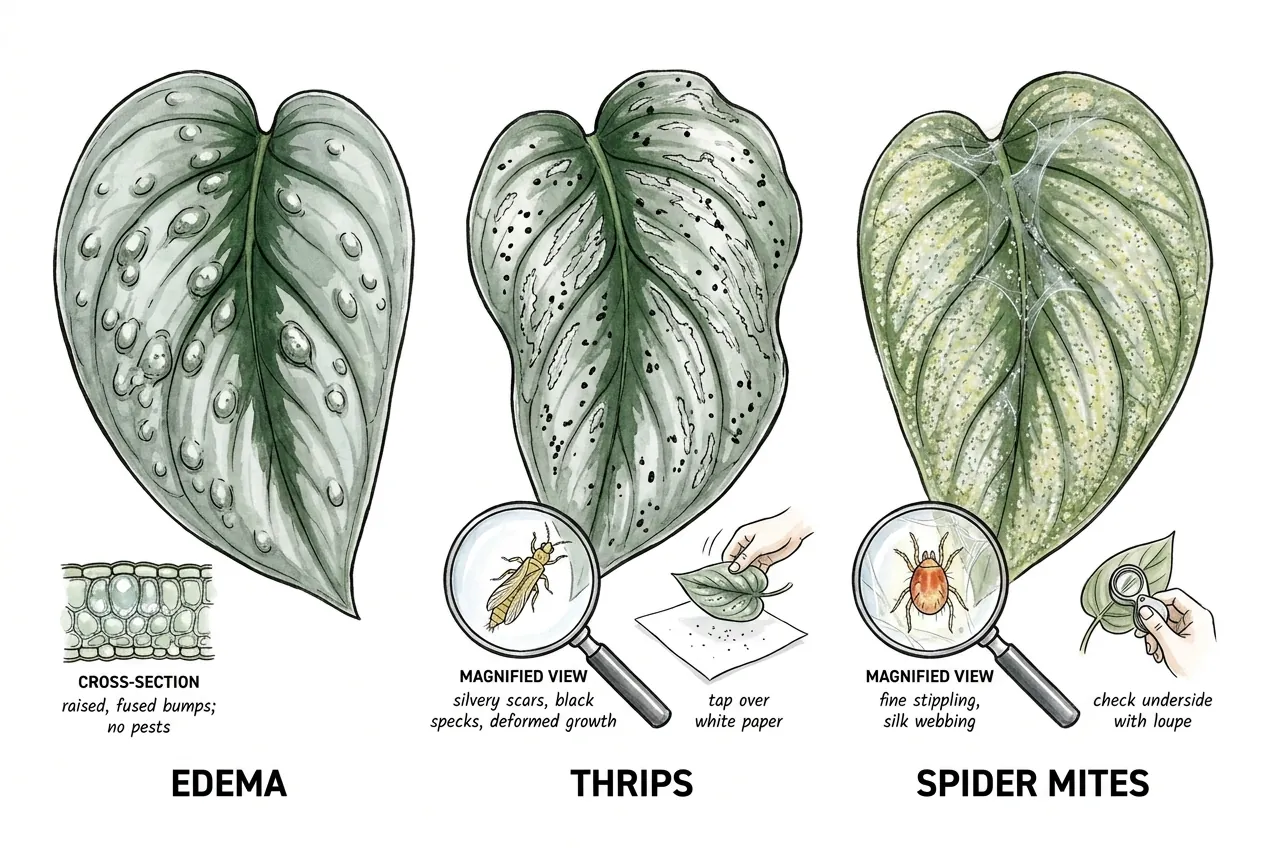
Finding the pest or its evidence points the diagnosis toward feeding damage. Thrips leave silvery rasped scars, black fecal specks, and often deformed new growth.
Spider mites leave fine pale stippling plus silk webbing in leaf corners and along veins.
Tap a suspect leaf over white paper, and moving specks are thrips. Check the underside with a loupe for tiny moving dots and webbing for mites.
Because a single negative check can miss eggs and low numbers, repeat the inspection over several days and consider a sticky card.
Raised, fused, frass-free bumps with no pest seen after repeated inspection are consistent with edema rather than feeding damage, but treat it as a working diagnosis to keep watching.
How do I tell edema from bacterial or fungal leaf spot?
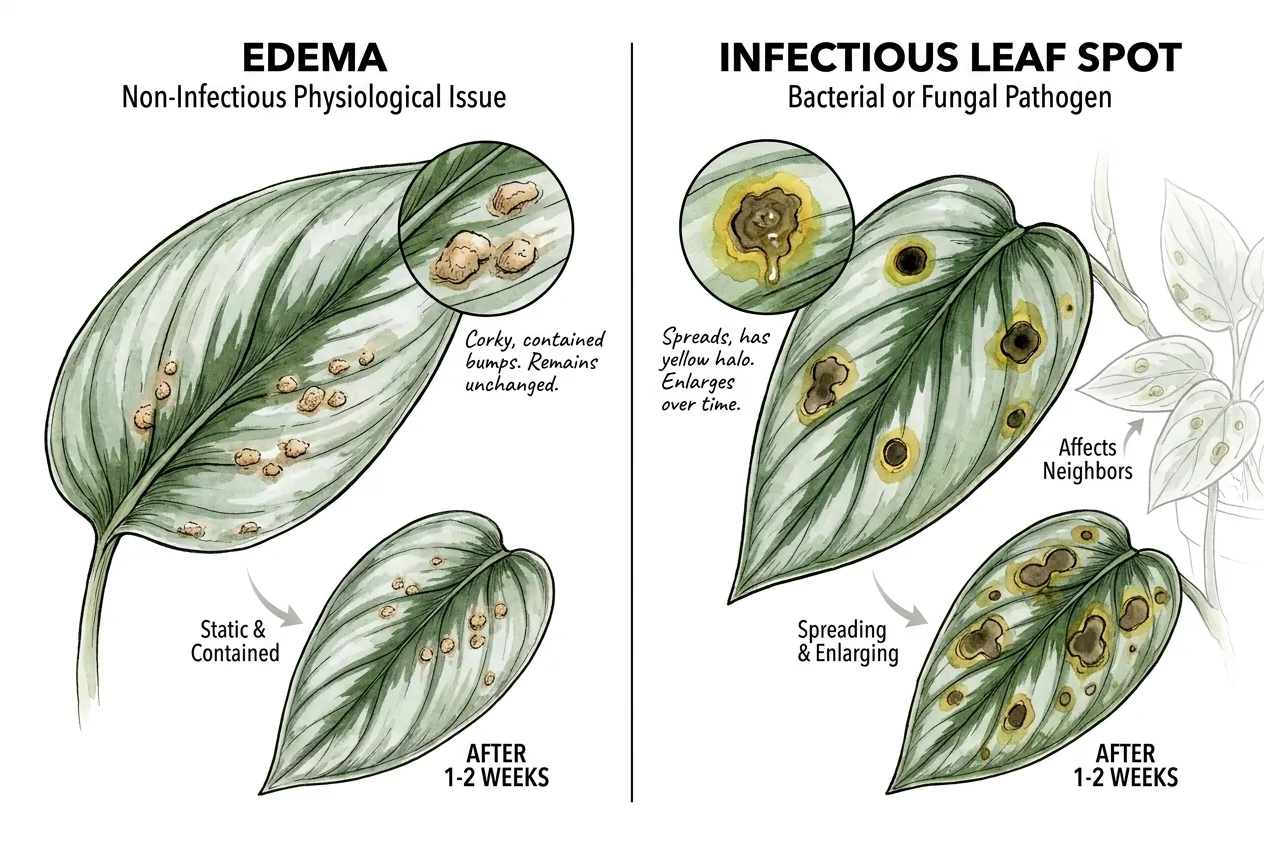
Infectious spots can spread to neighbors and often have defined margins or halos, while edema does not move plant to plant.
Be careful with absolutes, though. Infectious lesions do not always ooze or spread quickly, and edema lesions can enlarge or merge, so neither pattern is a perfect tell.
Mark a few spots and watch them over one to two weeks. Spots that develop yellow rings, ooze, or appear on neighboring plants suggest a pathogen. Static, dry, corky bumps on the underside fit edema.
If spots worsen quickly or the plant declines, isolate it and seek a diagnostic-lab or Extension opinion rather than relying on a two-week watch alone.
Could it be intumescence instead?
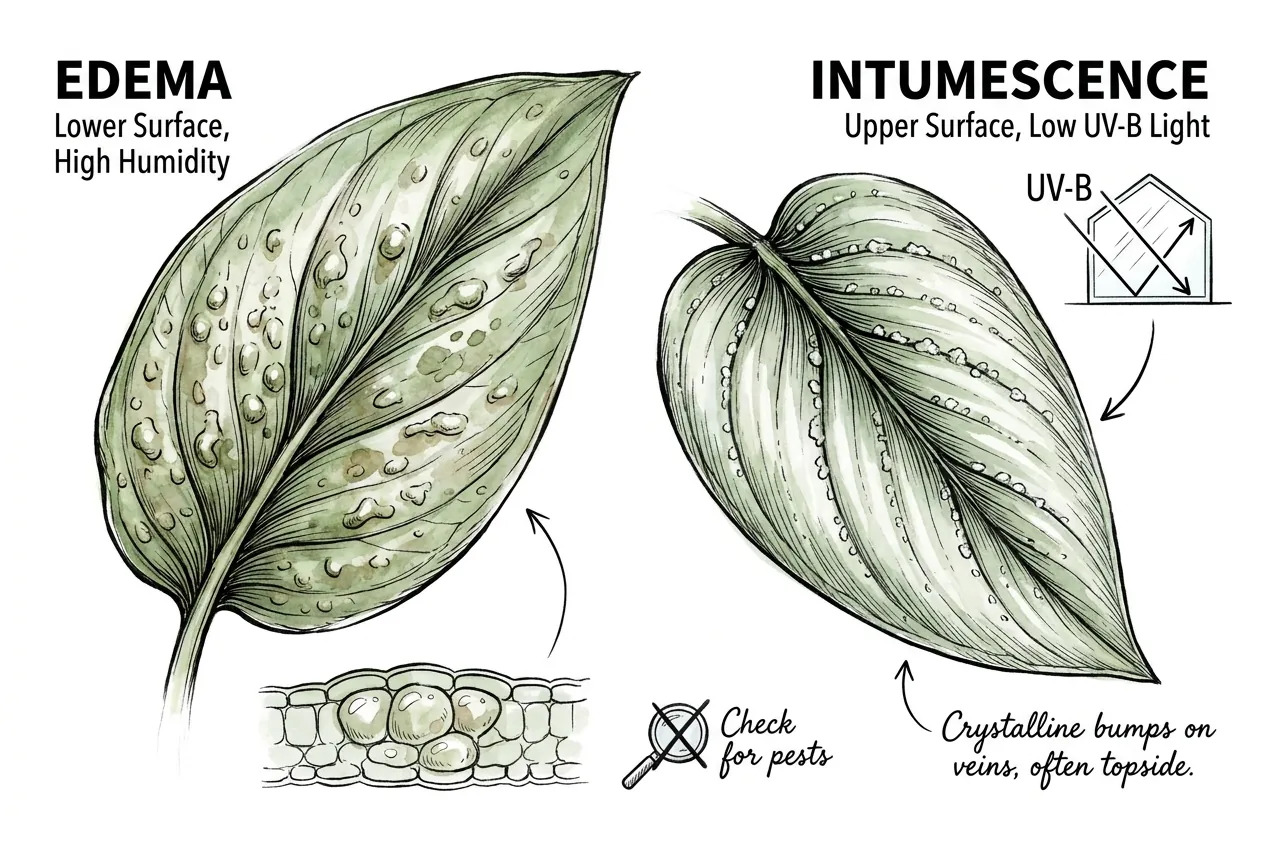
Possibly. The names edema and intumescence can overlap, and the exact cause can vary by plant. The practical response is the same at first. First rule out pests and disease, improve airflow and root-zone drainage, and watch new growth.
Do not add UV-B or another specialized treatment just because a leaf has bumps. Such changes can harm plants and people when the dose and fixture are not specifically planned.
How do I fix an active edema outbreak?
Start with gentle airflow, then reduce root-zone saturation and excessive humidity gradually. Change one or two variables at a time so you can tell what helps.
Restore Air Circulation
Use fans and open vents to keep air circulating.
Then attack the other half of the equation with watering changes, a modest humidity drop, and more light.
What is the fastest safe first move?
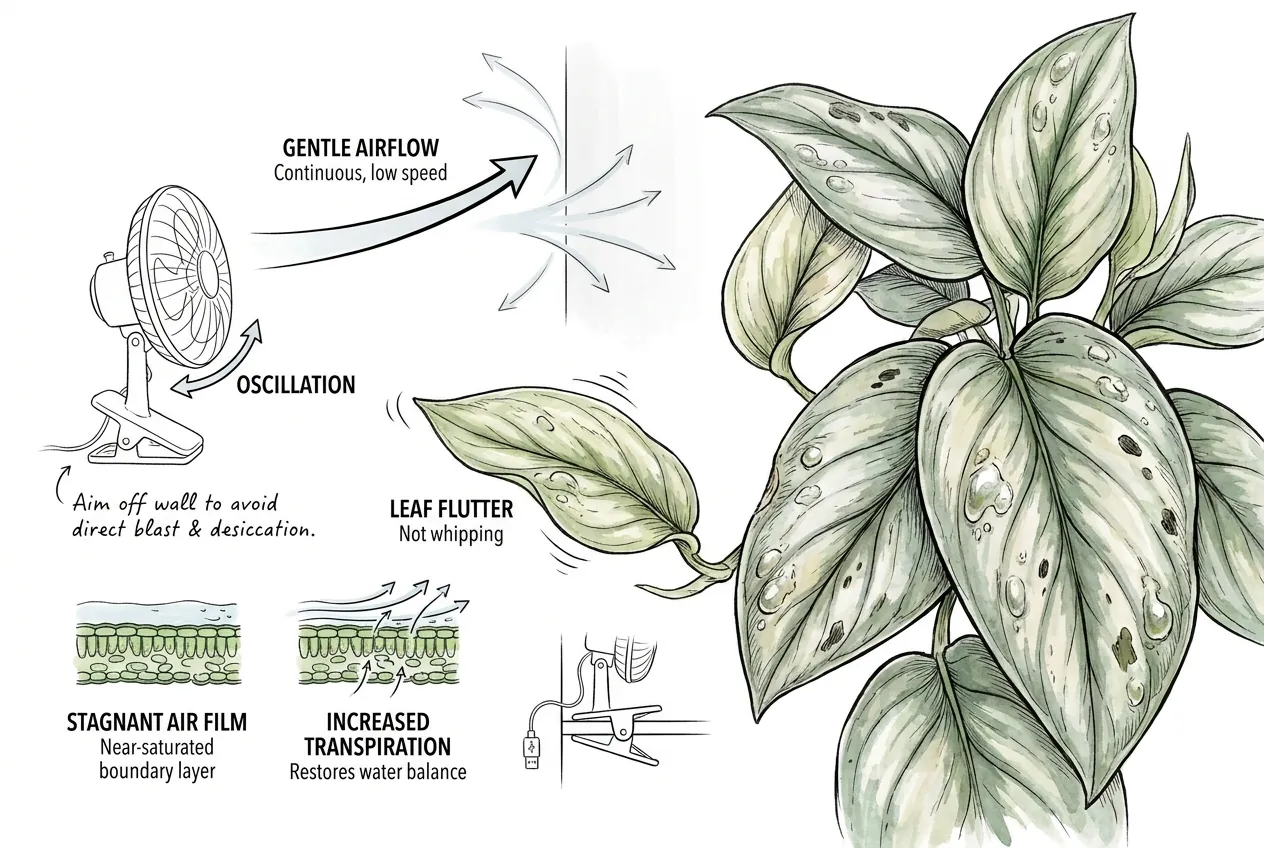
Add gentle airflow first. Moving air can support transpiration even before you touch the humidity setpoint, because it sweeps away the near-saturated film sitting on the leaf.
Run a small oscillating fan on low so the leaves move gently rather than whip. Aiming it to bounce off a wall rather than blast the plant directly helps avoid drying out thin new growth, and it is worth checking for dead-air pockets and condensation once the fan is running.
What fan specification actually matters
Choose a small fan that can run gently and distribute air without blasting one leaf. Confirm that its power setup is safe for continuous use in a humid enclosure, and always use a drip loop.
Grow Tent Clip Fan
Grow tent clip fan can suit a cabinet that needs gentle, distributed airflow. Place it so leaves move slightly rather than continuously bending, then check for condensation and dead-air corners. Cabinet size and fan placement matter more than treating one fan as a guaranteed fix.
What to check before you buy
It has only two speeds and a clamp mount, so a very tall cabinet may need a second unit mounted up high.
The listing does not clearly document noise level, continuous-duty rating, or moisture rating, and the exact plug type is worth confirming for electrical safety in a damp cabinet.
How should I change watering?
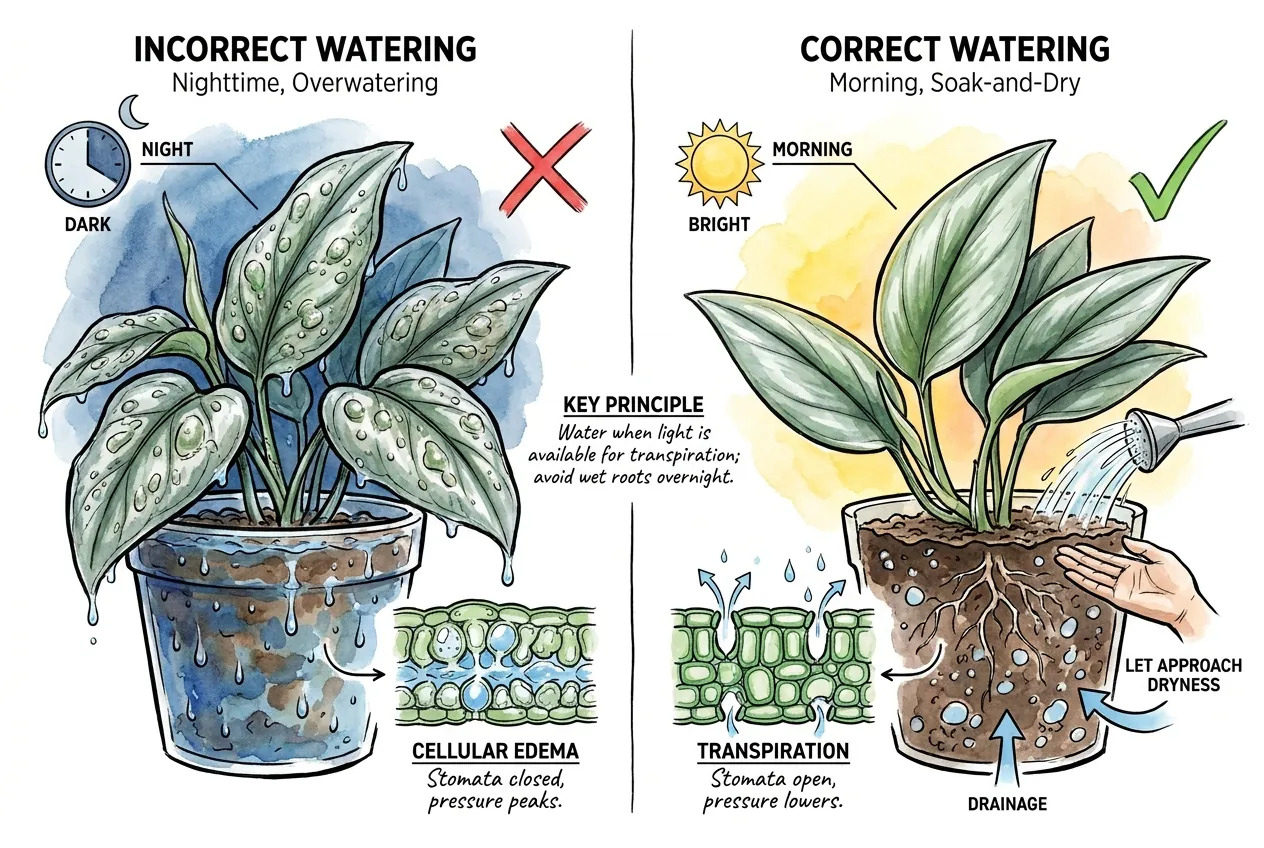
Water in the morning, water less on cool or dark days, and let the mix approach dryness between drinks.
Wisconsin prescribes watering less during cloudy or low-light periods and watering in the morning to allow soil drainage before nightfall.
A drier root zone lowers root pressure and absorption. Morning watering lets the plant transpire that water during the bright part of the day, instead of bottling it up overnight when stomata close and root pressure peaks.
Scindapsus generally tolerates this well. It is prone to overwatering and root rot, so NC State suggests letting the mix dry from about half to nearly dry between waterings. That does not mean it enjoys long droughts.
Watering earlier in the day, rather than right before lights-out, gives the mix time to drain, but adjust to your actual substrate moisture and photoperiod instead of following a fixed rule.
How much should I lower humidity, and how fast?
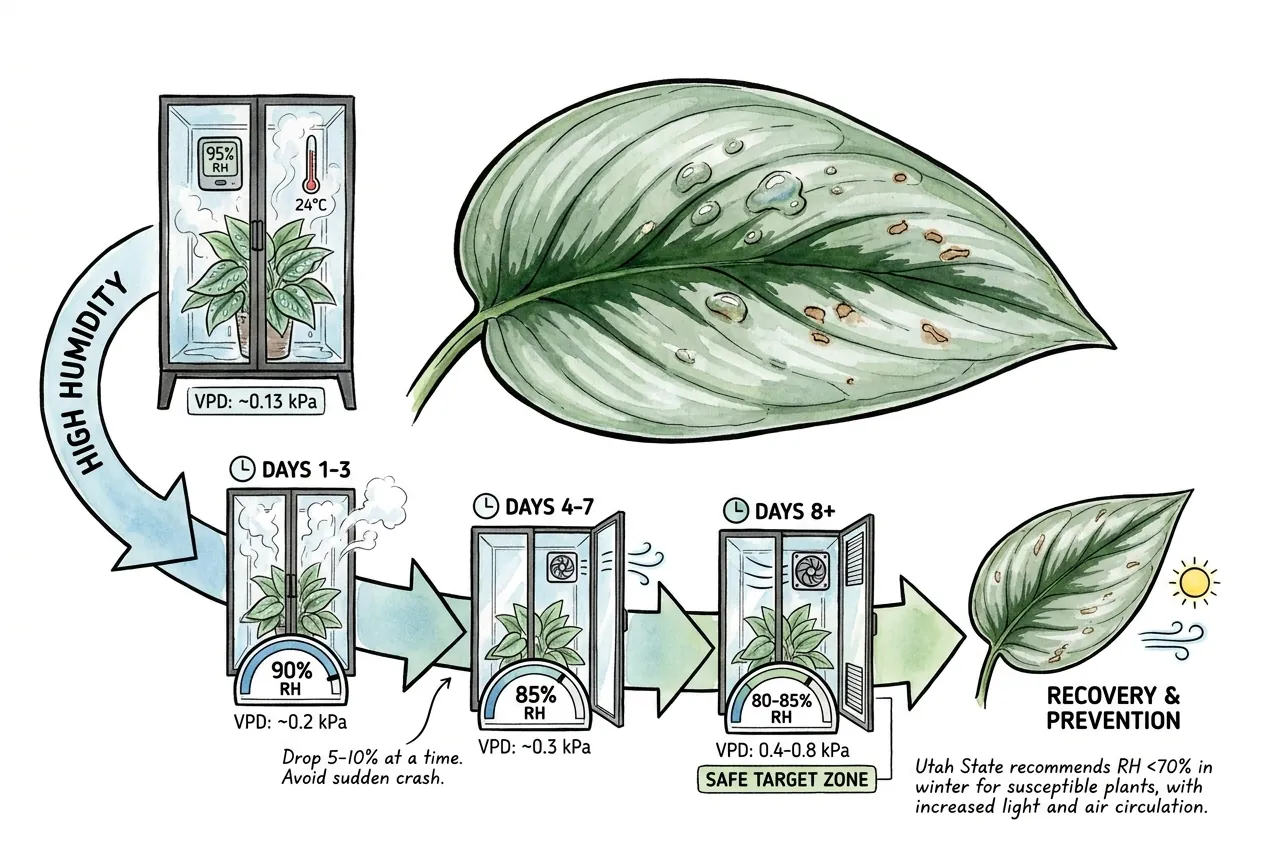
Drop humidity gradually rather than all at once, especially if the plant has lived near saturation. A vegetable-crop humidity rule is not a validated Moonlight target, so watch the plant instead of chasing a universal number.
Crack a vent or cabinet door and make small changes over several days. Record humidity, watering, and new damage so you can stop or reverse a change if the plant reacts badly.
Will the existing bumps heal?
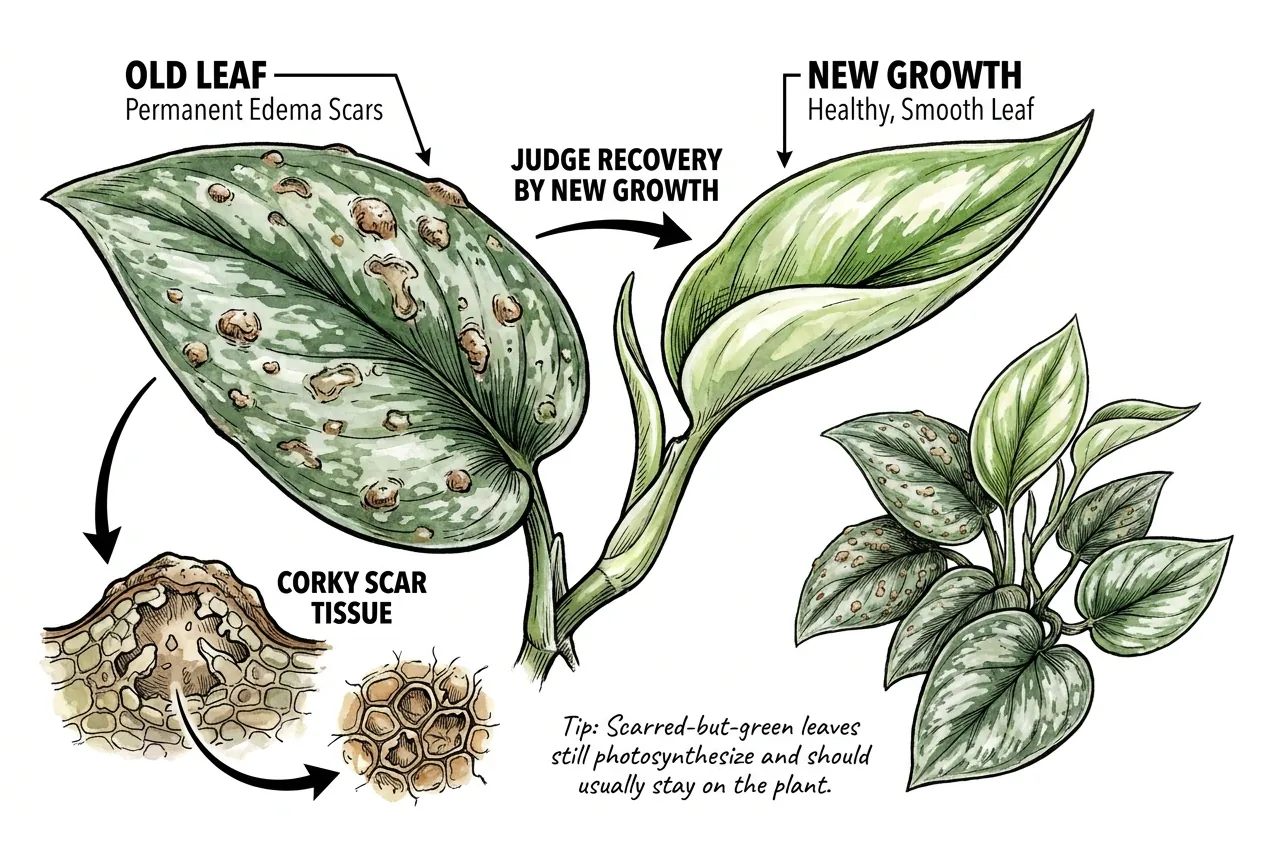
No. Existing corky bumps are permanent scars where cells burst and suberized. They will not disappear, but once conditions are corrected, new leaves usually grow in smooth.
Do not strip every bumpy leaf, because on a slow grower functional leaves are too valuable to lose. Watch the newest leaves instead.
Clean new Moonlight leaves over the following weeks are a good sign the change is helping. Compare dated photos with your recent watering and cabinet conditions rather than judging recovery from one leaf.
Tip
Judge recovery by new growth, not by old leaves. Scarred-but-green leaves still photosynthesize and should usually stay on the plant.
How do I set up a cabinet that keeps edema risk low?
Prevention is about managing the microclimate. Keep VPD in a transpiration-friendly range, keep air moving, light the cabinet well, and use a substrate that does not stay waterlogged.
A hygrometer that reports VPD helps, but remember it reads air conditions, not the leaf surface or the root zone, so it is one instrument among several rather than the whole answer.
The goal is a cabinet that is humid enough for a tropical aroid while keeping transpiration active.
What setpoints keep a Scindapsus cabinet safe?
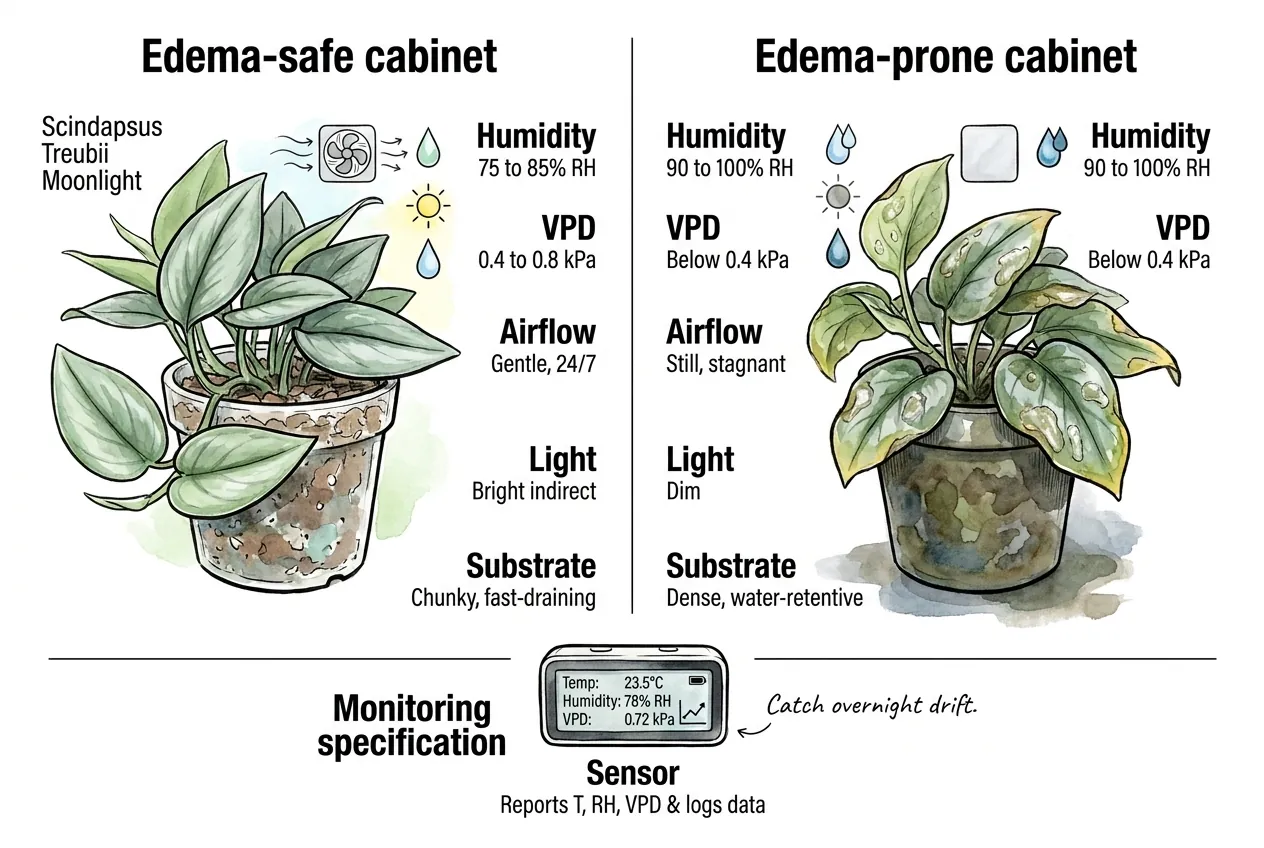
Many growers start this cultivar around 75 to 85% RH with gentle airflow and bright indirect light. Treat that as a starting range, not a proven safe threshold. Adjust gradually when the mix stays wet, condensation persists, or new bumps appear.
Example conditions associated with lower and higher edema risk
Illustrative, not diagnostic.
| Variable | Lower risk | Higher risk |
|---|---|---|
| Humidity | 75 to 85% RH | 90 to 100% RH |
| Cabinet feel | Ventilated, with leaves and mix drying normally | Near saturation, with condensation or prolonged wet media |
| Airflow | Gentle, 24/7 | Still, stagnant |
| Light | Bright indirect | Dim |
| Substrate | Chunky, fast-draining | Dense, water-retentive |
Sustained humidity above 90%, especially in a cool, still, dim cabinet, deserves closer observation. It is a risk cue rather than a hard cutoff because temperature, light, airflow, and root moisture all matter.
What monitoring specification matters
A sensor that reports temperature, humidity, and VPD or dewpoint, with data logging, helps you catch overnight drift.
Keep in mind it measures the surrounding air, which is a proxy. It does not read leaf-surface conditions or root-zone moisture.
SwitchBot Hygrometer
SwitchBot hygrometer suits a cabinet owner who wants to spot overnight humidity and temperature drift rather than rely on a single daytime reading. Its VPD and dewpoint are air estimates, not a diagnosis or a measurement of the leaf and root zone.
What to check before you buy
Full logging and history need the SwitchBot app, and it costs more than a bare dial hygrometer. Readouts are Bluetooth-only, so remote push alerts require a separate SwitchBot Hub, and humidity accuracy is looser at very high RH, which matters near saturation.
If you only want a live number, a basic digital hygrometer is cheaper.
What substrate and watering cadence reduce root-zone saturation?
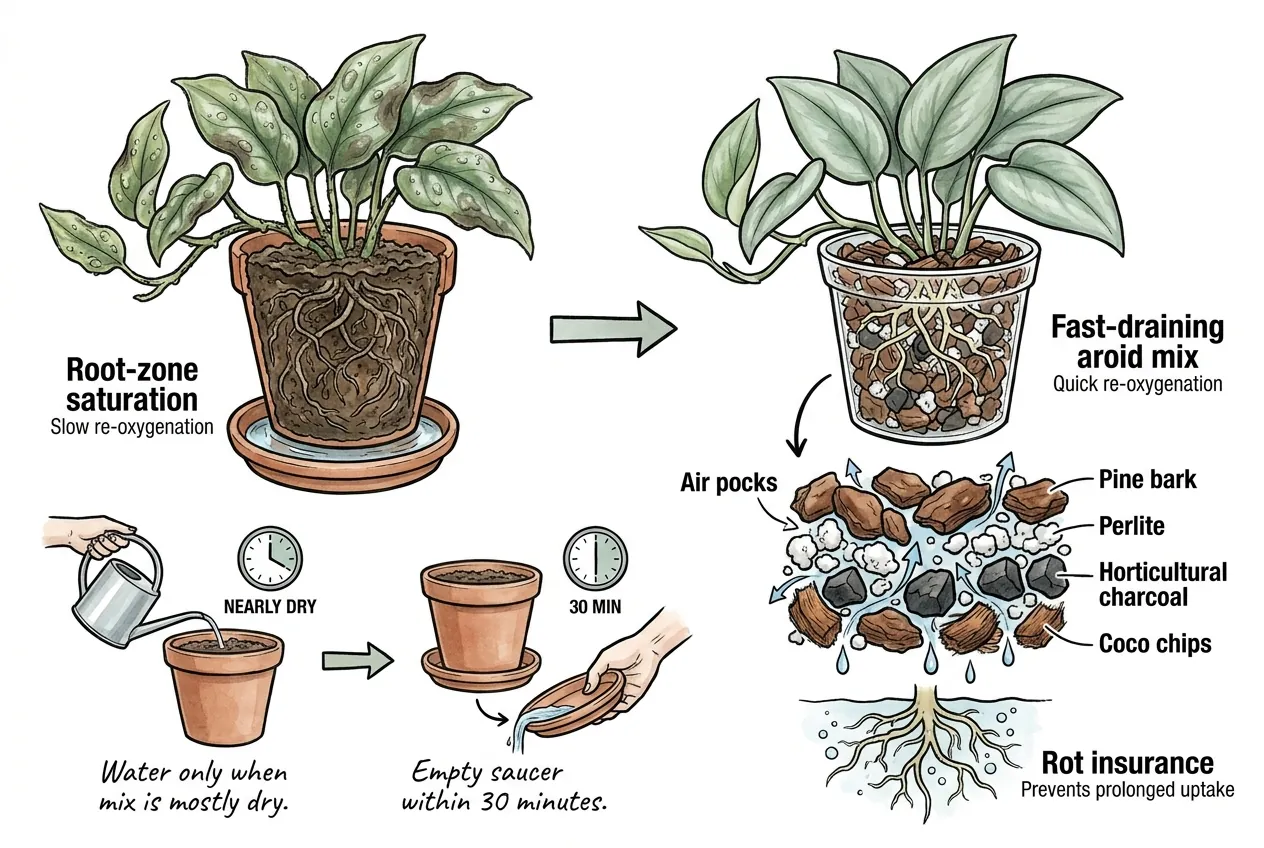
A chunky, fast-draining aroid mix, watered when it has mostly dried, keeps the root zone from staying warm and waterlogged.
Wisconsin advises a well-draining growing medium and emptying pot saucers within 30 minutes. A root zone that drains and re-oxygenates quickly spends less time saturated, which is generally healthier, though how dry to let it get depends on pot size, media, and root health.
Airy media also helps with rot. Scindapsus treubii struggles with excess water around its roots, and overwatering and root rot are a common problem for it, so a fast-draining mix supports both goals, even if it cannot guarantee prevention of either.
What substrate specification matters
A pre-blended chunky aroid mix, built from bark, perlite, and charcoal, holds some moisture inside the particles while letting free water drain from the pore space.
Note that coco chips and coco coir behave differently. Chips are coarser and more open, while coir holds more water.
Gardenera Aroid Mix
Gardenera aroid mix can suit someone who wants a ready-made chunky medium for a plant that stays too wet in dense potting soil. It should drain more freely than a fine mix, but still check how it behaves in your pot and cabinet instead of assuming the ingredients alone prevent edema.
What to check before you buy
Chunky mixes dry faster, so a bright, warm cabinet may need slightly more frequent watering. The small bags are also not the cheapest way to fill a large pot versus mixing your own bark and perlite, and a DIY blend lets you tune the ratio to your pot and watering habits, provided you use clean components.
Is it really just about watering less?
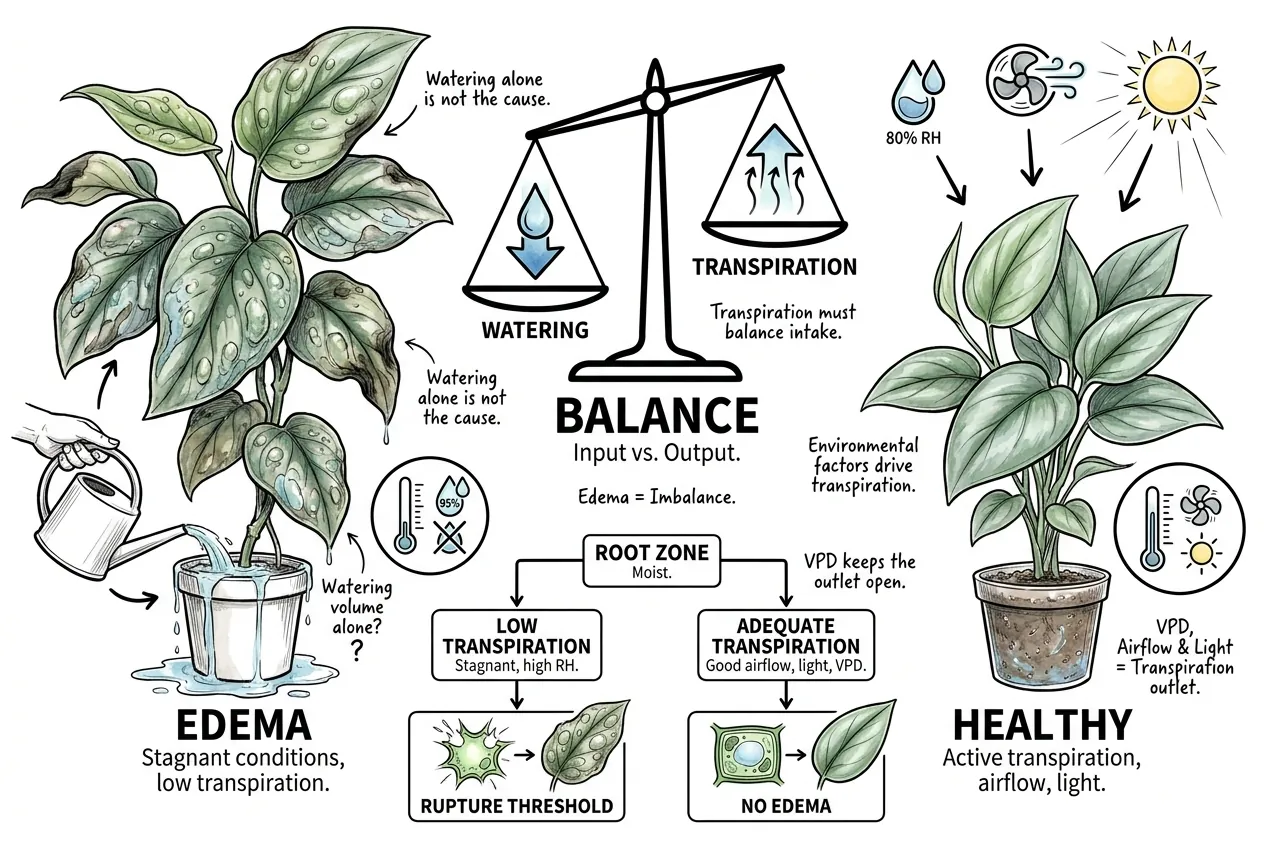
No. Watering is only one part of the balance. Airflow, light, humidity, and the potting mix all affect how well leaves and roots handle the same watering.
Keep the mix appropriately moist, but also give the cabinet enough light and gentle airflow. A watering routine that works on an open shelf can cause trouble in a sealed, saturated cabinet.
Is edema dangerous, and how do I handle it long term?
Edema is usually cosmetic rather than lethal. Wisconsin states it is typically not fatal but will make plants less attractive.
In severe cases it can still reduce photosynthesis and cause leaf curl, leaf drop, or stalled growth, and a ruptured leaf is an open wound that can admit rot if the cabinet stays wet and stagnant.
Manage the disorder as a warning sign and a long-term microclimate habit, not an emergency.
Should I cut off the bumpy leaves?
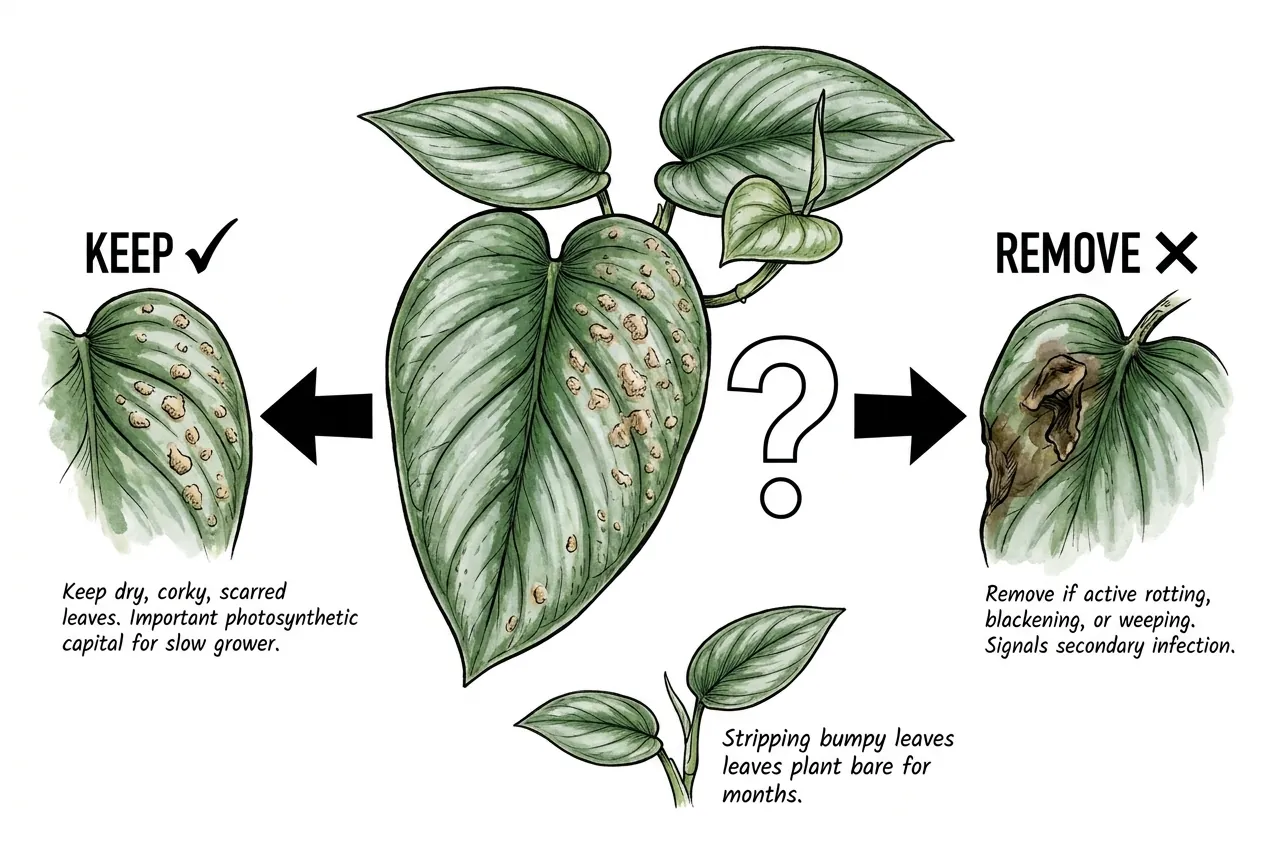
Remove leaves sparingly, and mainly when a rupture is actively rotting. On a slow grower, each mature leaf is significant photosynthetic capital that the plant cannot quickly replace.
Scindapsus treubii is a slow grower, so lost leaves are not replaced fast.
Keep dry, corky, scarred-but-green leaves. Remove and discard a leaf if a rupture softens, blackens, or weeps, which can signal secondary infection. When you do, use clean, disinfected tools and judge whether the whole leaf should go.
Stripping several bumpy leaves off a slow Moonlight can leave it sparse for a long time.
Can the ruptured tissue get infected?
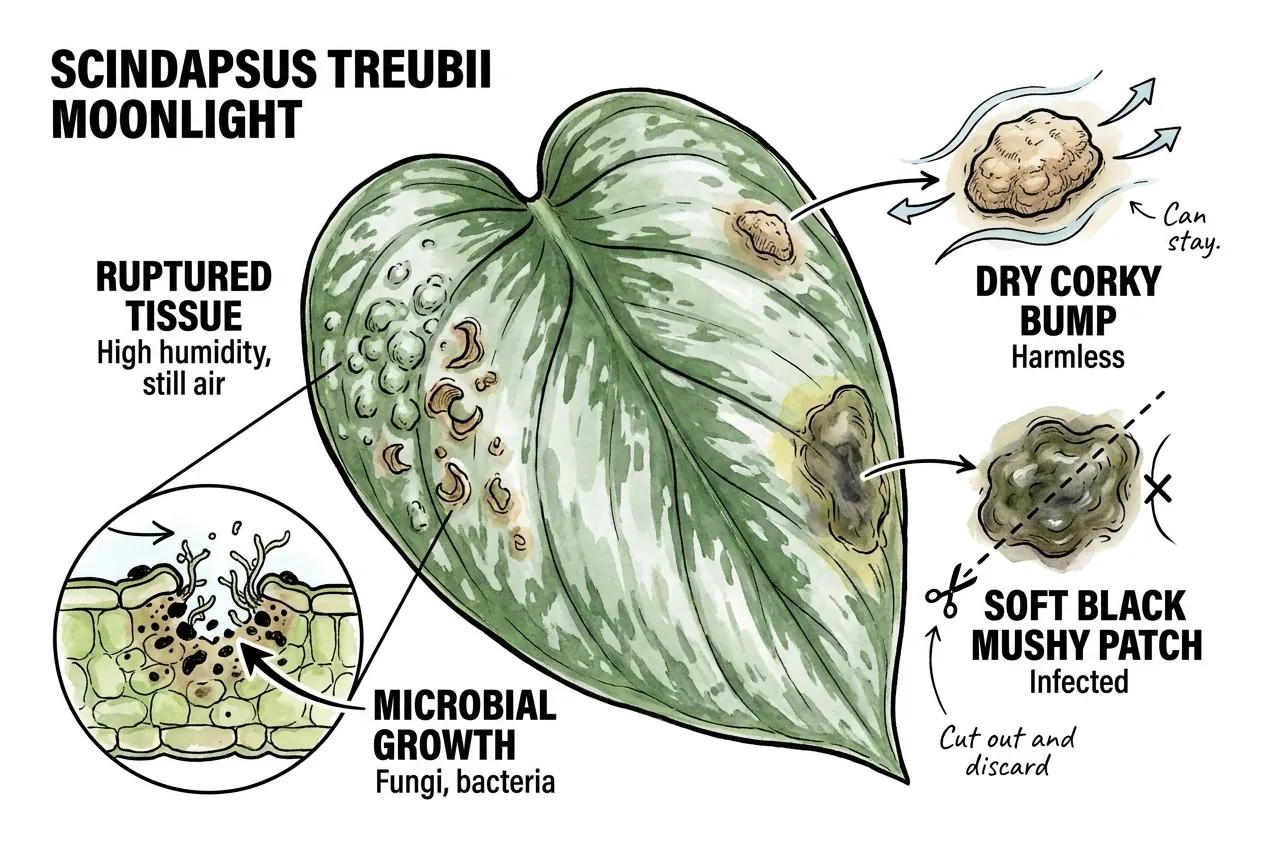
Yes, secondary infection is one real risk among several. Intact epidermis is the plant’s barrier, and a rupture breaches it.
High humidity and still air can then favor microbial growth on the wound.
Keep airflow up and the surrounding surfaces dry. A dry corky bump is generally low-risk and can stay.
Soft, black, mushy tissue suggests decay. Remove the whole leaf rather than nicking at a patch, use clean disinfected tools, and escalate to a diagnostic service if the plant is declining.
How do seasonal and monsoon swings change my management?
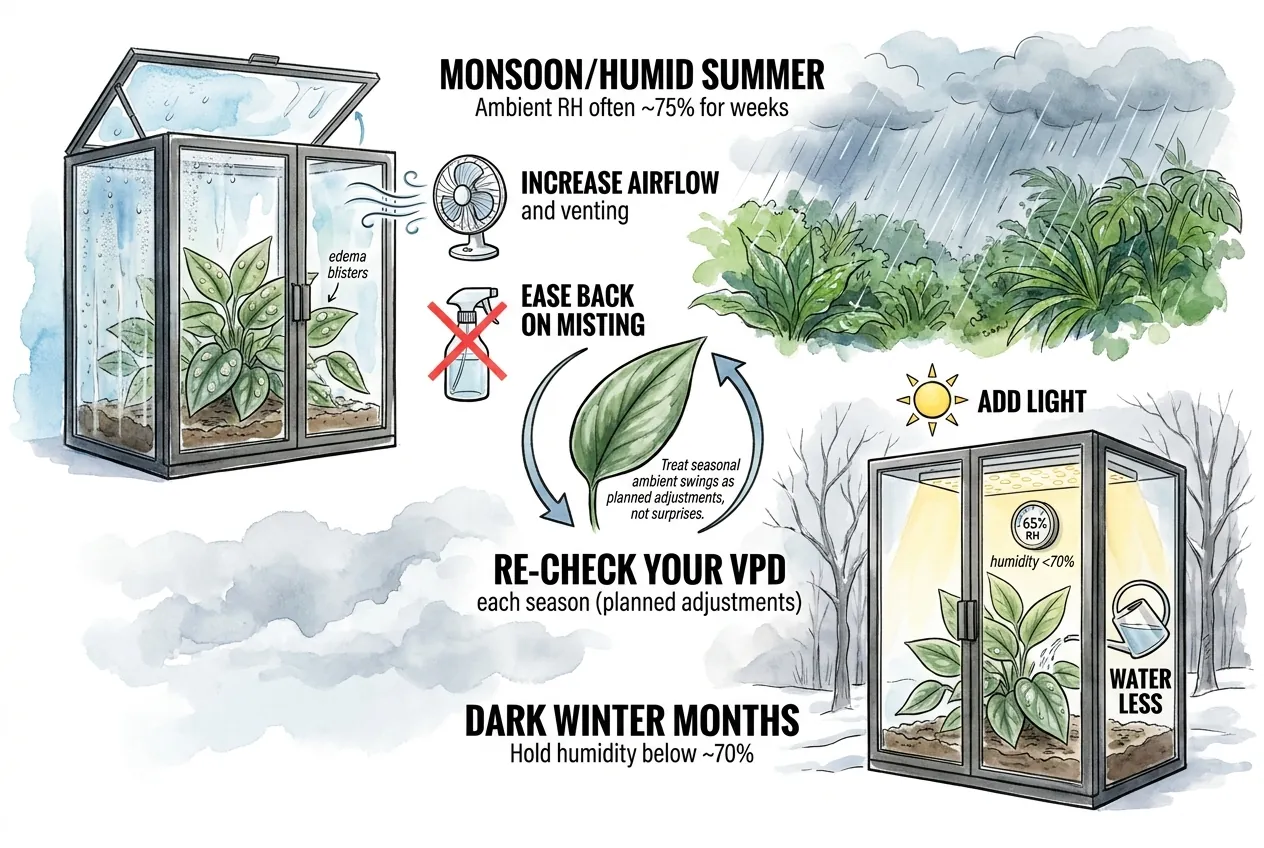
Seasonal changes outside the cabinet can change its risk level. Humid summer or monsoon air makes venting less effective, while dark winter weather reduces drying from the leaves.
In a humid season, increase airflow and venting and ease back on misting if the room stays damp. In dark winter months, provide enough light and water less. Re-check the cabinet each season rather than assuming one setting works all year.
Important
A cabinet that was stable in spring can shift toward higher risk once the ambient humidity of a wet season rises. Treat seasonal swings as planned check-ins, not surprises.
Confirm the Cause and Adjust the Cabinet
Confirm the cause before treating, then correct the cabinet’s airflow, wetness, light, and humidity in small steps. Do not expect old corky bumps to heal.
Keep dry, green scarred leaves and judge success by clean new growth. Isolate the plant and seek a diagnosis if lesions spread, soften, blacken, or appear with pest signs.
Affiliate Disclosure
This article contains Amazon affiliate links. As an Amazon Associate I earn from qualifying purchases. If you use these links, the site may earn a commission at no extra cost to you. Product availability, price, and specifications can change. Check the current listing before buying.