
Philodendron Verrucosum Root Aphids: Lockdown Without Foliar Spray
Manage soil (root) mealybugs on Philodendron verrucosum with substrate-only, label-directed treatments that spare the velvet leaves, and how to confirm the pest before you treat.
Priya Patel · Published 2026-06-09 · 29 min read
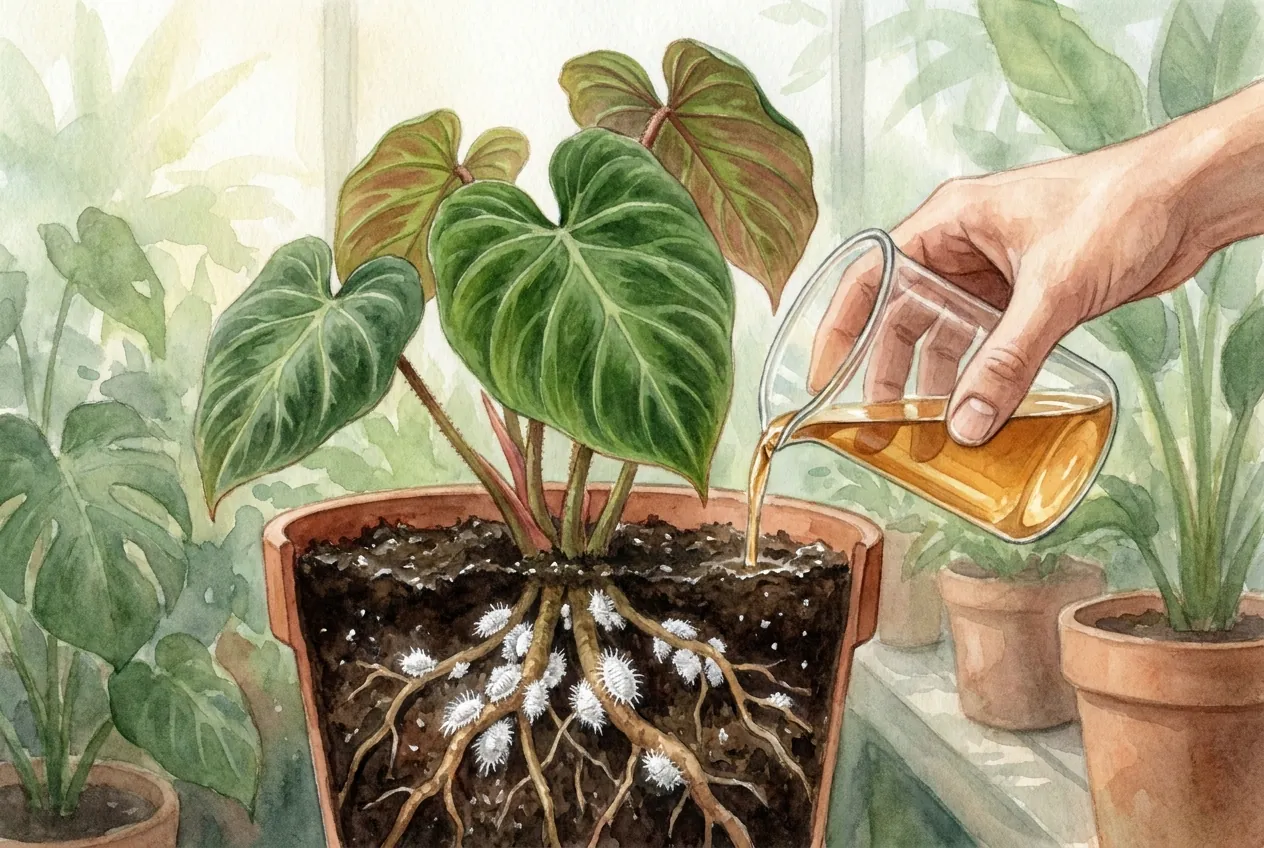
What is the root-aphid pest on Philodendron, really?
Confirm the Pest Before Planning Treatment
The white specks people call a root aphid on indoor Philodendron verrucosum are, in most hobby cases, a soil or ground mealybug in the genus Rhizoecus rather than a true root aphid in the Aphidoidea.
The two look superficially alike but belong to different insect groups, so the first job is to confirm which one you actually have rather than assume.
Be careful with the common name. Root aphid and root mealybug are used loosely and are not interchangeable, and some true aphids can feed on roots too.
Extension sources note that root-feeding aphids and mealybugs can be hard to tell apart without a hand lens and, for species-level confirmation, a specimen sent to a diagnostic lab.
Rhizoecus can complete its life cycle on a root system without an alternate host, which is why it turns up on long-term container plants.
That does not by itself rule out other root-dwelling insects, so treat the identification as provisional until you have looked closely.
Several Rhizoecus species show up on container ornamentals, and UC IPM notes they are difficult to tell apart in the field.
Rhizoecus floridanus is a valid species described by Hambleton in 1973 from Florida nursery material (the type was collected on Dracaena, not an aroid).
A Florida origin does not by itself identify your pest as R. floridanus. Species-level identification needs a morphological examination, not just the seller’s location.
I collect tiny samples from the crown, pot wall, and drainage zone into separate labeled containers and inspect them under magnification. Root aphids and harmless soil organisms are not distributed evenly, so one random speck is weak evidence.
Insects are photographed with scale, and a sample is preserved for identification before I treat. The map also shows whether a response must reach the whole root ball or one introduced pocket.
Runoff, saucers, tools, and discarded mix from the suspect plant stay separate. Root-pest quarantine fails when shared drainage reconnects pots that look physically apart.
How fast does a single founder become a colony?
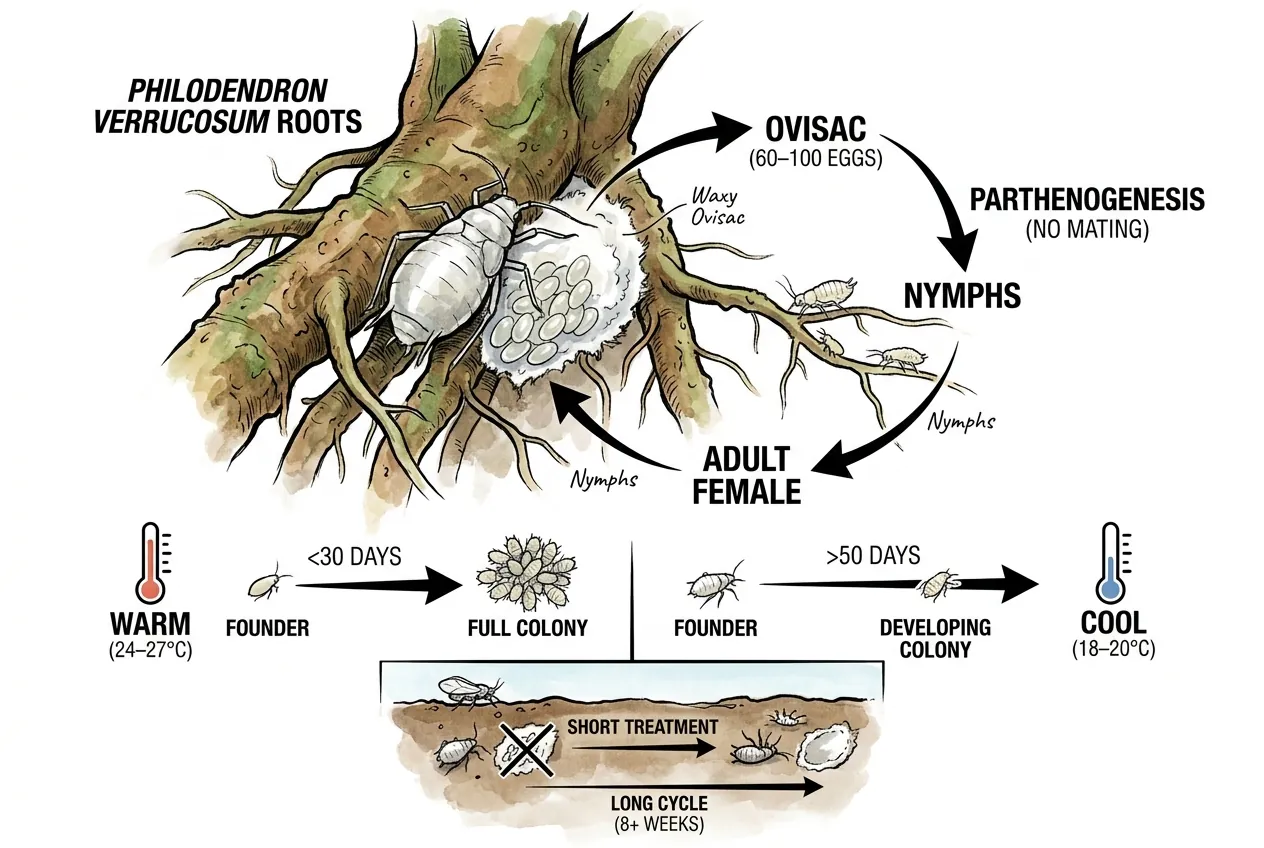
A small founder population can build up over time. Some Rhizoecus lineages reproduce parthenogenetically (without mating), but this is not universal, and egg number varies widely by species and host. One studied species has been reported laying anywhere from about a dozen to several dozen eggs.
Do not rely on a fixed per-female egg count for planning.
Generation time is not a single fixed number either. UC IPM gives a general figure of roughly two to four months for ground/root mealybugs at common indoor soil temperatures, with adults living another one to two months. Warmer soil speeds development and cooler soil slows it.
Published rearing data for one Rhizoecus species run to roughly two to three months depending on host. Treat any single-value 35-day cycle as an oversimplification.
Practical consequence
Any treatment that catches only feeding adults leaves the next egg cohort untouched. Because a generation can span two to four months, plan a treatment window long enough to cover at least one full generation under your conditions, and keep inspecting well beyond it rather than declaring success at a fixed week.
What does the colony actually look like under the crown?
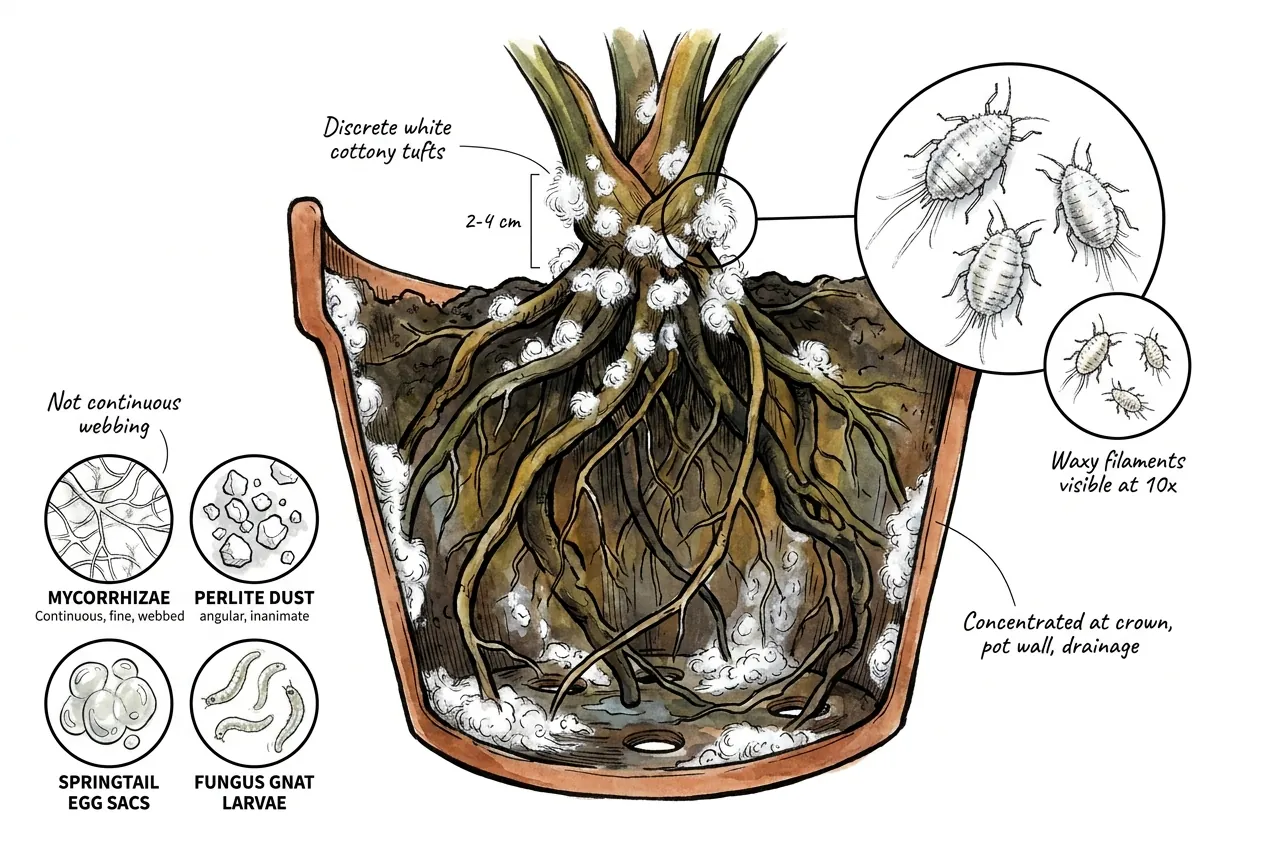
Soil mealybugs usually show as small white waxy specks or powdery patches on roots and inside the pot.
Look through the whole root ball rather than only one spot. They often gather along the pot wall and near the surface, but checking the entire root zone avoids missing a colony lower down.
One caution on identification. The peer-reviewed description of Rhizoecus floridanus reports a body under about 2 mm with powdery white wax and no long marginal filaments.
Many generic mealybug images show long side filaments. If that is what you picture, you may be looking at a different mealybug, so a hand-lens or lab check matters.
Rule out lookalikes before concluding it is a pest. Mycorrhizae form continuous webbed filaments without discrete insect bodies. Perlite dust is angular and inanimate. Springtail egg masses are clear and gelatinous, and fungus gnat larvae are translucent and actively wriggling rather than sessile on roots.
When in doubt, use a hand lens, and for species-level certainty send a sample to a diagnostic lab.
Why won’t foliar sprays work on this plant?
Why the Root Zone Is the Target
Foliar sprays are a poor fit for a root-dwelling pest for two reasons. First, the colony lives in the substrate and feeds on roots, so most of the population is never at the leaf surface where a spray can contact it.
Second, the velvet leaf surface is more vulnerable to surfactants, oils, and emulsified neem than a glossy leaf, so foliar products carry a real risk of visible leaf damage on this plant.
Neither point is a guarantee about any single product, always spot-test on one leaf first, but together they explain why substrate-directed treatment is the sensible default here.
What proportion of the colony does foliar spray actually reach?
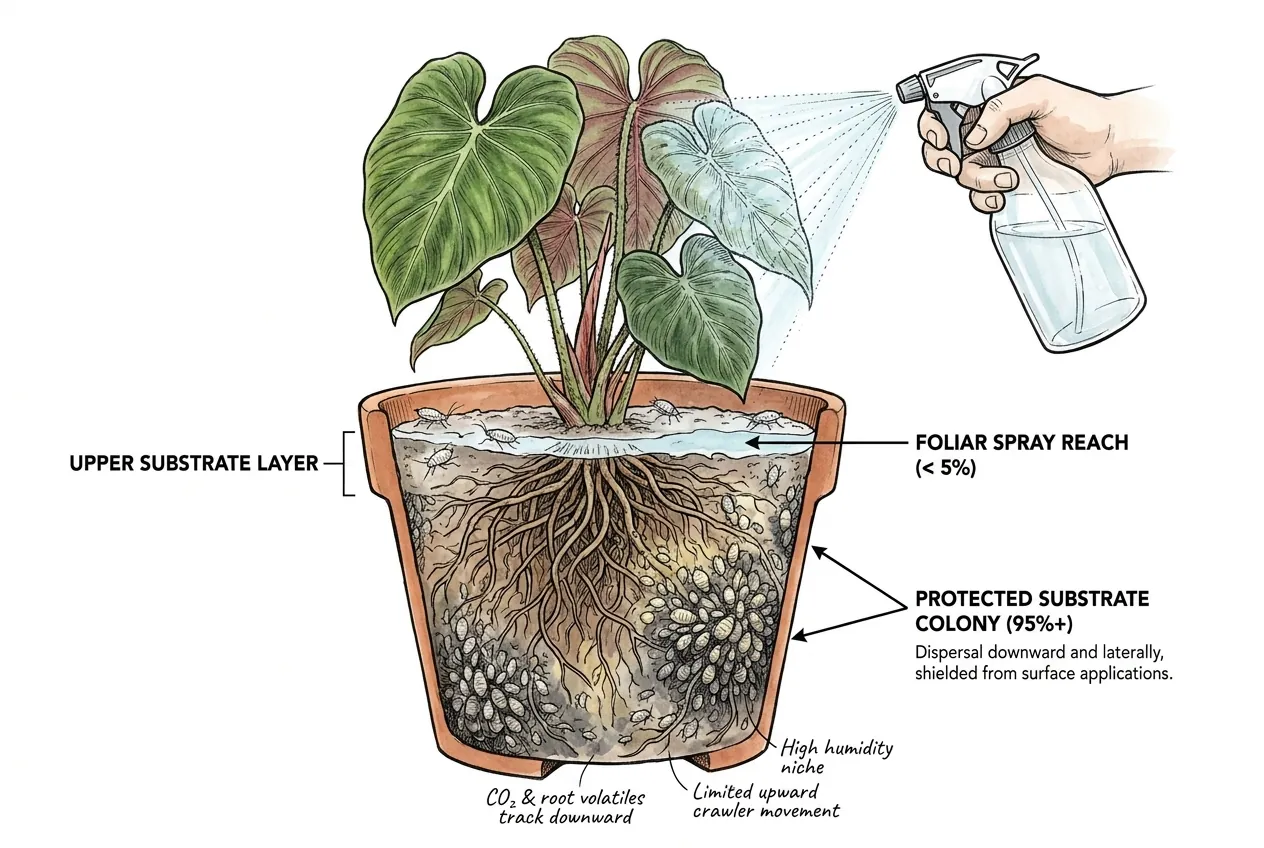
A soil mealybug colony lives on roots and in the substrate, so most of it is out of reach of a leaf spray. No reliable percentage is available for a potted verrucosum.
Keep a root-zone pest treatment in the root zone, not on the velvet leaves.
Why the biology drives this
Crawlers tend to stay in the moist root zone where their food is, so movement is mostly through the substrate rather than up onto dry foliage.
That is the general behaviour of root-feeding mealybugs. It is why substrate delivery reaches the colony and a foliar spray largely does not.
Why does neem ruin velvet leaves specifically?
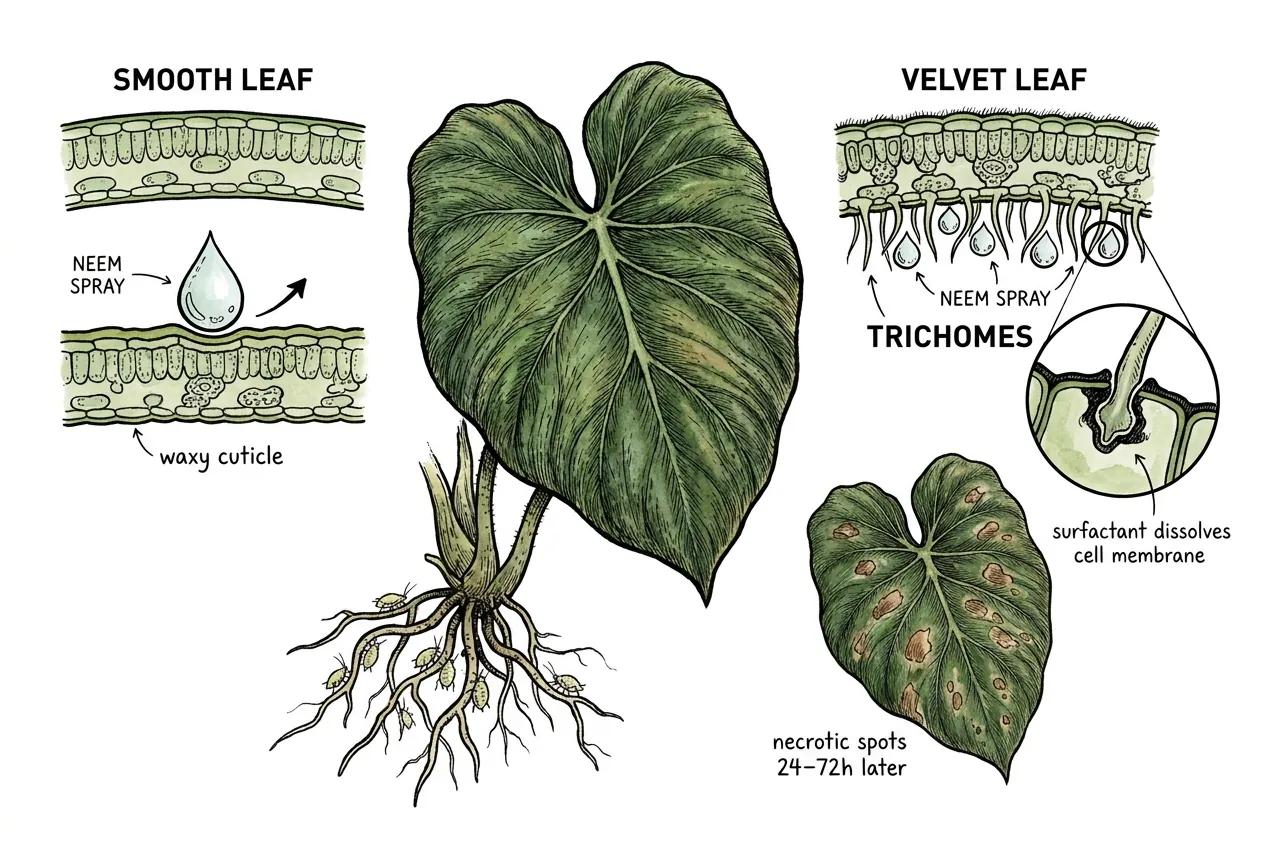
Much of the risk comes from the emulsifiers, not only the neem oil. Commercial neem and insecticidal soap products include surfactants to keep the oil suspended in water, and extension guidance flags that these can cause phytotoxicity, leaf spotting or burn, on sensitive plants.
Pubescent (hairy) leaves appear to be more sensitive than glossy ones. Cornell’s houseplant IPM material notes that soaps and horticultural oils can injure pubescent-leaf species, and Araceae are among the groups commonly cautioned about.
The likely reason is that a velvet leaf’s dense fine hairs hold spray droplets against the surface longer than a smooth waxy leaf sheds them, extending contact time.
Any necrotic spotting typically shows up in the days after application.
No verified trichome-density comparison establishes a precise risk for verrucosum. On a velvet aroid, spot-test any oil, soap, or neem product on one leaf and wait several days before treating the whole plant, or avoid foliar contact altogether by treating the substrate.
Cornell Cooperative Extension. Houseplant IPM
Will horticultural oil work if I’m careful?
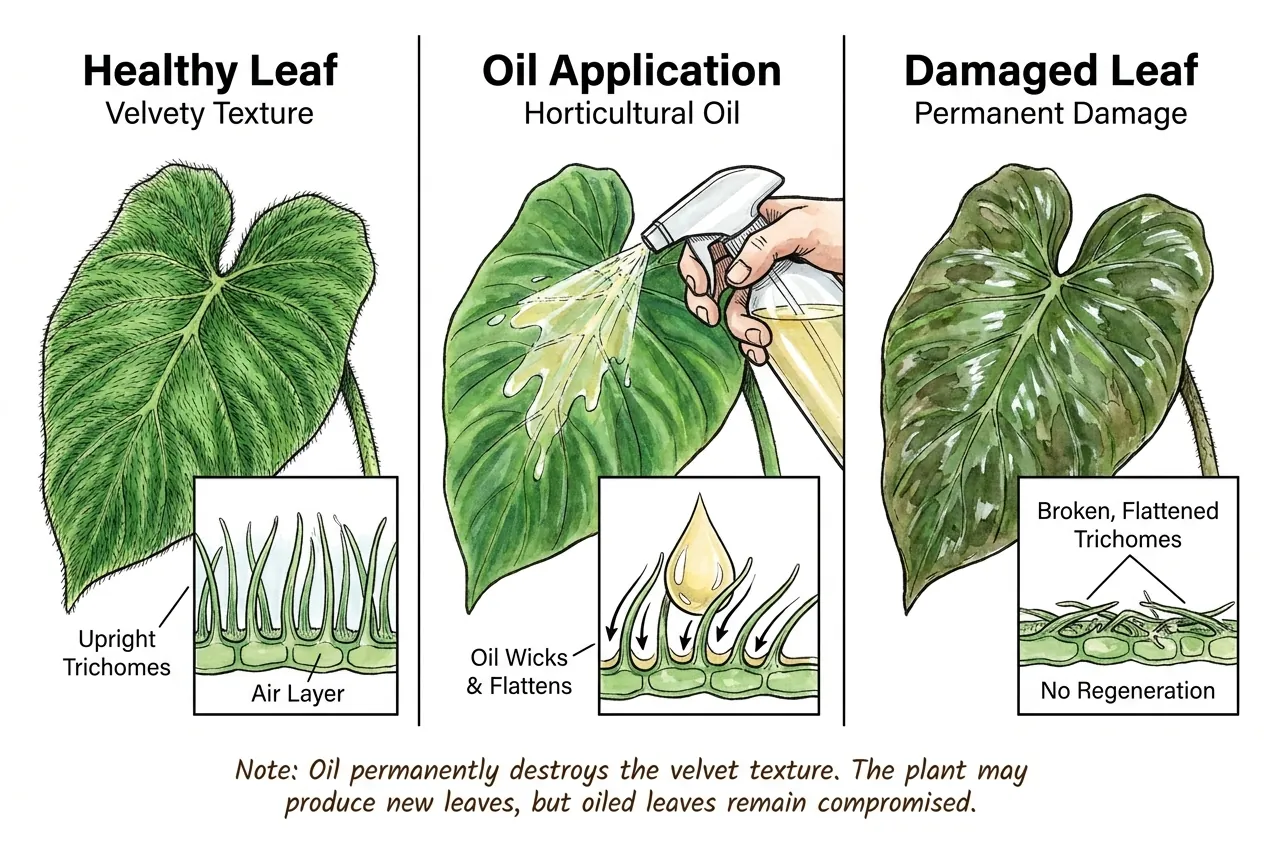
It is best avoided on the foliage. Beyond the phytotoxicity risk above, oils can coat and mat the fine leaf hairs and dull the velvet look.
Because a leaf’s hairs form during its development and are not rebuilt afterwards, matting or damage on an existing leaf may not recover on that leaf, even though the plant can go on to produce healthy new leaves if its roots are sound.
How much damage occurs depends on the specific product, its concentration, and how your plant reacts, so this is a caution rather than a guaranteed outcome.
If you want to avoid the risk entirely, keep oils off the leaves and treat the substrate instead.
What about translaminar foliar systemic actives?
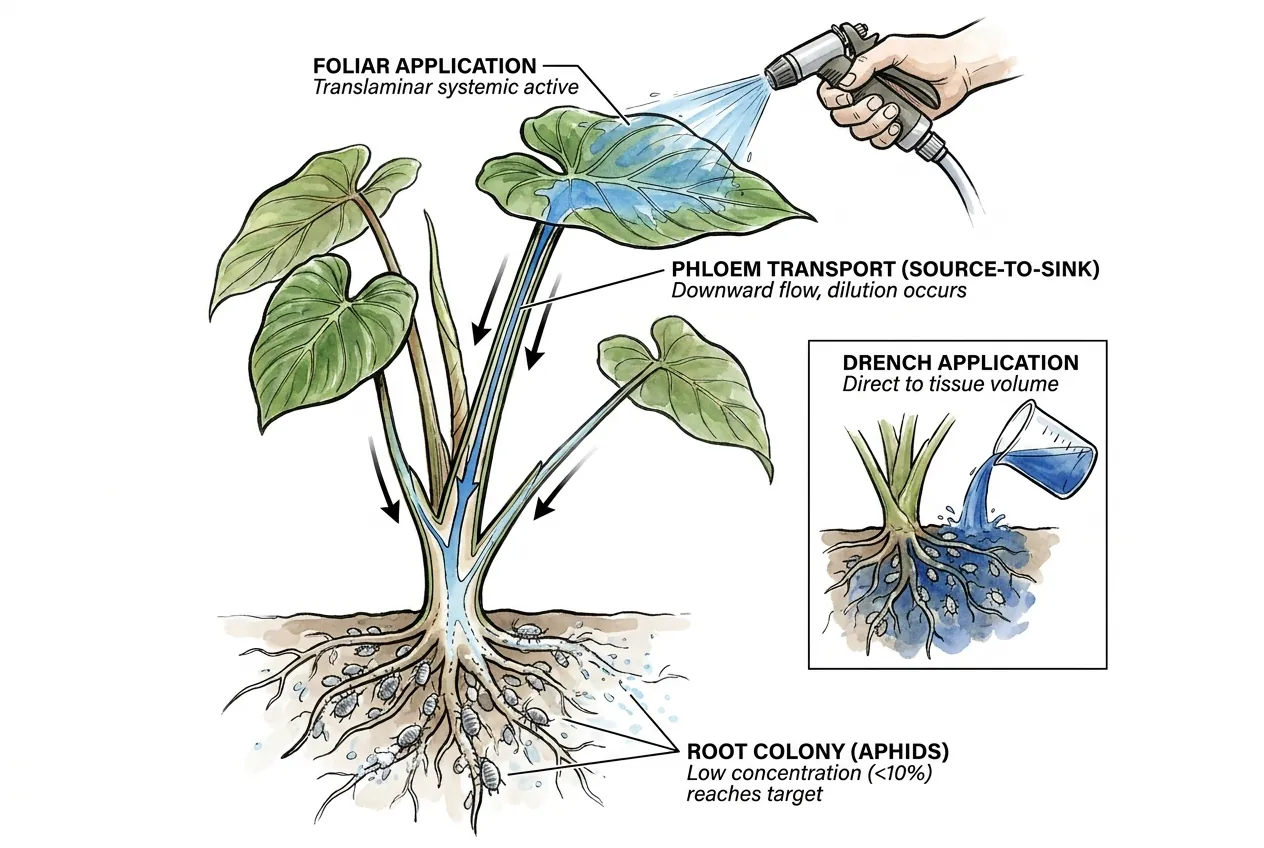
For a root-dwelling pest, the more direct route is to put the active where the pest is. Some systemics move phloem-to-sink after uptake. A two-way systemic such as spirotetramat is even labeled as moving into new roots as well as shoots after foliar application.
So it is not accurate to say a foliar systemic never reaches the roots.
The practical reason to drench is not that foliar treatment fails, but that a drench delivers the active straight to the root zone at the labeled rate, without wetting the sensitive velvet leaves.
For products labeled for soil mealybug on ornamentals, the substrate drench is the application method to follow on the label.
How do I confirm the diagnosis before treating?
Inspect Before You Drench
Confirm the pest before you treat. A simple sequence, rehydrate, unpot, rinse the root ball over a white tray, and inspect with a hand lens, helps you avoid mistaking unrelated soil arthropods or normal mycorrhizae for a pest colony.
It takes a few careful minutes per plant, and for a species-level answer you may still need to send a sample to a diagnostic lab. Diagnosis first, treatment second.
When should I unpot a plant for inspection?
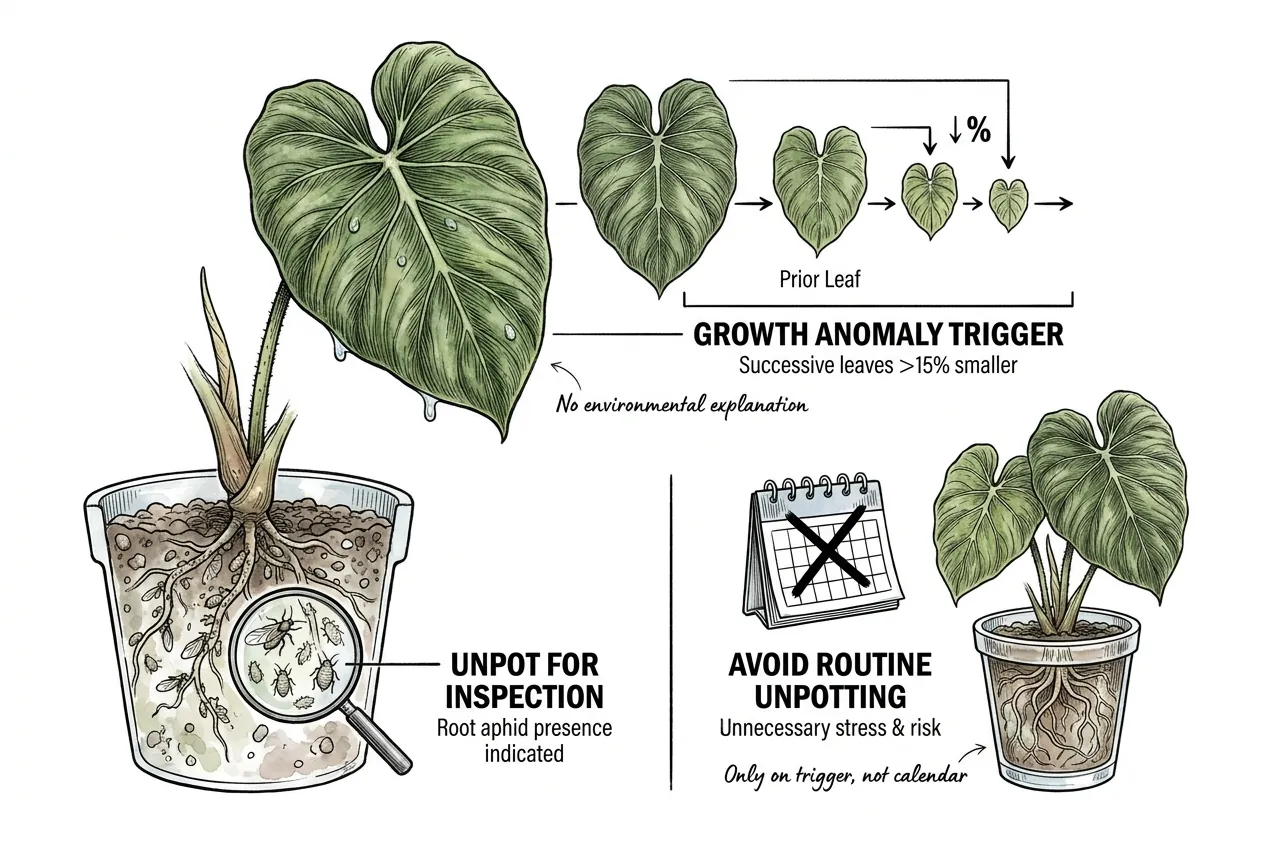
A good prompt to unpot and inspect is a run of noticeably smaller new leaves with no obvious environmental cause (a light, watering, or seasonal change).
Shrinking leaves are a general stress signal, not proof of a pest, so use them as a reason to look (then confirm what you actually find on the roots before treating).
The exact percentage isn’t a validated cutoff. A clear, sustained decline is what matters.
You don’t need to unpot on a fixed calendar. Routine unpotting of a healthy plant is stressful and can itself introduce problems through repeated substrate handling, so let symptoms and inspection findings guide the decision.
How do I pre-prepare for inspection?
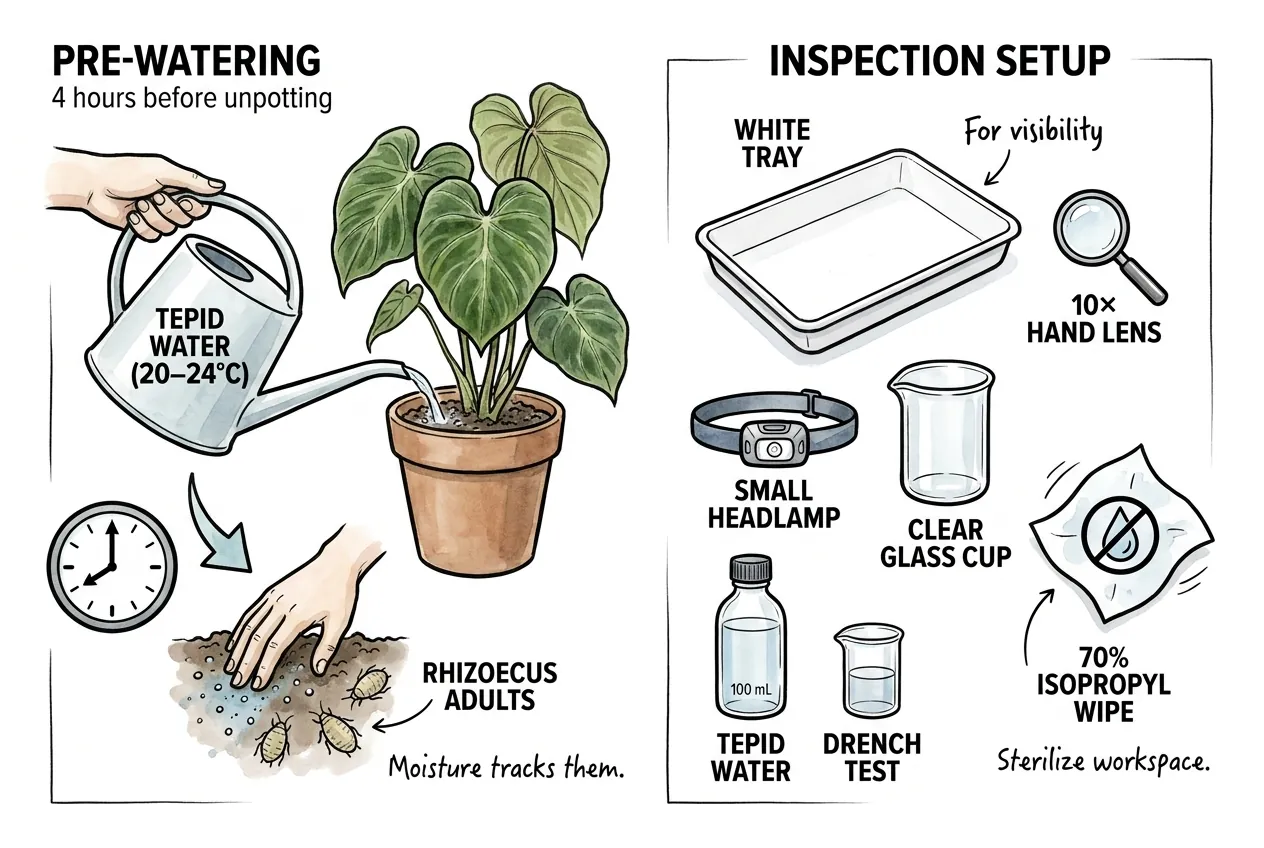
Water the plant with tepid (room-temperature) water a few hours before unpotting so the root ball is moist rather than bone-dry. Insects are easier to see on damp roots, and very cold water tends to make small pests less active.
This is a practical prep step, not a validated diagnostic procedure, so don’t over-water a rot-prone plant just to inspect it.
Pre-inspection setup
Lay out the following before unpotting.
- A white plastic or paper tray (cookie sheet works).
- A 10× hand lens.
- A small headlamp.
- A clear glass cup with 100 mL of tepid water for the drench test.
Sterilize the workspace with 70% isopropyl wipe before starting and between plants.
What is the drench test?
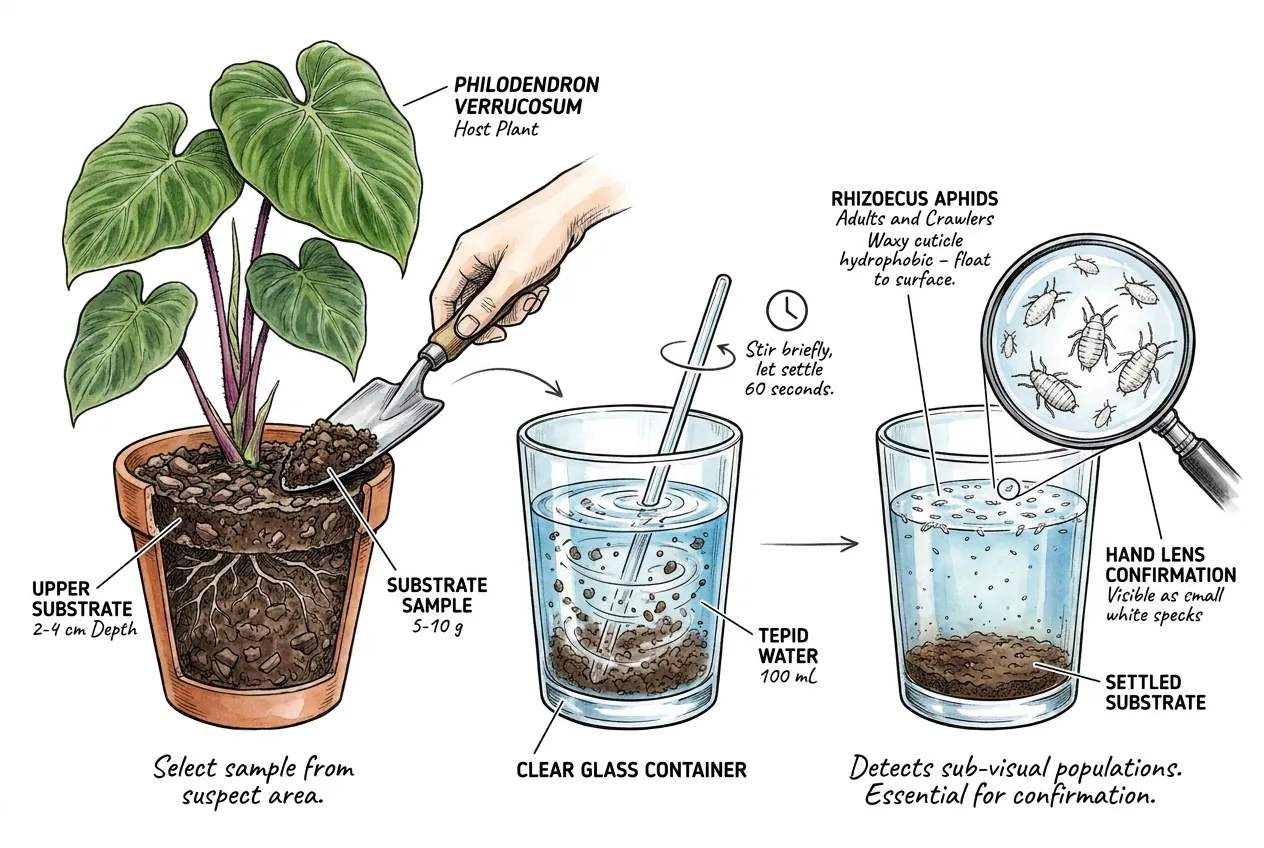
A simple float test can help you spot specks that are hard to see in the substrate. Swirl a small pinch of substrate from the pot in a clear glass of tepid water and let it settle for a minute.
Some waxy soil mealybugs are water-repellent and rise to the surface, where they show as small white specks under a hand lens.
Treat this as a quick screen, not a definitive test. Not every stage or specimen floats, organic debris and air bubbles can look similar, and a negative result does not prove the plant is clean.
Use it alongside direct root inspection, and confirm anything suspect with a hand lens or a diagnostic lab.
Which drench chemistries actually work on Rhizoecus?
Choose by Label and Mode of Action
Several substrate-applied actives are used against root-feeding mealybugs on ornamentals, including spirotetramat (Kontos), dinotefuran (Safari), imidacloprid (in retail houseplant granules), pyriproxyfen (an insect growth regulator), and azadirachtin.
The table below distinguishes their general modes of action. It is not a prescription, because efficacy and timing depend on the species, plant, substrate, dose, and current product label.
Before using any of them, follow the current product label for your region. The labeled target pest and site (some are for professional interiorscape or greenhouse use, not general home use), the per-pot drench rate, the maximum amount and interval, required PPE and re-entry intervals, and environmental cautions (several are toxic to bees and aquatic life).
If a product is not labeled for your situation, do not use it. For resistance management, rotate among different IRAC mode-of-action classes rather than repeating one.
The table lists mode-of-action class (which is reliable) and general role. It deliberately omits onset and persistence numbers, which are not reliably established for this pest and plant.
| Active | IRAC Class | General role |
|---|---|---|
| Spirotetramat | 23 (lipid biosynthesis inhibitor) | Two-way systemic. Acts on developing stages and reduces adult fecundity |
| Dinotefuran | 4A (neonicotinoid) | Systemic neonicotinoid, mainly used for knockdown of feeding stages |
| Imidacloprid | 4A (neonicotinoid) | Systemic neonicotinoid found in retail houseplant granules |
| Pyriproxyfen | 7°C (insect growth regulator) | Disrupts development. Does not kill adults directly |
| Azadirachtin | UN (unclassified) | Rotation diversity. Effects are variable |
Why is spirotetramat the first-line choice?
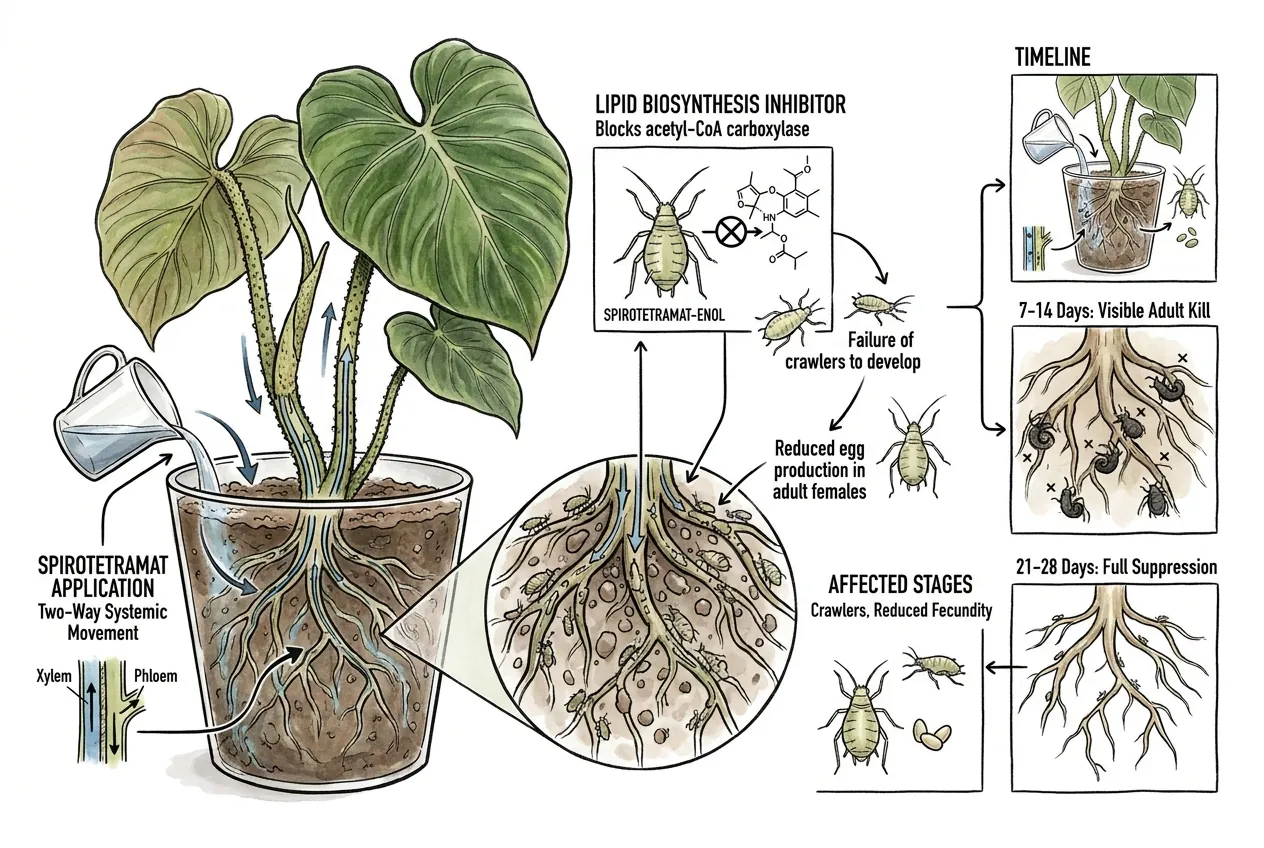
Spirotetramat is a two-way systemic, moving in both xylem and phloem after uptake. It is a lipid biosynthesis inhibitor (IRAC 23). The label describes it as acting on insects through feeding and as reducing the fecundity of adult females rather than promising a fixed adult kill time.
Because new stages have to feed on treated tissue to be affected, results build over weeks rather than appearing immediately.
No specific trial establishes a percentage reduction or day-by-day kill schedule for spirotetramat against Rhizoecus on Philodendron verrucosum.
Judge results by follow-up root inspections instead of an assumed timeline.
Kontos Is for Licensed Applicators
Kontos is a spirotetramat product for professional ornamental use. It carries PPE, restricted-entry, and environmental requirements.
Most hobbyists cannot legally buy or apply it, so use a licensed applicator if this product is appropriate for the confirmed pest and site.
Use Drench Directions, Not Foliar Math
The greenhouse rate often quoted as 1.7–3.4 fl oz per 100 gal is a foliar spray dilution. You cannot simply divide that rate into a pot’s water volume (for example ~600 mL) to get a drench dose. The Kontos label gives a separate per-container drench table, and using the foliar figure this way can under-dose a small pot several-fold.
If you use this product, follow the label’s drench table for your container size, wet the substrate per the label without driving product out the bottom, and observe the label’s maximum amount and interval.
Do not follow any per-pot number derived by hand from the foliar rate.
For an indoor retail option, consider only a product whose current registration and label explicitly cover indoor non-food container plants and the identified target pest. Do not select or dose a systemic granule by active ingredient alone. The product label sets the crop, site, pest, per-pot amount, reapplication interval, maximum uses, and safety restrictions.
A general mealybug label is not proof of efficacy against a particular Rhizoecus species. Use a permitted product only as directed and judge results by inspection.
Imidacloprid is a neonicotinoid. Keep the treated plant indoors, and never move it outdoors while flowering, since neonicotinoids are toxic to bees and other pollinators.
Follow the granule label’s per-pot amount and reapplication interval exactly rather than eyeballing.
What if I need faster knockdown than spirotetramat?
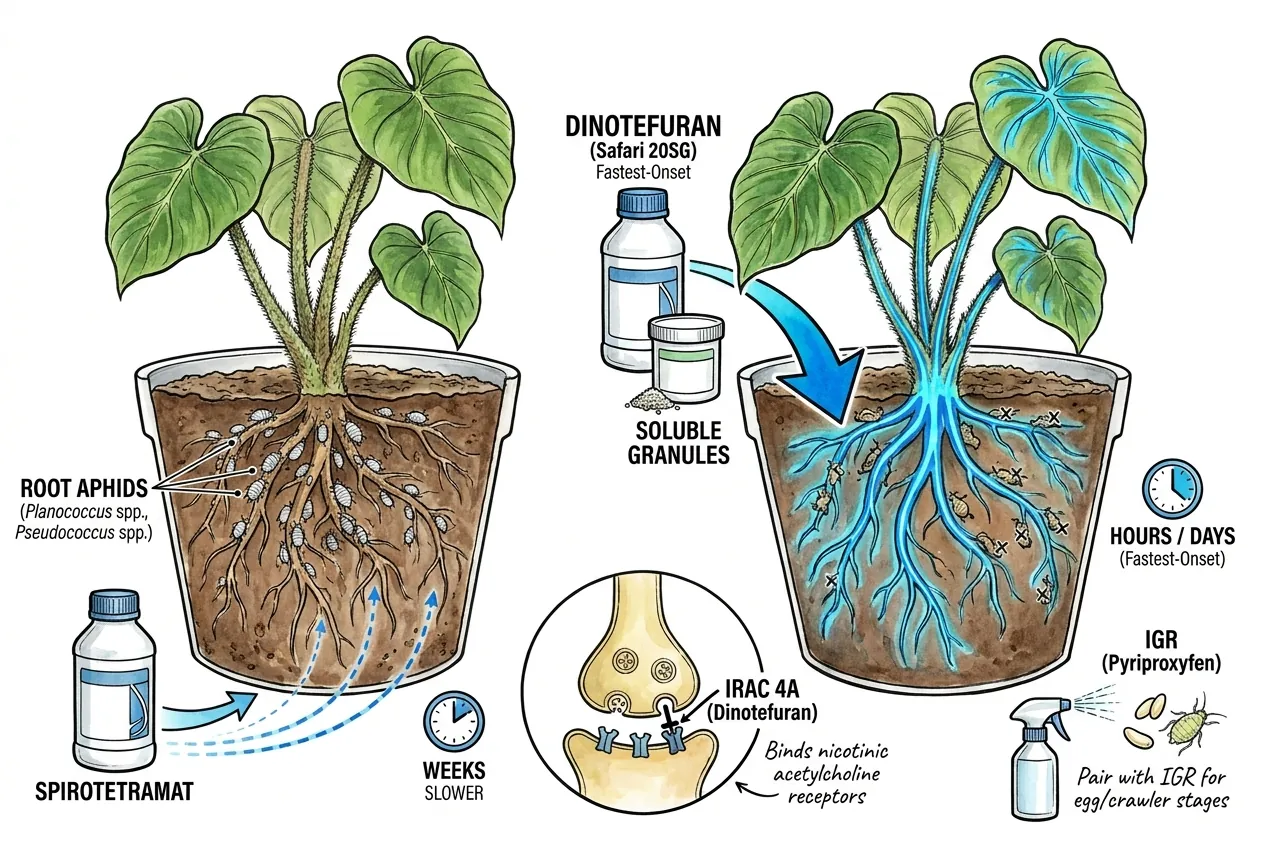
Dinotefuran (Safari 20SG) is a neonicotinoid (IRAC 4A) used as a systemic treatment on labeled ornamental sites. No specific onset ranking or percentage suppression is established for this pest and plant.
Judge results by inspection.
Like other neonicotinoids it acts mainly on feeding stages, so on its own it won’t address eggs already laid.
Pairing it with an insect growth regulator is a reasonable strategy where labels allow, but it is not a mandatory universal combination. Check that both products are labeled for your target and site first.
Safari Is Also a Professional Product
Safari 20SG is a dinotefuran product for labeled ornamental sites and is generally sold through professional suppliers.
Do not source a professional pesticide or substitute a retail granule by active ingredient alone. Any product still has to match the current registration, plant, pest, site, and application method.
Label Directions for Licensed Applicators
Follow the current Safari label for the target pest, container drench rate, the maximum applications per crop cycle, and the label’s conditions, including wetting the medium and avoiding leaching for the specified period.
Do not derive a per-pot dose by hand from a per-100-gallon rate. Use the label’s drench directions for your container.
Where labels permit, an insect growth regulator such as pyriproxyfen can follow to target eggs and crawlers.
Repeated use of one mode of action can select for resistance. If the label and local guidance call for another treatment, rotate by IRAC group rather than merely changing brand names. A different active ingredient is not automatically permitted or effective indoors, so verify the target pest, crop, site, application method, and maximum uses on every label. Handle professional products with licensed-applicator or local Extension guidance.
Indoors, pollinator exposure is limited, but remain cautious if the treated plant later moves outdoors during pollinator season, and note the label’s aquatic and groundwater cautions.
When does pyriproxyfen fit?
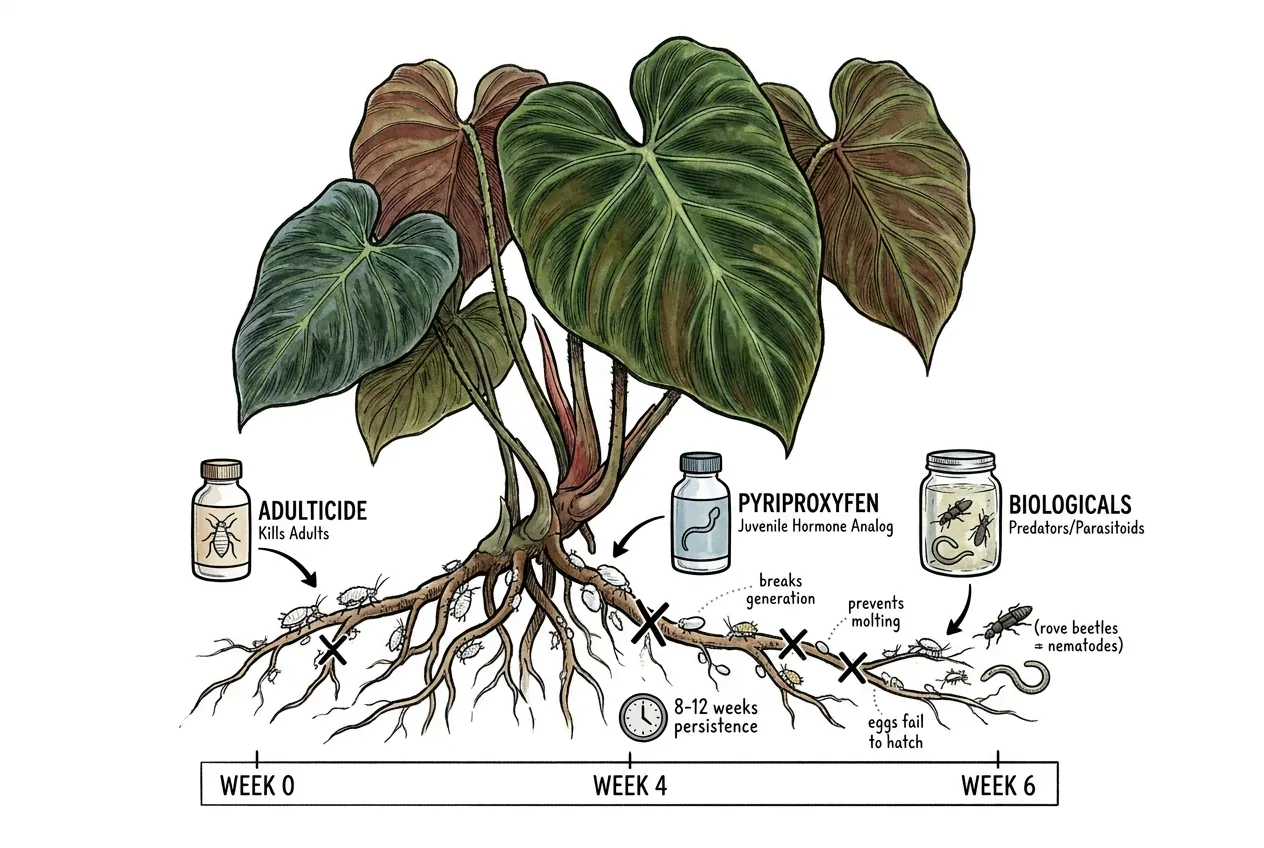
Pyriproxyfen is a juvenile hormone analog (IRAC 7C) that interferes with normal molting and egg hatch.
It does not kill adults directly. Its value is in targeting the next generation, so it can complement an adulticide.
Whether to pair it depends on your situation and, above all, on whether the specific product is labeled for your target pest and site. It is not a mandatory universal step.
Substrate persistence varies with the product, medium, watering, and light exposure. Do not follow a fixed number of weeks.
Any follow-up treatment must follow the product label and root inspections rather than a universal calendar.
Do beneficial nematodes actually work indoors?
Beneficial nematodes may support a program, but they are mainly marketed and validated for fungus gnats and other soil pests. No independent study establishes a specific suppression rate against Rhizoecus soil mealybugs.
Do not expect a guaranteed result. Heterorhabditis bacteriophora is a warmer-substrate alternative species, while predatory mites are best treated as general soil-pest suppression rather than a cure for root mealybugs.
Which nematode species should I use?
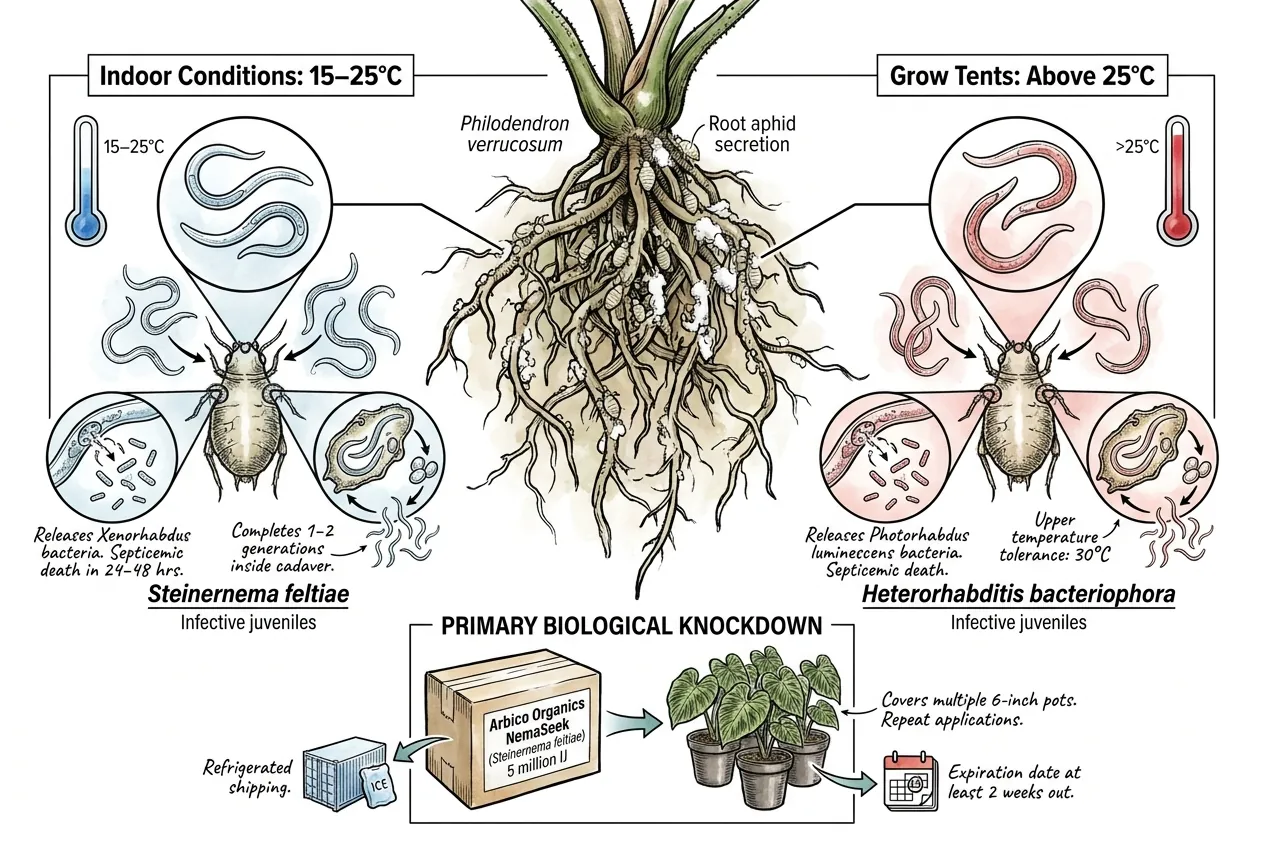
Steinernema feltiae suits the cooler indoor temperatures typical of most apartments. In general, infective juveniles enter a host through natural openings and release symbiotic bacteria that kill it, then reproduce inside the cadaver before the next generation emerges into the substrate.
That is the general mechanism against susceptible soil insects. Whether it reliably controls Rhizoecus on your plant is not established, so use it as a supplement, not a stand-alone cure.
For warmer grow tents, Heterorhabditis bacteriophora (with a different symbiotic bacterium, Photorhabdus) tolerates higher substrate temperatures.
Match the nematode species to your substrate temperature and follow the supplier’s conditions.
Spec for the primary biological knockdown
If you try nematodes, look for live Steinernema feltiae with refrigerated shipping and a comfortable expiration date, since viability is the whole game.
Hobbyist-scale packets are widely sold and typically marketed for pests such as fungus gnats and root aphids, but that marketing is not the same as an independent efficacy trial against Rhizoecus, so keep expectations modest. If your real problem is fungus gnats rather than a root mealybug, it helps to match control to the pest's life stage.
Pre-moisten the substrate, mix the nematodes in tepid water per the packet, and drench. Follow the packet’s own coverage and rate for your pot size rather than a fixed pack-to-pot ratio.
Nematodes need a moist substrate to move and survive, so the application period runs wetter than verrucosum’s usual routine of letting the top dry out.
That is exactly why this carries risk. Prolonged wetness in a chunky aroid’s pot can encourage root rot.
If your plant already has any root-rot concern, or its mix stays wet easily, it is reasonable to skip biologicals rather than push the moisture window.
Refrigerate on arrival and use within the expiration window.
Can I apply nematodes right after a chemical drench?
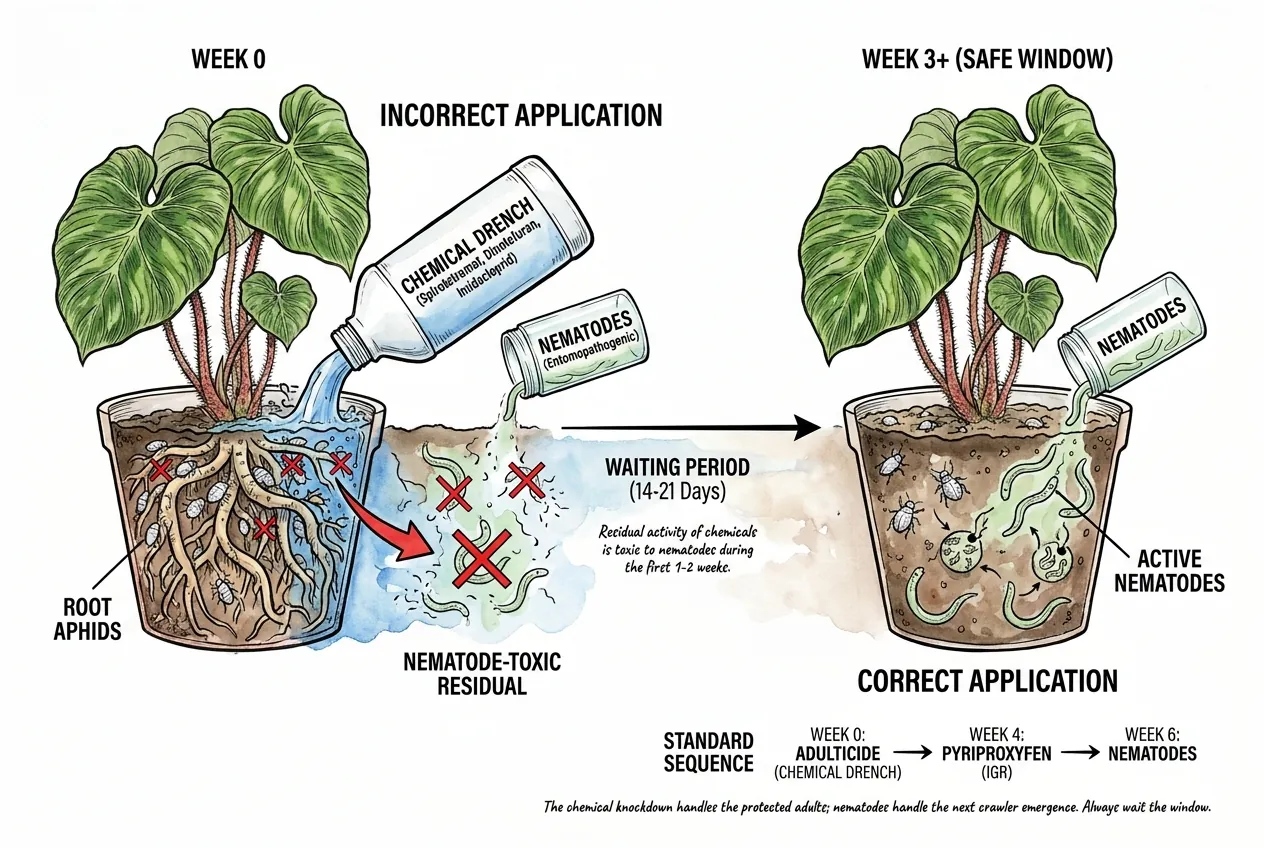
It’s prudent to leave a gap, but the details matter. Compatibility between systemic insecticides and entomopathogenic nematodes is not uniform. Some pairings are harmful, while others, including imidacloprid with certain nematodes, have been reported as compatible or even additive.
There is no single rule that declares a fixed set of products toxic to nematodes for a fixed number of days.
Separate Chemical and Biological Treatments
Separate a chemical drench and a nematode release rather than applying them together, and check the nematode supplier’s and the pesticide label’s guidance for the specific products you’re using.
Let the adulticide address feeding stages first, then use nematodes as a supplemental measure against later emergence if you choose to use them at all.
Where do predatory mites fit?
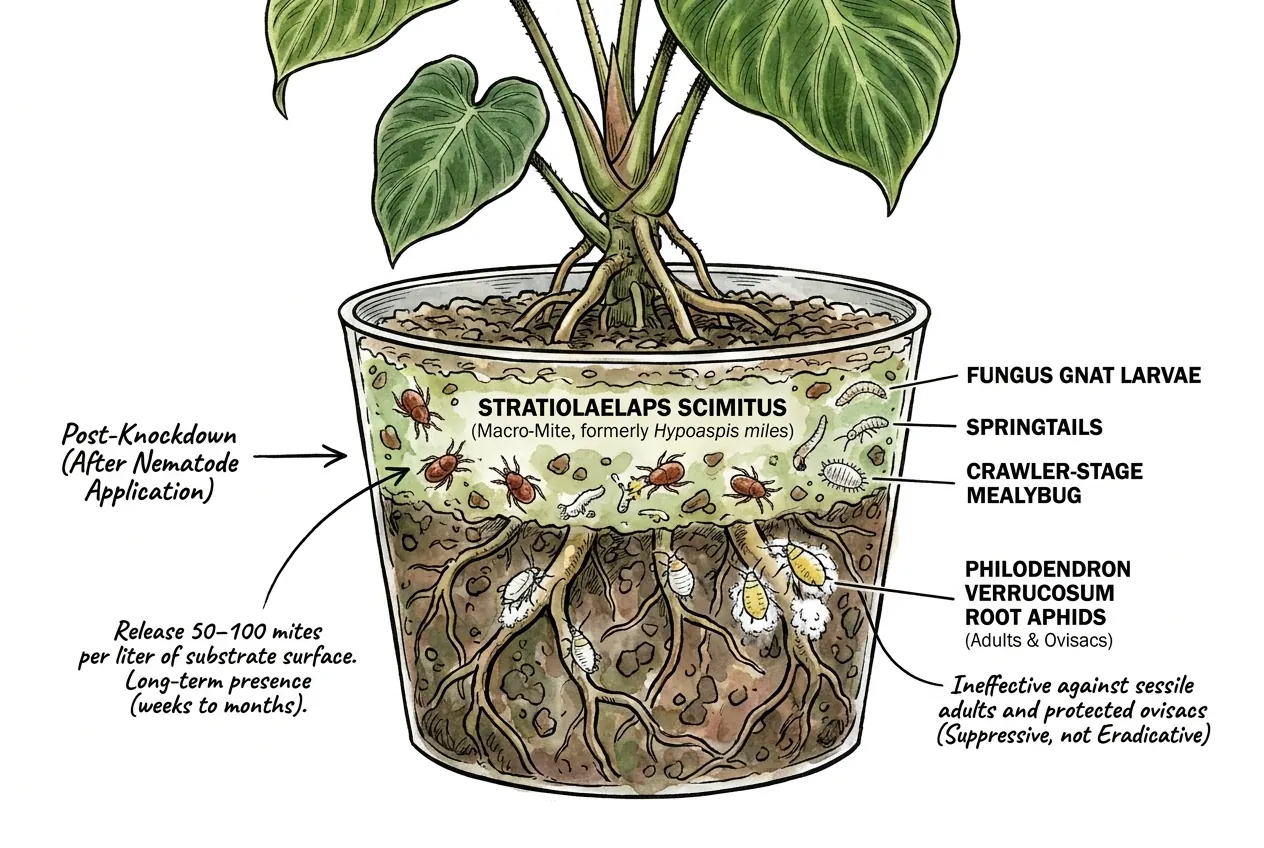
These are a general soil-hygiene layer, not a targeted root-mealybug control. Stratiolaelaps scimitus (formerly Hypoaspis miles) lives in the upper substrate, and its well-documented prey are fungus gnat larvae and pupae, thrips pupae, and springtails.
There isn’t good evidence that it meaningfully preys on root mealybug crawlers, so don’t count on it to control this pest.
If you release it for general soil-pest suppression, follow the supplier’s recommended rate for your pot area rather than a fixed number per liter, and understand it is a maintenance measure rather than a cure for a Rhizoecus problem.
When should I bare-root and dip instead of in-place treatment?
Bare-rooting and dipping is a more aggressive option that some growers use when a colony is concentrated and accessible and the plant has enough sturdy root mass to tolerate the disturbance.
It does not offer guaranteed one-cycle eradication. Hidden individuals, eggs, or re-contamination can survive it, and the dips below carry real plant-safety questions on a velvet aroid.
Treat it as a considered choice, not a sure thing.
Skip bare-rooting for mature specimens with extensive fine feeder roots, where the mechanical damage from stripping substrate is likely to outweigh any benefit.
The gentler alternative is a substrate-directed, label-based program with repeated inspections.
Which dip variant should I use?
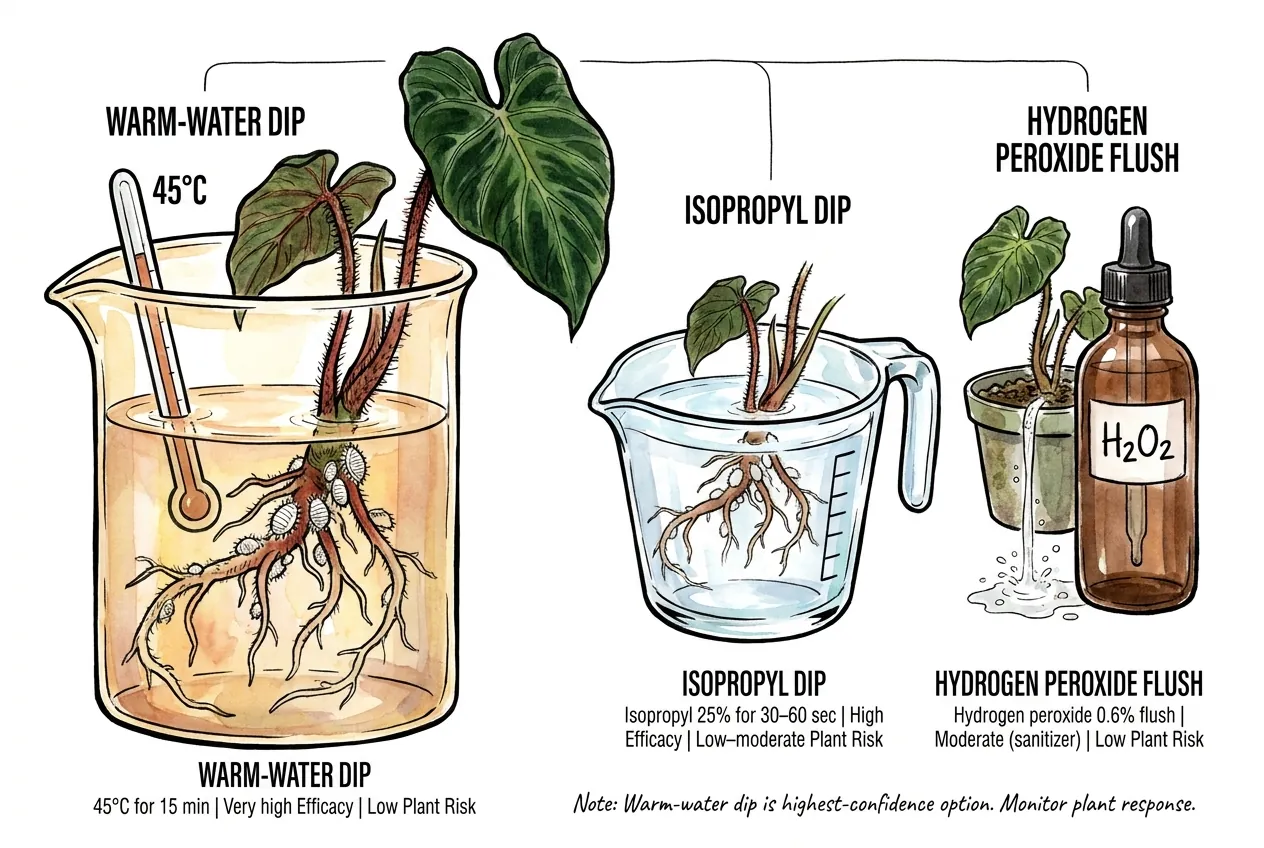
Warm-water immersion is a real technique in quarantine settings, but be careful how it transfers.
The published hot-water work for soil mealybugs was done on a specific potted plant (Rhapis), immersing the pot until its core reached a target temperature and holding it there before cooling, for example around 49°C with a timed hold.
Quarantine and review sources give a range of temperature and time combinations for different pests and stages, not one universal figure, and there is no verified APHIS 47°C × 15 min standard for this situation.
These conditions have not been validated for bare-root Philodendron verrucosum. Heat that kills insects can also damage roots, and the safe window differs by plant, root-ball size, and temperature measurement.
Do not use a fixed bare-root hot-water recipe for this plant. If you pursue the method at all, use a published protocol for a comparable potted plant and test it only on a plant you can afford to lose.
The comparison below is honest about how thin the evidence is for these dips on this plant.
None of them has a validated efficacy-and-safety profile for bare-root Philodendron verrucosum against Rhizoecus, so the efficacy and risk entries are cautions, not measured ratings.
| Method | Evidence for this plant/pest | Main caution | Equipment |
|---|---|---|---|
| Warm-water immersion | Method exists for other potted plants, not validated for bare-root verrucosum | Heat can damage roots. Needs core-temperature control | Temperature-controlled bath, thermometer |
| Dilute isopropyl root dip | No reliable efficacy or tolerance data for root dipping | Solvent can injure root tissue. Flammable | Measuring cup |
| Hydrogen peroxide flush | A sanitizer, not a proven insecticide for this pest | Effect on eggs/adults unproven. Can stress roots | Drugstore H2O2 |
| Insecticidal soap submersion | Contact effect on exposed insects only | Surfactant phytotoxicity risk. Keep off velvet leaves | Soap, container |
Setup for warm-water dip
Gather the following before starting.
- A clean bucket large enough for the bare-rooted plant.
- An aquarium heater rated for the bucket volume.
- An accurate thermometer (lab-grade or kitchen instant-read).
- Tepid plain water for the rinse.
- A fresh sterilized pot with new substrate ready for re-potting.
If you attempt this, follow a published method for a comparable potted plant rather than an invented recipe. Control the temperature to the target the source specifies, verify it with a thermometer, and understand that the effective and safe window has not been established for verrucosum.
Do not treat a plant you cannot afford to lose without testing first.
Keep the canopy out of the dip solution. Tie up leaves or hold them above the water line. Warm water and any additives on velvet leaves risk visible leaf damage, so avoiding foliar contact is a sensible precaution regardless of the exact outcome.
What about isopropyl alcohol short dip?
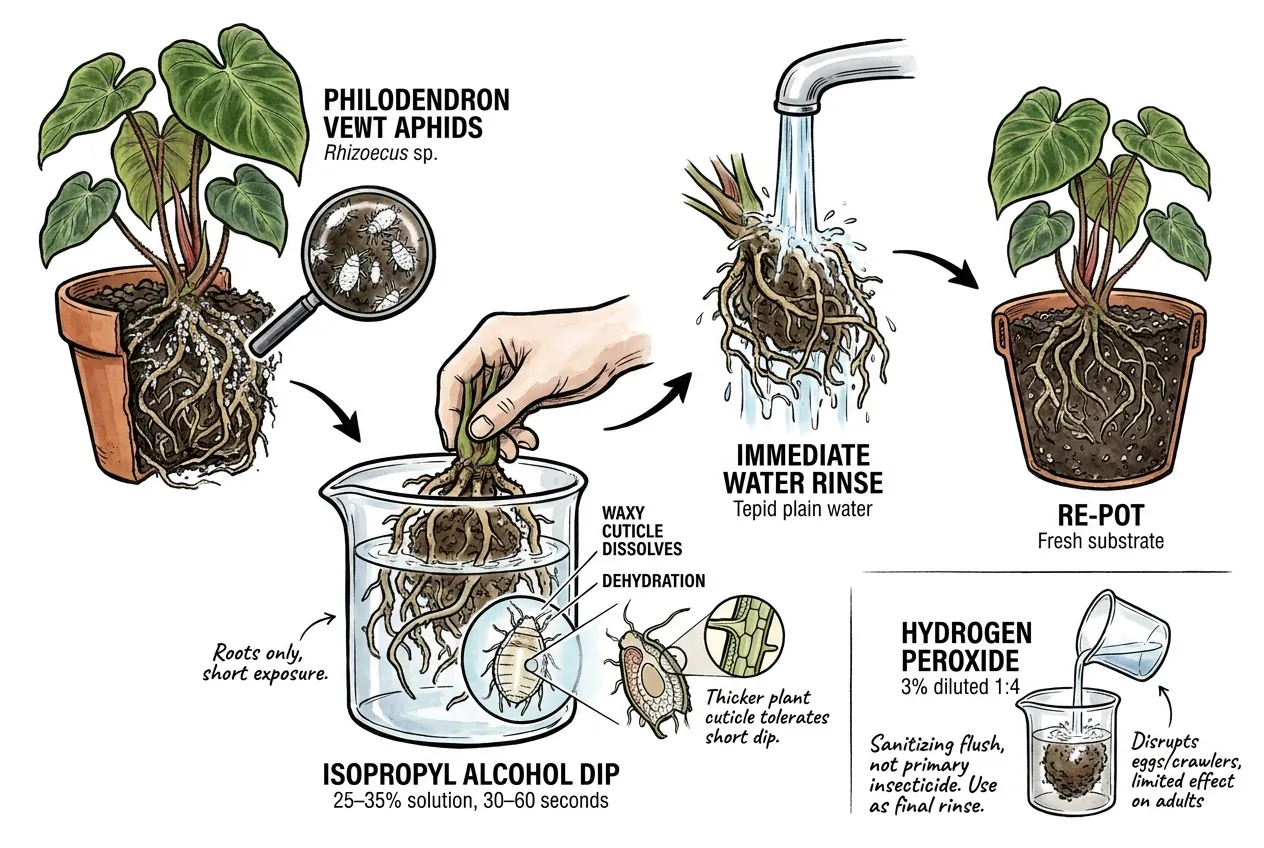
An isopropyl-alcohol root dip is neither a proven nor a safe method for this plant. Extension guidance uses alcohol to spot-treat exposed mealybugs, not to submerge living roots.
There is no reliable efficacy or root-tolerance data for a 25–35% alcohol root dip on this plant, and alcohol can injure roots and is flammable. Do not use it as a root treatment.
Hydrogen peroxide is a sanitizer, not a proven insecticide
Diluted hydrogen peroxide is sometimes used as a mild substrate sanitizer, but it is not a proven insecticide for Rhizoecus, and extension answers caution that hydrogen peroxide’s pest efficacy is unverified and that it can harm plants, people, and beneficial organisms.
Even a short peroxide dip on orchid roots in one study raised concerns about growth setbacks.
Do not rely on it to destroy eggs or kill protected adults. At most treat it as a general rinse, and prioritize accurate diagnosis and label-based treatment over home remedies.
What does a defensible IPM rotation actually look like?
Build a Long Treatment Window
Use one label-approved treatment at the time and rate the label specifies. Inspect the root zone again at the label’s follow-up interval, and keep the plant isolated until several inspections over the pest’s multi-month generation remain clean.
Do not create a calendar rotation by combining professional insecticides, growth regulators, and beneficial organisms on fixed weeks. If control fails, confirm the pest again and seek local Extension or licensed-applicator guidance before changing modes of action.
Why Should Follow-up Continue for Months?
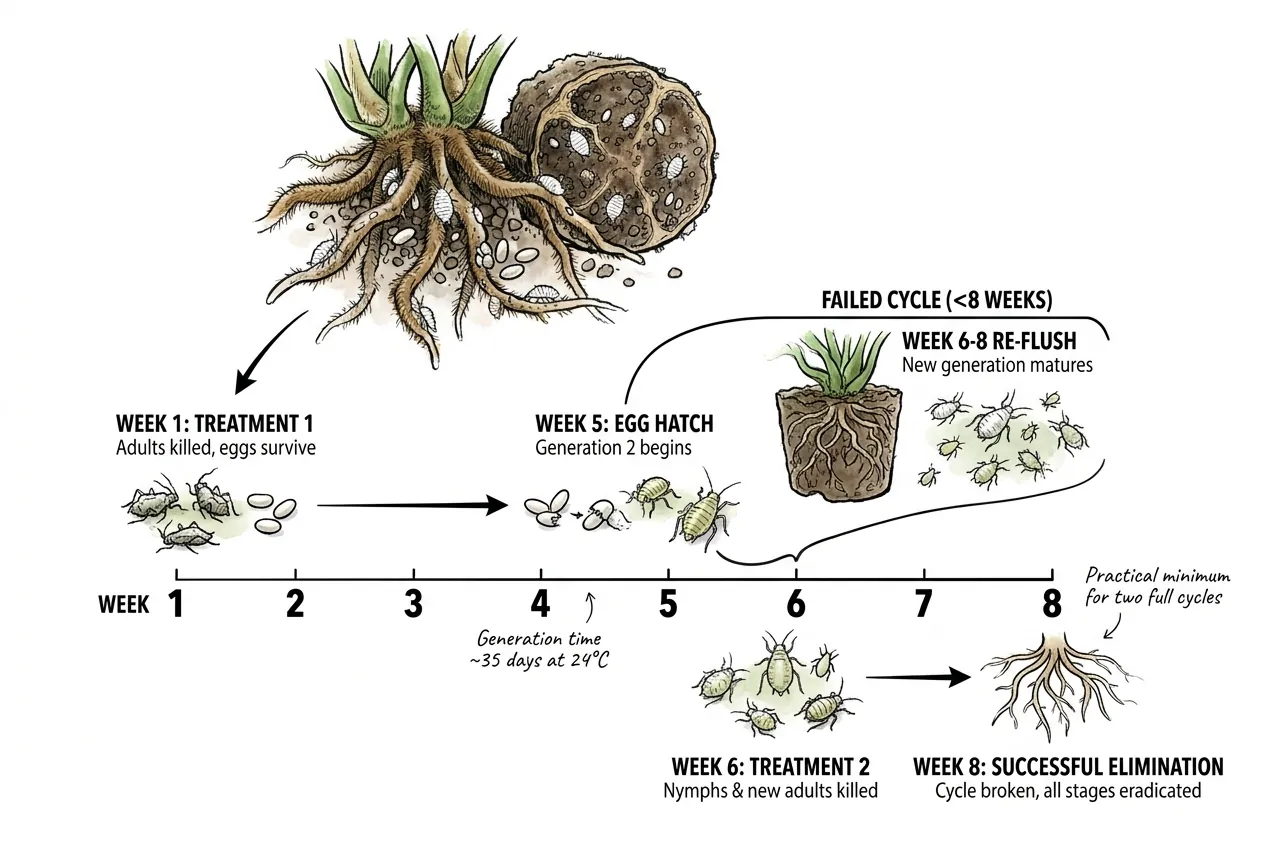
To cover the life cycle, not to hit a round number. Because a single generation of a ground/root mealybug can run two to four months depending on temperature, a program that stops at a few weeks will leave viable eggs behind and invite a re-flush.
Plan for a program that spans months and keep inspecting past your last treatment. Adjust the timing to your own temperatures rather than assuming a fixed 35-day cycle.
How do I prevent infestations in the first place?
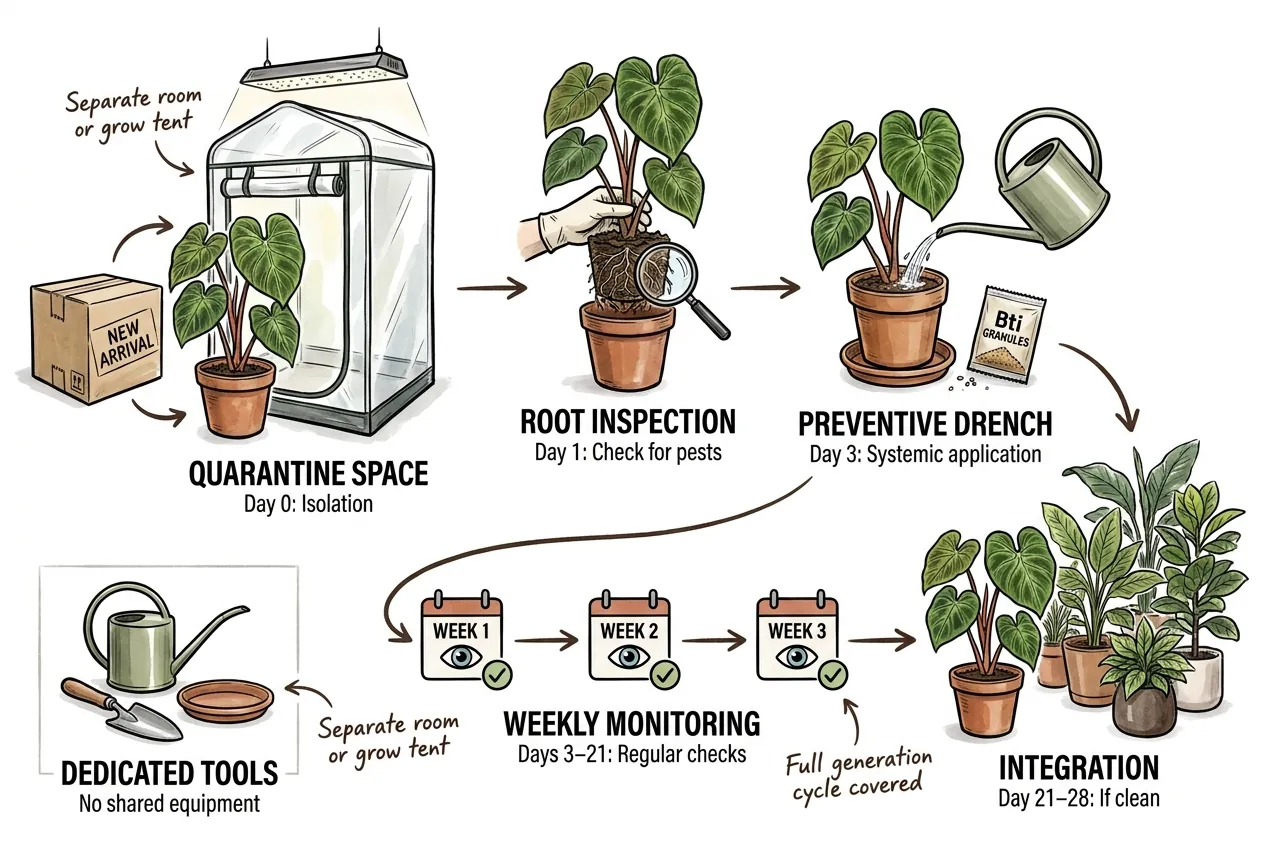
Quarantine every new arrival. A sensible routine is inspection-led rather than pesticide-led.
- Day 0 (isolate the plant in a separate room or grow tent).
- Day 1. Inspect the root ball (only unpot if there is reason to).
- Following weeks. Inspect regularly and watch for symptoms.
- Release into the collection once it has stayed clean for an extended period.
Do not apply a preventive systemic drench to every symptom-free new plant. Reserve pesticide treatment for a confirmed pest and use inspection-based quarantine instead.
Because a Rhizoecus generation can span two to four months, a 3–4 week quarantine may miss a low-level infestation. A longer watch period is safer for valuable plants.
Quarantine routine for any incoming aroid
Establish a physically separated quarantine space. A clean IKEA cabinet with a grow light works for collection-scale quarantine, though a separate room is better.
The space must have its own air circulation and its own watering tools (no shared saucer or capillary mat with the main collection).
A Bti (Bacillus thuringiensis israelensis) topdressing can help against fungus gnats, which are the most common co-occurring pest in quarantine.
Be clear about its scope, though. Bti targets fly larvae such as fungus gnats and is not a control for root mealybugs, so use it for gnats, not as a barrier or preventive treatment against Rhizoecus.
Mosquito Bits or pure Bti granules are standard hobbyist products for the gnat problem.
How do I keep the verrucosum alive through treatment?
Give the plant stable warmth, good humidity, and gentle care while its roots recover, and expect the process to take weeks rather than days.
The specific numbers people cite (an exact humidity target, a fixed fertilizer fraction, a set number of weeks) aren’t established values, so treat them as rough guidance to adapt to your plant and setup rather than a formula.
Support Recovery Without Forcing Growth
Don’t try to boost a stressed plant with extra fertilizer. Feeding hard adds osmotic stress to already-damaged roots and tends to slow recovery, so keep feeding light and consistent until new growth returns.
Why does humidity matter so much during recovery?
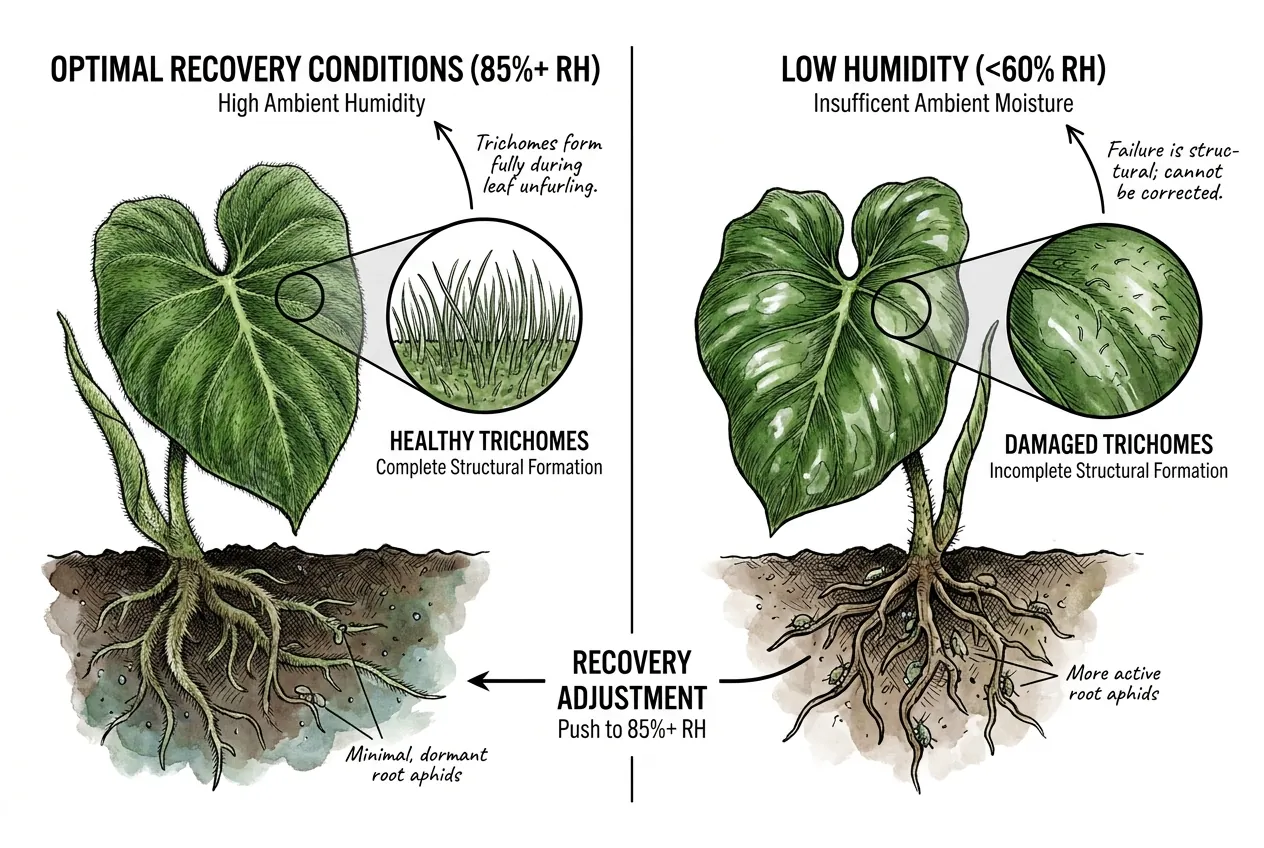
P. verrucosum is a plant of humid tropical forest. Kew’s Plants of the World Online records its native range across a broad band from Costa Rica to Peru, so it is not limited to a narrow Ecuador–Colombia elevation window. The common thread is consistently high ambient humidity, not a single altitude.
Velvet leaves generally look their best when they develop under high humidity, and low humidity during leaf development can leave newer leaves less uniformly velvety.
No verified RH cutoff or fixed leaf-by-leaf recovery rule applies here, so keep humidity steady while a new leaf forms rather than chasing one number. Light, genetics, maturity, and nutrition also affect leaf appearance.
Recovery Targets Are Flexible
Use the following values as typical ranges rather than strict targets, and adjust them to your plant.
| Condition | General aim | Recovery direction |
|---|---|---|
| Relative humidity | Comfortably high for a velvet aroid | Keep steady and high. Pair with airflow to limit disease |
| Root-zone warmth | Warm room temperature | Avoid cold roots. Gentle bottom warmth if the room is cool |
| Fertilizer | Normal dilute feeding | Ease off. Don’t over-feed damaged roots |
| Light | Moderate indoor brightness | Slightly softer light to reduce stress on recovering roots |
What recovery indicators should I monitor?
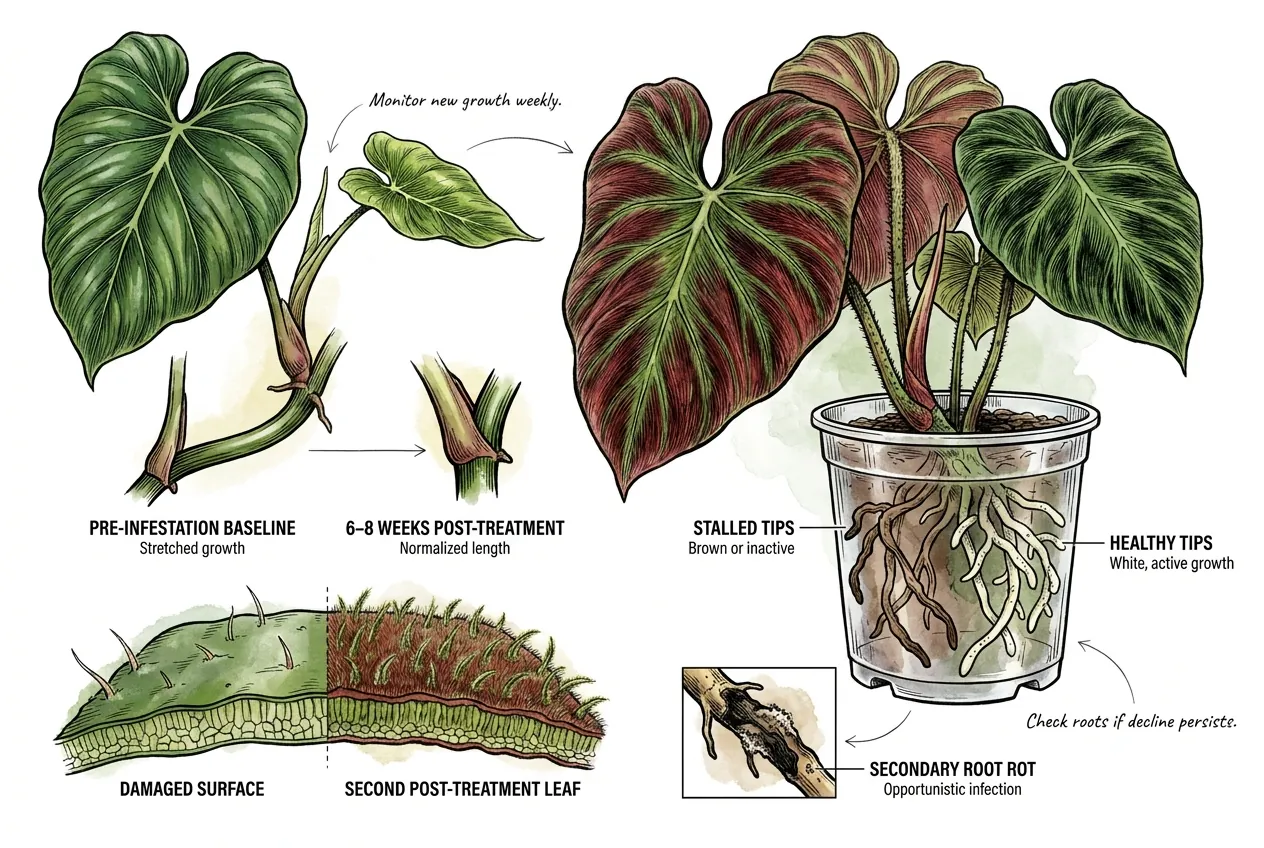
Watch a few practical signals rather than exact numbers. New leaves gradually returning toward their previous size, internodes tightening back up, newer leaves showing more uniform velvet, and white, actively growing root tips (easy to see through a clear nursery pot) are all encouraging.
Brown or stalled root tips suggest continuing trouble. The precise percentages and week counts are individual to each plant, so track the trend, not a target.
If the plant keeps declining after treatment and the pest appears gone, look into root rot, but don’t name a pathogen from symptoms alone.
Mushy or blackened roots can come from overwatering, low oxygen, bacteria, mechanical damage, or fungi such as Phytophthora or Fusarium, and these look similar.
Extension guidance is to confirm the cause (a lab test if it matters) rather than guessing.
The conservative response is to unpot, trim clearly dead roots with sterilized tools, let cut surfaces air-dry, and repot in fresh, well-draining aroid mix, then correct watering and drainage.
Home dusts such as cinnamon or sulfur are sometimes used but are not proven treatments for root pathogens, so don’t rely on them in place of fixing the underlying moisture problem or getting a diagnosis.
Troubleshooting and common mistakes
Underdosing the drench
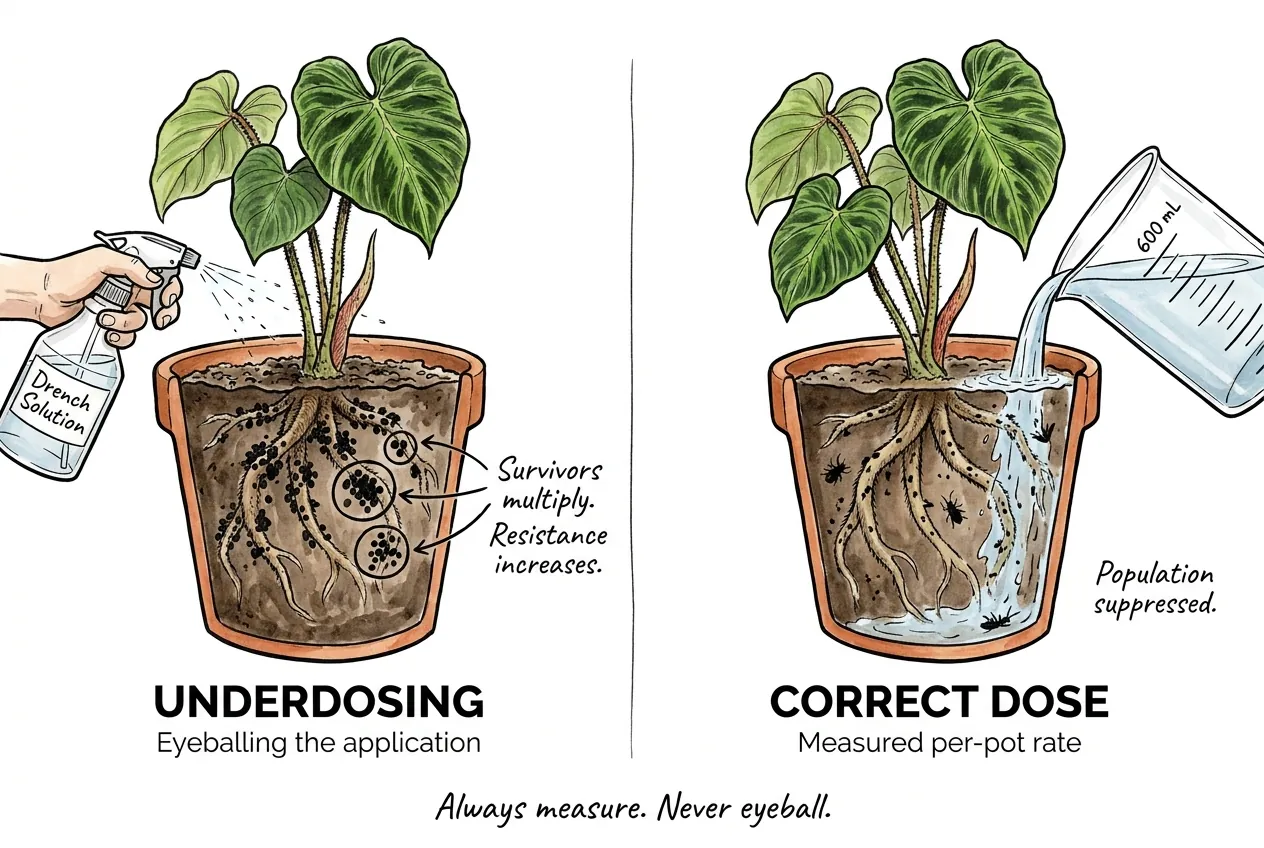
Applying a few splashes of drench without measuring tends to under-dose, which can leave the population intact and select for survivors. Measure your dose.
Get the dose from the label’s drench directions for your container size, not by dividing a per-100-gallon foliar rate into a pot’s water volume. Those are different figures, and the shortcut can under-dose a small pot several-fold.
A pot holding roughly 600 mL of water tells you the carrier volume, not how much active product to add. Always follow the labeled per-container rate and measure it.
Mode-of-action repetition
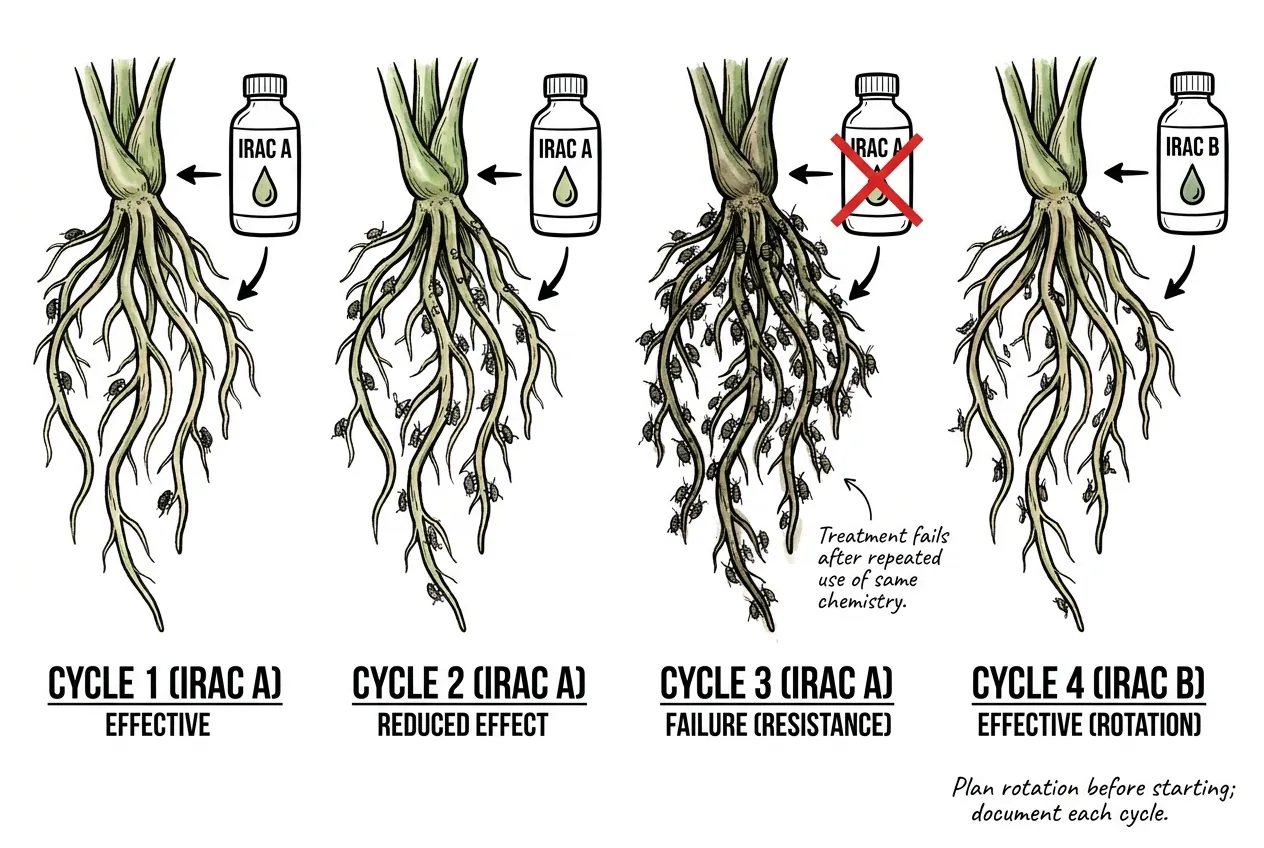
Repeatedly relying on one mode of action raises the long-term risk of resistance in a population.
A single reuse does not instantly fail. Resistance is about cumulative selection pressure across your whole treatment history, so rotating mode-of-action classes is sound practice.
Verify the alternate active is genuinely a different class, not a rebranded product with the same chemistry.
Spirotetramat is IRAC 23. Dinotefuran and imidacloprid are both IRAC 4A. Pyriproxyfen is IRAC 7C, and azadirachtin is currently unclassified (UN) but functionally distinct.
Plan the rotation before starting, and document each cycle. Product name, EPA registration number, concentration, plant, date, and the plant’s response.
Foliar contact during a substrate drench
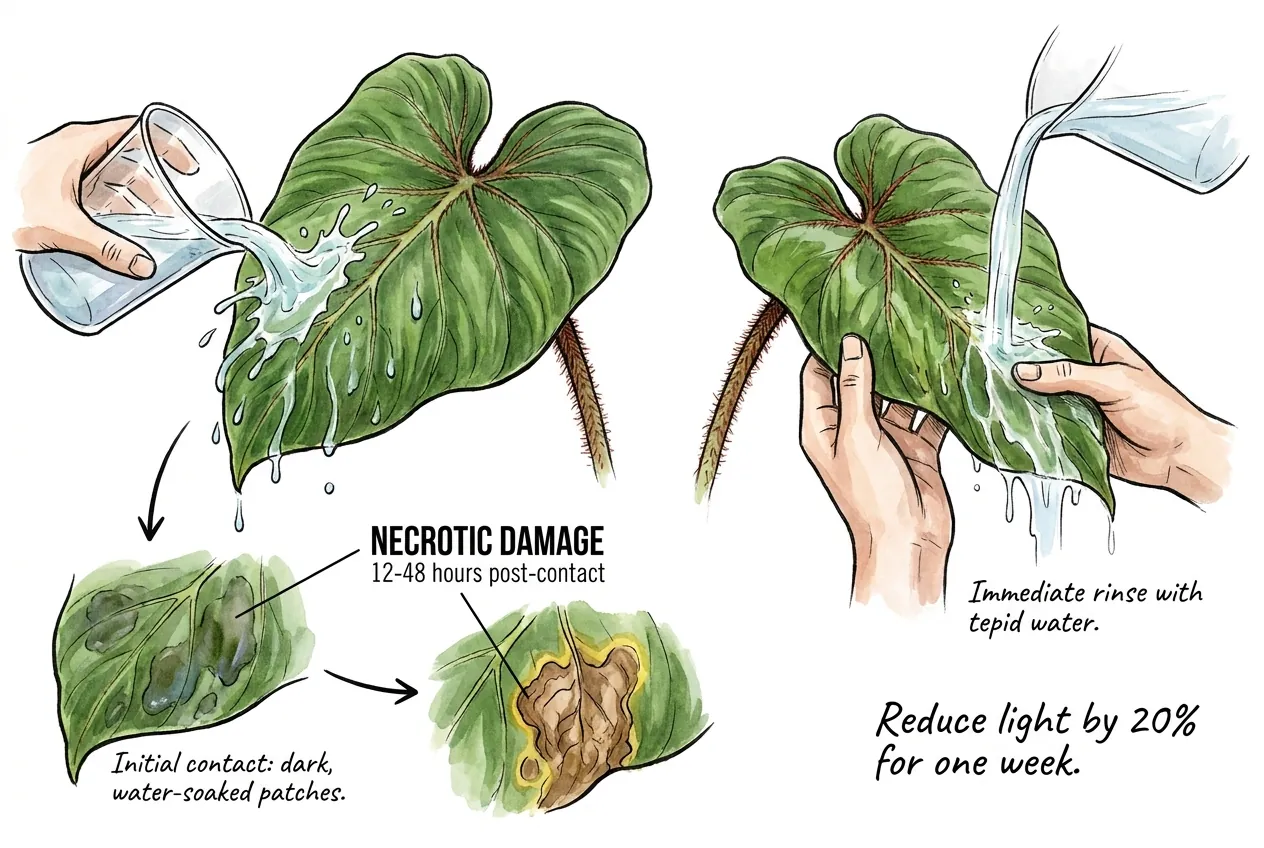
If drench solution splashes a velvet leaf, it can cause spotting or necrosis over the following days.
If it happens, rinse the leaf promptly with tepid water, ease off strong light for a while, and follow the product label’s first-aid and spill guidance.
An affected leaf may not fully recover.
Prevent it by tying up low-hanging leaves before drenching and using a long-necked watering can or a narrow-spouted cup to deliver solution to the substrate only, and wear the PPE the product label specifies.
Premature declaration of eradication
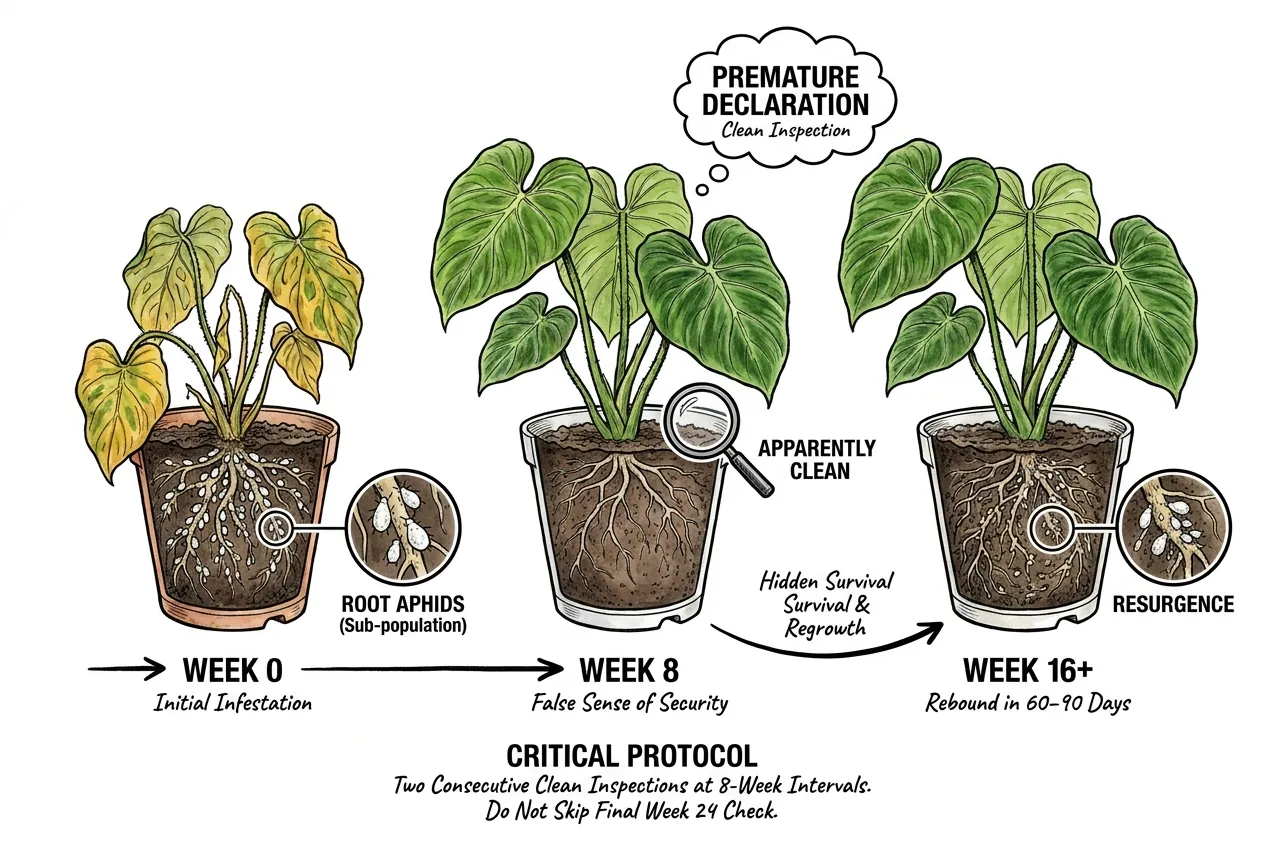
A single clean inspection can be followed weeks later by a re-flush because a small surviving population takes time to rebuild to a visible level. A low-level survivor can rebound after you think the problem is over.
The fix is to require several clean inspections spread over a long window, timed to this pest’s multi-month generation, before declaring eradication.
Don’t skip the long-tail checks. Most of the work is already done, and they’re what buy real confidence.
Trichome failure on next leaf
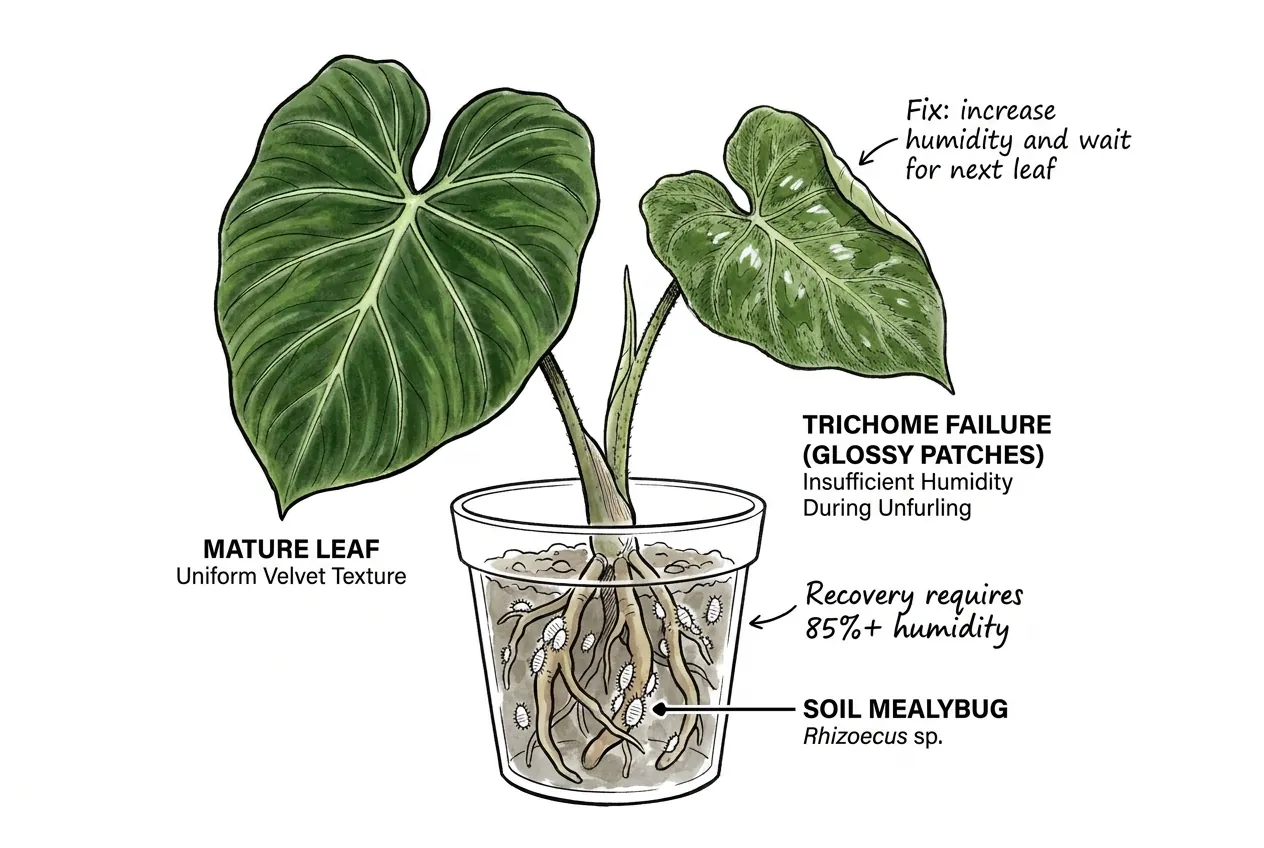
A new leaf sometimes emerges with glossy patches instead of uniform velvet. Low humidity during leaf expansion is one likely cause, though light, nutrition, genetics, and leaf maturity can also play a part, so it isn’t always a humidity problem.
The practical response is to keep humidity steady and high and wait for the next leaf, which often looks better.
To reduce the chance, hold humidity as consistent as you can while a new leaf is unfurling and expanding. The period from emergence to full expansion is when leaf surface quality is most influenced by conditions.
Pair high humidity with airflow to avoid encouraging disease.
Key Takeaways
- Confirm the pest first. The white specks are usually a soil or root mealybug in the genus Rhizoecus, but root aphid and root mealybug are not the same, and species-level ID needs a hand lens or a diagnostic lab, not just the seller’s location.
- Because the colony lives on the roots, treat the substrate rather than the leaves. Keep oils, soaps, and neem off the velvet foliage, and spot-test any foliar product first.
- Generation time is roughly two to four months and varies with temperature. Plan a treatment program that spans months and keep inspecting well past your last application.
- Use substrate-applied actives strictly per the current product label and rotate IRAC mode-of-action classes. Do not convert a foliar per-100-gallon rate into a per-pot drench dose.
- Biological aids are marketed mainly for other pests and lack proven Rhizoecus efficacy. Treat them as supplements, not cures.
- Bare-root dips are not validated for this plant and pest. Approach hot water, alcohol, and hydrogen peroxide cautiously, test first, and prefer label-based substrate treatment.