
Plants Spider Mites Guide: A Practical IPM Approach
A label-first spider mite plan: how heat drives outbreaks, why systemic neonicotinoids can make them worse, true insecticidal soap vs. dish soap, cold-pressed neem, and predatory mites.
Marcus Hale · Published 2025-12-15 · 12 min read
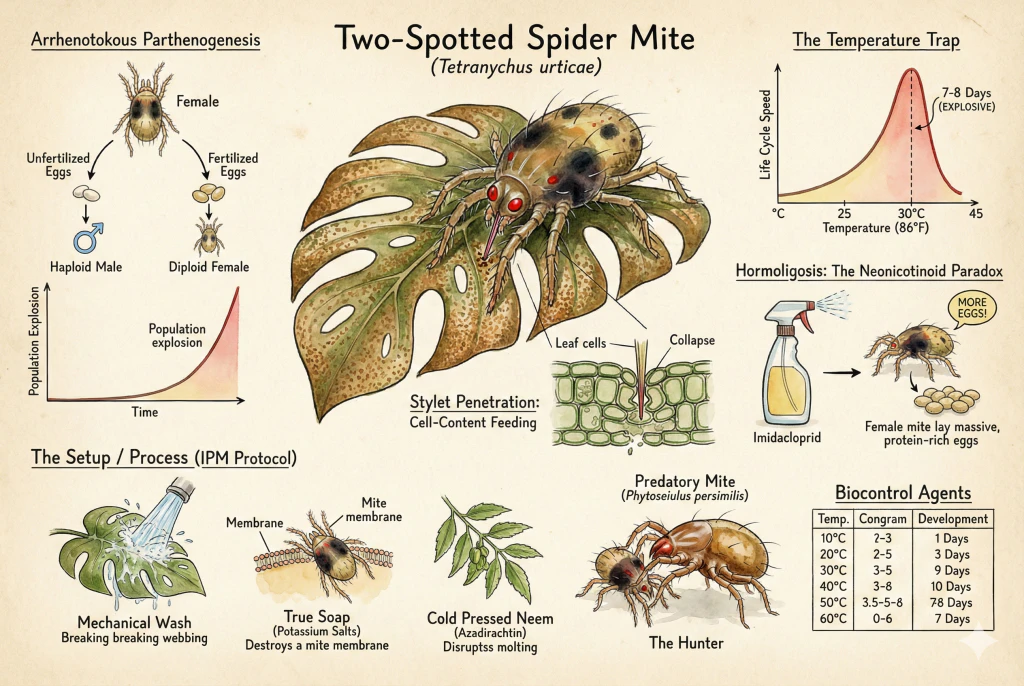
Key Takeaways
- Warm grow spaces can accelerate a spider-mite outbreak. Check leaf undersides more often during hot weather because a small population can build quickly.
- Avoid using a systemic neonicotinoid such as imidacloprid for a mite problem. It can harm natural enemies and may worsen mite pressure. Use a product labelled for mites instead.
- Humidity is not a mite killer on its own, but it can determine whether beneficial predatory mites establish. Check each supplier's condition, often 60–75% or higher RH, rather than assuming a single number.
- Use registered insecticidal soap rather than dish detergent, and treat cold-pressed neem as a pesticide only when its label provides directions. Read the label for prohibited and sensitive plants, test a leaf first, and rinse webbing off before spraying to improve coverage.
- Eggs are less sensitive to soap, so repeat treatments at the product's label interval and release predatory mites only after residual spraying has stopped. Base biological releases on pest density, quarantine new plants, and scan leaf undersides regularly with a loupe.
Spider mites are fast-breeding arachnids that build up in warm, dry conditions and rarely surrender to a single treatment.
Managing them isn't about one magic bottle. It's an integrated approach. Physically reduce their numbers, use label-appropriate contact products such as true insecticidal soap, support their natural predators, and avoid broad-spectrum systemic insecticides that can worsen outbreaks by killing beneficials.
Follow the Product Label
Every product’s registered label takes priority over a general schedule. Use the steps below only within the limits of the product you are actually applying.
Why Spider Mites Spread So Quickly
Spider mites feed by piercing leaf cells. Their feeding first appears as tiny pale dots, then bronzing, webbing, and a weaker plant as damage spreads. Check the undersides of leaves because that is where mites and eggs often concentrate.
A few survivors can rebuild an infestation quickly, especially in warm conditions. That is why physical removal, complete contact coverage, repeat treatment at the label interval, and continued inspection matter more than a single aggressive spray.
I record temperature, first treatment, and every follow-up on one calendar rather than using a fixed weekly habit. Warmer conditions can shorten development, so the interval must still follow the product label and observed life stages.
The same numbered leaves are inspected for eggs, moving mites, and new stippling. Each sign answers a different question about coverage and reinfestation.
One noncritical leaf is inspected immediately after spraying to photograph missed folds and underside zones. It shows whether my application method reached the places mites occupy without assuming the whole plant was coated.
Treat Heat as a Scouting Signal
Mites develop faster in warmer conditions, although the speed varies by species, host plant, and humidity. Inspect more often when a cabinet, greenhouse, or room runs hot.
Running a grow space warm to push plant growth can therefore also speed up a mite population, which may build up well before you notice the first webbing.
Effect of temperature on development and reproduction of the carmine spider mite, Tetranychus cinnabarinus (Acari. Tetranychidae), fed on cassava leaves
The Dry Air Myth vs. Reality
You'll often hear that raising humidity kills spider mites. On its own it won't clear an infestation, but the real picture is more nuanced than humidity only affects the predators.
Mite Physiology
Humidity and temperature affect the pest directly too. Egg hatch, feeding, fecundity, and survival all shift with conditions and life stage. Dry conditions can favor faster feeding and egg-laying, so dry air tends to make outbreaks worse. It isn't neutral for the mite.
Predator Conditions
Outbreaks also flare in dry air because many predatory mites establish poorly at low humidity. Their eggs are sensitive to drying, and the exact threshold depends on the species, strain, and leaf-surface microclimate rather than the room reading alone.
The Takeaway
Higher humidity mainly helps by improving conditions for the predators. It is not a standalone control. Use each predator supplier's recommended humidity rather than a single fixed number.
Do Not Treat a Mite Problem With Imidacloprid
Broad-spectrum systemic insecticides such as imidacloprid can harm beneficial predators and have been associated with increased mite reproduction in laboratory work. They are a poor choice for a mite problem. Select a product specifically labelled for mites and follow its plant-safety directions.
Fecundity in Twospotted Spider Mite (Acari. Tetranychidae) is Increased by Direct and Systemic Exposure to Imidacloprid
Use an IPM Sequence
Once you've confirmed mites, work through an integrated pest management sequence. Treat the steps below as a framework to adapt to your plants and products. The specific product label always takes priority over any schedule here.
Phase 1. Mechanical Control
Before spraying anything, physically reduce their numbers.
Prune Heavily Damaged Leaves
Badly bronzed leaves contribute little and often carry eggs and webbing. Removing the worst leaves reduces the population, but don't strip a struggling plant of most of its remaining leaf area. Leave enough for it to recover, then bag, seal, and trash what you remove instead of composting it.
Rinse the Plant
A firm spray of water in the shower or with a hose knocks many mites off and helps clear webbing, which improves later spray coverage. Rinsing reduces numbers rather than eliminating them, so it's a first step, not a cure.
Phase 2. The Chemistry (Soaps and Oils)
For most indoor growers, lower-risk contact products such as insecticidal soap and horticultural oil are a sensible first line.
They still carry labels and can still contribute to resistance if overused, so follow directions and rotate deliberately, but they are generally gentler than synthetic acaricides.
Insecticidal soap, not dish detergent
Use a product labelled as an insecticidal soap, not dish detergent. Dish detergents (e.g., Dawn) are formulated to cut grease and can strip a leaf's protective waxy cuticle on many plants, causing dehydration and burn.
Insecticidal soaps are potassium salts of fatty acids that act on contact against soft-bodied mites.
They tend to have relatively low phytotoxicity and short residual, but they are not risk-free. Sensitive, drought-stressed plants, or hot, bright conditions can still cause leaf burn, and labels list plants to avoid or test first.
Safer Brand Insect Killing Soap
Soap works only where it makes direct contact, so cover leaf undersides thoroughly and repeat only at the label interval. It suits an early outbreak when the plant can tolerate a contact spray. Test a leaf first on sensitive or stressed plants, avoid hot bright conditions, and do not spray released predatory mites. Follow the label’s plant restrictions, first-aid directions, and environmental precautions.
Neem With an Important Caveat
Per EPA materials, clarified hydrophobic neem extract has most azadirachtin removed and works mainly by smothering, whereas cold-pressed neem oil can retain azadirachtin, which may act as an insect growth regulator and anti-feedant.
In principle that adds a second mode of action.
The catch is that this only works if you use a product registered and labelled as a pesticide, with a stated dilution rate, application interval, and (ideally) a standardized azadirachtin content.
Many cold-pressed neem oils on the market, including bottles sold primarily for skin, hair, and nails, are cosmetic products that provide none of this, so they cannot be dosed reliably or safely as a miticide.
Neem Bliss Neem Oil
This cold-pressed neem oil is presented for cosmetic use, not as a ready-to-use miticide. It has no pesticide dilution directions or standardized active-content information, so do not improvise a spray from it. Choose a product with a pesticide label when you need neem for mites. Test a leaf first and do not combine oil with a recent soap spray unless both labels allow it.
A loupe to catch them early
Early detection is much easier than clearing a heavy infestation. Mites are hard to see with the naked eye until webbing appears, but UC IPM notes that a 10× hand lens is enough to spot spider mites on leaf undersides. You don't need very high magnification for routine scouting.
SE 10X Loupe
This pocket loupe is suitable for checking leaf undersides for mites and eggs during a weekly inspection. Ten-power magnification is enough for routine scouting. Choose a microscope only when you need detailed identification rather than quick detection.
Phase 3 (Biological Control)
For a large collection or a vivarium where spraying is impractical, predatory mites are a strong biological option.
Match the species to the situation and the supplier's conditions.
Phytoseiulus persimilis
A specialist that eats only spider mites. It is fast and effective on active, heavy hot spots, but it needs live prey and will move on or starve once the mites are gone, so it is a curative release rather than a permanent resident. It generally needs higher humidity. Check the supplier's stated condition, often 75% or higher RH, and the canopy microclimate rather than the room reading alone.
Neoseiulus californicus
This species tolerates somewhat lower humidity and higher temperatures and persists better when prey is scarce, which suits prevention and low-to-moderate maintenance. It still has an optimal humidity range and dry-air limits, and it does not establish indefinitely without prey.
Conserving these predators (and avoiding broad-spectrum sprays that kill them) is a durable part of control, though its effectiveness still depends on environment, prey availability, and reintroduction.
Spider Mites Management Guidelines. UC IPM
Phase 4. A Repeat-Treatment Schedule
Under warm conditions eggs can hatch in as little as ~3 days, but the full cycle ranges from under a week to several weeks depending on temperature, species, and humidity.
Eggs are less sensitive to soap than motile stages, so a single spray usually isn't enough. You repeat to catch newly hatched mites before they mature.
Let each product's label set the interval rather than a fixed calendar. An example, keeping within a soap label that specifies 5–7 day intervals.
1. Day 1
Mechanical rinse, then a labelled soap spray with full underside coverage.
2. Day 7
Repeat the soap spray within the 5–7 day label window.
3. Continue at the Label Interval
Reassess coverage and pest stage each time.
If you add horticultural oil, use a specific labelled product, follow its own interval, check that it's compatible with recently applied soap, and avoid it on sensitive plants or in strong light.
Keep treating for as long as you keep finding live mites, often a few weeks, and re-inspect rather than assuming a fixed end date.
Sprays and predators don't mix at the same time
Contact sprays can kill released predatory mites, so plan biological control as a separate step. Stop residual spraying, wait out the product's residual period, and release predators based on the pest density that's actually present and the supplier's recommended rate, not on a fixed Day 14 regardless of what you find.
Keep New Plants From Introducing Mites
Quarantine Every New Plant
Preventing introductions is easier than treating them. The following quarantine routine gives new plants time to reveal a hidden infestation before they join the collection.
1. Inspect Closely
Scan leaf undersides and stems with your loupe, since spider-mite eggs and webbing are almost always on the foliage. Signs of movement mean you should isolate and treat before the plant joins the collection.
2. Isolate
Keep new plants physically separated, ideally in a different room with their own tools, and re-inspect over several weeks so an unseen egg can hatch and reveal itself. A month is a reasonable observation window for many common pests, but it doesn't guarantee coverage of every pest because scale, mealybug, root pests, and dormant stages can differ. If you use a sealed tote, watch for poor airflow and condensation, which can encourage disease.
You generally do not need to bare-root new plants or discard nursery soil for spider mites specifically. Extension guidance notes that potting soil replacement isn't required for spider mites, and unnecessary bare-rooting can cause root damage and transplant shock.
A 1/20 bleach dip is also not a safe universal treatment for living plants. It has no established concentration, contact time, rinse, or protective-equipment protocol for foliage and can scorch tissue and expose the person applying it.
Reserve diluted bleach for disinfecting pots, tools, and surfaces under its label directions, not for dipping plants.
Nutrient Management
Fertilizer practice can influence mite pressure. In some hosts (studies include crops such as apple and bean), higher leaf nitrogen and amino-acid levels have been linked to increased Tetranychus urticae fecundity, so pushing very lush, high-nitrogen growth may make plants more attractive to mites.
This is host- and condition-dependent rather than a universal rule, so it's a reason to avoid over-fertilizing, not a guaranteed cause-and-effect.
Some crop-specific studies (for example on strawberry and rose) have found that added silicon can reduce mite damage, possibly by strengthening tissue.
The evidence doesn't show this works across all houseplants, and there's no established dose, so treat a silica supplement as an optional experiment rather than a reliable treatment.
Reserve Synthetic Miticides for a Labelled Plan
In a commercial greenhouse or high-value collection, a synthetic miticide may be a later option when lower-risk methods cannot control the outbreak. Check the current label for legal use sites, state registration, re-entry interval, PPE, and resistance-management instructions. Rotate by the resistance group stated on the label, not by alternating product names. For indoor plants, consult a qualified professional before using these products.
Avoid Common Mite-Control Mistakes
I'll just crank the humidity and they'll drown.
Raising humidity alone won't clear an infestation. Humidity affects the mites too, not only the predators, but high RH doesn't reliably kill them, and persistently damp foliage can favor fungal problems (Botrytis risk depends on leaf wetness, airflow, temperature, and host susceptibility, not humidity alone).
Raise humidity mainly to support predators, not as a control method by itself.
Dish soap is a cheap, safe substitute.
Risky. Dish detergents can strip a leaf's waxy cuticle, causing desiccation and burn on many plants. Damage that can look like mite injury and confuse your diagnosis.
Use a product labelled as insecticidal soap (potassium salts of fatty acids).
I treated once and they're gone.
Usually not. Contact sprays don't reliably kill eggs, so survivors can hatch within days and begin laying soon after.
Plan on repeat treatments at the label interval, and keep going as long as you keep finding live mites, often a few weeks, rather than stopping after one round.
5. Conclusion
Spider mites aren't a sign of failure. They simply do well in the warm, dry, predator-poor conditions that indoor grow spaces can create, which is why prevention and early detection matter so much.
Inspect leaf undersides regularly, isolate new plants, rinse off a heavy population, and use only label-appropriate mite controls with full coverage and repeat treatment.
Avoid dish detergents and systemic neonicotinoids. When a chemical or sensitive plant is in doubt, check the label or ask local Extension before spraying.
Affiliate Disclosure
This article contains Amazon affiliate links. As an Amazon Associate I earn from qualifying purchases. If you use these links, the site may earn a commission at no extra cost to you. Product availability, price, and specifications can change. Check the current listing before buying.