
Spider Mite Checklist & Control Guide
A practical IPM checklist for spider mites: confirm the pest first, then work through cultural controls, water and labeled oils/soaps, predatory mites, and why neonicotinoids can backfire. Always follow the product label.
Elena Vargas · Published 2025-12-10 · 12 min read
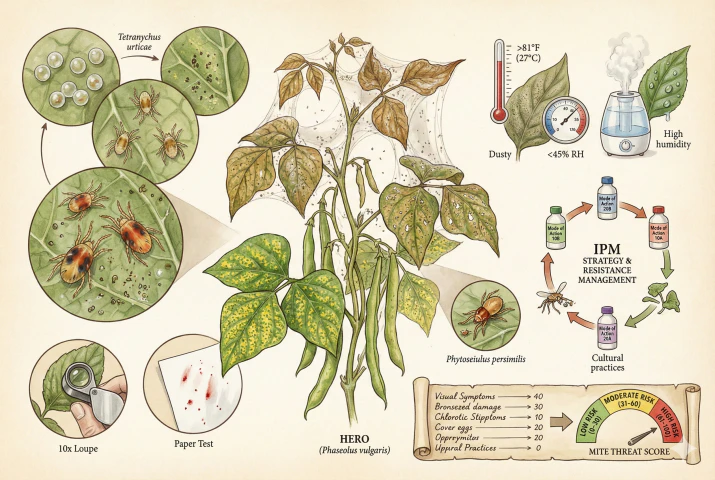
Key Takeaways
- Spider mites are arachnids that grow fastest in hot, dry, dusty, water-stressed conditions. Raising leaf-level humidity, keeping foliage clean and well-watered, and quarantining new plants are sensible first-line controls.
- Confirm the pest before you treat. Check leaf undersides with a hand lens and do the white-paper tap test, then distinguish pest mites from faster, longer-legged predatory mites. Stippling, curling, and bronzing are not mite-specific and also come from drought, thrips, or nutrient or chemical injury.
- Work from least to most disruptive and use only products labeled for spider mites on your plant and site. Start with a firm water rinse, then consider a labeled horticultural oil or insecticidal soap, and use predatory mites in enclosed spaces with adequate humidity.
- Avoid neonicotinoid systemics such as imidacloprid when mites are a concern. A laboratory study found sub-lethal exposure increased two-spotted spider mite egg-laying, so treating other pests with it can trigger a mite flare.
- Follow every pesticide label exactly for site, timing, interval, and safety warnings. A severely infested plant is often best bagged and disposed of to protect the rest of your collection. For high-value plants, ask your local extension service.
The two-spotted spider mite (Tetranychus urticae) is an arachnid, not an insect, and it multiplies fastest in hot, dry, dusty, water-stressed conditions.
Because it reproduces quickly, it can also develop pesticide resistance, which is one reason integrated pest management (IPM), leaning first on cultural controls, physical removal, and biological control, is the recommended approach.
Confirm the pest first, then choose the least disruptive response that fits how widespread it is. Begin with isolation, water, and labelled contact controls before considering stronger treatments.
Use the stages below to decide what to do next. Live mites, eggs, webbing, plant damage, and risk to nearby plants matter more than a score.
For a valued plant or an uncertain diagnosis, contact your local extension service.
The Spider Mite Checklist
Inspect both the plant and its growing conditions. Treat the environment and symptom notes as risk factors, and the hand-lens and paper-test findings as the actual confirmation of whether mites are present and how established they are.
On each monitored plant, I number ten expanded leaves, choosing two upper, one middle, and two lower leaves on both the window-facing and room-facing sides. Every three days, I inspect the same 1 cm section beside the underside midrib near the petiole with a 10× lens. If a plant has fewer than ten expanded leaves, I inspect all of them and record the mean mites per inspected section rather than compare its raw total with a larger plant. The balanced sample covers both faces and three heights, while the section mean keeps plant size from distorting the count.
Eggs, moving mites, webbing, and fresh damage are recorded separately. The four signals decline on different schedules and guide different follow-up questions.
Touching leaves, shared tools, fans, and recent plant moves are marked around every positive plant. Treating one pot while its canopy still bridges to a neighbor defeats visual quarantine.
Conditions that favor mites (risk factors, not proof of an infestation)
- Warm, dry air. Mites feed and breed faster when it is hot (roughly above 80 °F / 27 °C) and the air is dry. These are the same conditions that raise vapor-pressure deficit, so treat temperature and low humidity together rather than as separate scores.
- Dust on foliage. Dusty leaves are associated with worse mite problems, so keep leaves clean. Dust is a management factor, not a measure of how many mites are present.
- Water stress. Drought-stressed plants are more prone to mites, so avoid letting plants dry out.
Symptoms to note (useful clues, but not mite-specific)
- Chlorotic stippling (tiny white/yellow dots on the upper leaf), and in heavier feeding, bronzed, gray, or bleached leaves.
- Leaf curling or drying despite adequate watering.
Stippling, curling, and bronzing also result from drought, thrips, nutrient deficiency, or chemical injury, so use them to prompt a closer look, not as a diagnosis on their own.
Confirmation (this is what actually tells you mites are present)
- Paper test. Tap a branch over white paper and look for tiny specks that move. Do not treat fast movement or a red/green smear as proof by itself. Some fast, reddish specks are beneficial predatory mites.
- Hand-lens check of leaf undersides. Look for translucent spherical eggs, nymphs, or active colonies. Under a lens, pest mites are slower and rounder, while predatory mites are faster, longer-legged, and more teardrop-shaped.
- Silk webbing on undersides, petioles, or bridging leaves is evidence of an established, often higher-density population, but a single amount of webbing does not automatically place a plant at a fixed severity, since this varies with species and host.
Because eggs are spherical, translucent, and only ~0.14 mm across, a hand lens or pocket microscope is what lets you confirm mites reliably.
If you cannot confirm live mites or eggs, do not move on to pesticide treatment. Keep monitoring and address the risk factors above.
Hand Lens for Confirmation
UC IPM recommends a 10× hand lens for spotting mites and eggs. An illuminated 10× loupe is well matched to that task, while a higher-power clip-on scope shows more detail if you want it. What matters most is checking leaf undersides every few days so you catch an infestation while it is still small.
Detailed Response by Stage
No confirmed mites (Prevention & Cultural Control)
If a hand-lens check turns up no live mites or eggs, the focus is exclusion and keeping conditions less favorable to mites.
Under some conditions (short days, certain populations, and temperatures) adult females can enter diapause and turn orange-red, so a plant that looked clean can flare later. This depends on photoperiod and population and does not happen with every indoor infestation.
Keep inspecting rather than assuming a plant is permanently clear.
Two of the biggest levers are humidity and cleanliness. Mites do better in dry air, so higher humidity around the plant can help slow them.
Raise humidity at the leaf or cabinet level (grouping plants, a pebble tray, or an enclosed cabinet) rather than humidifying a whole room. The US EPA advises keeping indoor humidity below 60%, ideally 30–50%, because sustained higher humidity in living spaces can cause mold, condensation, and dust-mite problems, and humidifiers need regular cleaning.
Distinguish the microclimate right around the plant from the humidity of the room you live in.
Dusty, drought-stressed plants are more prone to mites, so wipe foliage with a damp cloth and avoid letting plants dry out, while also not overwatering, which brings its own root-rot risk.
Finally, quarantine every new plant in a separate area (nurseries are a common source), inspecting leaf undersides every few days.
Colorado State Extension suggests a quarantine of a few weeks. 14 days is a reasonable minimum, but the right length depends on the pest’s life cycle and what your inspections find, so keep it isolated until repeated checks come up clean.
For enclosed grow spaces with a large planting, preventive sachet releases of a predatory mite such as Neoseiulus californicus can help, because it survives on pollen and other prey at low pest densities.
Do not buy Amblyseius swirskii specifically for spider mites. Cornell notes it controls spider mites weakly and cannot get through webbing.
In every case, the correct release rate depends on crop, climate, and pest density, so follow the supplier’s directions rather than assuming one sachet stands permanent guard.
Confirmed but limited (Early Intervention)
You have confirmed a few mites or eggs under the lens, but numbers are still low. The goal is to reduce them physically and with gentle labeled products, before turning to broad-spectrum chemicals.
First, be sure it is actually mites. Thrips can cause similar stippling, and aphids more typically cause curling, distortion, honeydew, and visible colonies.
Do not rely on speed or a red/green smear. Instead, follow the paper test with a hand lens and look at body shape, leg length, the two dark spots, and movement, because faster, longer-legged specks may be beneficial predatory mites.
Start With Physical Removal
Then reduce the population mechanically. A firm water spray dislodges mites and washes away webbing, which extension services support as a first step. Take the plant to a shower or hose and spray the leaf undersides, axils, and veins, but test a lower pressure first on delicate foliage and let plants dry so you are not encouraging leaf disease.
If water alone isn’t enough, move to a labeled contact control. A commercial horticultural oil or an insecticidal soap that lists spider mites and is labeled for your plant and site.
These coat the mite. Follow the product’s directions for dilution, coverage, and repeat interval exactly, and spot-test a few leaves first, since oils and soaps can burn some plants.
Avoid homemade alcohol-and-soap mixtures. They are not labeled pesticides for spider mites, their strength is uncertain, and they can burn foliage and create indoor exposure and flammability risks.
Contact products have little residual activity, so thorough coverage of leaf undersides and a repeat application (on the label’s schedule) are what catch newly hatched mites.
For any spray used indoors, ventilate the area, wear the PPE the label specifies, protect surfaces, and keep children and pets away until it has dried. Follow the label’s storage and disposal directions.
Established colony (Biocontrol & Growth Regulation)
Repeated checks show an established colony with overlapping generations. Under warm conditions the life cycle is short, reported to fall to roughly a week around 86 °F (30 °C), which, combined with heavy selection pressure from repeated use of one mode of action, is part of why this species can develop resistance quickly.
The emphasis here shifts toward interrupting reproduction.
Predatory Mites Need Suitable Conditions
In greenhouses or grow tents, biological control is a good option. The specialist predator Phytoseiulus persimilis hunts spider mites using scent and web cues and can eat 5–20 prey per day. Its main limitations are that egg hatch and development drop when relative humidity is below ~60%, and that without prey it will disperse or starve. It depends on good plant contact, adequate humidity, and sometimes a repeat release, so order from a supplier who can advise on release rate and arrival viability.
A mite growth regulator such as etoxazole kills eggs and nymphs but does not kill adults, so it slows population growth while existing adults remain. If you need faster knockdown, the label may direct combining it with a labeled adulticide.
Because effects depend on the exact registered product, permitted site, application rate, and minimum interval, do not treat the active-ingredient name as a home how-to. Use only a product registered for your site and follow its label.
Avoid systemic neonicotinoids such as imidacloprid for spider mites
Do not use imidacloprid as a spider-mite treatment. It is not labelled for that job and can make mite outbreaks harder to manage.
If you use predatory mites, check a current compatibility chart before applying any other pesticide.
If you use biological control, note that many chemicals harm predators, but this is not an absolute, permanent ban.
Selective or compatible products exist, and labels and supplier guides list side effects and residue waiting periods (for example, waiting several weeks after some broad-spectrum applications), so check a compatibility chart before combining approaches.
Severe outbreak (Resistance Management)
Webbing is now extensive, bridging leaves and covering buds, with leaf drop and heavy chlorosis.
Dense webbing can shelter eggs, but it does not make the situation hopeless. A forceful water spray can wash webbing away, and Phytoseiulus persimilis actually increases its searching when it contacts webbing rather than being stopped by it.
This is the stage where commercial growers rotate registered acaricides by IRAC mode-of-action group, using different, effective products in sequence within each one’s labeled application window, to slow resistance.
Rotation means alternating legally registered products, not bringing unregistered agricultural actives into a home.
Check the Exact Product Label
Powerful miticides such as abamectin, bifenthrin, and spiromesifen come in different formulations. Some are agricultural or restricted-use, while others have homeowner labels. Legality and suitability depend on the exact EPA-registered formulation, the use site, and your local jurisdiction, not the active-ingredient name. At this severity, most home growers should consult a local extension service or a licensed pest-control professional rather than acquire stronger concentrates.
Physical reduction still helps. Before treating, bag and remove the most heavily webbed, badly damaged leaves to cut the mite population, using a sterile tool and considering how much defoliation your particular plant can tolerate.
Then a water knockdown followed by a labeled horticultural-oil spray can help wet through remaining webbing (always within that product’s directions).
You may see spinosad products marketed for mites, but registration differs by formulation and use site. Read the exact label before considering one, because an outdoor garden registration does not cover an indoor, heavily webbed houseplant.
Outdoor Spinosad Only
If a spinosad product is labeled for outdoor residential use, it is not a fit for indoor plants or grow tents. A label may also limit treatment to an early infestation before webbing, which excludes the severe case in this section. Do not infer an indoor site or treatment stage from the active ingredient alone. Spinosad can harm bees on direct contact and is toxic to aquatic invertebrates, so follow the selected label’s pollinator, runoff, storage, and disposal warnings.
Overwhelmed plant (Rescue or Disposal)
When a plant is heavily webbed with widespread necrotic foliage, and mites may be roping off the tips seeking new hosts, it is a triage decision.
For most growers, disposal is the responsible and conservative choice. The plant is a reservoir that threatens everything nearby.
Don’t move it first (that spreads mites). Bag it from the top down, seal it at the pot, and remove it from the building.
Then quarantine and inspect nearby plants, contain any fallen leaves and debris, vacuum and wipe down surfaces in the area, and dispose of the plant waste so mites cannot spread back.
Trying to rescue a badly overwhelmed plant with heavy defoliation, whole-plant soap dips, root disturbance, and a sealed humid bin can be riskier than disposal. A general insecticidal-soap label does not authorize soaking a plant, extreme defoliation and root disturbance add transplant stress, spider mites live mainly on foliage (so replacing soil or rinsing roots has little benefit against them), and a sealed high-humidity container without ventilation, temperature control, and daily inspection can promote rot and mold.
If a genuinely high-value specimen is at stake, ask your local extension service or a professional how best to proceed for that species rather than following a fixed rescue recipe.
Some tropicals can resprout from corms (Alocasia) or rhizomes (Calathea), but this depends on the species and the health of that storage organ, and cutting a plant back does not by itself guarantee the pest is gone. Eggs, survivors, and nearby plants can still carry it, so keep monitoring.
Confirm, Isolate, and Escalate by Label
Confirm live mites before treating, isolate the plant, and use water or a labelled contact control while the infestation is still small.
Escalate only when the label fits your plant and site, protect compatible predators, and remove a heavily infested plant when it threatens the rest of the collection. Check every product label for allowed plants, sites, intervals, and compatibility.