
Rhubarb Growing Guide: Expert Care, Planting & Harvest
Grow rhubarb with enough winter chill, well-drained fertile soil, careful feeding and harvest limits that protect the crown, plus clear troubleshooting and food-safety steps.
Jordan Cole · Published 2026-01-16 · 22 min read

Key Takeaways
- Rhubarb is a cold-loving perennial that often needs roughly 500 hours between 28–40°F to break dormancy well, although the exact result depends on cultivar and climate.
- Rhubarb is a heavy feeder that draws on root reserves, so build organic-rich soil near pH 6.0–6.8, confirm the range with a soil test, and prevent waterlogging.
- Protect the crown by taking no harvest in year one, harvesting lightly in year two, and leaving several healthy stalks from year three onward so the plant can recharge.
- Harvest edible stalks by twisting and pulling them cleanly from the base rather than cutting and leaving a decaying stub.
- Never eat rhubarb leaves because their oxalic acid can cause serious illness, but composting the leaves is generally acceptable and excluding light can force tender, pale stalks.
Understanding Rhubarb
Rhubarb Is a Storage Organ
Rhubarb belongs to the buckwheat family (Polygonaceae), related to sorrel and knotweed. Like its relatives it’s persistent, with a fleshy rhizome that acts as an energy store, accumulating carbohydrates through summer and autumn to help fuel rapid spring growth.
Harvest Depends on Root Reserves
That energy reserve is central to how the plant behaves. Much of the reasoning behind harvest limits and leaf retention comes down to protecting the carbohydrates stored in that root system.
Cultivars Retain Cold Hardiness
Choose a cultivar for your climate and intended use. Stalk color, tenderness, and harvest timing can differ between varieties, but none changes rhubarb’s need for cool winters, good drainage, and time to rebuild its root reserves.
Modern Selection Changes Stalk Traits
Many modern cultivars have been selected for qualities like lower fiber, milder acidity, or better color, but the plant keeps its ancestors’ hardiness.
Give Rhubarb the Winter Chill It Needs
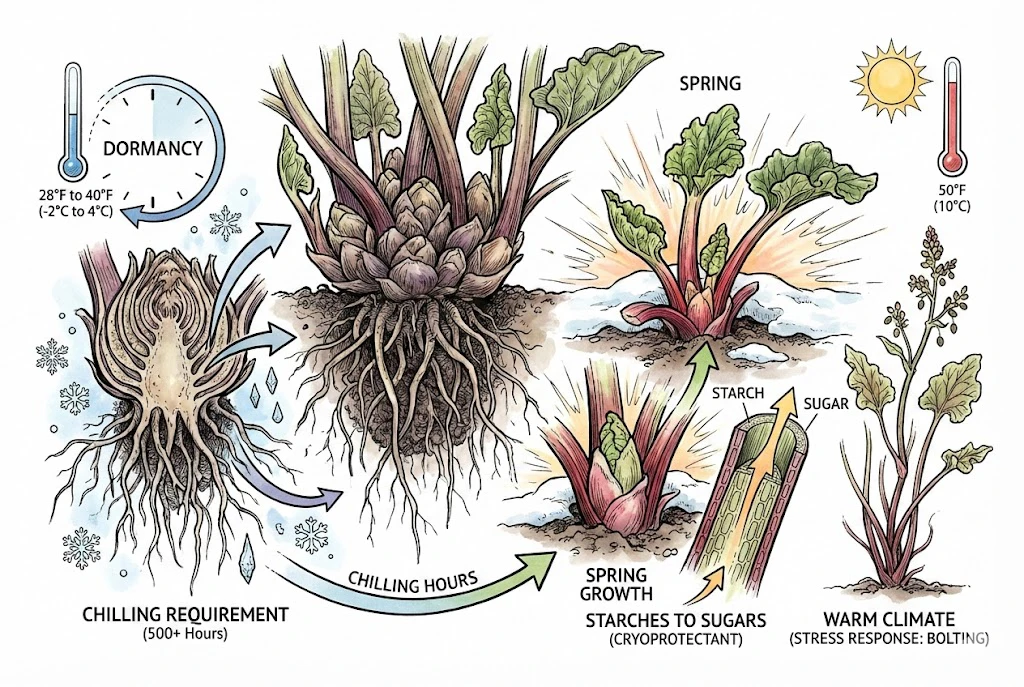
Temperature Drives the Seasonal Rhythm
To grow rhubarb well, it helps to understand its temperature-driven rhythm, especially the accumulation of cold in winter, though light and moisture matter too.
The Chill Factor (Understanding Dormancy)
Chilling Hours Break Dormancy
Rhubarb needs cold to grow properly (a chilling requirement). Extension guidance such as Oregon State University’s suggests crowns generally need on the order of 500 hours between 28°F and 40°F (-2°C to 4°C) to break dormancy and grow vigorously in spring.
Chilling-hour totals depend on the local model and weather station, so treat this as a guideline rather than a precise threshold.
Warm Climates Can Limit Emergence
Where winter chill is short, rhubarb tends to emerge weakly. In warmer climates, under-chilled plants often produce thin stalks and are more likely to bolt (flower) early.
Note that a USDA hardiness zone only reflects average annual minimum temperature, not summer heat, chilling hours, humidity, or drainage, so zone alone doesn’t determine success.
In hot regions, some gardeners grow rhubarb as an annual instead. Check your regional extension service for local guidance.
Spring Growth Uses Stored Energy
Once spring soil warms, the crown uses stored energy to send up stalks. A plant that had a weak previous season or inadequate winter chill may start slowly, so improve conditions before trying to force more growth with fertilizer.
The Heat Limit (Slowed Summer Growth)
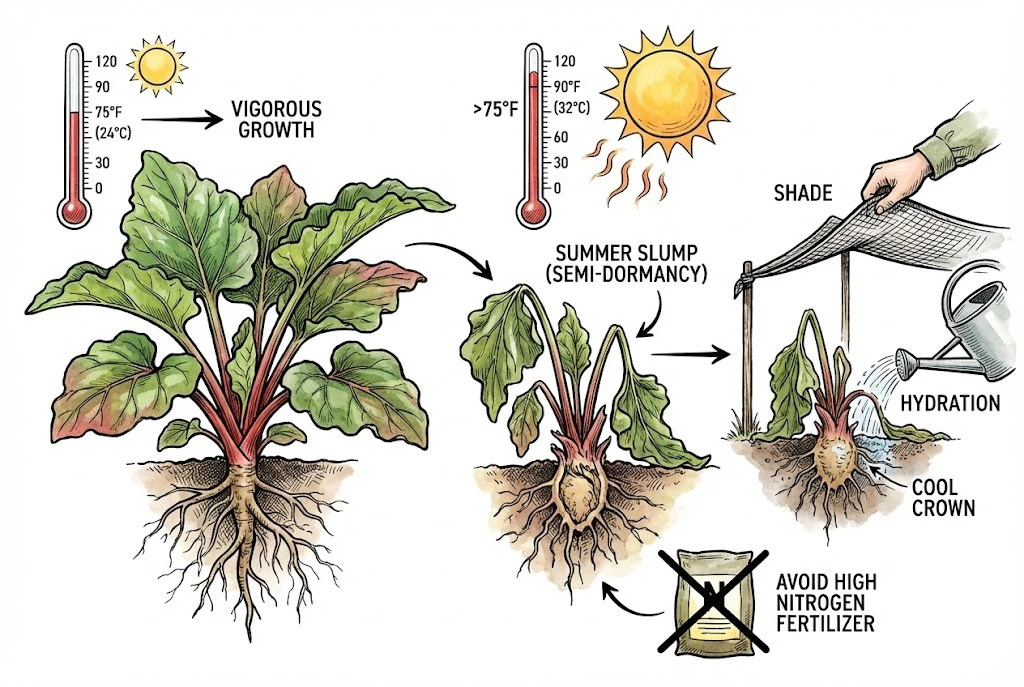
Although it needs cold, rhubarb doesn’t handle prolonged heat well. Oregon State University Extension notes an ideal average summer temperature around 75°F (24°C). Where average summer temperatures run higher than that, growth often slows into a semi-dormant summer slump. For growers in transitional climates, a plant wilting in midsummer may not be thirsty but shutting down to cope with heat. Before adding high-nitrogen fertilizer, check soil moisture and, if heat rather than drought is the cause, prioritize shade and cooling.
Leave Foliage to Recharge the Crown
How Leaves Recharge the Crown
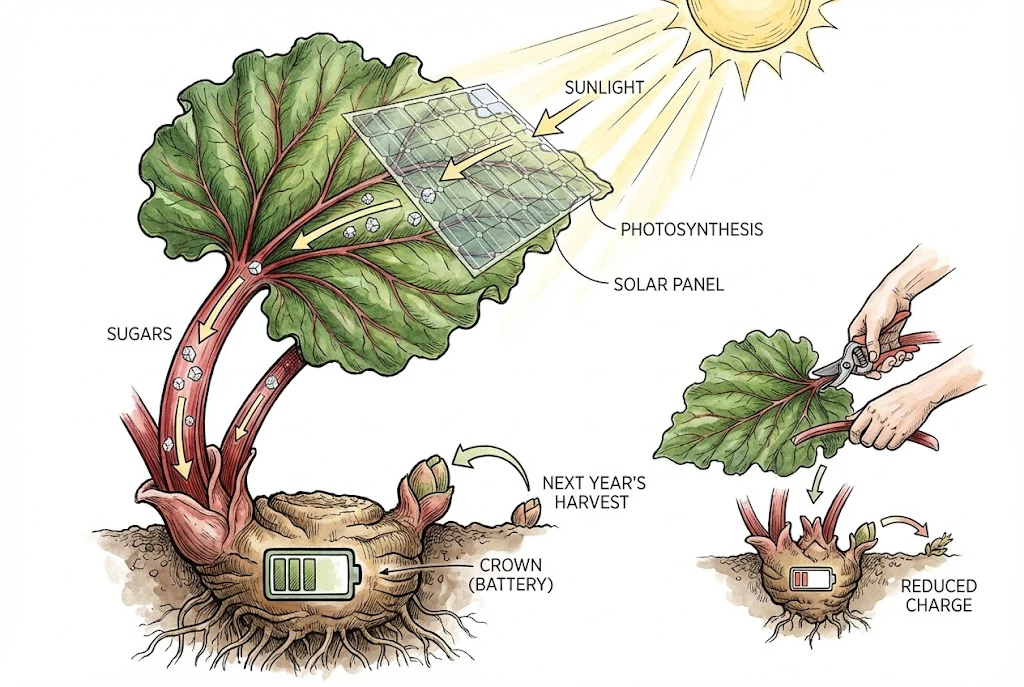
The large leaves act like solar panels, converting sunlight into sugars that move down to be stored in the crown.
As a rough rule, the size and health of this year’s leaves influence next year’s harvest.
Avoid Stripping Healthy Foliage
That’s why over-harvesting sets the plant back. Removing a lot of healthy foliage reduces its ability to recharge.
(Removing a few damaged or diseased leaves for sanitation is fine. The concern is stripping healthy ones.)
Soil Preparation Guide
Build Structure Before Adding Products
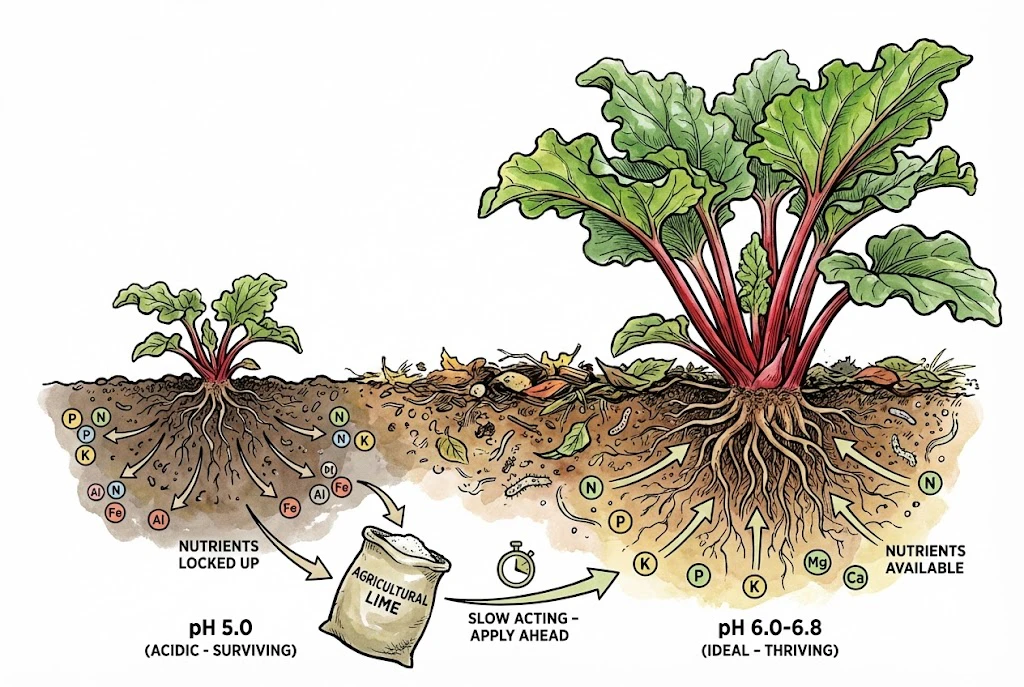
The key to large, healthy rhubarb isn’t a specific product but soil structure. Rhubarb is nutrient-hungry and does best in loamy, organic-rich soil that holds moisture yet still drains.
Managing Soil pH
Use the pH Range as a Guide
Rhubarb tolerates moderately acidic soil but generally grows best around pH 6.0–6.8, where nitrogen, phosphorus, and potassium are readily available. This is the range OSU Extension gives, and other regional guides may differ.
In strongly acidic soil, phosphorus, important for roots, becomes less available, so fertilizer may not help much until pH is corrected.
Test Before Adding Lime
Don’t guess at lime. Test your soil first. The needed amount depends on your current pH, the soil’s buffering capacity, and the liming material.
As a rough regional figure, OSU suggests on the order of 5–8 lb of lime per 100 sq ft where a test shows low pH, worked in ahead of planting.
Because lime acts slowly, applying it a season in advance is most effective, and your local extension service can convert a soil-test result into a specific rate.
Soil Texture (Improving Drainage)
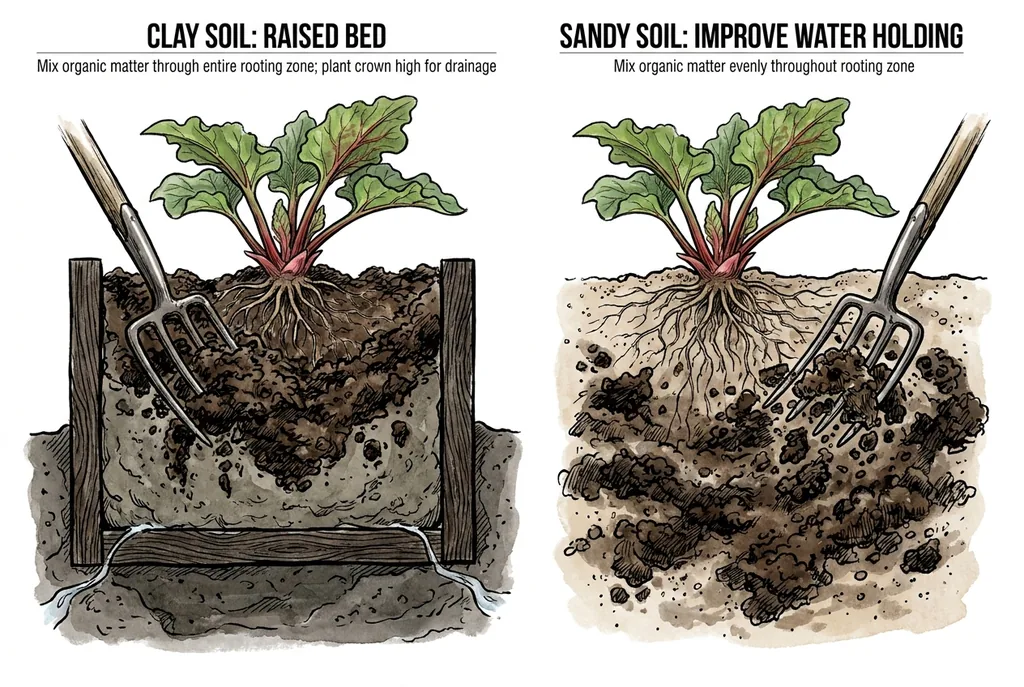
Waterlogged, oxygen-poor soil favors root and crown rots (such as Phytophthora), so good drainage matters.
Rather than a fixed backfill recipe, improve structure across the whole bed and confirm it actually drains before planting.
Scenario A (Clay Soil)
Clay Holds Nutrients but Can Waterlog
Clay holds nutrients but can stay wet and starve roots of air, and in wet winters it can waterlog and rot them. Don’t just add sand to clay. That can set hard.
Use Raised Beds for Heavy Clay
Instead, work well-rotted compost or aged manure into the whole planting area (not just one hole) to open up the structure.
Avoid concentrating a large fraction of organic matter into a small pit dug in surrounding clay. The texture boundary can trap water, and peat or coir added to poorly drained clay can act like a sump.
For heavy, wet clay, the most reliable fix is a raised bed so the crown sits above the saturated zone and gravity assists drainage.
Scenario B (Sandy Soil)
Sandy soil drains too fast and leaches nutrients, leaving thin stalks. Work generous well-rotted compost or manure through the bed so it acts as a sponge. The added organic matter helps sand hold moisture and reduces the drought stress that can trigger early flowering.
Mix it through the rooting zone rather than backfilling a narrow pit with mostly organic material, which can settle and stay soggy.
Grow Your Own Rhubarb (Oregon State University Extension)
The Importance of Organic Matter
What Organic Matter Changes
Extension guides emphasize organic matter because it holds water, loosens heavy soil for roots, and releases nutrients as it breaks down. The release rate depends on the material, temperature, and carbon-to-nitrogen ratio.
Incorporate Compost Before Planting
Incorporate well-rotted compost or manure into the soil before planting rather than laying fresh manure directly under the crown, which can burn roots and hold moisture against the crown.
For home gardens, working in a 2–3 inch layer of composted manure is a common practice. Keep an eye on soil-test phosphorus over time so it doesn’t build up.
Planting Protocols
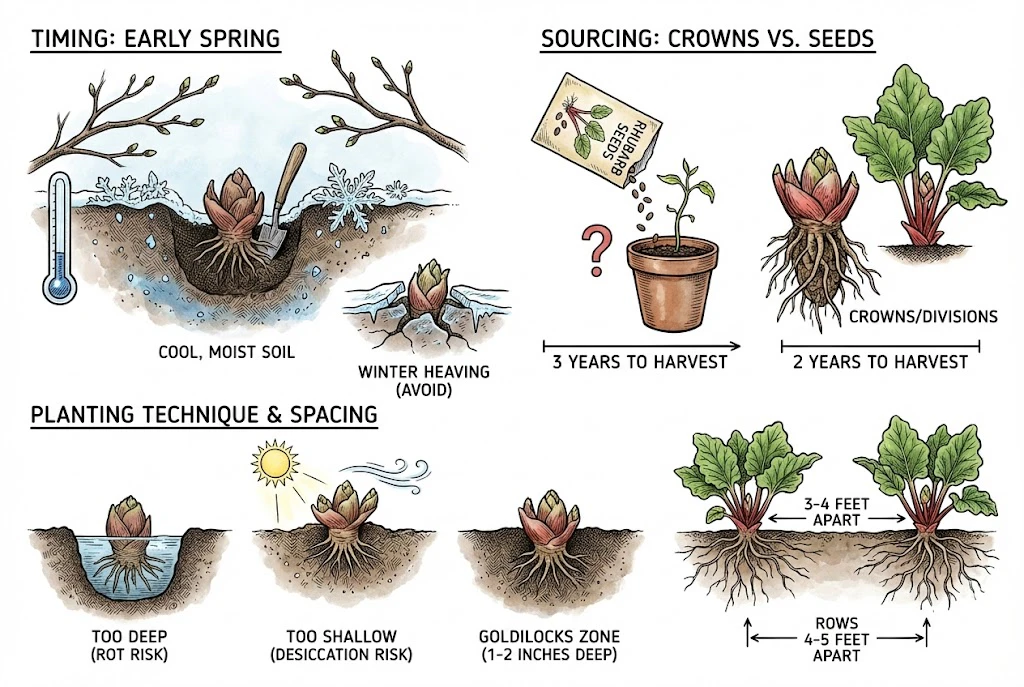
Plant for the Long Term
Planting is a long-term commitment to one spot (a rhubarb patch can last 10–20 years) so take your time.
Timing (When to Plant)
Use Early Spring for Establishment
Rhubarb is a cool-season crop, best planted in early spring as soon as the soil can be worked and before growth starts, letting roots establish in cool, moist soil.
Use Late Fall Only in Mild Climates
In milder climates late-fall planting works once plants are dormant, but spring is generally safer against frost heaving.
Sourcing (Seeds vs. Crowns)
Seeds Do Not Preserve the Cultivar
If you want a known variety, seed usually isn’t the way. Cultivars don’t come true from seed (a seedling might be green instead of red, or fibrous instead of tender), and seed-grown plants take an extra year to mature.
(Seed can still be worthwhile for breeding or low-cost experiments.)
Crowns Clone a Known Variety
The standard method is crowns or divisions, which clone a known variety. Buy one-year-old crowns or take divisions from a healthy, disease-free plant (using clean tools), making sure each division has at least one large eye (bud) and a good portion of root.
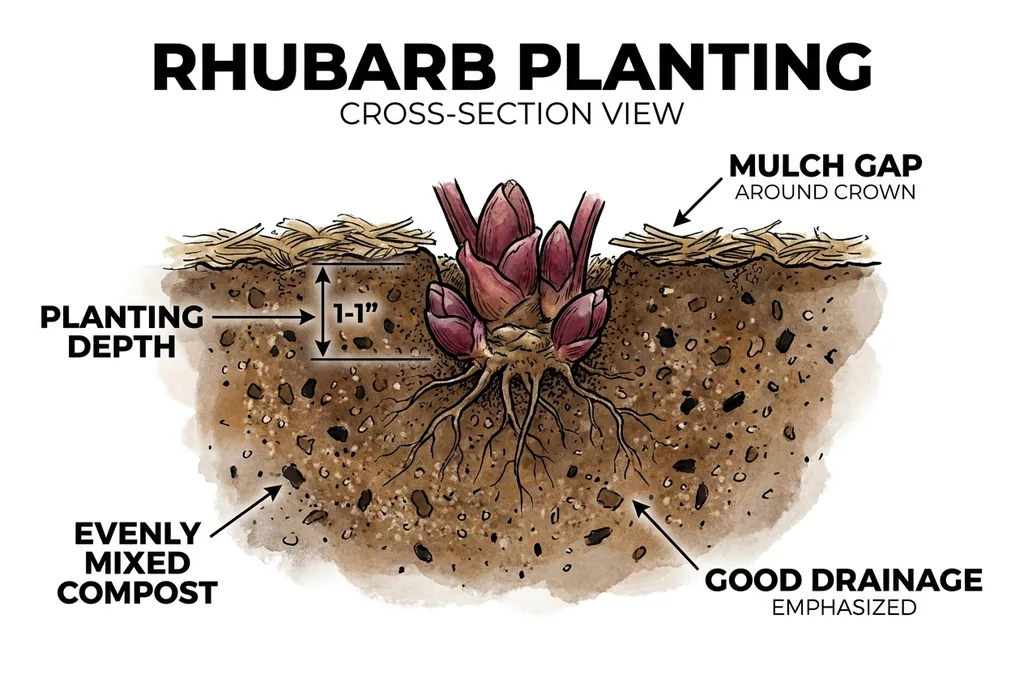
Proper Planting Depth
Set Eyes Just Below the Surface
Poor drainage and planting too deep both contribute to crown rot in new plantings, so depth matters. Set the crown so its buds (eyes) sit no more than about 1–2 inches below the soil surface.
Too deep and the buds may struggle to reach the surface. Too shallow and they can dry out in wind and sun.
Leave Room for Airflow
Space plants about 3–4 feet apart (rows 4–5 feet apart). Crowding reduces air circulation, which can favor fungal disease.
Fertilization Requirements
Let the Soil Test Set the Dose
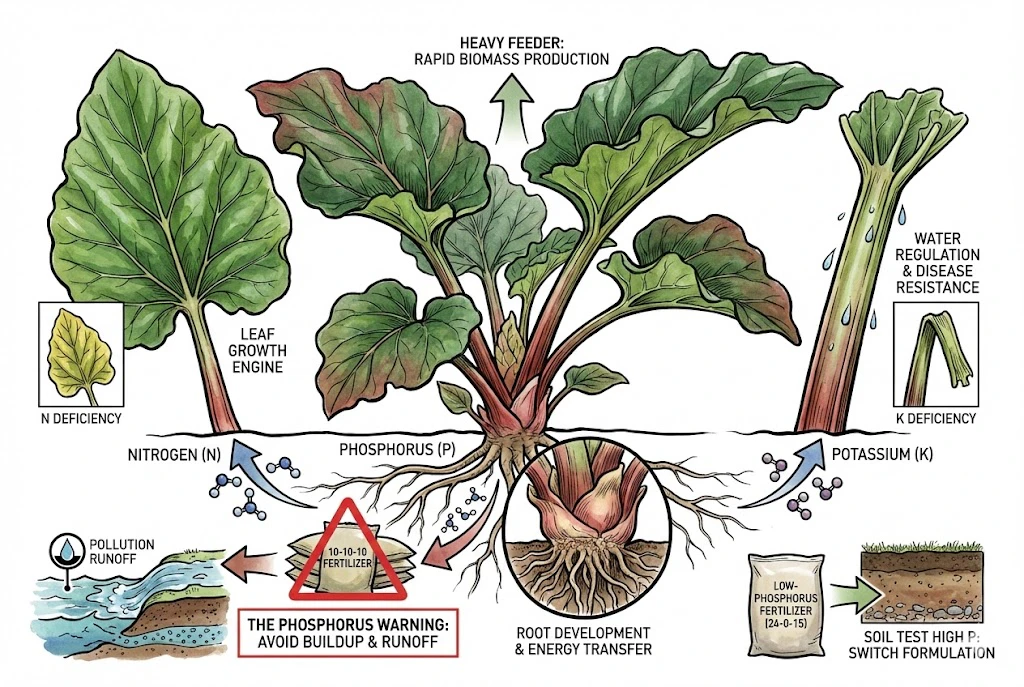
Rhubarb is a heavy feeder, putting on a lot of foliage and stalks quickly in spring, so it benefits from consistent nutrition.
Because it grows fast, it’s tempting to over-fertilize. Let a soil test, not a fixed dose, guide how much you add.
The Nutrient Balance
Nitrogen Supports Leaf Growth
Nitrogen is essential for leaf growth. Rhubarb needs plenty to support its large leaves. A deficiency shows as slow growth and yellowing of older leaves.
Phosphorus Needs Restraint
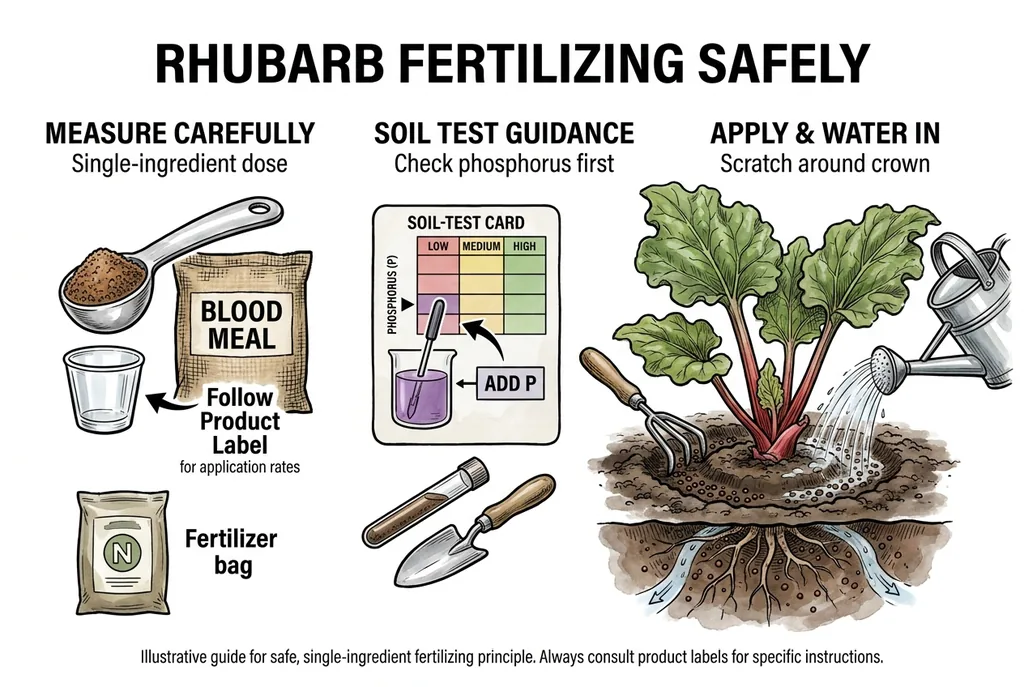
Phosphorus is critical for root development and energy transfer, but rhubarb removes relatively little. Continuous use of high-phosphorus fertilizers such as 10-10-10 can build up phosphorus in the soil, so if your soil tests high, switch to a lower-phosphorus product to prevent runoff.
Potassium Supports General Vigor
Potassium is involved in water regulation and overall plant health. It supports general vigor rather than acting as a stand-alone disease cure.
Blood Meal for the Spring Flush
A simple, fast nitrogen source for the spring flush is blood meal (12-0-0), scratched lightly into the soil around (not on) the crown as growth begins. Follow the product label rate. For an established vegetable plant, Down To Earth’s label suggests only about 1–2 teaspoons. Blood meal is concentrated, so a little goes a long way.
Handling Blood Meal Safely
Blood meal is a concentrated nitrogen source, but guaranteed analysis varies by product and release still depends on soil conditions. Too much can cause ammonia injury and force weak growth.
Measure by the exact label rather than by the cup, keep it off the crown, water it in, and do not reapply heavy nitrogen in summer heat.
Follow the manufacturer’s handling and safety notes, and let the current product label take priority over any general recipe.
Fertilization Schedule
Seasonal Fertilizer Table
| Growth Stage | Action | What to Use | Reason |
|---|---|---|---|
| Before planting | Correct the soil test and improve structure. | Compost or a fertilizer rate recommended for the test. | Builds roots without guessing at phosphorus or lime. |
| Early spring | Feed only if the soil test or growth calls for it. | A label-approved, nitrogen-forward fertilizer or compost. | Supports the spring leaf flush without stacking inputs. |
| After harvest | Restore organic matter and assess the plant. | Compost, with light nitrogen only when growth is weak and earlier feeding was modest. | Helps the crown recharge without pushing late soft growth. |
| Late fall | Protect the soil without burying the crown. | Loose mulch kept clear of the crown. | Moderates temperature and adds organic matter over time. |
Use the Table as a Seasonal Plan
Match feeding to the growth phases and avoid stacking the sources above so you don’t double up. Use a nitrogen-forward feed in early spring, roughly March or April, to drive the leaf flush, then avoid heavy nitrogen once summer heat arrives.
If you use the pre-plant and spring feeds in the table, treat them as your main phosphorus inputs and hold off adding extra bone meal or high-P blends unless a soil test shows a need.
Top-Dress With Compost Annually
An annual 2–3 inch top-dress of composted manure covers much of the baseline need. Monitor soil-test phosphorus so it doesn’t accumulate.
Organic Fertilizer Options
Treat Meals as Separate Inputs
If you prefer organic inputs, single-ingredient meals such as blood meal, bone meal, kelp meal and alfalfa meal can work, but they are not automatically slow-release or interchangeable. Blood meal, for instance, releases quickly.
Base Phosphorus on a Soil Test
Use each meal at its own label rate, base phosphorus additions such as bone meal or fish bone meal on a soil test rather than adding them by default, and don’t combine several nitrogen and phosphorus sources in one application.
Avoid Unmeasured Multi-Ingredient Recipes
If you want a specific blend and rate for your soil, your local extension service can recommend one. An unmeasured multi-ingredient recipe can easily exceed safe rates.
Liquid Feed for Stressed Plants
Check the Label for Food-Crop Use
Before feeding a stressed-looking plant at all, diagnose the cause. Yellowing or wilting can come from overwatering, heat, root damage, disease, or normal aging, and fertilizer won’t fix those, and can make things worse. Check soil moisture and root condition first.
Treat Seaweed as a Biostimulant
If you do use a soluble seaweed (kelp) extract, treat it as a low-nutrient biostimulant (near 0-0-1) rather than a real feed.
Read the current product label and safety data sheet before use. Some seaweed products state that they are not intended for agricultural use on food crops, which would rule out using them on rhubarb you plan to eat.
Follow the label for approved crops, dilution, and any regional restrictions. The label takes priority over any general suggestion here.
Advanced Growing – Forcing
Why Forcing Changes the Stalk
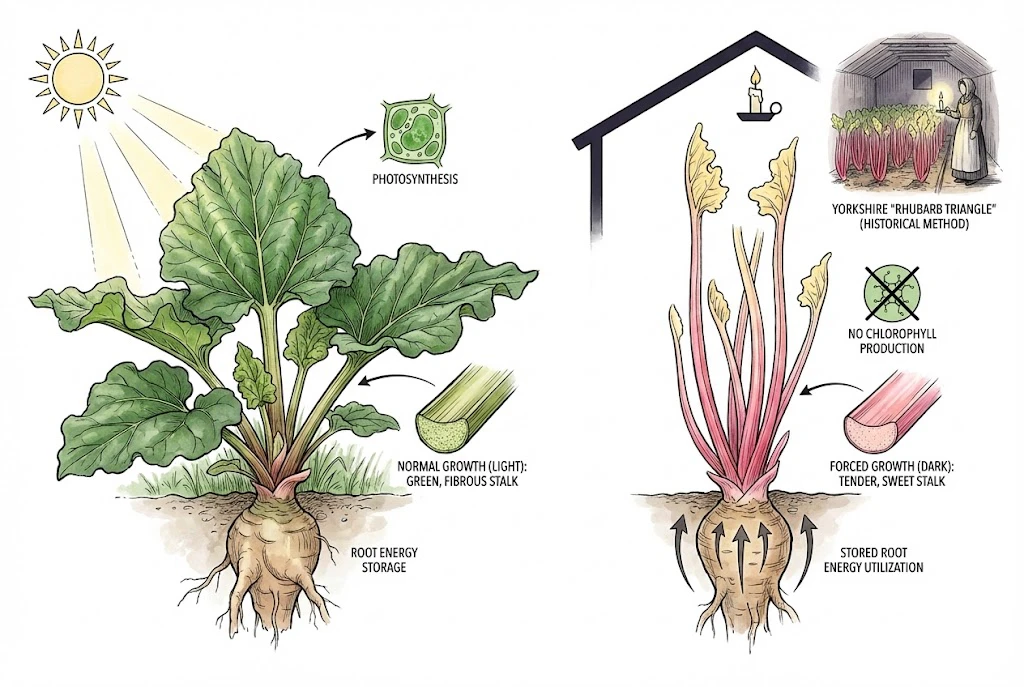
Forcing encourages a plant to grow out of season. With rhubarb, excluding light produces paler, tender stalks that are often pink or champagne-colored.
They also tend to taste milder, though sweetness and texture vary with cultivar and harvest timing rather than being guaranteed by forcing alone.
How Forcing Works
Blocking light reduces chlorophyll (so stalks stay pale rather than green) and pushes the plant to draw on stored root energy.
With little photosynthesis, the stalks stretch rapidly toward any light, growing long and tender with small leaves.
Reduced chlorophyll is one factor in the milder taste, but it isn’t the sole cause.
Outdoor Forcing (The Jar Method)
Use an Opaque Vessel Over a Mature Crown
This is the easiest home method and needs no digging. In late winter, when the plant is dormant but has already received its winter chill, place an opaque vessel such as a traditional forcing pot, tall bucket, or clean bin over a healthy, mature crown that is roughly three years old or more. Timing varies by region and cultivar.
Seal Light and Insulate Carefully
Pack straw around the outside to insulate, if you use manure for warmth, keep it off the crown and make sure it’s well-rotted.
Seal light gaps for full darkness, then check after about 4–6 weeks and harvest when stalks reach the top.
Rest the Crown After Forcing
Forcing draws heavily on root reserves, so don’t harvest from that plant again for the rest of the season.
Let it recover well before forcing the same crown again. Sources vary, and RHS advises a longer rest (on the order of a couple of seasons or more) depending on the crown’s vigor.
Indoor Forcing
Force Indoors With a Dormant Crown
This produces high-quality stalks but requires digging up the plant. First, dig a mature crown in late autumn (November) and leave it on the soil surface exposed to frost so it senses winter.
Move the Chilled Crown Into Darkness
Once it has frozen a few times (usually by December), bring it inside and pot it in moist soil or peat.
Move the pot to a dark, cool place (50–60°F / 10–15°C) like a cellar or garage (total darkness is essential) and harvest the pale, sweet stalks after about 4–6 weeks.
Allow the Crown to Recover
These roots are usually exhausted. Commercial growers discard them, but a home gardener can replant them, though recovery may take years.
Growing in Containers
Containers Need Room for Roots
You can grow rhubarb in a pot, but it’s a large plant with a large root system that dislikes being constricted, so size up.
Container Specifications
Choose a Deep, Wide Vessel
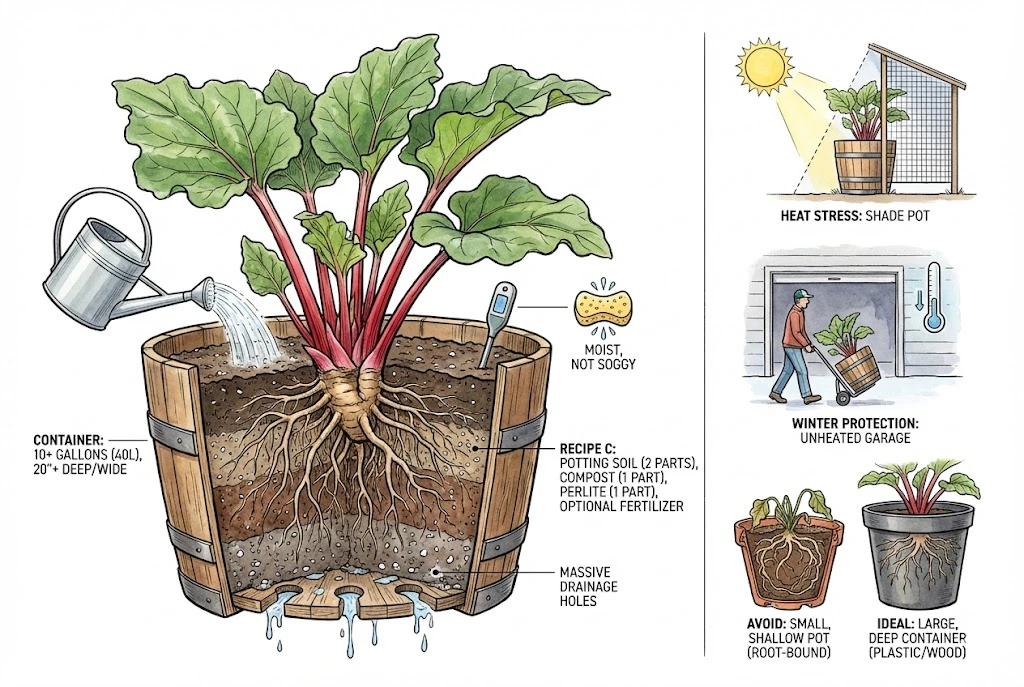
Give each plant a big, deep container (a large planter or half-barrel works well). Aim for at least about 20 inches deep and wide, which is a good deal more than 10 gallons. Shallow pots cause roots to circle and overheat, so err on the larger side rather than treating a small 10-gallon pot as enough.
Protect the Pot From Heat
Avoid unglazed terracotta in hot climates (it dries out fast). Plastic, glazed ceramic, or wood holds moisture better, though dark plastic can still overheat in full sun. Make sure there are large drainage holes.
Soil Mix for Containers
Garden soil is too heavy for pots and compacts, starving roots of air. Use a mix that holds water but drains freely.
As one example, roughly 2 parts quality potting soil, 1 part compost, and 1 part perlite or pumice (aeration helps prevent rot), plus an optional handful of slow-release organic fertilizer (adjust to your ingredients and climate rather than following it as a fixed formula).
Special Care for Pots
Water by Soil Moisture
Containers dry out much faster than the ground. In hot weather you may need to water often.
Rather than watering on a fixed schedule, check the soil and water when the top inch is starting to dry, keeping it consistently moist but never soggy.
In hot climates, sun on the side of the pot can overheat the roots, so shade the pot or move it to afternoon shade.
Protect Container Roots in Winter
Because potted roots are less insulated, in very cold regions move the pot into an unheated garage or sink it into the ground for winter to protect the root ball from repeated hard freeze–thaw.
(This is about protecting the roots from extreme cold, not about the winter chilling the plant still needs.)
Troubleshooting and Diagnostics
Diagnose Before Treating
Rhubarb is tough but signals stress through its leaves and stalks. These symptoms are rarely specific, so treat the notes below as possible causes.
For anything that looks like a serious rot or wilt, send a sample to a plant-diagnostic lab or your local extension service before removing plants or applying any product.
Situation (Yellowing and Wilting)
Possible Cause A (Crown Rot)
Stalks that are mushy at the base and pull away easily suggest a crown or soft rot (for example Phytophthora or bacterial soft rot), which can be serious.
Field symptoms overlap, so a lab test is the reliable way to confirm which pathogen is involved.
If a plant is clearly rotting, remove it and don’t compost diseased tissue, improve drainage before replanting, and ask your extension service how long to wait and whether the site is suitable again. There is no single fixed rest period that fits every pathogen.
Possible Cause B (Verticillium Wilt)
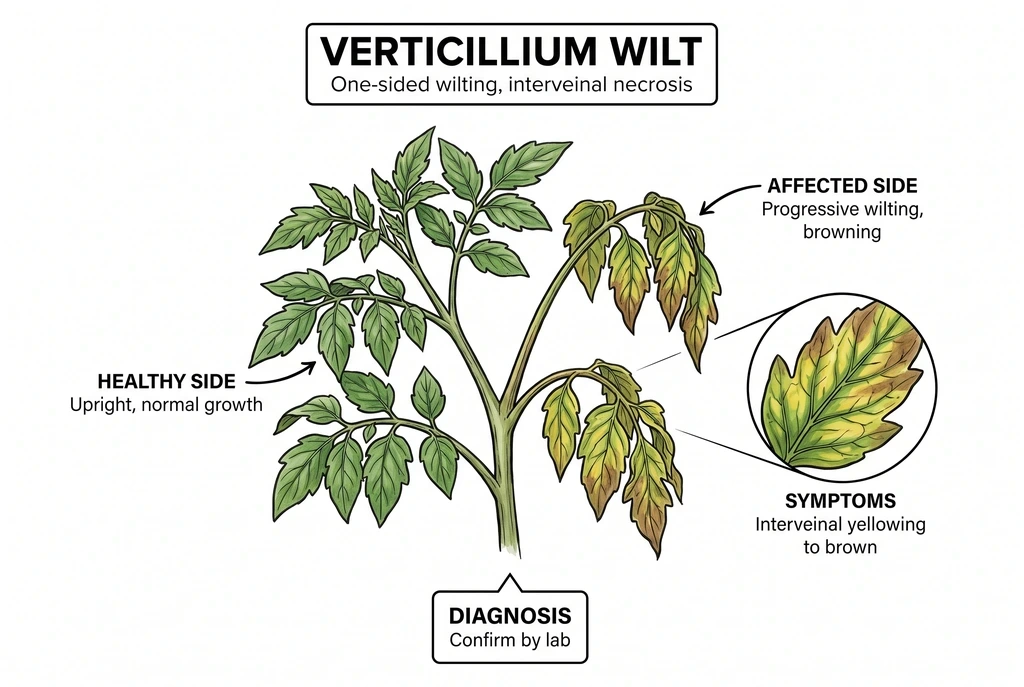
Yellowing that begins between the veins and browns, sometimes with one side of the plant wilting while the other looks healthy, can point to Verticillium wilt, but other causes look similar.
Confirmation usually needs a lab (for example, checking for vascular discoloration). This soil-borne fungus can persist for years and affects a wide host range, so if it’s confirmed, remove affected plants and get site-specific advice (simply avoiding a few crops for a short time doesn’t guarantee it’s gone).
Situation (Red or Spotted Leaves)
Possible Cause A (Leaf Spot)
Red or brown spots, sometimes with a pale center, are often a fungal leaf spot, common in wet spring weather, though bacterial and physiological causes can look similar.
Remove affected leaves, and improve air circulation by weeding and thinning. If you consider a fungicide such as copper, use only a product whose label lists rhubarb and that disease in your area, and follow its label directions, protective-equipment, and pre-harvest interval requirements. If you cannot confirm that, do not spray. Leaf spot rarely kills the plant.
Possible Cause B (Red Leaf Disease)
Leaves turning a dull red (different from the bright red of autumn) while the crown declines can indicate red leaf disease, associated with the bacterium Erwinia rhapontici.
How it spreads is not well established (infected planting stock or insects are suspected) so there isn’t solid support for a specific insect vector or a routine insect-control step here.
Remove affected plants and start with clean, healthy stock.
Situation. Premature Flowering (Bolting)
Diagnosis
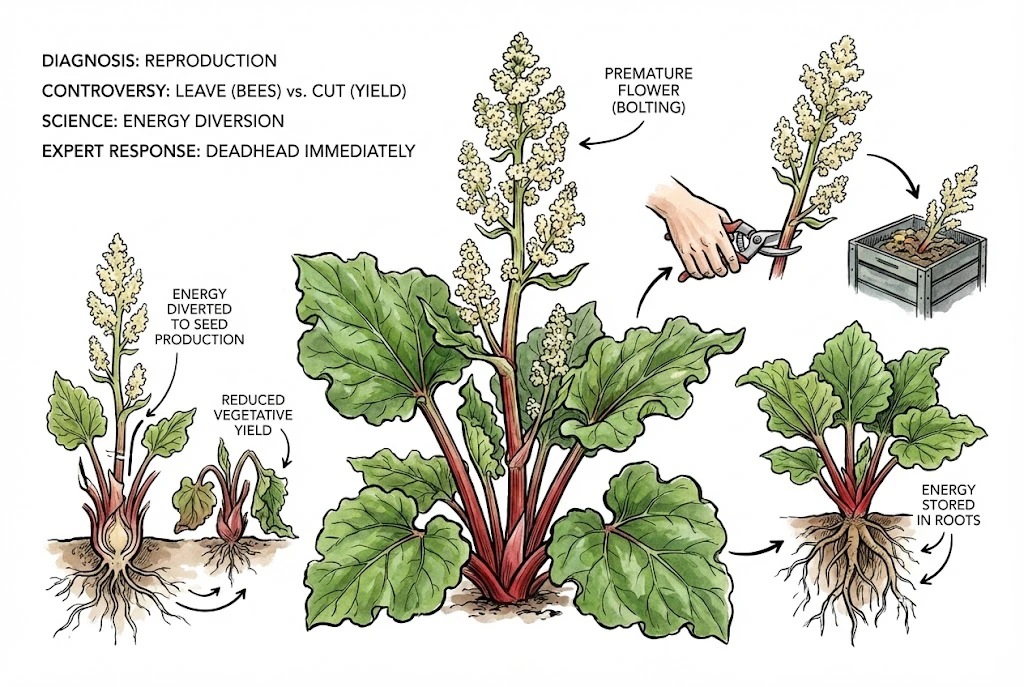
A large flower stalk rising from the center means the plant is trying to reproduce. Age, heat, drought, and maturity can all contribute rather than one trigger acting alone.
Letting a seed stalk mature can reduce later edible yield because the plant diverts energy to seed.
Cut the flower stalk at the base as soon as you see it. This differs from harvesting edible stalks, which you pull.
Situation. Pest Damage (Curculio)
Diagnosis
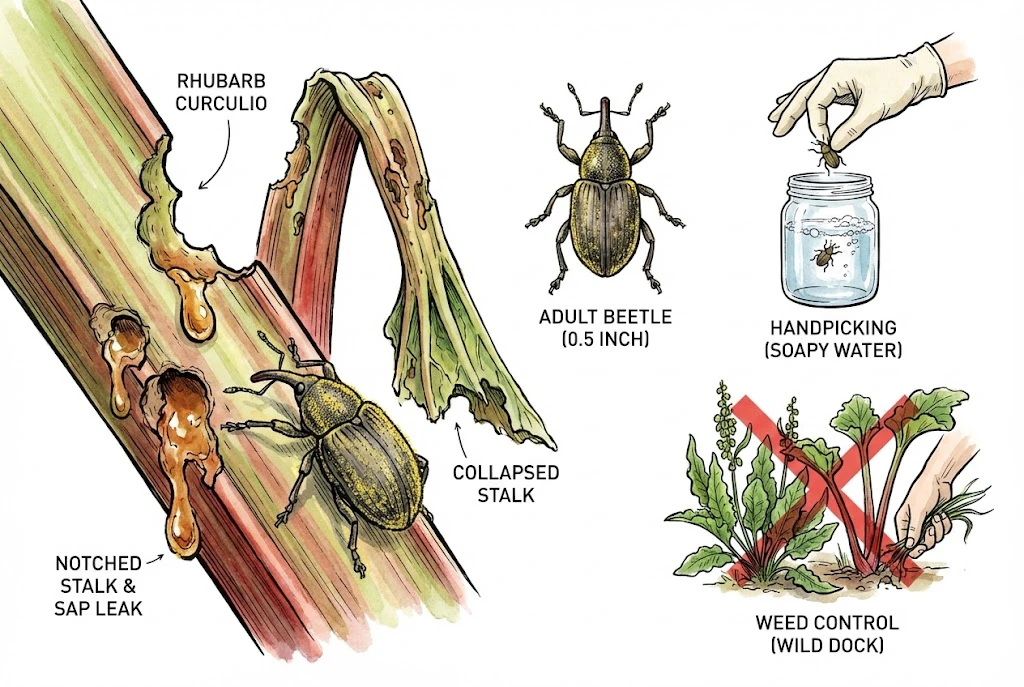
Notches chewed in stalk edges, leaking sap, and collapsing stalks can point to rhubarb curculio, a snout beetle about 0.5 inch long often dusted yellow.
Adults are fairly large, but they drop quickly when disturbed, so approach carefully when handpicking them into soapy water.
The larvae don’t develop successfully in rhubarb. The beetle completes its life cycle on hosts such as wild dock (Rumex), curly dock, thistle, and sunflower.
Removing those nearby host weeds and cleaning up plant debris in fall helps break the cycle.
Rhubarb Curculio (Virginia Tech Cooperative Extension)
Harvest Protocols
Harvest Protects Future Growth
Harvesting draws on stored root energy, so how much you take affects the plant’s future.
Harvest Schedule
Follow a Gradual Harvest Schedule
- In year one, do not harvest because the plant needs its leaves to build the root system.
- In year two, harvest lightly, taking only a few stalks for one to two weeks.
- From year three onward, harvest over a longer window, often several weeks from late spring into summer, but always leave several healthy stalks so the crown keeps recharging.
I keep one weatherproof tag at each crown with its planting year and a tally mark for every stalk pulled that season. Before the first harvest I photograph the whole crown, then compare the remaining healthy leaf area at each visit instead of relying on how full it felt weeks earlier.
The tally stops when new stalks become consistently thin or the crown has lost too much healthy foliage, even if a calendar says the harvest window is still open. The tag also prevents several people from unknowingly taking a full share from the same plant.
When to Stop Harvesting
Ease off around early July in many regions (timing varies by climate), when new stalks come in thin (pencil width, signaling low root reserves), or when summer heat makes stalks woody and fibrous.
Let the plant’s condition, not just the calendar, guide you.
The Technique (Twist and Pull)
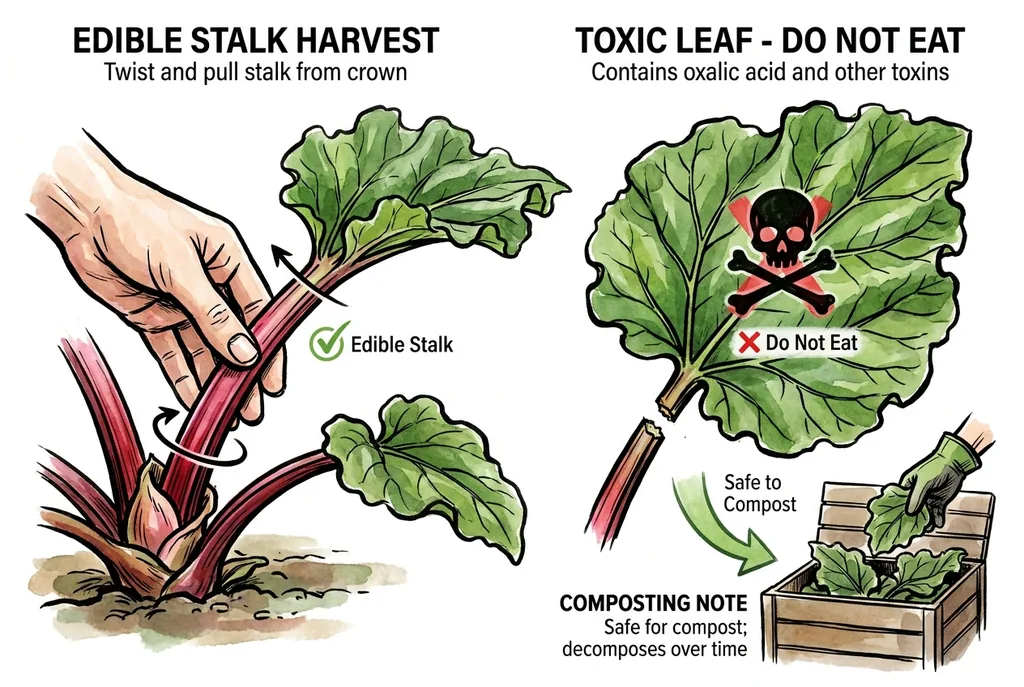
Pull rather than cut. Removing the stalk cleanly at the base avoids leaving a stub that can decay.
Grasp the stalk near the base and pull gently outward and down while twisting. It should separate cleanly from the crown without your uprooting the whole plant.
The Toxic Leaf Question
Keep Rhubarb Leaves Out of Food
Do not eat rhubarb leaves. They contain oxalic acid (and possibly other compounds such as anthraquinone glycosides) and can cause burning of the mouth and throat, vomiting, difficulty breathing, and, in serious cases, effects on the kidneys. Rare deaths have been reported.
There is no safe amount to eat, and individual sensitivity varies, so if a person or pet swallows the leaves, contact Poison Control or emergency services right away, and keep the leaves away from children and animals.
Composting Is a Separate Use
The leaves are, however, generally fine to add to a home compost pile, which is a separate question from eating them (normal composting breaks the tissue down).
Composting the leaves is not a way to make them safe to eat.
Selecting Varieties
Match the Cultivar to the Climate
Not all rhubarb is the same, so choosing a cultivar that suits your goal helps. Stalk color isn’t a reliable guide to sweetness (red stalks aren’t automatically sweeter than green ones, and flavor depends heavily on cultivar, growing conditions, and harvest timing).
Cultivar List
| Variety | Characteristics | Best Use | Notes |
|---|---|---|---|
| Victoria | Green/Pink, very large. | Jams, chutneys. | A long-established, widely grown variety. Can flower heavily. |
| Canada Red | Solid red stalks. | Pies. | Often described as sweet and tender. Popular in home gardens. |
| Crimson Red | Thick, bright red stalks. | General purpose. | Reported to balance sweet and tart. Grown in the Pacific Northwest. |
| Glaskin’s Perpetual | Green/Red. | Longer harvest. | Reputed to tolerate a longer harvest window. Verify local performance. |
| Timperley Early | Early emerging. | Forcing. | A traditional choice for winter forcing. Starts growing very early. |
| Valentine | Deep red. | Desserts. | Often described as less tart. |
| MacDonald | Bright pink/red. | Home gardens. | Described as vigorous and upright. |
Cultivar names and traits vary by supplier and region, and the descriptions above come from grower and catalog listings rather than controlled trials, so treat them as starting points and confirm with a local supplier or extension service.
Match the variety to your goal, color, flavor, or forcing, and your climate.
The Habits That Keep Rhubarb Producing
The Key Habits
Manage the Growth and Rest Cycle
Give rhubarb cold winters, well-drained soil, and time to rebuild before you expect a heavy harvest. Improve soil structure with organic matter, watch weather and symptoms, and avoid treating a stressed plant before you identify the cause.
Follow Labels and Protect the Crown
Use fertilizers and any registered product according to soil tests and labels, pull edible stalks rather than cutting them, and never eat the leaves. You can compost the leaves separately.